Concrete is the main building material. It is found everywhere and has many positive characteristics. But its thermal conductivity coefficient is high, so the material is cold. Heat escapes through the walls, so a lot of money is spent on heating. The only option is to insulate concrete walls. There are many materials for this purpose, and the work itself can be done with your own hands.
Thermal insulation of concrete - features
The peculiarity of concrete walls is that in order to insulate them, everything needs to be calculated and planned in advance. The task is not easy when compared with walls made of brick or wood, but it is doable. Insulation of a concrete wall outside and inside has the following features:
- The surface must be treated with antiseptic agents.
- Communications and wiring are laid even before thermal insulation work.
- When insulating a façade, the entire area is treated; you cannot do only certain areas or a wall.
- Areas behind heating radiators are treated using insulation with foil. This is a thin aluminum layer on insulation. It will reflect thermal energy.
If we talk about internal insulation, there are also some nuances here. For example, condensation will accumulate inside, since the moisture has nowhere to go. Therefore, it is important to ensure good ventilation. In addition, environmentally friendly insulation is selected that will not harm health.
Tips and tricks from experts
Fortunately, this problem is solvable. One has only to choose a heat insulator with a reduced level of moisture absorption and vapor permeability. The structure of such insulation should not contain fibers. During installation, avoid the formation of joints or gaps that will allow condensation to enter the room and air to penetrate into the interlayer space.
The following types of insulating materials do not meet the above criteria:
GKL and plaster can only be used at the final stage of thermal insulation of the room.
This type of material such as penoplex or expanded polystyrene also does not cause delight among experienced builders. This is due to the fact that this slab material is difficult to perfectly join. If you do not use special adhesive solutions, it will not attach well to the wall. As a result, the level of tightness decreases, which leads to the difficulties described above.
Where to insulate, inside or outside
The first question that arises before starting insulation. The answer to this is ambiguous, since these options have their pros and cons. For example, insulation from the inside is often done in apartments with more than 3 floors, especially in high-rise buildings, since working outside is dangerous. In addition, the heat insulator inside will not be exposed to the negative influence of the street, and the insulation process itself can be performed in any weather and season. But there are also disadvantages: reduction in living space, condensation formation, release of harmful substances.
External insulation is a more common option, as it allows you to protect a concrete wall and cover it. It is more convenient to work outside and there is no loss of living space. There is no human contact. And the insulation inside causes the wall to freeze itself. A phenomenon occurs in which the wall, on one side, is insulated from the heat of the rooms, and on the other side is constantly exposed to sub-zero temperatures. That is why it is better to insulate concrete walls from the outside. But it is still up to the owner to choose methods for insulating concrete structures.
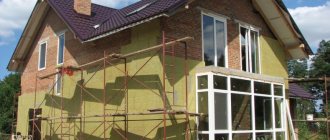
Thermal insulation plaster
The secret of heat-insulating plaster lies in polystyrene foam bubbles with air, they create thermal insulation. Plaster must be applied to a prepared base; this is the simplest and most common method of fastening. The product is expensive and in demand; it is best to purchase plaster in specialized stores; purchasing it on the market risks purchasing a fake. You should check the documentation and certificate of conformity to be sure of the effectiveness of the composition when used.
Technologies for carrying out insulation work come in two options: external and internal methods. The main technological procedures are:
- Wet method - gluing sheets to a pre-prepared base with special glue, followed by plastering. Plus - the simplicity of the installation process itself.
- The dry method (frame) is more complex; hiring professionals is the most advisable solution.
External treatment of the facade is much more effective, but for a number of reasons, internal thermal insulation is often carried out. In any case, comfort and coziness in the living space is ensured.
Insulation methods
A variety of insulation methods allows you to choose the best option for yourself, in accordance with your financial capabilities and preferences.
The first option is to use polystyrene foam
Polystyrene foam is a cheap and practical material. Suitable for those who have a limited budget, at the same time, it has excellent characteristics. You can buy EPS (extruded polystyrene foam). It has better characteristics, but the price is not very high. But it is not recommended to insulate concrete walls from the inside.
Algorithm for performing the work:
- Along the perimeter at the bottom there is a plinth that will serve as a stand for sheets.
- Fixation is done with glue. Can be applied in a continuous layer with a notched trowel or in spots, around the perimeter and in the center.
- The first mat is fixed from the corner, and so on for the entire row. The rest are close to them. The next row is laid offset so that the seams of adjacent rows do not intersect.
- Additionally, the mats are fixed using dowels with an umbrella. Holes are drilled using a hammer drill and dowels are driven in. For 1 sheet you need 5 dowels.
- When the glue dries (from 1 to 2 days), the reinforcing mesh is glued. To do this, glue is applied to the foam, and the mesh is embedded in it. An overlap of 5-10 cm is made at the joints.
- After drying, the walls are plastered.
At the end, all that remains is to prime the wall and do the finishing touches. This method is called a wet facade.
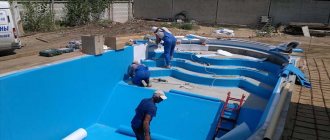
The second option is to use PPU
Polyurethane foam is a heat insulator applied by spraying. It is somewhat reminiscent of polyurethane foam. When the components are mixed and react with air, the material begins to increase in size, filling the entire space. The option is modern and effective. The material is not afraid of moisture. Internal and external insulation is possible. However, the process of insulating concrete walls with polyurethane foam requires special, expensive equipment.
The work is done quickly, the layer turns out monolithic, without cold bridges. However, it is vulnerable to UV rays. In addition, the layer does not allow steam to pass through; a ventilation system is needed. The essence of the work is to apply material from the compressor to the surface.
The third option is thermal insulation plaster
If you need a cheap, quick way to insulate concrete walls, then you can use heat-insulating plaster. However, it is not a full-fledged heat insulator; for cold regions this is not an option, only combination with other materials.
Application of ceramic-isol
In the modern market, new promising technologies are replacing traditional building materials; production produces universal products that have increased efficiency when used. Keramo-izol is an environmentally friendly composition and does not pose any danger to human health, which is an important aspect in its application. Installation does not require complex preparatory processes, application is simple with a long service life. Liquid thermal insulation suspension successfully protects against cold, creating coziness and comfort in the rooms.
Keramo-izol is used for everything that can be painted. Application is carried out with a brush, spray gun, or foam roller. The suspension has good adhesion and is easily applied to the surfaces of monolithic structures. The environmentally friendly product has advantages that are appreciated in the construction industry.
Pros:
• good thermal insulation properties - reduction of heat loss by 1/3;
• easy to use, application can be done independently;
• can be applied to structures of different shapes;
• the range of shades for painting is varied;
• resistance to ultraviolet radiation;
• has anti-corrosion properties.
Keramo-izol is a universal means for creating an atmosphere of warmth in your home.
Insulation instructions
If you do not take into account the option of using polyurethane foam, then all the work is done with your own hands. It is important to familiarize yourself with some nuances and begin the task:
- Insulation of concrete walls is carried out in dry weather, at temperatures from +5 to +30 degrees.
- The wall is well dried, not damp.
- It is important to clean the surface, remove all excess, seal cracks and level it. Mold, mildew, and greasy stains are removed.
At the end, all that remains is to treat the concrete with an antiseptic and get to work.
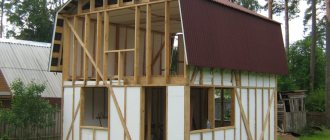
Using polystyrene foam
The advantages of polystyrene foam are considered, as is the technology for creating a wet facade. But, there is a second option - frame. Sequence of work:
- The sheathing is placed on the surface.
- The distance between the slats is identical to the width of the foam sheet.
- Insulation is installed in the created cells.
- Everything is covered with lathing and the structure is finished with finishing panels: block house, lining, siding.
For insulation in cold regions, the layer thickness is from 10 to 20 cm.
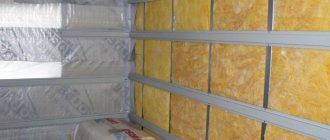
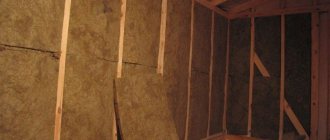
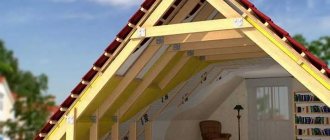
Using mineral wool
Mineral wool is an excellent material with excellent characteristics. However, she is afraid of moisture. Therefore, when thermally insulating concrete, it is necessary to create a ventilation gap so that the wool dries. Here we need the frame technology described above.
Features of the work: after creating the sheathing, mats or rolls of mineral wool are installed. It is important to lay them tightly, without forming joints. To do this, the distance between the slats is made 5–10 mm less than the width of the wool. All that remains is to fix the vapor barrier, glue the joints and sheathe the frame with the selected material. An apartment can be insulated with mineral wool both from the outside and from the inside.
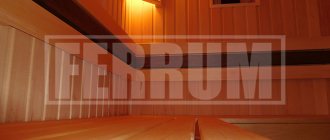
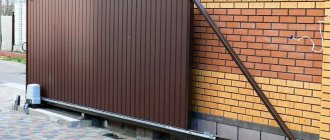
Using thermal panels
Thermal panels are a multilayer material. It is made of insulation and decorative material. The manufacturer has simplified the task; a concrete house can be insulated with such panels, and not have to think about additional finishing. Typically used for exterior decoration. Installation is simple - just apply glue to the surface and fix it on the wall.
Using foam glass and fiberglass
Foam glass is an insulating material in the form of slabs, the density of which is from 100 to 150 kk/m3. Such insulation is fixed to the wall using glue. The structure can be strengthened with dowels, as is the case with polystyrene foam. The finishing layer is different, ordinary plaster, drywall or decorative panels.
The peculiarity of the material is that it is not afraid of moisture, is environmentally friendly, and is not damaged by rodents. Cutting mats is quite simple. The surface can be strengthened and secured with reinforcing mesh and corners. The disadvantage of such insulation for concrete is that it has a high cost.
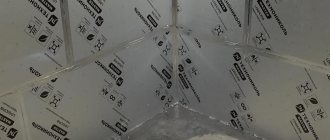
Using penofol
This is foil insulation. It is environmentally friendly, efficient and practical. The thickness is small, which allows you to quickly fix it on the wall. The layer is vapor-proof. However, penofol is not suitable as the only insulation material. It is better to combine it with other heat insulators or use it as a heat-reflecting layer and vapor barrier material. Installation is carried out on the wall or on the lathing.
Before insulating concrete walls, it is important to think through the sequence of work in advance, choose what to insulate the structure with, comparing all the pros and cons, and then get to work. But, if you are unsure of your abilities, it is better to overpay, but entrust the work to specialists who will do it efficiently and without errors.
Tips and tricks from experts
One of the main problems with the internal thermal insulation of a room is that the wall itself does not begin to warm up, on the contrary, it cools down more. In this case, the dew point, that is, the area where condensation begins to occur from the warm part of the room, moves closer to the inner area.
Condensation itself leads to increased dampness, destruction of the wall and finishing layers. In addition, the thermal insulation properties of the insulation used for insulation are significantly deteriorated. The result is the same heat loss, only now with an even higher level of humidity. Brick surfaces will suffer especially greatly from this.
But this problem can be overcome. To do this, when choosing, choose a heat insulator that has a low level of vapor permeability and moisture absorption. The material must not be fibrous. Also, during installation, you need to avoid gaps or joints through which condensation can enter the housing, and air into the space between the layers.
Mineral wool, liquid ceramics, cork, plasterboard coating, and layers of warm plaster are not suitable for the above conditions. Drywall and plaster are used as additions in the final stages of insulation.
Expanded polystyrene or penoplex also raises doubts among experts. This is due to the fact that when using the material it is difficult to achieve a clear connection between the plates, moreover, the material is poorly attached to the wall without the use of additional strong solutions. All this leads to a drop in the level of tightness and leads to the problems already outlined.
If you have aerated concrete or expanded clay concrete walls, then thermal insulation is especially necessary. In the case of expanded clay concrete, this is important to prevent the formation of cracks. However, most experts agree that if you are faced with the choice of doing thermal insulation from the outside or inside the room, then, of course, it is better to choose the first option. This is due to the fact that internal work will significantly reduce the housing space and cladding will be required. Only if you have an apartment, and it is located above the third floor, and it is also corner, in this case you will have no alternative, and you should resort to interior work.
We examined the main issues that arise when insulating walls with your own hands. Internal thermal insulation has a number of disadvantages, and if you still decide to carry it out, then you have a wide range of materials at your disposal, the choice of which must be approached scrupulously in order to minimize risks. You can insulate your home yourself, but first you need to carefully study the specifics of the work and take care of safety precautions.
Source
Common mistakes when insulating concrete walls
Most mistakes come down to the wrong method of insulation. Namely, insulation from the inside. This is fraught with many negative consequences. In addition, it is better to choose moisture-proof materials as insulation.
Sometimes insufficient attention is paid to the preparation of a concrete wall: cracks are not repaired, mold, stains or mildew are not eliminated. This can lead to the insulation cake peeling off and all the work will be in vain.
When creating a reinforced layer on a wet facade, it is important to place the mesh correctly. It will strengthen the structure and protect the surface from cracks. However, it cannot be glued to foam plastic and glue should be applied on top. In order for the mesh to perform its functions, it is embedded in a layer of glue. Then the mesh will be inside the adhesive mass.
Another mistake is failure to maintain temperature conditions when working outside. The insulation process is carried out in dry weather, at the specified temperatures. If it is below +5 degrees outside, it is better to wait for comfortable conditions.
If you follow all the recommendations, you can avoid mistakes and the work done will not be in vain.
Special requirements
Thermal insulation of a concrete wall requires compliance with all technological conditions, the violation of which can affect the efficiency of the work performed, as well as the service life of the structure and the entire house. Before you begin installing thermal insulation on the facade of a building, you need to consider the following factors:
- The surface of the walls must be treated with an antiseptic solution. This will prevent the formation of mold and the appearance of insects that can disrupt the integrity of the structure;
- It is necessary to insulate the entire surface of the external walls of the house, and not just individual elements. This will serve as an additional guarantee that there will be no “cold bridges” in the facade;
The term “cold bridge” refers to a section of the wall that is colder in winter compared to the rest of the façade surface. These mainly include cement seams, through metal elements (gas pipeline pipes), metal ceilings in window or door openings.
- Installation should begin only after completion of all communications necessary for human life, so that it does not happen that, after the insulation is fixed to the wall, drilling or gouging out an additional hole from the outside is required.
Installation
There are different methods for installing insulation. When choosing a suitable option, you need to take into account the complexity of its implementation and financial capabilities.
Insulation
To attach the polystyrene foam sheet, an adhesive mixture of Ceresit and dowels are used. First of all, you need to dilute the adhesive base with water to obtain a uniform consistency. The quality of this mixture determines the reliability of fixation of the material.
After applying the glue, proceed to fixing the material. The sheets are glued from the bottom corners. It may take 2 to 4 days for the mixture to dry. To improve the strength properties of the structure, dowels are driven into the wall. The formed joints are treated with plaster or construction foam.
Mesh and rough finish
After making sure that the adhesive base has completely dried, you can proceed to the next stage - fixing the reinforced mesh using the same Ceresit glue.
The base must be evenly distributed over the slab, pressing the mesh with reinforcement on top, moving from the upper parts to the lower ones. After this, another layer of glue, putty and primer are applied. At the last stage, siding panels are installed.
Mineral wool
The insulation is available in the form of rolls or in a modern version in the form of slabs. The benefits consist of many factors that deserve the consumer's attention.
- thermal conductivity is low;
- the product is environmentally friendly;
- Rodents do not like mineral wool;
- fire-fighting properties - not susceptible to persecution;
- long service life.
- moisture resistance at a low level;
- installation requires preparation in choosing a waterproofing coating;
- When compressed, it loses its thermal insulation properties.
Due to the price/quality ratio, mineral wool is in consumer demand.
Rating of insulation materials for brick walls
User ratings are compiled by large online trading platforms based on customer requests. The highest ratings are given to insulation materials with a low price, easy installation and high thermal characteristics. Rating of insulation for brick walls:
- Foam plastic has a fairly low price, easy installation, a good degree of protection and durability. The imperfections of the material undoubtedly include its flammability and the ability to release poisons when burning. Therefore, it is not recommended to install it indoors. In addition, it is damaged by rodents.
- Extruded polystyrene foam (EPS) is a modern insulation material that does not have many of the disadvantages of foam plastic.
It began to be produced with higher density, lower thermal conductivity, low flammability, increased strength and low water absorption, which allows it to be used without auxiliary vapor and waterproof layers. The disadvantages include the high price and almost zero vapor permeability, so in a house with EPS there must be good ventilation, since walls covered with EPS practically do not “breathe”. - Mineral wool is made with different densities, with higher densities the price is also high.
The material has excellent vapor and air permeability, as well as additional noise absorption and a low heat transfer coefficient. The material does not burn, smolders with gradual self-extinguishing, it does not emit toxic substances or smoke. Not afraid of rodents. The big disadvantage of mineral wool is its hygroscopicity, so it must be installed with layers of steam and water protection in the form of films and membranes. - Glass wool is similar to mineral wool, except that it has higher elasticity, always returning to its original shape, and is resistant to vibration loads. Its disadvantage is considered to be an increased danger when performing work, in case of contact with the respiratory system, skin and eyes.
- Ecowool is a modern environmentally friendly insulation material; it does not shrink like mineral wool. The material not only does not support combustion, it extinguishes, thereby extinguishing the fire, which allows it to be used inside the house. The disadvantages include the high cost of this insulation.
- Liquid-ceramic thermal insulation is the thinnest insulation for walls. Outwardly similar to ordinary paint, it contains microvacuum spheres that create an insulating effect. Foam-polyvinyl chloride thermal protection consists of artificial resin, under the influence of electromagnetic vibrations and light it acquires a foam structure and is a universal heat insulator.
What types of insulation are available for the external and internal walls of a brick house, and how to choose the best one, can be found in this article.
Using plaster mortar
We can say that this is the dirtiest, longest and most ineffective method in the fight to preserve heat.
The walls are plastered, rather for aesthetic purposes, but as a heat insulator it plays a very small role.
For comparison, let’s consider the thermal conductivity of various types of plaster and other materials.
| Material | Thermal conductivity (W:(m*°C) |
| Cement-sand mixture | 1,2 |
| Limestone | 0,7 |
| Plaster | 0,3 |
| Dry | 0,21 |
| Concrete of different brands | 0,3 – 1,5 |
| Brick of different brands | 0,4 – 1,6 |
| Mineral wool | 0,03-0,04 |
| Styrofoam | 0,03-0,05 |
| Extruded foam | 0,02-0,03 |
As you can see, most plaster solutions are close in performance to the walls themselves on which they are applied.
For interior work, “warm” cement- or gypsum-based plasters are used (gypsum is used only indoors).
Instead of sand there are various components:
- pumice powder;
- perlite;
- polystyrene foam granules;
- sawdust;
- expanded vermiculite.
But even with the use of such additives, the layer of plaster must be five to ten times thicker to compare with polystyrene foam and mineral wool.
If you need a little additional thermal insulation, using plasters you can “kill” several birds with one stone - level the surface (plasters fit well on almost any material), and slightly improve the thermal insulation and sound insulation of the wall. Plaster and painting can be the finishing touch to polystyrene foam.
Warm plaster application technology:
- Preparing the wall. The remains of the previous coating are removed, the wall is cleaned, and primed with an antiseptic solution.
- Reinforcement. It is recommended to attach a special plaster mesh to the wall as reinforcement.
- The surface is wetted with water.
- Preparation of the mixture. The composition is mixed in a special container according to the instructions. The mixture is mixed using a construction mixer. Test: a small amount of the mixture should stick on the trowel even if you turn it over.
- Applying the first layer. There is a manual method of applying the solution and a machine one. Layer thickness - up to 2 cm. Drying time - 4 hours or more (if it is humid or cold indoors or outdoors).
- Applying the second layer. The total thickness of the two layers should not be more than 5 cm.
A thinner layer of plaster can be applied without using a reinforcing mesh. After all, the metal component reduces the heat-saving properties of the layer.
Brick is a very reliable material, but without thermal insulation it is very cold to live in a brick house. How to insulate a brick wall from the inside - this is the subject of the next article.
The technology for making ecowool with your own hands is described at the link.
How and with what to insulate a wall in a corner apartment from the inside
https://vk.com/id188753612 Nina Anisimova
I inherited from my grandmother an apartment on the fifth floor of a brick building. The corner room was cold and felt somewhat damp, although there was no fungus. There was no way to insulate the wall from the outside, so we decided to do it from the inside. They covered it with plasterboard, and mineral wool between the wall and the building block. It became warm and cozy.
https://vk.com/id188395771 Tatyana Vyalaya
We also suffer from this problem and want to insulate a corner in the bedroom. We don't have any problems with freezing, but the walls are very bloomy. The wallpaper is always moldy no matter how much you re-paste it. I didn’t want to insulate myself with polystyrene foam, I thought it was harmful, but it turns out mineral wool is toxic. My husband wants to run more batteries along the wall, like a snake, so that they warm up better. In general, let's think about it now.
I think the approach of insulating the wall from the inside is fundamentally wrong. Let's figure out what happened. Your wall is frozen or frozen. Clearly the design does not meet the requirements. The consequences are obvious. Microbes or microcracks will soon simply destroy the wall. You are protecting yourself, but you need to eliminate the cause. After all, no matter how much you insulate from the inside, you will not change the dew point, even if you lose half the room for insulation. Sooner or later, the destroyed wall as the main barrier to the external environment will remind itself. The fungus will come out next to your insulation and the destroyed wall will crack away from your insulation. And then major repairs cannot be avoided. What am I talking about? If you seriously decide to overcome the problem, insulation should be carried out only from the outside. I'm not even talking about the lost space and the harm of any insulation. Don’t be fooled by advertising; there are no safe materials.
There was such a problem in a large room, five corners. Three of them were near the windows and the corners there were constantly freezing. So they solved the problem easily - they insulated it with polystyrene foam, it is very easy to install and disguise with wallpaper.
Preparatory work
If it is planned to insulate the wall from the inside for one reason or another, preparation consists of:
- maximum surface drying;
- installation of vapor barrier;
- laying waterproofing.
It is better to install the formwork before applying the foam. It will keep the surface as smooth as possible and make the layer especially reliable. The frame is covered (wrapped) with thermal insulation material, otherwise it will turn into an entrance gate for frost. If a brick wall is being finished, everything is removed from it (right down to the very foundation). The approach to concrete is similar. Dirt is removed with a vacuum cleaner; visible fungal infections can be easily eliminated by treating the surface with brushes and sandpaper.
Pipeline insulation
Sewerage and water supply are those systems that are connected outside the house. In some cases, they are not provided with thermal insulation at the required level, which is why the water in the riser freezes or the drain becomes clogged. To insulate communications, foil insulators, polystyrene foam, penoizol, polyurethane foam or basalt sleeves are used. To carry out the procedure, you need to dig out the place where the pipes are inserted into the house. The further process is performed according to the following algorithm:
- the pipe is cleaned of plaque and dirt;
- heat-insulating material is applied;
- cover the joints with the wall with polyurethane foam;
- wrap the heat insulator with polyethylene.
If you were excavating a pipe, you need to fill the hole with expanded clay and compact it with soil on top. After completing all procedures for thermal insulation of a private residential building, the temperature in the room during cold times will increase noticeably and will remain for a longer period after heating. If it is not possible to isolate the house from the outside, the entire procedure can be carried out from the inside, but this option will take up some space from the room.