This device, despite our brave space achievements, is still unknown to few people in our country. And for sure, only a few are interested in how to make a rocket stove with their own hands, because they do not understand the principle of its operation.
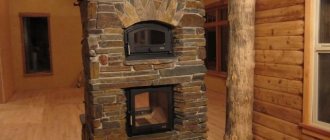
Photo 1 Rocket stove in the interior
This is a relatively new word in the domestic heating environment, coming from Germany. The key to unprecedented popularity in the homeland is a simple, cheap design coupled with high efficiency and the slightest absence of signs of soot. Considering that making your own equipment is not at all difficult, we will tell you how to do it, provide drawings, recommendations from specialists, videos and photos.
How to load fuel and operate the unit correctly
A long-burning unit differs from a traditional furnace by an increased loading volume and limited access of oxygen to the working area.
The operating time of the boiler depends on the amount of fuel loaded, so the firewood is stacked as tightly as possible, without leaving large gaps between the logs. If materials such as peat, fine coal, shavings, sawdust or pallets are used as fuel, then they are poured to the level of the smoke channel without compacting. The necessary compaction of the fuel will be provided by a heavy metal piston. Fuel loading is performed in the following order:
- remove the top cover from the unit;
- remove the air distribution device;
- load the stove to the level of the chimney;
- spray the top layer of flammable material with lighter fluid;
- install an air regulator;
- return the cover to its place;
- A piece of rags soaked in a flammable liquid is thrown inside the air channel.
Steady combustion is accompanied by smoke coming out of the chimney evenly. As the wood burns, the duct pipe moves down. It can be used to judge the remaining operating time of the solid fuel unit.
It is best to light the stove using a rag moistened with a flammable liquid.
During operation, ash and ash accumulate at the bottom of the barrel. It must be said that their quantity does not have any effect on the combustion process. However, fuel combustion products must be periodically removed, since they reduce the thickness of the filling layer. To do this, open the bottom door and scoop out the ash using a regular metal scoop.
When removing ash, leave a layer 10–20 mm thick on the bottom of the oven. This will not have a particular effect on the amount of firewood; however, it will create an excellent heat-insulating cushion that will protect the bottom of the unit from burning out.
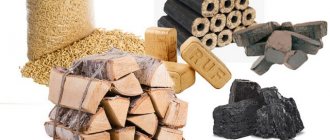
What types of fuel can be used
When it comes to the heating system for a temporary premises, such as a workshop or garage, two aspects are usually taken into account - economic feasibility and safety.
In terms of economic feasibility, the most accessible type of fuel today is wood. Liquid fuel, such as diesel fuel or used engine oil, is used for heating mainly utility rooms; in residential premises, the use of this fuel is limited because it has a specific smell. Coal is usually not used for long-burning furnaces of handicraft production; it is intended for heating boilers and stationary brick furnaces.
Thus, the most acceptable type of fuel is firewood or pallets - fuel from wood processing waste. And here lies the whole secret of long-burning furnaces. The fact is that to get maximum effect you need to use only dry firewood. In ordinary, freshly cut firewood, the wood contains a large amount of moisture; during combustion, it turns out that two processes occur in parallel - burning of wood fibers and drying, releasing a large amount of water vapor. The result is a large amount of unburned fuel and combustion at a low temperature. These processes do not allow obtaining the maximum amount of heat.
It's a different matter with dry firewood. The moisture content in them is minimal, which means that when the temperature rises to 300 degrees, the process of decomposition of wood into simple substances begins. This allows you to significantly increase heat transfer, as a result of which the firewood burns completely with minimal formation of soot and ash.
Advantages and disadvantages
With all its undoubted advantages, a long-term combustion device with an afterburning chamber also has certain disadvantages. Before choosing the right model, we recommend that you familiarize yourself with the strengths and weaknesses of the equipment. This will help you settle on the best option.
The advantages of such units include the following:
- High efficiency is the main advantage of this type of furnace.
- Easy to maintain. If conventional units require frequent loading of fuel, then in the devices under consideration it burns very slowly, therefore the frequency of loading the flammable substance varies from 5 hours to 2 days.
- High efficiency.
- Large selection of models. Today, there are many similar ovens on the market of various shapes, sizes and power.
- Unpretentiousness in fuel. The equipment operates successfully on various types of flammable substances. Combination type ovens are also available for sale.
As for the shortcomings, the following are worth noting:
- The need for chimney insulation. This is a prerequisite for the normal operation of long-burning furnaces. The fact is that hot gases enter the channel from the combustion chambers. In cold weather, this causes immediate condensation to form, which quickly leads to soot accumulation and severe pipe blockage. In order for the stove to work properly, the chimney will have to be cleaned frequently.
- Need for customization. If the equipment is poorly adjusted, then the combustion of fuel in it will be incomplete, which will prevent the achievement of the main goal.
- High price. This disadvantage can be compensated, on the one hand, by independent production, and on the other, by significant fuel savings, thanks to which such a stove will quickly pay for itself.
Read more in Metal
Tools and accessories
To make your own stove, you must first determine the place where you want to place the device. This must be a room in which electricity is installed and it has a large area. Now about the materials. The easiest way is to use a steel barrel with a volume of 200 liters for the stove. But in general, the volume does not matter much; all that is required is the heat transfer of the device; you can use a gas cylinder and even a fire extinguisher. But it’s all about the volume – from a 27-liter cylinder you can make a stove for heating a bathhouse, or from a fire extinguisher a device for a very small room. The thickness of the metal is also of considerable importance, since the thicker it is, the longer the furnace will work. If nothing suitable is available, use steel sheets or thick-walled pipe. The metal must be free of damage and traces of rust.
Some other materials are also required:
- Pipes, fittings or an angle for the legs if the stove is round.
- Sheets of steel with a thickness of 0.5 cm according to the size of the end side of the furnace.
- Material for creating a sealed door.
- A pipe with a diameter of 10 cm, which will be 15 cm longer than the device.
- Pipe 5 m and with a diameter of 15 cm for the chimney.
Measuring equipment you will need is a plumb line, tape measure, building level, as well as a trowel, hammer and mallet.
Nuances of the top combustion boiler control system
In long-burning boilers with top combustion, the main control principle is the regulation of air flows entering the combustion chamber. Standard units are equipped with a mechanical device for this purpose. The chain driven damper is driven by the thermostat.
The thermostat in the boiler is adjusted to a certain temperature. When the coolant heats up to the desired level, the damper is automatically set to a certain position, reducing the heating intensity. It is impossible to sharply reduce the temperature, because... The coolant will continue to heat up by inertia, heating the room.
Devices with fans work a little differently. If you need to increase the heat transfer force, this can be done using a fan. The device will pump air. Due to this, it is also possible to reduce the inertia of the boiler. Control occurs automatically, and sensors record the slightest changes in coolant temperature.
Features of kindling
Having understood what a pyrolysis boiler is and how it works, you should learn how to melt it correctly. Especially for the first time or after a long period of inactivity. A cold firebox must be preheated; for this purpose, small kindling is first lit at the bottom and allowed to burn well with the draft open. Wood chips and thin logs are added until the chamber warms up and smoldering coals form in it that can ignite the main fire.
The firebox is loaded to the top and the wood is allowed to burn well, after which the damper is closed and the draft is reduced.
How wood stoves work
One of the features of heating devices is a secondary combustion chamber, which is characterized by slow combustion of fuel. Simply put, the logs in the firebox do not burn, but smolder. This effect is achieved by adjusting the amount of air entering the fuel chamber.
The combustion chamber is divided into two compartments. When wood is smoldering, unburnt combustible gas enters the second compartment of the chamber, where additional air is supplied from the injection pipes, after which the gas burns out completely, and the wood remains to smolder further.
Among the advantages of the system, it is worth noting: an increase in the operating life of the devices, greater efficiency - the stove operates for 8-9 hours on one load of firewood.
There are a few more disadvantages: the system only works on dry wood, the combustion mode will have to be constantly adjusted, which is somewhat inconvenient. It is also necessary to constantly monitor the cleanliness of the chimney and periodically clean it.
How does a rocket stove work?
Despite the loud space name, this heating structure has nothing to do with rocket systems. The only external effect that gives some resemblance is a jet of flame that escapes from the vertical pipe of the camping version of the rocket stove.
The work of this center is based on two basic principles:
- Direct combustion - free flow of fuel gases through the furnace channels without stimulation by the draft created by the chimney.
- Afterburning of flue gases released during wood combustion (pyrolysis).
The simplest jet stove operates on the principle of direct combustion. Its design does not allow achieving thermal decomposition of wood (pyrolysis). To do this, it is necessary to perform a powerful heat-accumulating coating of the outer casing and high-quality thermal insulation of the inner pipe.
Despite this, portable rocket stoves perform their functions well. They do not require much power. The generated heat is quite enough for cooking and heating in the tent.
Types of long-burning devices
Conventional heating units require a constant supply of fuel, which burns out very quickly. If this happens at night, then by morning the stove has time to cool down, and the room needs to be heated again.
In such devices, solid fuel does not burn so quickly. In fact, it simply smolders, while releasing heat for a long time. Various types of solid fuel can be used in such furnaces:
- firewood;
- coal;
- pellets;
- sawdust, etc.
The most popular long-burning stoves are the following models:
- potbelly stoves using waste oil;
- Butakov heating devices;
- "Buleryan."
These units differ significantly in their design, but are similar in the benefits that their owner receives. They are characterized by ease of maintenance, cost-effectiveness, fire safety and durability. The equipment can operate without adding fuel for a long time and quickly heats up the room.
Purchasing such a stove will not be difficult: there are many different models on the market. They have a neat appearance, are compact, but at the same time they are very expensive. You can save a lot by building such a unit yourself, using scrap materials.
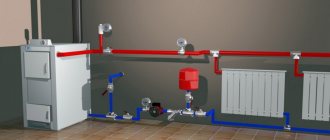
The better way to heat
The most important advantage of using solid fuel boilers is their versatility in terms of fuel used: firewood, briquettes, pellets and coal.
When choosing a fuel, you need to proceed from its calorific value:
- coal, 15-25 MJ/kg;
- firewood, 15-17 MJ/kg;
- wood pellets 12-17 MJ/kg.
It is equally important when choosing fuel to take into account its combustion time in the firebox. When using firewood and briquettes, the average operating time of the boiler on one refill does not exceed 30 hours. At the same time, using pressed pellets, it is capable of heating a house for at least 72 hours.
High-tech automated coal-fired boilers can heat rooms for 5 days or even more, which significantly increases the practicality of using such units.
Today, combined modifications powered by both solid fuel and electric heating elements are especially popular.
Such thermal power equipment is characterized by practicality, versatility and easy operation. Firewood or coal is used as the base fuel, and in their absence, heating elements are turned on, which ensures the required temperature in the house.
§ 3. Continuous combustion furnaces
If the stove is heated continuously in such a way that every hour it receives from the burned fuel and transfers into the room the amount of heat required for its heating, then there will be no need for accumulation (reserve) of heat, i.e. there will be no need for a large volume of brick array.
A continuous combustion stove will evenly transfer heat to the air in the room, since its walls will have the same temperature.
In terms of their operating mode and uniformity of heating, continuous furnaces correspond to central heating radiators.
The reduction in the volume of a continuous combustion furnace is quite significant (3-5 times) compared to the volume of a heat-intensive furnace. Savings in materials, labor, transportation costs are all a result of reducing the volume of the furnace
And, no less important, the continuous combustion furnace takes up little space
Continuous combustion furnaces have some distinctive features. These include:
- loading shaft (hopper), where the fuel supply required for the entire life of the furnace is placed;
- hermetic fittings for tightly closing all openings in the walls of the furnace (furnace, blower, etc.);
- a device by which the air supply is regulated to change the combustion rate;
- a device for scooping fuel and cleaning the ash pan without interrupting the operation of the furnace.
In continuous combustion furnaces, so-called “bottom” combustion occurs.
Long-burning furnace of the Academy of Public Utilities (AKH-9) (Fig. 82). Oven dimensions 49 x 59 x 105 cm. Heat transfer - 2400 kcal/hour; weight - 350 kg. The outside of the stove is decorated with tiles.
Rice. 82. Tiled stove AKH-9 long burning
The furnace consists of a shaft 1, a firebox 4, an ash pan 7, a middle flue 8, an intermediate chamber 5, side flues 10, two upper flues 11, a collector 9
As combustion proceeds, fuel flows from the shaft onto the grate under the influence of its own weight. The firebox maintains a constant thickness of the fuel layer and a small combustion mirror. A uniform combustion process creates a uniform temperature on the outer walls of the furnace,
The shaft is equipped, in its upper part, with a door for loading fuel. In its lower part there is a firebox with a grate and a combustion door. The middle part of the grate rotates freely. This makes it easier to clean up the ash. The stove is assembled in a metal frame. The outer walls of the stove are made of glazed tiles. Their voids are filled with ceramic tiles and crushed stone in mortar. The internal filling of the furnace is made of fireclay bricks installed on edge. Intermediate chamber 3 protects the side walls and roof of the furnace from local overheating.
There is a smoke exhaust pipe in the rear wall at the level of the collecting manifold. There are holes on the front and side walls of the furnace for cleaning the manifold and flues. The openings are closed with ceramic glazed stoppers.
Combustion products rise from the firebox along the middle flue 8 into the intermediate chamber 3, from which they flow into the side flues. Then the combustion products rise along the outer surfaces of the walls of the intermediate chamber and fill the space of two gas ducts 11 under the furnace roof. The cooled gases, being heavier, descend through the same side flues 10, but along the internal surfaces of the outer walls of the furnace. The cooled combustion products are collected through special openings in the manifold 9, and from here they are removed through the pipe into the chimney.
Fuel is ignited and the firebox is cleaned through ignition door 5. Fuel is loaded through door 2. Ash is removed through ash door 6. All three doors are cast iron and hermetically sealed. The intensity of the furnace operation is regulated by more or less air supply under the grate using a slider in the blower door. One full load of the furnace with anthracite is enough for round-the-clock continuous combustion with a heat output of 1600 kcal/hour. During severe frosts, fuel should be loaded into the furnace shaft twice a day.
The stove is manufactured in a factory and delivered to the installation site in finished form. The stove can operate stably on coke, anthracite, peat or fine coal briquettes, shavings and sawdust.
Calculation of basic parameters
A long-burning solid fuel stove can be made from available materials, such as a used gas cylinder, a piece of large steel pipe or a metal barrel. You should select a material with a wall thickness of at least 5 mm. This is due to the fact that a thinner casing will burn out after some time.
Option of the “Bubafonya” stove with a water jacket
Furnace size
In the absence of any drawings and diagrams for the manufacture of the furnace, you can make all the necessary calculations yourself.
Calculation of parameters in the Bubafonya furnace
In this case, it would be more accurate to talk about its diameter - D and height - H. These values should be proportional to each other, where a ratio in the range from 1:3 to 1:5 is considered optimal. The height of the stove is usually made at least 100 cm, since this parameter is directly related to the duration of operation of the unit. However, it is not worth making a structure that is too high, as it will be inconvenient to load it with firewood. It can also negatively affect traction. It can drop so much that the maintained flame inside the combustion chamber goes out.
As numerous thermal engineering studies have shown, you should not make a stove with a small diameter. From this narrow unit, the air will simply be drawn into the chimney pipe, causing the stove’s power to significantly decrease.
If you make the stove frame too wide, then there will be no uniform burning of the fuel near the inner walls of the chamber and in the middle of the hearth. In this case, only the central part of the combustion material will burn out. The metal circle of the piston will sag and clog the fireplace, causing the flame to go out. The optimal diameter of this design is from 300 to 900 mm.
Thickness of material used
This criterion must be taken into account, since the thin walls of the housing will burn out after some time. In this regard, it is necessary to select a material with a thickness of at least 5 mm. This is especially important if you plan to equip the frame with a water jacket, turning it into a boiler. In the image, the wall thickness is indicated by the symbol Δ.
If you use material with a wall thickness of up to 4–5 mm, this risks causing the oven to lose its power. Due to the thin walls of the housing, the temperature above the piston plate will drop. As a result, the afterburning of pyrolysis gases will be reduced, and therefore the heat generated will be reduced.
However, for heating small spaces such as a garage, shed or small workshop, the thickness of such material is quite acceptable.
Parameters of a metal pancake
For efficient operation of the furnace, not only the diameter of the round plate on the piston is important, but also its thickness. After all, the metal pancake is a partition and at the same time a heating surface for igniting pyrolysis gases.
When making a metal pancake, you should adhere to the optimal size. The distance from its outer edge to the inner wall of the oven should be 5%. In the image, this gap is indicated by the formula C=5%D.
The diameter of the metal pancake should be slightly smaller than the internal diameter of the oven body
Outlet pipe parameters
In the image, the diameter of the chimney pipe is indicated by the letter S. It is recommended that its diameter be at least 80 mm.
Air supply pipe dimensions
In the diagram, its diameter is indicated by the letter d. To design such a furnace, you can use a 75 or 80 mm pipe. The pipe must be welded to a metal circle (into its hole in the middle). The result is a part called a piston.
Another option for a long-burning stove is Bubofonya. Description of the operating principle, calculation of materials, as well as step-by-step installation instructions in our article:.
Stoves for heating summer cottages
The range of heating stoves is wide, it’s easy to get confused, so even before going to the store you need to clearly understand what functions the stove should have. To do this, it is worth understanding the capabilities of heating units.
Power
The most important characteristic, the wrong choice of which will make the stove ineffective. All heating devices have a certain thermal power, it is expressed in kW. For a normally insulated residential building, the calculation is usually made by area: divide the total number of square meters of the house by 10 and get the required power in kW.
For a country house, this calculation is not entirely suitable. When selecting power, the following subtleties must be taken into account:
- material of walls, floors and ceilings and its thermal insulation properties;
- seasonality - will the house be used in winter, or is heating needed only on cool days in spring, summer and autumn.
The greatest power of the stove will be required if the house is made using lightweight technology, and visits to the dacha are planned in winter, in frosty conditions. In this case, it is necessary to choose a stove with a power greater than the calculated one or install additional heating devices.
Long burning mode
Some wood-burning stoves can operate in a long-burning mode. It is due to a special combustion mode of fuel - pyrolysis. Pyrolysis stoves can operate on wood or pellets. When ignited, the firewood heats up, and the process of decomposition begins into a solid fraction - coals and ash, and a gaseous fraction - smoke.
Flue gases contain many combustible elements; in conventional stoves they are not completely used and exit through the chimney, heating it greatly and releasing heat into the atmosphere. Thus, the thermal resource is used at best by 60%.
In stoves equipped with a long-burning mode, flue gases are burned in a special zone, it is called smoke circulation. The smoke passes through these channels, and its combustible components burn, giving off heat to the walls of the stove.
For this process to proceed successfully, it is necessary to limit the flow of air into the firebox in order to cause smoldering of the wood and increased formation of smoke. It is adjusted using a valve on the combustion door, and the optimal mode is selected experimentally.
Body and firebox material
- The debate about which stove is better, cast iron or steel, has been going on for a long time. What is the difference?
Weight. Cast iron models have thicker walls and a massive structure, so they are heavier, their weight can exceed 250 kg. If the floor in the country house is wooden, it may need to be strengthened, which will lead to additional costs. Steel models are approximately twice as light. Corrosion resistance. Cast iron is not subject to corrosion in a slightly acidic environment - for stoves used periodically, this is a big plus. The temperature difference during kindling leads to the formation of condensation in the firebox. Mixing with soot deposited on them, water forms weak carbonic acid. Steel structures corrode under these conditions. Burnout resistance. Due to their thick walls, cast iron models are more resistant to burning even at very high temperatures. Price. Steel models are 1.5-2 times cheaper than cast iron ones.
Inexpensive models popular among summer residents are usually combined. The highly heated and corrosion-prone surfaces in them are made of cast iron, the remaining structural elements are made of steel, which allows them to combine durability and low weight. The price of such devices is in the average range.
Additional functions
The main task of heating stoves is to quickly warm up the house
- . Depending on the model, they may be equipped with additional useful features:
hob, solid or with burners; possibility of connecting a heating circuit, water or air; decorative elements that allow you to create a cozy atmosphere at the dacha - panoramic glass in the fire door, decorative inserts, forged grilles.
Whether these functions are needed or not is a matter of personal preference, but it is worth considering that their presence affects the price of the stove.
Calculation of required heating power
Calculation of the thermal power of the boiler unit must cover all heat losses of the building with a margin of at least 20%. If the boiler must produce thermal energy to heat water, the power must accordingly increase in terms of the volume of water used in each specific case.
Calculating the heat loss of a building is quite complex; it depends on the climatic region of the facility’s location and the material of the walls and roof.
For an approximate calculation in the central region of Russia for houses with brickwork of at least 2 bricks and an interfloor height of 2.7 m, you can use the practical formula at the rate of 1 kW per 10 m2 of facility area with a margin of 20%.
For example, for a cottage with an area of 150 m2, the heating power of the boiler unit will be equal to:
150:10x1.2 = 18.0 kW
For a family of three, a domestic hot water tank of at least 100 liters with a power of 5.8 kW is required.
Thus, the total load on the boiler will be:
18.0 + 5.8 = 23.8 kW
Furnace order
Before you start laying the stove yourself, complete a few simple preparatory steps.
First, soak the brick. To do this, the bricks need to be dipped in clean water and left there for about a day. Water will fill the pores in the brick structure. Thanks to this, the building material will not absorb water from the clay solution in the future.
Prepare a clay solution. It will consist of ground clay, some sand and clean water. The specific ratio of components is selected in accordance with the characteristics of the clay.
It is important that the finished solution has normal plasticity and a uniform structure. On average, it takes about 20 liters of mortar to lay hundreds of bricks
1 row. It was previously noted that this row should be laid out exclusively at the building level with additional checking using a square. Lay out this row in continuous masonry. Inside, it is allowed to use halves of bricks.
2nd row. Lay out in the same pattern as the 1st row. Be careful and do everything in strict accordance with technology, because... the first two rows serve as the base of the furnace, which should be as reliable as possible.
3-4 rows. Continue laying, gradually forming an ash chamber. At the same stage of masonry, the door of the mentioned chamber is installed. Additionally, 3 doors for cleaning hatches and a door for the blower are installed. Place smoke vents on the reverse side of the swede. They are placed in a vertical position and communicate with the combustion chamber through a hole created during the laying out of the furnace.
5 row. Install the finished oven and place a grate of suitable size in it. Form a cover for the cleaning hatches and the blower door.
6-10 row. Lay out the walls of the firebox and oven chamber. A partition made of fire-resistant brick is laid between the combustion compartment and the oven. The brick must be laid on edge. The partition should be a row lower than the chamber itself. After the tenth row is ready, lay a standard steel corner and an additional cast iron slab on the front of the structure. To secure the corner, use steel wire and a 2-centimeter layer of clay mortar.
11 row. Completely complete the closure of the channel through which the cast iron plate and the right wall of the furnace are separated.
12-16 row. Lay out the cooking compartment and 3 vertical flues. Lay out chimney openings from fire-resistant bricks.
17-18 row. Form an overlap over the cooking compartment. To form the ceiling, use the sheet steel laid in the previous stages and a corner made of the same material.
Row 19-20. Attach 2 hatches to the front of the door structure for cleaning the gas exhaust channels.
Rows 21-28. Lay out the chimney ducts. Don't forget to re-tie your stitches. In the process of laying out the 27th row, install a convenient latch. Above the installed smoke damper, leave a technological hole through which the gas ducts will interface with the air ducts.
Row 29-30. Lay out the overlap of the chimney ducts. At this stage, the width of the masonry around the perimeter must be increased by 50 mm. Thanks to this expansion, a cornice will be formed.
31 row. Adjust the dimensions of the overlap to the structural dimensions of the 27th row.
32 row. Start laying out the chimney. The standard chimney design has dimensions of 130x250 mm.
At this point, the laying out of the oven can be considered complete. At the end, all that remains is to complete the installation of the chimney, and also, if desired, to decorate the stove, for example, with paint or ceramic tiles. Additionally, you can buy a variety of accessories, for example, for storing fuel.
Shvedka stove (front view)
Building a staircase in a house is not an easy process, but it is doable. The main difficulty lies in calculating the angle of inclination and span parameters, because not only the ease of use, but also the durability of the structure depends on this. Durable and beautiful wood...
Preparatory work and choice of location for installing the furnace
If the furnace is made of sheet steel, then it is necessary to cut it into blanks in accordance with the drawing:
- cut identical fragments from the corners that will serve as a grate;
- you can also use metal corners to make stands and handles for the case;
- It is also necessary to cut the pipes in advance.
The location for installing the long-burning stove is selected with the condition that when assembled it is not installed closer than 100 cm to the wall.
Since the furnace body will be completely heated, it is necessary to take care of the insulating material in advance. To do this, you can build a stand from brick, which should be 30 cm larger than the base of the case. Alternatively, you can weld steel rods or angles to the stove frame.
At the installation site, from the side of the door into the combustion chamber, it is necessary to lay insulating material. As such, a basalt or asbestos layer is used, on top of which a steel sheet with an area of 100 cm is placed.
The walls next to the stove must be lined with insulating material
Advantages and disadvantages
Modern long-burning stoves have a lot of advantages, which can play a decisive role in the initial selection of heating equipment. However, the disadvantages of existing designs require weighing the pros and cons before deciding to replace an existing heating unit with a newfangled pyrolysis boiler.
The advantages of the structures under consideration include:
- multiple increase in operating time on one fuel load;
- possibility of full autonomy - when entering the main mode, operation of the unit does not require operator intervention;
- the fuel burns with virtually no residue;
- the interval between downloads increases;
- using not only coal and firewood as fuel, but also wood chips, sawdust, dry plant waste, pellets, etc.;
- reduced weight and dimensions;
- possibility of adjusting the combustion process;
- The efficiency of long-burning pyrolysis boilers reaches 90%;
- smoke residues do not contain soot or harmful substances;
- many designs available for DIY.
Be sure to check out the disadvantages of this type of oven:
- increased requirements for the chimney. It must have sufficient height and thermal insulation;
- In long-burning furnaces, only dry fuel can be used. Excess moisture reduces the flame temperature, and water vapor blocks the access of oxygen, which makes it impossible for the unit to operate in gas generator mode;
- the reduced smoke temperature promotes the layering of soot and other combustion products on the walls of the chimney;
- when burning wet fuel, heavy fractions and dangerous chemical compounds appear in the smoke residues;
- higher cost compared to conventional furnaces.
If you weigh all the pros and cons, it is not difficult to understand that the wide popularity of long-burning stoves is not an accident at all, but the result of precise calculations and a carefully designed design.
Recommendations for improving device performance
An upper combustion stove should be heated following certain rules. First you need to remove the cover and remove the adjustment device (pipe with a circle for pressing). Then we load the firebox with fuel, and the maximum height is the lower part of the chimney opening. Try to pack any fuel more tightly, and in the center on top there should be dry twigs, a rag or paper soaked in kerosene. Install a clamp, a lid and throw a rag or paper that catches fire towards the pipe. Matches will not help, as they will go out on the fly. When the fuel warms up well, you should close the air damper and the operation will be in smoldering mode.
The device for making full use of the combustion duration is the injector. These are one or two pipes with holes that go into the firebox. Holes of diameter should be cut in the walls of the heating apparatus, and then the injector should be welded. It will be located at the height of the center of the chimney pipe, but in front of the firebox. The injector will serve to feed the combustion process with air, and the upper wall will warm up even better. When the device goes into the smoldering process, the injector stops working.
As you can see, there are many options and all kinds of designs, and we only talked about a few - those that are the most popular. We hope that the knowledge from this article will help you make your own reliable and simple device that does not require constant maintenance, and it will delight you with its work for decades!
Step-by-step instructions for making a long-burning stove with your own hands
1. To make the stove body, use a grinder, which is used to carefully cut off the top of the metal barrel. Of course, in the case of using a container with a thickness of more than 3 mm, the use of a gas cutter will be more justified. We remind you once again that the work must be done carefully - the furnace lid will be made from the cut part in the future. If a pipe is used as a body, then it is necessary to weld a bottom cut from sheet metal 5–6 mm thick to it.
When cutting off the cover, remember that this element will be needed later
2. In the lower part, four legs from a channel or angle are mounted to the body using a welding machine. Note that if the body is made of metal and has a rectangular shape, then you can do without additional supports.
One of the options for arranging support legs
3. Using the same grinder or autogen, an air distributor is cut out of sheet steel 5-6 mm thick - a circle that can fit into the barrel with a small gap. The edges of the metal pancake must be thoroughly cleaned to prevent the possibility of touching the walls of the oven.
4. A hole with a diameter of 20 mm is cut in the center of the air distribution device and a pipe is welded to supply air to the combustion zone.
The blades of the air distribution device are mounted at the same distance
5. On the back side of the flat piston, four sections of a channel or angle are welded, evenly positioning them in a circle. Note that the blades should not protrude beyond the air distributor. In the future, thanks to these elements, there will be an air gap between the metal pancake and the firewood, which is necessary for fuel combustion.
As a result, the air distribution device should look like this
6. A lid is made from the previously cut off top of the barrel. To do this, a metal strip is welded from the outside along the entire contour so that its diameter allows the top of the stove to be freely installed on the body.
7. A hole is cut in the lid, 3–5 mm larger than the diameter of the air duct pipe. In addition, two handles made of strips of metal are welded onto its top. With their help, it will be easier to open the hatch for loading fuel.
8. A hatch for cleaning the oven is cut out in the lower part of the body. Try to do this part of the work using a grinder with a thin circle installed. This will ensure a more precise fit of the door to the body. A thin metal strip is welded along the perimeter of the hatch to eliminate the resulting gap. Then the hinges are welded, the structure is installed on the body and the valve is mounted.
9. On the other side of the stove, at a distance of 50–100 mm from its upper cut, a smoke exhaust pipe is cut in. It is used as a piece of steel pipe, into which the chimney will fit with a slight interference.
Installation of a smoke exhaust pipe
It is better to use a chimney of a collapsible design, consisting of several sections - it will be easier to clean during operation.
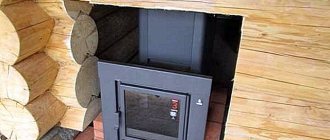
At this point, the production of a vertical-type solid fuel unit can be considered complete. All that remains is to install the stove in place and connect the chimney.
Long burning stove: final version
"Rocket" or rocket stove (RP)
Another type of energy-efficient stove is known as the “Rocket” or “Rocket stove”. It received a sonorous name because of the reactive process based on heat exchange with a significant temperature difference (and the resulting thrust), which is also implemented in rocket jet engines. This natural phenomenon is inscribed in the basic laws of physics due to its trouble-free operation.
Design
The RP always has a “knee” of no more than 90° in one form or another. That is, the chimney is located at a right or acute angle to the bottom of the firebox. It is necessary to have an air duct (AH), which is often located adjacent (through the wall) to the firebox.
Operating principle and advantages
The main difference between RP and previously described furnaces is that the temperature is concentrated not in the firebox, but in the air flow, which is in constant dynamics. The continuous draft that occurs at the heating site (elbow) introduces oxygen with the flow of combustion air into the furnace through the explosive; in the furnace, the air receives thermal energy from fuel combustion and releases it at the place of temperature difference (elbow and “surroundings”), due to which the draft supported.
In the constant RP mode, no adjustment of the air supply is required - the natural desire for a balance of processes provides a draft of exactly the strength required to realize the temperature in the firebox. The exhaust gases also exit naturally - under the pressure of heated air (therefore, the RP does not require a high chimney pipe).
We will implement the effect of heat flow reactivity in stages, making the design more and more complex.
Stage one. Pure flow
As we have already found out, the main element and condition for the existence of the flow is the channel elbow. By welding two pipes with a diameter of 150 mm or more at an angle of 90°, correlating as 1/2, we will get a ready-made “rocket” firebox with a chimney pipe. The short section is horizontal, the long section is vertical. If you light a fire horizontally, the flame will come out through a vertical pipe.
A primitive option for supplying secondary air can be organized by installing a sheet of metal on brackets inside the firebox - the hearth will be separated from the air duct. In this case, the air passing through it will enter the corner of the knee, which allows us to call it secondary. For such a device, you can weld the legs and place a grate for the frying pan on the upper channel.
Stage two. "Rocket Potbelly Stove"
We take the design described above as a basis and add one more element - a horizontal section (channel). The rectangular cross-section of channels will be more convenient to use than pipes.
Rocket potbelly stove: 1 - plate; 2 - heating and heat exchange area; 3 - air flow
In this case, the air duct can be positioned arbitrarily - the main thing is that air passes through it. These can be “cheeks” parallel to the side walls of the loading hatch, or a plate on the ribs along the bottom wall.
Next, we attach a chimney made of a steel pipe (also known as a residual heat exchanger) to the elbow and install a lid. It is difficult to accurately describe the design, since most often it is made from scrap materials. It is important to understand and implement the very principle of flow formation.
Stage three. System with vertical heat exchanger
The idea is to install a steel heat exchanger with thick walls along the path of the hot flow.
The design is an element from the second stage, increased in size, on which, instead of a vertical pipe, an empty container for dry heat exchange (ideally an empty gas cylinder) will be located. In this case, the chimney channel must be located coaxially with the horizontal element.
The horizontal element itself (firebox) can be made in different forms - stove body, pipe or box. It can serve as a pre-heat exchanger (if it is large enough). For long-term (up to 4 hours) continuous combustion, you need to increase the fuel compartment. It can be up to 600 mm in height and accept logs vertically. Combustion will occur in their lower part, and under their own weight they will gradually burn out.
Rocket stove with heat exchanger: 1 - ash pan; 2 - cold air; 3 — fuel compartment; 4 - cover; 5 - firewood; 6 — flame boundary; 7 - combustion area; 8 - heat exchange; 9 - chimney; 10 — cylinder
Primary air will be supplied through a door in the firebox area, which will serve as an inspection hatch for cleaning. Secondary - through a hole or channel in the knee, or through a channel in the fuel compartment.
Stage four. Installing the injector
Prototypes of secondary air supply channels were mentioned above. At this stage, we will install a separate channel to fully supply the flame with oxygen during the afterburning stage of the fuel.
To do this, you will need a steel pipe with a diameter of 12–15 mm, bent in the shape of a channel, which is obtained from the elements of the system. On one side it needs to be plugged and 6–8 5–6 mm holes drilled in the wall over an area of 100 mm. Then you should install the tube so that it passes through the entire system, and its “blind” end with holes is in the place where the flame reaches. The open end should exit into the “cold” part of the system and have air access. The heated metal of the tube will create draft, and fresh air will be supplied for afterburning.
Injector installation options: 1 - ash pan; 2 - cold air; 3 - firebox; 4 — fuel compartment; 5 — injector; 6 — flame boundary; 7 - heat exchanger
Stage five. Turbocharging
An air pump (possibly an old vacuum cleaner) is connected to the injector. The injector itself must have a greater throughput than with natural supply. When the pump is turned on, the flow of fresh air creates excess additional pressure, and the draft increases in proportion to the power supplied. This ensures an increase in the temperature of the heat exchanger.
This method has been known to craftsmen since ancient times - the function of an air pump was performed by blacksmith bellows.
When taking measures to develop a rocket furnace, remember that the system must be harmonious - all elements must be balanced, otherwise the metal will overheat and burn out.
Do-it-yourself Swedish stove with three firing modes
Swedish stoves differ from other heating and cooking stoves by the presence of a heating panel in the rear part. This brick panel has a system of gas ducts: vertical or horizontal. The smoke passing through them heats up the structure, and from it the rooms are already heated. The system turns out to be efficient and economical: the heat that went into the chimney in a traditional Russian stove is used to heat the premises. But both shield construction systems (vertical and horizontal) have disadvantages.
With a horizontal arrangement of gas ducts, the entire shield is heated evenly. But such a system requires a large number of cleaning holes and, accordingly, doors on them. Considering that furnace casting is not cheap today, these doors significantly affect the final cost.
Heating panel of a Swedish stove with horizontal and vertical flue channels
If the gas ducts in the swedish are arranged vertically, there can be only one cleaning hatch. But there is another problem: while the stove is heating, in the first channel, on the side where the hot gases from the furnace enter, the shield will be noticeably hotter than in the third - at the exit. Since the shield is usually located in two rooms, one of them will be much warmer than the other.
There is also a third type of shield device: bell-type. It combines the advantages of both systems: one cleaning window is required, the entire surface is heated evenly, and less bricks are required for construction. Moreover, with this design, the oven cools down more slowly: the warmest air stays in the tops of the hoods for a long time, and the “draft” from the doors passes only through the center.
When using the bell-type principle of constructing the shield, heat is retained longer
From all that has been said above, it follows that the most economical and effective are Swedes with shields built on the bell-type principle. They are also easier to manage: it is possible to organize “summer” and “winter” operating modes, in which only a small part of the panel is switched on (in summer) or the entire heating power is turned on: in winter. There is even a version of a Swedish stove with three combustion modes: an “autumn” mode is added, in which a little more than half of the chimney channels are involved in the smoke circulation.
Means for manufacturing and the process itself
If you want to make a thematic unit, you will have to look at a lot of photos of metal stoves made by yourself, then draw up a drawing and arm yourself with:
- Welding equipment with electrodes;
- Sheet metal or “donor” structures;
- Steel corners;
- Grinder with cutting wheel;
- Large and medium hammers;
- Reinforcement with a diameter of 8 mm;
- Measuring tools - tape measure, corner;
- Use a pencil or sharp nail to draw lines.
When all the tools are collected, you can proceed directly to the event:
- Cutting a pipe and 5 rectangles using a grinder;
- Butt welding of steel or cast iron sheets with a welding machine;
- Welding the bottom to the walls, followed by checking the evenness of the finished structure;
- Marking on the walls of the barrel the places where the firebox, ash pan, and chimney will be located;
- Welding the corners to the “barrel” at a level of 10 cm from its bottom (this is necessary for installing the grate);
- Making grate bars from scraps that can be taken from a 2-centimeter diameter pipe or corresponding metal rods;
- Fixing the tubes and welding them;
- Welding two reinforcement sections at the top of the structure to organize the reflector;
- Welding the lid to the “barrel” (the first one should already have a hole for the chimney);
- Making door handles from pipes or plates;
- Making legs from corners or fittings;
- Organizing a chimney using a 135-180 mm pipe;
- Creating a rotary damper at the bottom of the chimney;
- Furnace installation.
Manufacturing a metal furnace is a completely feasible task. You just need to approach the corresponding project slowly and gradually. Then the finished result will not disappoint.