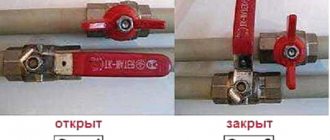
Hello! I have an Aquaphor Crystal N filter with tap 3. The faucet began to leak. Is it possible to repair it - replacing the ceramic pair?
You voted (2)
To disassemble your faucet, you need to: 1. Unscrew the flow control knob. 2. Remove the outer part. 3. Unscrew the nut (together with the metal ring). 4. Remove the ceramic pair.
Another question is, is there a ceramic pair of the required size in your city? Only a service specialist in your city can answer this question.
PS: The faucet must be disassembled and reassembled carefully so as not to damage the threaded connections. It is advisable to entrust this procedure to a specialist.
All the best to you.
Good afternoon. Please tell me how the crane is disassembled. I was able to remove the plug from the flow control knob and remove the screw. And then without super efforts (I’m afraid to use force, because ordinary taps can be easily disassembled) or additional tricks, it’s impossible to disassemble. Maybe there is a diagram or a more detailed description. Thank you very much. Sergey.
Good afternoon You did all the steps correctly. The handle can be removed without effort, you just need to pull it towards you, do not twist it in different directions, as the grooves of the handle can be damaged. Due to the long use of the faucet, the handle has become stuck to the faucet axle, use WD-40, then remove the handle.
Thank you very much for your answer. I'll try.
Good afternoon Unfortunately, it was not possible to disassemble the faucet - the handle cannot be removed. Is it generally possible to disassemble this faucet - “Classic faucet version 1”? Sergey.
Good afternoon Yes, the faucet can be disassembled, but apparently the handle is so stuck that even proven means (WD-40) do not help; try lightly tapping the faucet handle with some kind of wrench, if this does not help, unfortunately, the faucet will need to be replaced.
I bought a new set of Crystal A. I installed it according to the instructions, but somehow clean water immediately dripped from the spout of the tap. A week later it began to drip continuously. A call to technical support yielded nothing in essence. Did you install it yourself? That means your problems. You can take everything apart (!) and bring it to the service center (this will take a whole day). Where they will conduct an examination and maybe decide to change it. Or maybe not.
I removed the crane axle box. It looks like the problem is in the original defect of the ceramic pair, the edge is broken off, there was no fragment inside (in the photo). It turned out to be impossible to buy such a 3/8″ crane axle box; they are not available anywhere. As a result, the filter stands idle. Terrible.
I do not recommend this company's products.
Hello Dmitry. We do not waive the warranty on our filter. You can contact the service center for warranty. Since you installed the filter yourself, the technician’s visit to your home will be paid, but if our technician installed it, the visit would be free. You can call the technician by calling the numbers on the website. Best regards, Aquaphor support service Nikolay Efremov.
You released a low-quality product, I have already spent time and money on it. Now you are asking me to spend time traveling across all of Moscow from the other end of the Moscow region. The cost of a trip to you is several times more expensive than the filter itself, and even more so than a defective part. Will you compensate me for the trip? The filter turns out to be golden.
Types of breakdowns of a drinking water device
When using an Aquaphor filter, the valve fails over time, as it has its own technical resource, like any other mechanism.
Another reason for failure is a limescale layer that impairs the performance of the device.
Plaque is a deposit of calcium and magnesium salts contained in tap water. Appears due to untimely replacement of filtration elements and is the cause of faucet leakage.
Causes
Each manufacturer's cranes have:
- special look;
- dimensions;
- design features.
But the configuration and operating principle are the same for all.
Leakage may occur due to:
- wear of the crane axle box,
- deposits that have arisen on the internal elements as a result of wiping the gasket.
To find out what's wrong, you need to disassemble the tap.
We invite you to watch a video on how to disassemble an Aquaphor faucet to replace the axle-box faucet:
Replacement without overlap
First of all, there are several ways to replace a pressure tap. Among them there are some unusual ones, such as those with a tool for freezing pipes, and some simple ones, like just take it and do it. The first, again, will not work with pipes in which hot water flows, but the second is a completely extreme option.
Usually there are no special tools and devices at hand, and therefore you have to improvise. First you need to find a larger container - as large as it can fit under the tap.
Next, you should stock up on material that absorbs water well. If these are towels, then it would be better for them to be high-quality and expensive, since cheap ones usually do not absorb moisture well.
Despite the fact that you roughly know, or have seen a video or photo, how to replace a faucet in such conditions, you still should not do this unless absolutely necessary if there is a room under the room in which you will work that can be flooded - even if you are on the ground floor of a multi-story building, it may turn out that there is either a warehouse, a store, or whatever in the basement below you.
How to disassemble it yourself?
First of all, you need to prepare your tools.
Next, the algorithm of actions is as follows:
- First of all, you need to turn off the water.
- Next, you need to disconnect the hose through which the water is supplied.
- Remove the tap from the hole.
- Unscrew the valve.
- Remove the plug.
- Using a wrench, disconnect the valve axle.
This completes the process of disassembling the mechanism. Next, you need to troubleshoot the problem.
Preparatory activities
Before you start directly fixing the leaking faucet, take care of the main thing - turn off the water on the riser, otherwise flooding of the apartment - both yours and the neighbors below - will be added to all your problems. Then, having turned off the water, you can begin repairs.
To carry out repairs you will need the following materials and equipment:
- a vessel for collecting water;
- adjustable wrench;
- silicone seals;
- screwdrivers (flat and Phillips);
- fluoroplastic sealing tape;
- pliers;
- new gaskets;
- wrench;
- cleaning agent, sponge;
- rags.
All this is quite enough to fix a faucet leak on your own.
Note! If you recently purchased a faucet and still have a box left of it, it may contain a repair kit and detailed instructions with diagrams. If so, the repair will speed up significantly.
Repair if water leaks
Let's look at how to fix a leak yourself, depending on the cause of the breakdown.
- If the leakage occurs due to wear of the valve axle box, this part must be replaced with a new one.
- Disassemble the structure as described above, remove the unusable crane axle box and install a new one in its place.
- When the cause is plaque, it is necessary to clean the mechanism plates.
Features of cleaning plates
The valve head consists of 2 flat thin elements. They can be ceramic or plastic.
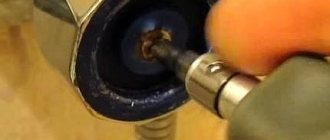
We disassemble the crane axle box in 3 seconds
If anyone doesn’t know how the axle box works, I’ll tell you how to disassemble it:
- Remove (or unscrew) the stopper from the rod.
- We remove the silicone (or rubber) plug from the end of the axle box.
- We squeeze the rod out of the body with all the insides.
This is what the crane box looks like from the inside.
Assembly of the mechanism after repair
After the restoration work, it is necessary to assemble the crane axle box. The steps are performed in reverse order:
- The plates must be positioned properly in the housing.
- Place the gasket in place.
- Place a plug.
- Screw in the valve.
- Using a wrench, screw the faucet axle onto the faucet body.
- Secure the faucet in place.
- Connect the water supply hose.
After this, turn on the water and perform a leak test. If it does not drip, then the problem has been successfully resolved.
Basics
First of all, do not try to do this in a multi-story building, especially on its upper floors. The same applies to heating with hot water - not only can there be burns, but hot water can cause more serious damage to your repair, and in the worst case, not only to yours.
Now let's figure out whether it is possible to replace the tap under pressure. Naturally, this can be done, but there are several conditions. To begin with, you can try this with small-diameter pipes that do not have high pressure.
Polypropylene tap - a modern solution for your communications
Faucets made of polypropylene cause distrust among many buyers due to the fact that they consider the material to be unreliable and short-lived. Meanwhile, modern technologies ensure the highest quality manufacturing, thanks to which such cranes are not inferior in properties to metal products, and in some respects even surpass them. This article will discuss the main features of this type of product and the criteria for selecting quality models.
Taps and fittings for polypropylene pipes meet the highest quality standards if they are manufactured in accordance with the technology
Advantages of this product group
Taps for polypropylene pipes can be very different: steel, brass, or made of the same material as the main communications. It is the latter option that we will consider in more detail, especially since it has a number of undeniable advantages:
A polypropylene faucet is an excellent solution for most types of communications
Important! Another important advantage is the fact that the locking mechanism is made of high-quality stainless steel, this guarantees the durability of the structure and its resistance to adverse influences.
Features of polypropylene taps
First, you should understand the basic design features, this will allow you to better understand how the system functions.
Products can be made from different types of raw materials, most often the upper limit of heat resistance is limited to 95 degrees. It is best to choose designs from the PPRC brand of raw materials; the size range of products is quite wide, but the most common sizes are 20, 25, 32 and 50 mm, but other options can be found.
Regardless of size, the structure consists of the following components:
In the photo: this is what the structure looks like in cross-section
- Housing made of the highest strength polypropylene . It is very important that the assembly is cast with high quality, without any flaws or surface defects.
- The closing element is a ball with a hole for water flow . It is best if it is made of stainless steel and the surface is laser polished to ensure the tightest and most reliable fit.
- The rod is the axis on which the locking mechanism is attached ; it must be adjusted very precisely to prevent even minimal play.
- To prevent water from penetrating through the rod mounts, O-rings are used ; they must be made of high-quality rubber.
- To ensure a tight fit of the ball to the body, two rings are used , which can be used either from fluoroplastic or Teflon.
- The mechanism is adjusted using a handle, which is attached with a special screw..
Dismantling
As already mentioned, there is a high degree of risk in this process, since the base of the faucet may crack or even burst when unscrewed. This occurs due to strong water pressure.
The valve handle can be removed by unscrewing the fastening nut. Then you need to adjust the gas or adjustable wrench to the size of the faucet edges.
After adjusting the tool, you need to unscrew the tap in the opposite direction clockwise, while holding the riser outlet. The final turns of the thread can be unscrewed by hand, because further the unscrewing resistance will become easier.
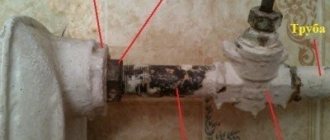
After unscrewing the tap, you need to prepare some kind of container and hose so that there is somewhere to drain the water.Everything about the entrance tap to the apartment
Introduction
The water supply of the apartment is part of the water supply of the apartment building. The water supply system of the house is separated from the water supply system of the apartment by the inlet tap into the apartment. This will be discussed in this article.
What is an entrance tap to an apartment?
Let me remind you that the internal water supply system of a house consists of: inputs to the building, water metering units, distribution water supply network, water supply risers, connections to plumbing fixtures and installations. As well as water supply, mixing, shut-off and control valves. Read: What is a collector water supply scheme.
As we can see from this regulatory definition, the inlet tap into the apartment belongs to the internal water supply system, namely its utility and drinking part.
Technically, the more correct name for an apartment's inlet tap is a shut-off valve that separates the water supply riser from the apartment's water supply.
It is this boundary location that gives rise to frequent disputes about who should repair it and at whose expense. I will not get involved in this dispute, I will only note that when putting a house into operation, only the installation of inlet shut-off valves is required. Read: Who should check and replace water supply risers
If during the operation of the house the residents do not make other decisions, the water supply riser valve is part of the common property of the apartment building.
Since residents pay for the maintenance and repair of housing, it is quite reasonable to assume that emergency repairs (replacement) of the inlet shut-off valve should be carried out by the building management company or HOA. The same applies to major repairs or planned repairs of the house’s water supply system, and with it the valves.
Read: How does a toilet work?
However, it seems to me that if a tenant decides to renovate the bathroom at his own request, replacing the inlet shut-off valve is carried out at his expense.
For example, you decide to replace the water supply risers within the boundaries of your apartment. It is illogical to replace risers at your own expense, and valves at the expense of the repair fund. Although there may be options.
Location of inlet valves in apartments
There are two entrance taps to the apartment. One for cold water supply, the second for hot water supply (if it is provided in the house and there is no water heater).
Previously, the location of apartment inlet valves was only in the bathroom, and in rare cases in the kitchen. In new houses, inlet valves may be located outside the apartment.
According to regulations, free access to input valves must be provided. In practice, the location of the valves can be varied. However, if you are making repairs and changing valves, or perhaps moving water supply risers, you better make free and convenient access (if possible) to the inlet valves.
Inconvenient location of valves, locking them, or covering bathtub furniture or plumbing fixtures leads to a more severe flood in the event of an accident.
Read: Bathroom plumbing
The most convenient location of the apartment's inlet taps is in a specially equipped plumbing closet.
Behind the inlet tap there should be a sump pump, then a water meter, then other control and water withdrawal devices. Read Preparation, placement and installation of water meters.
How to choose an inlet tap for an apartment
I will definitely devote a separate article to this issue, briefly here. Understanding the importance of the purpose of inlet taps, for the correct choice there should be only one criterion - reliability.
Therefore, exclude valves made of zinc-aluminum alloy (TSAM or ZAMAK) from your choice. It is often called silumin, but this is not true, although silumin is even worse than TsAM.
Give preference to stamped brass valves with ball lock (ball valves). Don't buy valves. They are cheaper, but wear out faster. The water from the riser has not yet been cleaned by mud collectors, so the valve valve quickly wears out, although it can be repaired.
How to change the inlet tap in an apartment
I will describe a practical version of the stages of replacing the inlet tap in an apartment. The last case is the replacement of an inlet valve by a resident, carried out by an employee of the management company, house series P-44.
Firstly, the shut-off valves were purchased in advance. The choice fell on. They have a nickel-plated brass body and a chrome-plated brass locking ball. One faucet with a handle type, the second with a butterfly handle.
I note that the handle is more convenient than the butterfly handle, but there is often not enough space to turn the “handle,” so they buy valves with a “butterfly” handle.
Read: Distribution manifolds without taps
Secondly. The work was carried out by an employee of the management company, so there was no need to negotiate additionally with him about shutting off the water supply risers.
Thirdly, access to old cranes was provided for the work. Since the toilet, and the risers in the house of the P-44 series are located in the toilet in the plumbing closet, were being renovated, access to them was free. The closet was broken, the toilet was removed. The plumbing cabin was not demolished.
Fourthly, since there was no transfer of risers, replacing the inlet valves took about half an hour. Along with the valves, a bypass was installed on the heated towel rail, so I can’t say exactly the time of work.
Causes
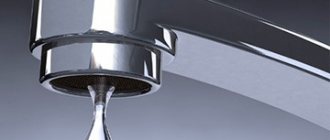
Let's figure out why water drips from the mixer tap.
As a rule, it is not possible to completely shut off the water in the mixer due to excessive wear of the gaskets installed in it or the mixing unit.
This phenomenon is due to natural causes and cannot be avoided.
In order for the parts to last longer, the mixer must be used carefully, without applying too much force. This is especially true for valve devices with a screw stem, in which, when the valve is tightly tightened, the gasket quickly wears out and breaks.
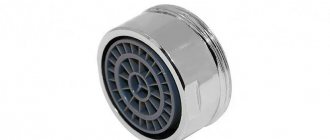
Leaks can also be caused by damage to certain elements. They are primarily caused by solid impurities present in the water. These are small fragments of scale, scale, rust or sand. In devices with ceramics, such particles can cause chips and cracks on its surface. These mixers are especially demanding on water quality, so before installing them, the water supply system must be equipped with mesh filters (they are also called oblique filters or mud filters).
For mixers with screw stems, solid particles are not a damaging factor, except in cases where one of them is caught between the gasket and the seat. Such an accident leads to both deformation of the gasket and the appearance of scratches on the seat, as a result of which leaks will certainly appear.
We solve the problem with different types of mixers
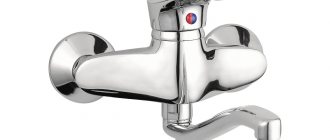
Water is dripping from the tap - what to do?
The procedure will depend on what kind of mixer you are dealing with. If there is only one handle sticking out above the spout, which regulates both temperature and pressure, then you have a single-lever mixer installed.
Based on the type of working unit, such devices are combined into two groups:
- ball;
- cartridge
If you have to rotate two knobs to adjust the pressure and temperature, then your mixer is of the two-valve type. They, in turn, are divided into two types:
- With a screw rod (to open the water, the thumb must be turned several times).
- With ceramic elements (the wing rotates only 90 or 180 degrees, which is why such devices are called semi-rotary).
We will begin our educational program with the taps of the oldest design - with a screw stem.
It would seem that what could be difficult about changing the gasket in a mixer? However, nowadays there are many types of cranes and not everyone knows how to properly disassemble it and make simple repairs. You will learn how to change the gasket in the faucet yourself in the article.
Which faucet manufacturers are considered the best, read here.
Cartridges in faucets sometimes become unusable, but their design is quite simple and repairing the faucet is not difficult. Here https://aquacomm.ru/cancliz/mnogokvartirnyie-doma/santehnika/kak-pomenyat-kartridzh-v-smesitele.html we will look at the main signs and causes of failure and methods for replacing the cartridge.