- Do-it-yourself compost pit: options for manufacturing and design
- How to make a compost bin: features of this type of construction
- How to properly make a compost bin at your dacha: choosing a location
- What can and cannot be put in a compost bin
- Features of caring for a compost heap: recommendations from experts
- Compost pit: what is it and what is it for?
- DIY compost bin: manufacturing options and design requirements
- DIY compost bin: manufacturing options, photo examples
- DIY compost bin: manufacturing options and instructions
What is a compost heap for?
Land owners plant a variety of vegetable, garden and cultural plants that constantly need feeding.
Without additional soil fertilization, representatives of the flora world lose vitality, sometimes even die due to depletion of the soil from which they draw minerals.
It is known from school botany courses that plants require additional nutrition. It is difficult for trees and shrubs, annual vegetable crops and perennial ornamental plants to survive without additional feeding.
Manufacturers offer a huge range of fertilizers, including many compost fertilizers. However, most often we doubt the quality of such products, since many unscrupulous manufacturers accelerate the ripening processes of natural humus using chemicals that decompose organic matter.
For this reason, the owners of most land plots create individual compost heaps and pits on their own territory in order to obtain cheap and natural organic fertilizer.
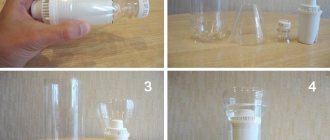
Manufacturing from pallets
A special feature of the product is the absence of fastening screws. The connection is made through slots in the pallets.
For manufacturing you will need materials and tools:
- pallets;
- hammer;
- roulette;
- assembly adhesive;
- gun;
- level.
The work consists of the following steps:
- At the first stage, all the pallets are disassembled and slots are made in the boards using a jigsaw.
- Then they gather again. One side is installed at an angle. This is necessary to remove fertilizers.
- During assembly, you should constantly use a level to prevent distortion of the structure. All seams are coated with assembly glue.
- At the end, the product is coated with an antibacterial solution.
What does a humus pit consist of?
A do-it-yourself compost pit will allow you to obtain 100% natural, organic, safe, environmentally friendly fertilizer.
In fact, this is not difficult, considering that the constituent elements are always at hand:
- vegetable and fruit peelings after cooking;
- weeds torn from beds, mown grass;
- fallen leaves, spoiled fruits;
- branches and leaves after trimming ornamental shrubs and trees.
A pit in a dacha will “mature” faster (literally in 3-4 months) if you add special biological preparations to the waste pile - solutions containing live bacteria.
In addition, the contents of a natural pile or container should be stirred periodically to speed up and stabilize the natural decomposition of organic matter.
Selecting a location
Even the nicest compost bin will be an unfortunate neighbor for residential buildings and can interfere with the movement of cars and garden carts.
You should not place it at the main entrance to the dacha, otherwise an unpleasant smell will greet both you and all your guests. Find or clear a hidden area in the shade to prevent the sun from drying out the compost. And to the finished pit, lay a convenient path, wide enough for the cart. The ideal solution is to pave the path with bricks or stones to prevent the wheels from getting stuck in the grass and sand.
Requirements for a compost pit
Photos of the compost pit allow us to appreciate that the overall design should create a charitable environment for the life of bacteria and other inhabitants who “work” to process waste.
The place for the natural formation of natural organic fertilizer should be organized taking into account the basic requirements:
- Firstly, it is necessary to ensure free access of air. With the help of air masses, phyto-waste breaks down faster and is gradually exposed to bacteria and earthworms. Limited air access will contribute to the rotting of the constituent elements and the release of foul odors.
- Secondly, you should think about maintaining the correct temperature.
- Thirdly, it is necessary to ensure that natural humidity remains at a constantly high level.
- Fourthly, you need to choose the right sizes. A structure with a depth of no more than 0.5 m and dimensions (1 m x 2 m) is considered optimally acceptable.
If the garden plot is large enough, you can build several ECO compost pits and place them on opposite sides of the plots.
There may be different options for compost pits. Experienced gardeners and gardeners advise placing structures with compost in partial shade, trying to avoid direct sunlight.
Pits or heaps decorated with a mobile (removable, portable) flower bed of decorative garden flowers and vegetable crops look original.
How to properly make a compost bin at your dacha: choosing a location
Speaking about arranging a compost heap, one cannot fail to mention the importance of its correct location. First of all, the structure must be sufficiently distant from residential buildings. In addition, the place where it is installed should be well blown by the wind to avoid stagnation of air and concentration of the unpleasant odor emanating from it. In addition, access to the compost must be ensured so that the process of adding raw materials or removing finished fertilizer is as comfortable as possible.
In order for the rotting processes in the compost bin to proceed faster, large branches and waste should be crushed.
On a note! In order for the rotting process to proceed faster, it is recommended to periodically mix the layers inside the heap. Therefore, even at the stage of planning and arrangement, it is worth considering how this can be accomplished.
In addition, the following criteria for choosing a site suitable for a compost pit must be taken into account:
- the selected location should be located at a sufficiently large distance from any sources of drinking water, for example, a well or borehole. The distance between these objects must be at least 25 m;
- if the site is not level, but on a slope, then you need to make a compost pit below the water level (preferably at the lowest point of the site). This will prevent the entry of rotting waste and clean water;
- You should inquire in advance about the most common direction of the wind, since the pit often becomes a source of a rather strong and unpleasant odor, and can cause discomfort to both you and your neighbors;
- It is worth making sure that there is not only a free approach to the pit, but also enough space to be able to bring in waste or remove finished compost using a wheelbarrow.
Scheme of construction of a compost bin.
On a note! It is advisable to choose a shaded place for the compost pit, since sunlight has a negative effect on the rotting process, significantly slowing down the composting process.
Requirements for a compost container
If a universal ready-made container is chosen as a place for the formation of natural compost, some requirements must be observed to ensure the most beneficial effect of this structure:
- the container or box must have holes on the walls for unhindered penetration and free circulation of air flows;
- the structure should be placed on a certain hill, slightly above ground level;
- doors or removable structures must be provided on the walls;
- the height of the design box must be suitable for the height of the person who will be engaged in periodic loosening of the mass;
- It is recommended to leave the bottom earthen to maintain a constant level of natural soil moisture and to ensure free access for earthworms.
A mobile (portable) container or box for ECO compost looks original and creative on a personal plot. This allows you to place the structure anywhere in the garden.
In addition, the mobile container saves time and physical effort when feeding plants.
Material selection
There are a huge number of options for making your own compost bin. You can buy a plastic container in a specialized store, you can put together a box from boards or plywood, or you can make it out of brick. It all depends on the design of the summer cottage, your imagination and financial capabilities.
Boards
How to make a compost bin from wooden planks left over, for example, after construction? To begin with, be sure to saturate the tree with an agent that prevents rotting, otherwise the compost material itself will turn into humus over time. Next, we assemble a simple structure on four vertical posts. We leave gaps between the horizontal boards for aeration. We attach a lid on top, which needs to be made in advance. For ease of use, it can be placed on hinges.
If rodents are a big problem on the site, you can attach a galvanized chain-link mesh around the perimeter of the wooden compost bin. To prevent it from entering into a chemical reaction with the compost, cover the inside of the container with greenhouse film.
Plastic
You are unlikely to be able to make a plastic compost box with your own hands, but if you have little free time and finances allow you to purchase a ready-made container, why not?
Such a composter will already have hatches for loading and unloading with convenient covers, and ventilation openings on the walls. The plastic used is usually thick and resistant to low temperatures, chemical attack and mechanical damage.
Pallets
Using fasteners, you can assemble a reliable wooden compost box from cargo pallets. The only drawback of this option is the large distances between the boards. This problem can be solved by upholstering the pit with chain-link and then covering it with film. As mentioned above, this will also protect the compost from curious rodents.
Stainless steel
The stainless steel compost container is quite durable and resistant to mold. In addition, it looks good on the site. But there is also an unpleasant feature - the ripening period of compost will be much longer than in plastic or wood.
Making a metal compost bin is very easy. Simply cut off the bottom of the barrel and make cuts in the walls for ventilation.
Brick
The option made from ordinary building bricks looks interesting: visually it resembles a barbecue area. For particularly sophisticated landscapes, a container lined or lined with natural stone is suitable.
Otherwise, the compost bin is made according to the same principles as from any other material. Aeration will be ensured by small distances between stones or bricks.
Types of environmentally friendly waste
A proper compost pit only provides useful and effective fertilizer for plants when the compost is made from environmentally friendly, natural and safe products.
The first mandatory layer is tree branches, previously sprinkled with lime, which serve as natural drainage. All other layers are chaotically located plant components:
- chopped branches of trees of various species;
- bark;
- fallen needles;
- last year's or fallen leaves of trees and shrubs;
- mown or pulled out weeds;
- peeling vegetables, fruits, berries;
- spoiled fruits;
- waste after brewing coffee or tea;
- paper waste without printing ink and foil elements;
- woodworking waste (shavings, sawdust);
- hay, straw;
- ash and other waste from wood combustion;
- chicken droppings and rotted manure.
It is advisable to sprinkle large layers of contents with a layer of soil to speed up the decomposition process.
Important nuances of composting
We figured out how to make a compost bin correctly. Now let’s briefly discuss the specifics of the fertilizer manufacturing process itself. The procedure is as follows:
- We place the components in as even layers as possible, adding a little manure or droppings between them.
- We loosen it so that air can easily get deep into the mixture. From time to time it is useful to turn over parts of the compost for the same purpose.
- If the weather is dry, lightly moisten the mixture with water. When it rains, this is not necessary.
- Do not be afraid to use special preparations containing effective microorganisms.
- During the cold season, cover the ripening compost with film. It will protect waste from rapid freezing and infection by weeds, the seeds of which are actively carried by the wind.
- Do not allow house guests or children to throw non-degradable waste into the compost.
Types of hazardous waste
For obvious reasons, it is absolutely forbidden for oil residues, plastic bottles or plastic bags to get into the garden composter.
Toxic substances that are released during the decomposition of certain inorganic elements can be dangerous to plants and human health.
Let us designate a list of those components that are taboo:
- plastic, polyethylene, rubber, synthetic, metal products;
- potato or tomato tops infected with late blight;
- animal bones;
- pits from fruit bushes and trees;
- pet hair;
- glass.
Operating principle and purpose
Composting is an aerobic (with access to air) process of rotting (re-rotting) plant and household organic waste of animal origin with the help of: bacteria; microorganisms; decomposers (bacteria and fungi that destroy the remains of living beings); detritivores (animals and protozoa that eat decaying organic matter); mushrooms; worms (vermicomposting). The end result of the biodegradation occurring in the compost pit (destruction of complex compounds as a result of the activity of living organisms) is the formation of a useful nutrient mass for plants - humus (humus).
In households, a compost bin performs two main functions: recycling organic waste and processing it into useful fertilizer. During composting, the following processes occur in the stored mass:
- the quantitative indicator of chemical elements useful for plant nutrition—phosphorus, potassium, nitrogen and others—increases;
- the content of hemicellulose, cellulose and pectin components in humus decreases, causing the transition of nitrogen-phosphorus compounds that are well absorbed by vegetation into another organic state that is not absorbed by plants;
- microflora harmful to human health that causes pathogenic bacterial diseases is neutralized, helminth oviposition is destroyed;
- the formed finished mass becomes free-flowing, its introduction into the ground is significantly simplified.
Rice. 2 Compost laying scheme
Materials for ECO compost pit
A place for collecting, “ripening” and storing compost can be made independently from a variety of raw materials:
- wooden parts;
- metal parts;
- slate;
- metal mesh;
- special geotextiles;
- universal film or polyethylene bags.
Building a box for manure and humus with your own hands
You can compost not only plant waste, but also cattle manure and bird droppings. These are nitrogen-containing substances and the primary task is to preserve them. You need to know how to properly make a box for manure or humus.
Manure is stored in two ways - cold and hot. In the first case, bedding manure is folded tightly into a pile and compacted so that less air gets inside.
Such a pile will not burn and the beneficial nutritional components will last longer. The box for the cold composting method is made airtight - the boards are nailed close to each other. The lid is also made airtight. After laying the manure, you will need to cover it with grass, soil or straw.
The hot method of storing manure requires oxygen, so the boards are placed wider. After ripening and overheating, excess liquid evaporates, the substance loses its original volume and weight.
To preserve the remaining nutrients, the humus is covered from rain and other precipitation. It is not recommended to bring manure to its extreme state, because then you will have to add mineral fertilizers to provide nutrition to the plants.
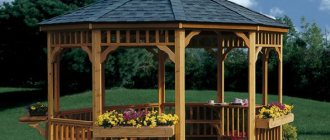
Options for ECO-humus facilities
Making compost bins is a creative and exciting process that is practiced by gardeners and gardeners everywhere.
There are many creative ways to organize space for collecting, “ripening” and storing compost.
Tips for making compost
If you want to know how to properly make compost at your dacha, follow the recommendations of experienced gardeners regarding what can and cannot be put in the composter, how to speed up the ripening process and how to ensure that the finished fertilizer brings maximum benefit to the plants and improves the structure of the soil.
What not to put in the composter
To ensure that the nutrient substrate is saturated with all the microelements necessary for plants, but does not contain harmful substances, compost must be prepared only from waste of organic origin. But you shouldn’t push everything into it; there are some restrictions.
Infographics - what compost should consist of Source vokrugsada.ru
Ready-made eco-container for humus
The finished container, made of UV-stabilized, waterproof, frost-resistant plastic, has an attractive appearance and is in harmony with any stylistic direction of landscape design.
You can buy ready-made humus containers in various shapes, sizes and colors at hardware stores.
Compost container options
The most common options for laying compost in Russia:
- homemade composters from scrap materials and household items (for example, a barrel with holes drilled for ventilation) are widely used, but are not always convenient: they have a too narrow “neck”, are not aerated enough, and do not use space optimally);
- factory boxes are good for their ergonomics, presentable appearance, strength, and the fact that they are often collapsible, but nevertheless they are not cheap;
- capital (immovable) independent buildings from excess building materials, erected in a certain place on the site reserved for compost;
- compost pits.
The last option is the most basic. It’s better than nothing, but it’s only suitable for a demanding gardener for the first time, as it’s significantly inferior to even a primitive box.
The humidity in the pit is difficult to control, it is inconvenient to get compost from its bottom, and it does not provide protection from wild animals (for example, rats). In addition, the pit will have to be covered with something to protect the substrate from rain, snow and direct rays of the sun - a tarpaulin or film can easily be blown away by the wind, and the cover will need to be made separately.
Wooden eco-container
A wooden humus container is characterized by the greatest environmental safety. You can make it yourself from scrap wood and scrap materials.
The structure should be treated with an antiseptic and painted to prevent drying and cracking under the influence of sunlight and precipitation.
There can be a huge number of different design options (open, closed, from one or several sections).
The wooden ECO-container looks very original and aesthetically pleasing, suitable for most areas of landscape design (French Provence, rustic country, Russian, ECO-style).
What about fish?
It is very tempting to compost fertilizer and animal waste (not feces!). Especially fish, they are a rich source of phosphorus and minerals. There is a way to make them unattractive and unsuitable for the feeding and reproduction of harmful organisms. This is, firstly, a household waste shredder; It is most often installed under the sink in the kitchen. Secondly, the mass from it must be immediately treated with any composting bioaccelerator (you can make it homemade) after placing it in the composter and immediately covered with a layer of plant waste from an area of 10-15 cm. In extreme cases, with soil. What is a household waste shredder and what are they, see video:
Compost ECO bin
An ECO basket for natural organic fertilizer made of metal mesh, special geotextile or dense universal polyethylene film, functional clamps and ordinary wire for fastening is an inexpensive budget option for forming a humus heap.
You can make a humus basket yourself by allocating a separate area of your garden plot for compost.
Cyclic use of compartments
A convenient option for laying compost is not in a single heap, but alternately in several compartments. In the first year, only one of them is used, after which in the spring the unprocessed top layers are transferred to the second compartment, and the finished compost (about half of the original filling) is used in the garden. The following year the procedure is repeated.
This method of composting allows you to receive fertilizer every year, without interruptions and without waiting two years before receiving the first portion.
Concreted ECO pit
A concreted humus pit is a costly, costly and labor-intensive option. The pit is formed below the soil level, filled with concrete or lined with brickwork, so it is much more expensive than previous options.
It should be taken into account that the concrete structure must have holes that will provide access to the soil and earthworms.
Initial conditions
Modern knowledge and methods of its application allow a bunch of waste, which rots into compost biochemically in the same way, to be decorated, if not beautifully, then at least acceptable to the eye, compare on the left and right in the figure:
Compost heap as it is (left) and in technical and decorative design (right)
However, aesthetics are the last thing in composting for fertilizer, and the following is more important:
- Dimensions of the plot;
- The presence of adjacent neighboring and nearby objects susceptible to contamination;
- Land use order on the site;
- Composition and quantity of waste to be composted.
Based on these factors, firstly, the composting method is selected - fully or partially anaerobic or aerobic, using biological products for composting waste or naturally. Secondly, the construction of a waste composter:
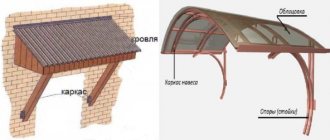
Construction of a container for composting waste on the ground surface
- A hole buried below the humus layer.
- A pile or partially buried container on the ground surface, see fig. on right.
- A leaky box or other container that does not have direct contact with the ground.
- An airtight container for quick preparation of compost using special biological products.
The latter type of composter cannot be built independently. But a non-hermetic composter is easy to make on your own and almost always without additional costs. But first, let’s take a brief look at what it’s worth and the labor to save, i.e. buy ready-made.
Make or buy?
Possible options for purchasing a composter for a private household are shown in Fig. below. Pos. 1 – sealed container for continuous anaerobic composting using biological products. Provides a portion of compost ready to be added to the soil in less than a season; perhaps 2-3 times a season. Capacity – up to 600 kg of raw materials. Prices for devices for 200-300 kg are 9-15 thousand rubles. Raw materials cannot be added continuously. Each load requires refilling with an expensive drug.
Ready-made composters for composting organic waste for fertilizer and humus
Pos. 2 – box for staged and continuous composting (see below). It is ineffective for anaerobic composting, because leaky. Partially anaerobic requires manual labor - mixing the ripening mixture. Capacity up to a ton or more, prices - 3000-5000 rubles. Pos. 3 – ventilated box for partially anaerobic stage composting. The capacity is also up to a ton or more. Does not require heavy manual labor for care (see below). Prices – approx. 2000 rubles, but you need to buy 2 (for composting with biological products) or 3 pcs. for natural. True, the costs are not one-time, but spread over the years. Compost from both cannot be added to the soil at once, see below.
Note: about raw materials for aerobic composting and composters for it, see below.
How to calculate volume
The capacity of both a ready-made and a home-made composter is taken based on the fact that one adult, permanently living on the site, provides raw materials of approx. for 150 kg of finished compost. The volume of compost from compostable plant waste can be approx. 10 kg per hundred square meters. In total, for a personal plot with a family of 4 people you need a composter of approx. by 800 kg. It’s better to take it per ton – partially filling the container does not affect composting. If compost is prepared in stages, each section should have such a container, see below.
Slate ECO-brut
The slate ECO composter is a simple and convenient option using remnants of universal roofing materials, which are fixed on boards.
A slate-lined compost heap is ideal for the oxygen or aerobic method of producing natural organic fertilizer.
Slate ECO-brute can be stylized to suit such trends of landscape design as loft, minimalism, hi-tech.
Composter size calculation
Before starting work, it is necessary, of course, to decide on the dimensions. It is believed that humus matures completely in two years. Accordingly, it is necessary to estimate how much garbage suitable for putting into the device can accumulate during this time. If there was already a compost heap or bin on the site before, this is easier to do. If not, you should calculate how many times a week/month garbage is thrown out, what percentage of this garbage is suitable for putting in the composter and what is the volume of the trash can/bag.
For example: in a private house during the warm season, garbage is thrown out every day, the volume of the bucket is 10 liters. Organic waste accounts for 80% of this volume. In winter, garbage is thrown out every two to three days, the volume of organic matter in waste is 60...50%. Accordingly, we take as an average 7 liters per day and a half.
(365/1.5)x7=1700 l.
Considering that garbage is not water, and one cubic meter contains not 1000 liters, but approximately 700...800 (taking into account compaction and different sizes of waste), we assume the volume of the composter is approximately 4...5 cubic meters. This volume will give a box with sides 2x2x1 m (4 cubic meters) or 2x2.5x1 m (5 cubic meters).
Natural soil ECO pit
A natural open-ground pit is the most inexpensive and widely used option for a compost pit, which allows products to decompose faster.
It is very convenient and practical when the compost ECO heap, pit, container, box or basket is located directly on the plot.
The choice of structure design depends on financial capabilities and specific preferences. Opt for natural organic fertilizers that can be obtained from plant waste.
Slate box
This option often turns out to be the most budget-friendly. In addition, if you wish, you can easily find a drawing of a slate compost bin and step-by-step photos of the assembly process on the Internet.
Advantages of the material: it does not rot, it is convenient to segment and process. The disadvantage is fragility, so the walls are usually mounted on a support made of boards.
We offer this method of creating a compost box with your own hands:
- mark the space for the proposed box;
- make recesses in the corners, install vertical supports;
- between the posts you secure prepared boards of the required length;
- Mount slate sheets on the boards. Holes in the sheets are not needed; it is enough to fasten them not tightly, with gaps.
Photo of compost pit
Please repost

Advantages and disadvantages of compost
Compost has the following benefits:
- availability;
- can be done on a plot of any size;
- replaces all types of organic, mineral fertilizers;
- contains a large amount of useful substances;
- It loosens the soil well, unlike other fertilizers.
Minuses:
- long cooking;
- contains little nitrogen - special additives help solve this problem.
Compost contains nutrients necessary for normal growth
Additives for compost pit
Feedstock for creating organic fertilizer: which components should not be added
Any plant or food waste can be used for composting, but it must be limited, understanding that:
- fresh feces contain helmite eggs. To destroy them, microbial treatment is required - exposure to air for about a year;
- thick branches and bones will not have time to decompose during composting by microorganisms;
- plants treated with chemicals will be harmful: they will change the composition of humus not for the better;
- Potato and tomato tops affected by late blight will become the cause of infection of garden crops in the future;
- Grass mowed with seeds will serve as a source of weeds. But if you plant it for the next season after winter, the seed pods will most likely open up and become empty. In addition, birds and various rodents will work on them.
Naturally, any garbage of inorganic origin, and this is plastic, polyethylene, synthetic materials, rubber, will simply clog the prepared fertilizer.