If the main tools of a blacksmith are a hammer and an anvil, then for a carpenter there is nothing “more familiar” than his workbench. For people who work with wood, it can at the same time be a cutting platform and an assembly table, a stop and stand, a device for storing tools and even, if you want, a small carpentry machine, and sometimes a means of earning money. This article tells you how to make woodworking tables with your own hands. The instructions, photographs and drawings presented in it will help even a beginner to install this structure.
Osya member of FORUMHOUSE
First of all, after building a workshop, you need to make yourself a table. A table like a workbench, essentially. This is a table for work - fitting, assembling small things made of wood (stools, shelves, etc.). I'll call it an assembly table.
In fact, the second name for a workbench is an “assembly table.” But, as you already understand, its purpose goes far beyond assembly operations. Therefore, the design of a multifunctional workbench in a carpentry can be quite intricate (see drawing below), and its development (in the absence of experience) can be spent as much time as it takes to design the carpentry workshop itself.
What materials can it be made from?
A homemade computer table has a number of advantages over purchased furniture:
- It can be corner, hinged or regular
- Its dimensions will be ideal for the room
- It can be made from any materials
- This is environmentally friendly furniture
- It's always nice to make it yourself
A computer desk must combine many functions.
The cost of the product and its appearance depend on the material. The materials may be different: MDF sheets. This is a classic option.
You can choose any color of wood for the table.
The MDF material looks aesthetically pleasing and resembles wood. It is easy to process and reliable to use. MDF can replace other particle boards: chipboard or laminated chipboard.
Chipboard is one of the most popular materials for furniture.
Plywood. This material is the cheapest. However, it is the least reliable. Plywood is well suited for a country table.
Plywood is cheaper than wood, but less durable and strong.
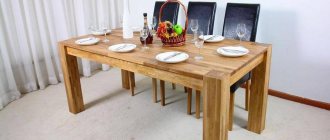
Natural wood slabs. Solid wood furniture looks noble and luxurious. This is the most environmentally friendly material. However, it is very expensive. Another disadvantage is its heaviness.
Natural wood has been used to create furniture for many centuries.
Types of circulars
According to the method of performing the work, circular saws are divided into two types:
- Stationary;
- Hand tools.
Each type has its own characteristics, advantages, and disadvantages. The main difference between a stationary machine and a hand tool is the object of movement. On a stationary machine, the sawn material is moved along the saw blade; the hand tool is moved along the stationary workpieces.
A circular saw is chosen depending on the type and amount of work performed. To make a shelf for books, a stool, or a flower stand, all you need is a hand saw.
For mass production and sawing of long, dimensional workpieces, a stationary installation is used. Many experienced craftsmen have both types of circular saws at their disposal.
Drawings and diagrams of computer desks with dimensions
When the question arises of how to make a computer desk with your own hands at home, you should first of all think about the types of these products. This will help you choose a general project and create high-quality drawings, which will greatly simplify your work. The details will subsequently be cut out from them.
There are different types of computer desks:
- Classic
- Corner
- Mounted
- With top shelves
The table must be made exactly following the drawing.
The classic version is a regular rectangular work surface with solid side legs, a pull-out keyboard shelf, drawers and a compartment for the system unit. The length should be from 80 to 150 cm. Depth – 65 – 70 cm. Normal height – 75 cm. If a person’s height is larger than usual, then the height is calculated using the formula: human height X 75/175.
Making a drawing of a table is not difficult.
The drawings for this model are the easiest to complete - just measure the desired length and width of the product. Once the dimensions of the tabletop have been determined, you can draw out the dimensions of the remaining compartments.
Make sure you have all the necessary tools available.
Important! The product should be 3-5 cm less than the occupied space. Otherwise, it will be inconvenient to install the furniture in the designated place.
You definitely need to check that you have worked out all the details and haven’t forgotten anything.
The model with top shelves is similar to the classic one. But it has shelves built above the work surface. This option is very convenient for small spaces, or for installation in the play area of the family room or next to the kitchen table.
Use quality materials to make the table.
You can install a printer, books, or put necessary things on the top shelf. Here they will always be at hand. Making a drawing for this model also begins with determining the dimensions of the tabletop. After this, the dimensions of the sidewalls are determined.
Prepare all the parts to assemble the table.
Their width should be equal to the width of the table, height 160-180 cm. At this height you can place 1 or 2 shelves for small items. At the bottom there is space for the system unit. For convenience, you can place a couple of drawers or shelves.
A corner table will be more difficult to make.
Corner products come in two types. The simplest option is when a person is positioned perpendicular to one wall and parallel to the other. This is the most convenient model, but it takes up more space in the room. The working space of such a product consists of two rectangles connected perpendicularly. On one side there will be a monitor and keyboard. On the other hand - a printer, papers, and small items.
After preparing the drawings, it is necessary to calculate the required material.
When making a drawing, the dimensions of the main tabletop where the monitor will be located are first determined. Then the dimensions of the additional working surface are determined. After this, the sidewalls and the bottom support in the corner are created.
Advice. The most convenient option is when two tabletops are located one above the other. The main one is slightly higher, the additional one is 15-20 cm lower. At the same time, an additional shelf appears in the corner between the parts.
Important! For comfortable working conditions, the length of the free edge of the working surface should be 80-100 cm.
You can choose any material for the table top.
Another model of a corner table requires the user to sit diagonally in the corner. This is the most difficult option to manufacture. To create this drawing, you first need to determine the size of the side parts and then, relative to the size of the sidewalls, calculate the size of the tabletop. The working diagonal should be 60-70 cm long. The depth of corner furniture should be 80-85 cm.
The legs can be made of metal.
The suspended version assumes the absence of legs. In this case, the tabletop is attached directly to the wall. Typically this option is used for country houses. This model is placed in a corner, attached to both walls using furniture corners.
The table may have no legs.
Advice. For convenience, a separate stand should be provided under the screen, which will be located 7-10 cm above the tabletop.
Construction of a carpentry workbench
Despite its simple appearance, the carpenter's table has a very complex structure, since any inconspicuous detail here carries a number of important functions.
Traditionally, woodworkers worked with hand tools, so to work with electric tools, the worktop must be modified to suit your needs.
Main elements of the workbench:
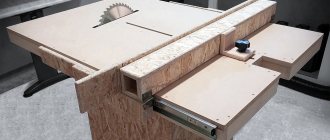
- Base or bed. This element is also called the underbench. This is a support made of thick timber or metal. As a rule, it is a frame that has additional drawers or crossbars. It must support a heavy structure with a tabletop, tools and wood for processing. The drawers and frame elements are connected to each other with wedges and glue. The construction of a carpentry workbench is simple, but requires careful design, calculation of dimensions and the correct choice of material.
- Tabletop. It is also called a workbench board. It is made from thick boards. As a rule, the thickness of the board is 6-7 cm. This is necessary to withstand the weight of tools, workers and heavy blows to them. The table top has the necessary grooves, holes, holes or clamps. Each master places them at his own discretion.
For a home workshop, it is most convenient to make a stationary wooden carpenter's workbench with a base made of metal or wood. - Vices, clamps. The workbench should have at least two clamps on both sides. The clamps are made of wood, since it will not deform the material of the products. The maximum number of clamps is not limited. If you plan to work with parts of different sizes - for example, small items and large boards, then there should definitely be several clamps. At the same time, they should be located on opposite sides of the tabletop so as not to interfere with each other. All types of work tables known to us originated from the carpenter's workbench.
- Shelves for tools and additional stops. They are located under the tabletop. It is important to place shelves for tools so that they can be easily reached with one hand without leaving the table. That is why it is convenient to place them below, and not in the closet nearby.
Instructions for making a table with your own hands
After creating the drawings and cutting out the parts, you can proceed directly to assembling the furniture. It is important to first prepare all the small components, such as furniture corners and guides for the retractable surface for the keyboard and the necessary tools.
Follow the instructions for assembling the table.
Step-by-step instruction:
- Round the corners of all parts. On the sides, cut out the corners for the baseboard.
- Using furniture corners, fasten the main parts: table top, sides and back part.
- Check how comfortable a person feels at the table and how the furniture is installed in the designated place.
- If everything is in order, then you need to tighten the screws in the furniture corners more firmly and continue assembly.
- Turn the product upside down. First, additional vertical parts are attached, after which shelves, guides for drawers and a pull-out panel are installed. Special legs are screwed onto the bottom to protect the floor from scratches.
Finishing
The table should have an attractive appearance, which is ensured by the finishing. First of all, the end is processed . To avoid scratching on a sharp edge, it is recommended to remove a small chamfer.
The end itself is ground to eliminate the risk of splinters. The entire surface of the tabletop is also processed. It should be perfectly flat, horizontal and smooth.
Important : the most common finishing methods are painting and varnishing.
After sanding the surface, the wood can be impregnated with tinting compounds that will create a specific shade and emphasize the wood structure. A layer of varnish will seal the finish. With the help of alkyd paints, you can provide almost any color of furniture for combination with other interior elements .
Another common option is self-adhesive film. It is often used to finish chipboard countertops. With its help, you can imitate various natural materials - wood, natural stone, marble, metal, etc. Inlay or veneering adds special sophistication to the table.
Advice : if the issue of free space is acute for you, also take a closer look at the designs of a folding table, a laptop table, a coffee table and a children's table.
How to decorate a table
To create coziness and make the furniture original, it can be decorated with additional decor. Table decoration methods:
- Drawer fronts can be decorated using decoupage technique
- Place original fittings on the drawers
- The tabletop and side surfaces can be painted with oil paints and varnished on top.
Show your imagination when creating a table.
Tools
When making a wooden table with your own hands, you should prepare the following tool :
- electric drill;
- Bulgarian;
- plane;
- screwdriver;
- hacksaw for wood and metal;
- hammer;
- screwdriver;
- chisel;
- files of different sizes;
- paint brush;
- Grinder;
- construction knife.
If using plywood, you will need an electric jigsaw . Grinding and emery cloth are used to treat surfaces. Measurements and quality control are provided with a tape measure, metal ruler, caliper, plumb line and building level.
Models of ready-made computer desks
Classic model. It's the easiest to do. It is suitable for a school student. Dimensions: length 150 cm, depth 65 cm, height 75 cm. The product has an additional lower shelf for the block system on the right and several drawers on the left.
A gaming computer desk is a work of art.
Compact model with top shelves. The product is suitable for small rooms where space is very limited. Dimensions: length 85 cm, depth 65 cm, working surface height 75 cm, product height 170 cm. The model has a compartment for the system unit, above which there is a small shelf, 30 cm wide. There are two shelves at a height of 150 cm and 170 cm.
If the table is intended for working with a laptop, you can make additional shelves instead of niches where things will be stored.
Corner table with top shelves. This option is more suitable for an adult who works at home. Dimensions of one side: length 150 cm, depth 65 cm, height 75 cm. Dimensions of the second side – length 75 cm, depth 65 cm, height 75 cm.
A standard computer desk only has drawers at the bottom.
The upper shelves are secured using additional side parts, which are screwed separately. Between them, at a height of 10 cm from the working surface, there is a stand for the monitor. There are 3 drawers on both sides of the table. The option is very spacious.
A handmade desk is no longer just furniture, but a part of you, albeit inanimate.
How to paint garden furniture
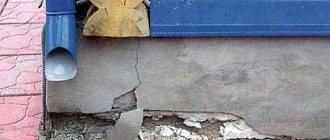
Since the garden table will be located in the open air, it will be exposed to increased moisture and sudden temperature changes.
The tree will also be susceptible to attack by pests. You can extend the life of your country table using various impregnations, paints, and varnish .
It is recommended to paint the table not only to add aesthetics, but also to extend its service life.
To do this, you should use special paint for exterior use .
Advice . Life in the country can be made even more comfortable by making a gazebo table or folding table.