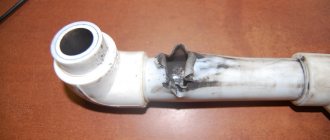
Over the weekend I redid the heating and moved the expansion tank into the attic. The old one was made from a plastic canister into which a special brass adapter was screwed so that a pipe could be connected, I don’t know what it’s called correctly, in order to screw the brass adapter into the canister I had to cut a hole like this (see photo below), at first the heating was imperfect and somewhat since my system boiled, so the canister from under the primer began to leak a little, this is clearly noticeable, but nevertheless, for two winters the canister faithfully served as an expansion tank.
This canister was hanging in an unfinished room and confused me, I had long wanted to take it out into the attic, and suddenly I came up with a way to make a hole in the canister and attach a brass fitting without cutting a huge hole for a hand to insert it from the inside. We take a canister from under the primer, I took 10 liters, this is enough for my heating with a reserve:
We make a hole in the right place, I made it just above the bottom, so that if suddenly some debris gets in, it won’t get into the heating system and will simply settle to the bottom. The hole is easily made using a utility knife; I periodically check whether the fitting fits in and cut off the excess.
Now there are two holes in the canister, one standard and the second made by me, we insert a piece of wire into both, and the fitting slides along it directly to the hole made
I push the fitting into the hole, put on the rubber gasket
I put on the nut and tighten it, the expansion tank is ready
My heating tank is connected by a piece of rubber hose with clamps, but you can solder an American pipe to a plastic pipe and connect it more thoroughly, but as my two years of experience have shown, it’s quite reliable.
After moving the tank into the attic it looked like this:
Heating equipment
The expansion tank compensates for the increase in the volume of heated coolant, reducing the pressure in the wiring. Therefore, such a unit must be present in both open and closed heating systems. Moreover, you can even make a tank for a closed system with your own hands, using homemade or ready-made containers.
Purpose of the expansion tank for the heating system
The coolant (this is water) circulates throughout the system continuously and this movement occurs because there is pressure inside. It is created under gravity or forcibly if an electric pump is connected. In any case, the heating system cannot be considered complete if there is no expansion tank.
It can be of 2 types:
- Open.
- Closed or sealed.
An expansion tank is simply necessary in a water heating system, because when heated, the liquid tends to increase in volume. There is more water and the pressure in the system increases. Sometimes the pressure can be so strong that the system cannot withstand the load. But nothing can be done with water, because it cannot be compressed. If you install a heating system without an expansion tank, the water can rupture the pipes. To prevent this from happening and to ensure that the pressure in the system remains stable, it is necessary to install a container so that this reservoir compensates for pressure drops when heating the water. This is the expansion tank. It turns out that without this reservoir the heating system cannot operate fully.
An expansion tank can be purchased at a specialized store or made independently.
Main functions of the expansion tank
The first and main thing that the expansion tank must cope with is:
- Stabilize instrument readings (pressure gauge) by compensating for the expansion of liquid in the system.
- Remove air from the system.
- Accumulate hot liquid.
Before you start making an expansion tank, you need to find out how it copes with increased loads. When the liquid in the system heats up, it increases more than we would like. The excess of this liquid must flow into a separate tank, then the operation of the heating system will be stable. It is into this reservoir that the excess heated liquid enters. When the water cools down, it flows back into the heating system. If the tank is sealed, then the membrane handles this part of the work, and in an open system, by gravity the water cools and returns back to the circuit.
Thanks to the expansion tank, the water in the system always remains in the same amount, as well as the pressure. This is the main task that the expansion tank copes with. There are also auxiliary functions that this tank can also handle - removing air pockets. Therefore, it is best to install the tanks at a high point in the system with a slight slope so that the water helps push the air upward.
Connection rules and possible difficulties ↑
How to install an expansion tank? Installation of the expansion tank is carried out according to the project, according to the instructions. It is best, of course, to entrust this matter to a specialist or, at least, to consult with knowledgeable people. There is a great risk of making a mistake that will have to be corrected, spending additional time and money.
In open heating systems, open expansion tanks are used with a threaded connection in the bottom necessary for connection to the system. They are installed at the highest point of the heating system, which is determined by the elementary laws of physics, and is necessary to ensure that water does not spill out of the system. This type of system is now uncommon, since installing an expansion tank of this type is not always convenient.
In closed-type heating systems, closed-type expansion tanks are used, which are divided internally into two parts. On one side, a heating system is connected to it, and on the other there is a valve that allows you to regulate the pressure: bleed off the air, or, on the contrary, pump it up. Initially, the entire internal volume of the tank is filled with gas, which is under excess pressure. This value needs to be adjusted.
Installation of the expansion tank is carried out according to the project, according to the instructions
Connecting a closed expansion tank can be done almost anywhere in the system, except that you should avoid tapping directly after the pump to avoid surges in the heating system. The principle of operation is simple - when the coolant is heated, it expands, the excess fills the space in the membrane tank, which prevents the pressure in the system from increasing. When the temperature drops, the missing liquid is squeezed back into the system.
It is best to install a membrane expansion tank next to the boiler, connecting it to the return pipeline in front of the pump. The fastening must be strong, since during operation its weight increases significantly as the tank is filled with water or other coolant that circulates in the system.
Several general recommendations can help when installing an expansion tank:
- in the immediate vicinity of the fastening point, the connection diagram for the expansion tank must provide for the installation of a safety valve and pressure gauge;
- It is not allowed to install filters and install valves on the branch that connects the heating system and the tank;
- shut-off valves are connected;
- The tank must be connected taking into account the prospects and ease of its maintenance.
An expansion tank is a necessary and important element of heating systems of both closed and open types. At the stage of choosing an expansion tank for your own home, you need to make sure that you have a quality certificate. It would be a good idea to familiarize yourself with the safety certificate, since the heating system is an important element of comfort and life support.
With this approach, one can hope that the selected expansion tank will be functional, reliable and durable, which is important for a thrifty owner
How to make an expansion tank for heating with your own hands
It is very difficult to make a sealed tank at home. As experts say, it is better to pay and buy a quality item than to make it yourself.
But if you have a great desire, then you can make an expansion tank for the heating system with your own hands:
- First you need to make a body or frame. It must be made of 2 metal parts;
- a flange must be attached to each part to screw the membranes and connect both halves;
- there will be 2 chambers inside - air will enter into one, liquid will accumulate in the other. Both halves should not be interconnected, otherwise nothing will work;
- you need to insert a pipe into one of the parts to allow excess liquid to flow in, and insert a nipple into the second part to regulate the amount of free air in the system (to bleed air);
- the body should be metal, but the membrane should be rubber. It must be installed between the two halves of the chamber, and the flange must be bolted together. We remind you once again that absolute tightness must be observed;
- All that remains is to install the tank in place, turn it on to the heating system and check the operation;
- and another very important thing is that the pressure in the tank must be adjusted individually, according to the parameters of the boiler.
Plastic tank
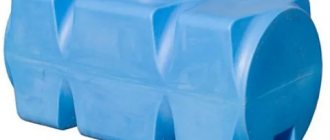
Here you just take a plastic container. A 10-40 liter canister or a regular 10 or 12 liter bucket can serve as a tank. A more preferable option would be a rectangular base.
For it you should purchase a threaded fitting with a thread for two bends and a rubber washer according to the diameter of the fitting, as well as two nuts for the diameter and pitch of the thread of the bends.
Then one of the ends of the fitting is heated over an open fire with a blowtorch, gas cutter or gas stove, and with this heated fitting, the bottom of the canister, bucket or some other container intended for the expansion tank is burned. After this, you should cut off the top of the product and burn three holes using a nail heated over an open fire. These holes are made in a triangle and serve to attach the tank to the wall.
Now you should equip the bottom of the product with a fitting. For this purpose, a nut is screwed onto the drive, and it itself is inserted into the hole. From the inside of the tank container, put a rubber sealing washer on the thread of the outlet and screw on the second nut, tightening it tightly. The purpose of this second nut is to tightly fix the rubber to the bottom part with emphasis on the second nut located on the outside.
The last stage of work is to mount the container higher, somewhere under the ceiling. For this, dowels or self-tapping screws are used. They are inserted into holes pre-burnt with a hot nail or drilled in plastic. This mounting method is suitable for mounting a 5-liter container, but for its 10-liter sample, you will need to build a shelf.
Making an open expansion tank for heating with your own hands
You can make an open type expansion tank with your own hands. Not so long ago, when not many people knew about installing individual heating, there was no talk about an expansion tank - it was attached at the last moment from what came to hand. A large diameter flower pot or any suitable container was used as a tank. Today, an expansion tank can be purchased in a store or you can make an open-type expansion tank with your own hands. This is much easier than making a closed tank.
- marker;
- ruler;
- Metal sheet;
- Bulgarian;
- basalt wool;
- welding machine;
- gloves and other protective equipment.
How to make a tank:
It is better to make the tank from stainless steel, then the tank will last for many years. If there is no such material, then use any metal.
- We make the markings: the dimensions of the tank depend on the length of the heating system circuit. If this is a standard, then you need to cut 5 squares measuring 30 by 30 or 30 by 40 cm. These are the walls for the tank and the bottom.
- The workpieces must be assembled, placed at right angles and welded with a welding machine.
- The design is ready, you need to drill a hole in the bottom of the tank to insert the pipe. Through it, water from the system should flow into the tank. The pipe must be connected to the heating system (looped).
- It is advisable to insulate the expansion tank, because often the highest point of the circuit is in an unheated room in the house (the attic). Therefore, it is necessary that the expansion tank be insulated so that the water in it does not freeze. You can use any insulation, for example, basalt wool. It is resistant even to the highest temperatures.
- You need to be prepared for the fact that in an open tank (open circuit) the water reaches the boiling stage. Therefore, when choosing insulation, take these nuances into account.
DIY expansion tank for heating. Photo
Characteristics of plastic
Durable material is very demanding in terms of operating conditions. Installation errors or an uneven installation surface can lead to changes in the geometry of the tank. Impacts and careless use cause deformation, which leads to damage.
A small crack on the bottom or side gets larger under water pressure. If you don’t know how to seal a plastic tank, the tank will fall apart. Small containers are easier to buy. I can’t always find voluminous, oversized or exclusive models on sale, so I prefer to repair them.
Source greenera.com.ua
Before sealing the tank, I advise you to understand the type of plastic. Tanks made of low-density polyethylene can be identified by the “PE-HD” marking. Very hard raw materials are resistant to inorganic and organic matter. Due to the preservation of characteristics in the temperature range from -50 to +80 C, it can be used both at home and outdoors.
Water storage containers can be made of polypropylene (PP-H). The strong material does not break down under the influence of household chemicals and is highly resistant to tearing. Due to its resistance to UV rays, the liquid inside does not deteriorate, which allows you to store moisture for a long time.
Source polipro.kz
Tanks made of polyvinyl chloride are easily recognized by the “PVC-U” marking. The tanks operate in a temperature range from 0 to +60 C, so I do not recommend leaving the tanks outside in cold weather. The raw materials have high resistance to aggressive and oxidizing environments, which preserves the hardness of the containers.
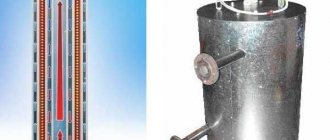
DIY expansion tank from a canister
Metal makes a reliable and durable structure, but not everyone knows how to work with this material, so we suggest you read the step-by-step instructions and learn how to make a tank from a canister:
- We immediately draw the reader’s attention to the fact that a plastic canister will not last long, a maximum of 2 winters. Therefore, although this option is fast, it is not durable. In any case, the time will come when you have to replace the old tank with a new one.
- You will need a canister with a volume of 10 liters; there is no need to cut a huge hole, but in the lower part, closer to the bottom to the right, we cut out a neat hole. This can be done easily with an ordinary construction knife. Check whether the fitting fits well into the finished hole; if not, then you need to cut off a little more excess plastic.
- The canister has 2 holes - the first is factory-made, the second we made at the bottom. You need to insert a wire and a fitting into both holes so that it slides along the wire directly into the lower hole.
- You need to insert the fitting and install the rubberized gasket, then the nut and tighten the thread thoroughly.
- You can connect such an expansion tank to the heating system using a piece of rubber hose (install clamps) or take a piece of plastic pipe and make the structure solid.
DIY expansion tank. Photo:
Glue BF
I advise you to seal polyethylene containers with BF-4 or BF-2. The products dissolve the top layer of plastic, thereby improving adhesion to patches. Before restoration, I carefully remove any remaining damage, leaving smooth edges without creases. Degreasing ensures maximum adhesion of the adhesive to the polymer.
Source dnepravtokraz.com.ua
As patches, I take pieces of fiberglass that are 3-4 cm larger than the crack. I fill the flaps with liquid BF. I slightly warm up the area of the breakdown using a blowtorch or a hair dryer, apply the polymer to the hole and seal the tank. After 4-6 hours you can add water.
Purpose and types
In a heating system, the temperature of the coolant constantly changes, which leads to changes in its volume. It is known that liquids expand when heated and contract when cooled. The expansion tank for heating is precisely designed to absorb excess liquid during heating (expansion) and return it to the system when cooling. Thus, it maintains stable pressure in the heating system.
Heating expansion tank painted red
Open type
There are two types of expansion tanks: open and closed. Open type containers are usually used in gravity systems (with natural circulation). It is called this because it is a non-sealed container. This could be a barrel, a pan, or a specially welded tank. In order for the coolant to evaporate less, a lid is installed, but the container itself is not airtight. The principle of operation of an open expansion tank is simple: it is a container into which excess coolant is forced out when the temperature rises and is supplied back when it cools.
Open type expansion tank - any container, for example, a plastic canister
When calculating open-type tanks, take a significant reserve in volume: you can add coolant and not check its level for some time. The container is not airtight, so there is constant evaporation of liquid and a supply will not hurt. If there is a lack of coolant, air will enter the system, which can stop it. The consequences can be sad - if the boiler’s automatic system works (if it has one), there is a possibility of defrosting. If there is no automation, the boiler may rupture due to overheating. In general, this is the case when the stock is really justified.
If the heating system is filled with water, you can make an automatic replenishment based on a float from the toilet cistern. The principle of operation is exactly the same: when the level drops below a certain point, the water supply opens. When the required level is reached, the supply is shut off.
Expansion tank for open type heating with float
The advantage of this solution is that there is no need to control the amount of coolant, the possibility of airing is minimal. The downside is that you have to pull the water pipe. Since open systems usually operate on natural circulation, the expansion tank for heating is placed at the highest point of the system. Very often this is an attic, so the route turns out to be long.
And these are not all possible emergency situations. Floats sometimes do not shut off the water supply. If this happens to the toilet, the water simply runs into the drain. In the case of heating, water will flow into the attic, flooding the house... To avoid such a situation, it is necessary to control the overflow. In the simplest case, it is a pipe welded/attached at the required level with a hose connected to it. The hose can be led into the sewer, but then you also need to come up with an overflow alarm (at the same time, the level will drop below critical). You can simply lead the hose a meter away from the house or run it into the drainage system. In this case, “traces” of overflow will be visible and it will be possible to respond in a timely manner without an alarm. So an open expansion tank for heating requires some retrofitting.
Epoxy adhesive
The resin-based product quickly hardens under the influence of hardeners, forming a dense polymer layer on the surface. If a plastic tank is sealed with epoxy, the raw material will provide good adhesion to the smooth wall. The inert composition of the chemical is resistant to aggressive environments and will not collapse under the influence of moisture.
Source sdelai-lestnicu.ru
Before sealing the plastic tank, I degrease the damaged area. For restoration, I cut off a piece of glue, which I knead in my hands until smooth. In terms of plasticity, the material resembles clay or plasticine. I make a small cone out of the mass, fix it in the hole and leave it to dry for 1-2 hours.
If you need to seal a plastic tank without draining the water, I recommend using two-component Contact glue. The product hardens upon contact with liquid and quickly restores the altered shape of the tank. The plastic mass is ready for use in 3 minutes, and polymerization takes place within half an hour.
Source hobbirukodelie.ru
Determining the volume of the expansion tank and its selection
For normal heating operation, the expansion tank must have sufficient volume. There are two ways to determine it: you can calculate it using a formula, or you can use empirical data.
The volume of the expansion tank for heating is selected for each system
Empirical path
Let's start with the empirical method. Based on operating experience, it was concluded that if the volume of the expansion tank for heating is about 10% of the total volume of the heating system, this is sufficient. The question is how to determine the volume of the system. There are at least two ways:
- Count when filling (if it is filled with water and there is a meter, or when filling with coolant from canisters, you will know exactly how much liquid was pumped in).
- Calculate by volume of system elements. You will need to find information about how many liters fit in one meter of pipe, in one section of the radiator. With this data you can already find out the volume of the heating system.
Coolant volume in pipes of different diameters
Knowing how many liters of coolant are in your heating, it is easy to calculate the required volume of the membrane tank - it should be at least 10% of this figure. In the case of an open type tank, the actual volume can be at least doubled - there is less chance that the tank will be empty. At a minimum, you should add half - you will still underfill it by at least 1/3.
A membrane expansion tank for heating is usually taken without overestimating the calculated figure. The fact is that the larger the capacity, the more expensive the expander costs. And the price increase is significant. However, you should not take a smaller one - the pressure will “jump”, which will lead to early wear of components or even shutdown of the system. It is most likely that the heating will fail in cold weather, because in cold weather the coolant is hotter, which means its volume is larger. And it is at these moments that the volume of the expansion tank may not be enough. If you notice such symptoms and the calculation confirms that your membrane tank is of insufficient size, it is not necessary to change it to a larger one. You can put a second one. It is important that their total capacity is not less than the calculated value.
If there is antifreeze in the system
Heating antifreeze has greater thermal expansion than water. Moreover, different brands have different characteristics. Therefore, for this type of coolant, it is advisable to pre-calculate the volume of the expansion tank.
There are two ways: determine how for water, make an adjustment for greater thermal expansion. It depends on the percentage of ethylene glycol (antifreeze). For every 10% glycol, add 10% volume. That is:
- 10% ethylene glycol - must add 10% of the found volume of the water tank;
- 20% ethylene glycol - add 20%, etc.
This calculation is usually justified, but more accurate figures can be found using the formula (shown in the figure).
Formula for calculating the volume of an expansion tank for a heating system
Once you have decided on the volume, it's time to buy an expansion tank. But in the store they are in different colors. At a minimum, there are blue (cyan) and red. So, the membrane expansion tank for heating is always red . Blue ones are for plumbing, and for cold water. They are much cheaper, but the membrane there is made of rubber not suitable for high temperatures. So it will not last long in the heating system.
Tank Installation Guide
Fastening the expansion tank
Fastening the expansion tank
The first stage is preparation for work. In accordance with the general scheme, first, to install the tank, you need to disconnect the heating boiler from the power supply, shut off the water supply to the boiler, and then drain the liquid from the radiators. Additionally, you can open the so-called. Mayevsky taps, thanks to this, more efficient and faster drainage of water will be ensured.
Mayevsky crane
Prepare your expansion tank for installation and further use. If you plan to use polypropylene pipes to connect system elements, prepare a special soldering iron to fasten them together. You will also need standard elements such as corners, couplings, etc. As for fittings, it is best to use “American”. Such a fitting will allow you to easily remove the container in the future for maintenance and repair work.
American fitting with internal thread
The American fitting consists of 2 main elements. The first part of such a fitting must be attached to the thread on the expansion tank. The second part is attached to the first. A polypropylene pipe is soldered to the second part. Before screwing the fitting to the expansion tank, wrap a sealant around the threaded connection (flax is usually used) and additionally apply a little special sealing paste. Screw on the first part of the American fitting using a regular gas wrench.
The second stage is laying polypropylene pipes. Make sure that all water has been drained from the system and proceed to install the pipes. Where the tee will be installed, the pipe is cut using special scissors. Solder the tee and a pipe to it. Next you need to solder the stopcock. Thanks to it, it will be possible to repair the tank in the future without the need to remove water from the system. Solder the polypropylene pipes so that the last of them can later be connected to the expansion tank.
Installation of polypropylene pipes
The third stage is connecting the expansion tank. You need to screw the American to the container. After this, feel free to proceed with placing the tank in the location chosen for it. It is best to install the tank in a corner, on a flat floor, in such a place that you can freely access the tank in the future for repairs, etc.
The fourth stage is checking and replacing filters and cartridges. Before you run coolant into the pipes, thoroughly rinse the cleaning filter with water. Remove it first. At the same time, replace the main filter cartridge. It is installed directly after the pump.
The fifth stage is preparing and launching the system. Once all the elements are in place and the required connections have been made, you can begin preparing the tank for use. Restore water supply. Let the batteries fill with liquid until the pressure level in them increases to approximately 1.3 kPa. Next, you need to bleed the air from the pipelines, turn off the Mayevsky taps and start the heating equipment to warm up the rooms.
Tank installation
Recommendations for bleeding air and optimal pressure values were given earlier. If the pressure level rises above 1.1 kPa (this is the value that was set when setting up the tank), excess water will flow into the tank. When the pressure level decreases, the coolant will flow into the batteries. This will ensure normal operation of the heating system.
Thus, there is nothing super complicated about installing an element called an expansion tank. Follow the instructions in everything, remember the main recommendations and everything will be at its best. Happy work!
Pressure in the membrane tank and checking it
For a closed heating system to work properly, the pressure in the expansion tank must be 0.2-0.5 Bar lower than in the system. The larger the system, the greater the pressure difference. But, as already said, at the factory they are pumped up to 1.5 Bar, so before installing the expander, it is better to check it and adjust it to your heating system.
The spool is often hidden under a plastic cover
We check the pressure with a pressure gauge by connecting it to the outlet with the spool. If the pressure is higher than you need, bleed off a little. This is not difficult to do - press the petal in the nipple with something thin. You will hear the hiss of escaping air. When the pressure reaches the desired level, release the petal.
If the membrane tank is inflated too weakly (this also happens), it can be inflated with a conventional pump. But it’s more convenient to use a car one, with a pressure gauge - you can immediately control the pressure. After verification, you can install it on the system.