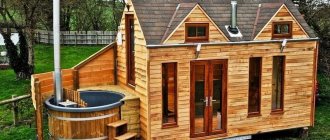
When purchasing a country house or dacha, every summer resident plans the interior as carefully as in his own home. As a rule, garden furniture is an expensive pleasure that not everyone can afford.
One of the most important pieces of furniture in the country is a reliable table, around which all your family and friends can gather. You can make a table for your dacha with your own hands quickly and without spending a lot of money.
Depending on the future purpose of the country table, you can choose its shape and design. The most common options are: a folding table, a wooden dining table, and a small round table, which is perfect for dining outdoors. Photos of garden tables are presented below.
Pallet table designs
Self-construction from old pallets will not require any special costs. You can do it in several simple ways, for which a simple set of tools will be useful:
- construction screwdriver;
- sandpaper;
- brush;
- colored stain;
- wheels;
- self-tapping screws and self-tapping screws.
First you need to properly sand the pallet, this is first done with coarse sandpaper. At the completion stage, finer sandpaper is already taken. The work will go much faster if you have a grinding wheel for processing parts.
Next, you should turn over the finished processed pallet and screw the small swivel wheels from below using a screwdriver. In order to fix the product to the tree more efficiently and reliably, it is recommended to use washers for lining the wheels.
A small neat table for a summer house, as shown in the photo, can be placed on a terrace, veranda, or directly in the room.
The summer recreation area will look most comfortable and cozy if you make a large set of furniture from pallets. Such a furniture set can be made in a portable version, that is, with the possibility of moving it to different areas of the area.
Manufacturing procedure
Cut out several decorative motifs from a napkin and layer them. Then glue these motifs onto the bench in accordance with the chosen composition, applying glue on top of the motifs.
Add green paint to the pictures: add branches and leaves.
Add accents with gold paint: make painterly strokes on the drawings, emphasizing the lines and details.
When the bench is dry, cover it all, along with the pasted pictures, with a clear or slightly tinted wood preservative.
If desired, the bench can be slightly tinted with blue-gray acrylic paint, creating the effect of old wood.
Solid, stylish stone
You can also make a table with your own hands from stone - granite, marble, sandstone, onyx or composite stone. This material is characterized by a long service life, pleasant appearance, ease of maintenance, and environmental friendliness. A stone table is perfect for outdoor use.
But such a piece of furniture will be quite expensive, even if it is made by hand. Another disadvantage of stone products is their very heavy weight. Some types of stone are sensitive to chemicals and, due to their porosity, can absorb moisture. So, for example, a stain may remain on marble from wine spilled on it.
A popular solution is to use several materials when making a table. For example, the legs and base can be forged, and the tabletop can be wooden. But in this case, you need to take into account the characteristics of each of the materials used and provide the product with appropriate care.
How to make a garden table from wood with benches
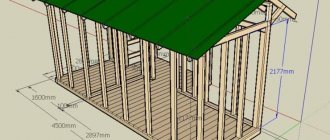
For this table we used 38*89 mm boards (we unraveled them ourselves), but you can take standard sizes. A difference of millimeters will not greatly affect the results. In the photo below you can see what should happen.
Outdoor table for a summer residence with benches
To connect the parts, 16 cm long studs with washers and nuts (24 pieces) were used. All other connections are made with nails 80 mm long.
We connect the table parts together with studs, washers and nuts.
The parts are installed in place, a through hole is drilled with a drill. A stud is installed in it, washers are put on both sides and the nuts are tightened. Everything is tightened with a wrench. Why is this option convenient? For the winter you can disassemble it and take it to a barn or garage.
Making seats
Drawing of a bench with dimensions
According to the drawing, we cut the boards to the required size. Everything is needed in double quantities - for two seats
We sand the boards, pay special attention to the ends
The short sections that we use to fasten the three boards of the seat along the edges are cut at an angle of 45°. First, we assemble the structure that is attached to the seat from below. We take a board about 160 cm long, and attach two short boards sawn at an angle to the end of it. You need to attach it so that this board is in the middle.
Bottom seat support assembly
Then we attach the legs to the resulting structure (you can use nails). Then we add more boards cut at an angle and tighten everything with studs and bolts.
We attach the seat boards to the resulting structure. Since this is an outdoor table, there is no need to knock them together closely. Leave a gap between two adjacent ones of at least 5 mm. We nail it to the supports (which have been sawn down), two for each board.
Fastening the seats together
We fasten the finished seats using four boards 160 cm long. We fasten each leg with hairpins (if you walk, you can put two hairpins, installing them diagonally or one above the other).
We connect the legs to the boards using pins
Assembling the table
The table is assembled according to a different principle. Please note that for the tabletop, the transverse boards along the edges are cut at 52°. We attach them at such a distance that the legs fit in
2 nails for each board. You can use finishing ones, with small heads, or you can drive them deep and then mask the holes with putty.
How to make an outdoor table out of wood
Now we need to assemble the cross legs. We take two boards, cross them so that the distance between their ends is 64.5 cm. We outline the intersection with a pencil. At this point you will need to remove the wood to half the thickness of the board.
This will have to be cut out
We make the same notch on the second board. If you fold them, they turn out to be in the same plane. We connect with four nails.
How to make X-shaped legs for a garden table
We make the second leg for the table in the same way. We are not assembling the table yet.
Installing the table
Now you need to attach the legs to the structure on which the benches are installed. We place them at an equal distance from the benches and fasten them with pins.
Table installation
Table leg fastening unit
Now we install the tabletop. We also fasten it with pins. The last stage is painting. Here everyone does as he pleases.
Outdoor table for a summer residence with benches
Variations on a theme
According to this drawing, you can make separate benches and a table for a summer house or garden. The design is reliable and simple to implement.
Separate benches and a table for the garden according to the same drawing
You can make the appearance more decorative by slightly changing the design of the seats and tabletops
Another option with separate benches
Painted white
Manufacturing procedure
Sand the board and paint it light yellow.
Decorate the ends of the board with a simple ornament using red paint.
Paint the lids of the jars with red paint.
Attach the jar lids to the board at regular intervals using small screws.
Hang the finished shelf on the wall of a utility room or workshop using ready-made fasteners (the covers should be on the underside of the shelf).
Fill the jars with screws, nails, small fasteners, staples, nuts and other small household items and screw the jars to the lids.
You can decorate jars with simple painting, applique and any other methods.
Colorful, airy vine
Making a wicker table with your own hands is a task that only a person with great patience can cope with. However, his efforts will be rewarded, because wicker furniture has a number of advantages. It is very beautiful, lightweight, environmentally friendly, easy to use, and does not require special care (just wipe it with a damp sponge to prevent cracking). If the weaving is done correctly, the table will be strong and durable.
But the vine also has disadvantages. Thus, it does not tolerate high humidity well, so furniture made from it cannot be left outside in the rain. Drying out also damages the products, so prolonged exposure to sunlight should be avoided.
The most suitable types of vines for weaving are broom, willow, raspberry, hazel, bird cherry, rattan, and grapevine. Experts recommend that beginning craftsmen use bird cherry because its rods are characterized by maximum plasticity.
Wooden table with glued top
This design features L-shaped legs. They are assembled from boards of the same thickness. In this case 20 mm. In order for them to hold well, 5 self-tapping screws are needed. We pre-drill holes with a drill with a diameter 1-2 mm smaller than the diameter of the screws. Then, using a drill of a larger diameter, we drill recesses for the caps. The diameter can be matched to furniture plugs of a suitable color or made from a wooden rod. Another option is to use wood putty, to which you add wood dust that remains after sanding. After drying and sanding, the marks will be difficult to find.
Legs with markings for fasteners
When assembling the legs, you must ensure that the angle is exactly 90°. You can choose timber as a pattern. First, coat the joint of the two parts of the leg with wood glue, then install the screws in the following sequence: first the two outer ones, then the middle one, and only then the other two. After the glue has dried, we sand the legs, varnish them and dry them.
Table legs are ready
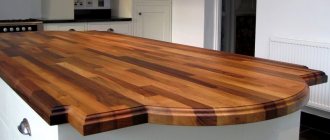
It's time to make the tabletop. We assemble it from boards of the same thickness. We select the size as needed. You can use fragments of different widths
It is only important that everything looks organic, and that the sides of the boards are smooth and fit together without gaps
We coat the sides of the boards selected for the tabletop with glue, lay them on a flat surface (some kind of table) and tighten them with clamps. In this case, we got by with one, but preferably at least three. We tighten it so that there are no gaps in the resulting shield. Leave it for a day. Having removed the clamps, we get an almost finished tabletop. It still needs to be trimmed - to align the edges, and then sand it. You can trim with a jigsaw or a regular handsaw. It's difficult to get a straight line using an angle grinder, but you can try. After sanding we get a beautiful table top.
Gluing a tabletop from boards
Using the same technique, you can make an oval or round tabletop. You just need to draw the appropriate line and trim the glued boards along it.
To make the table look more attractive, we will make a frame. We take a thin strip, sand it with sandpaper and fasten it around the perimeter of the tabletop. You can also use finishing nails. Only we also first coat the planks with wood glue, and then with nails.
We fasten the bar around the perimeter
After the glue has dried, we sand the joint again with sandpaper.
This is what the finished tabletop looks like
Now you can attach the table legs. We assemble a table frame from four boards (there is no photo, but you can do it as in the previous paragraph). We attach it to the back side of the tabletop with glue, then install furniture confirmations through the tabletop. A preliminary hole with an extension for the cap is drilled for the confirmations. The holes for fasteners are masked in the same way as on the legs.
We attach the legs to the fixed frame. We place them inside the frame. You can attach it with regular self-tapping screws. That's it, we made a table for the garden with our own hands.
The board table is ready
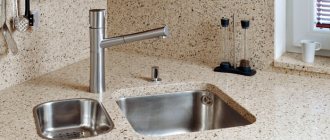
How to make a countertop from artificial stone?
The second most practical option for a summer kitchen is a polymer countertop made of liquid stone, acrylic or polyester (epoxy resin). The polymer can be applied in a thin layer to a concrete slab or made into a monolithic shield.
Liquid acrylic stone is best suited for application in a thin layer on a rigid concrete base, along the perimeter of which an aluminum corner is fixed with mastic. The material is mixed according to the instructions and poured in a thin layer of 3-5 mm.
Epoxy resin is suitable for pouring into formwork made of laminated plywood or other building sheets, coated with wax for easy removal of the finished tabletop.
When the polymer has completely set and hardened, the surface can be sanded with fine abrasives at low speeds and the tabletop can be installed in the design position.
Homemade table from pallet boards
The material for this table was disassembled pallets. Naturally, you can use new boards. There is only one condition - they must be dry. You can buy dry ones (this costs more) or buy regular ones, put them somewhere in ventilated stacks and keep them for at least 4 months, or better yet, six months. In general, any furniture, including garden benches, is made from dry wood.
We are assembling a table for the street - to put it in a gazebo, so we will not glue the boards of the tabletop, but will fasten them from below, using planks. This is a very simple country table and very cheap.
Having disassembled the pallets, we get boards with individual colors and patterns. Having worked a little magic, rearranging them several dozen times in different ways, we achieve the required result. It turns out to be quite a nice tabletop.
We assemble a tabletop from boards
Take the side parts of the pallet. We use them for the table frame. We first sand them with coarse sandpaper, then fine sand them to the required smoothness (grain 120 and 220).
The side slats will go to the sides of the table
We take the planks that remained unused and use them to fasten the tabletop. We place them in the place where the joints of the boards are located. We use two screws to fasten each board with a joint, and one for a solid one.
From the treated sidewalls and two boards (also sanded) we assemble the table frame. We fasten its parts with self-tapping screws at the end (two for each joint). The frame can be glued or also “planted” on self-tapping screws. Only they are long. For each, we pre-drill holes with a drill whose diameter is slightly smaller than the diameter of the screws.
The tabletop is almost ready
We turn the assembled tabletop over and sand it. The procedure is the same - first use sandpaper with coarse grains, then with fine grains.
Next is installing the legs. We select four boards of the same size, check their length, and adjust if necessary. Then - sanding again. This is easier than sanding the legs that are already screwed on. We screw the sanded boards to the frame. These will be the legs. For each there are two self-tapping screws, fixed diagonally (look at the photo). For greater stability, we install jumpers at the bottom. You can leave about 10 cm from the floor to the lintels. We connect everything with self-tapping screws, so that the boards do not crack, we pre-drill holes.
Installing legs and jumpers
Next, we coat the garden table with varnish. After the first layer, the entire pile will rise. Don't be alarmed, this is normal. Take fine grit sandpaper and sand until smooth.
The DIY garden table is almost ready. All that remains is to coat it with varnish
After removing the dust, varnish again. In theory, the varnish should lie flat, but it depends on the wood, so another sanding/painting cycle may be needed. As a result, we get this homemade country table.
DIY garden table ready for use
If you don’t like mismatched boards and traces of old nails, you can make the same design into boards. This table can be rectangular, or square. All sizes are arbitrary - please see the space available.
Types of garden tables for summer cottages
In order to choose a suitable table for your summer cottage, we should consider 3 important factors:
- Table size;
- The durability of the material from which it was made;
- And also the functionality of the table.
Let's look at these factors in more detail.
Garden table for the site. Which size is better to choose?
Of course, the table needs to be selected in such a size that there is somewhere to put it, it would be convenient to use, and, of course, you need to think about how long a person will sit at it.
For example, if you are planning to buy a table for a site for 5 people, it is better to choose tabletops that are at least 150 cm long and 70 cm wide. Around such a table you can easily place 5-6 chairs - 2 at both ends and 4 at more wide sides
If you are planning to purchase a round table rather than a rectangular one, pay attention to tabletops with a diameter of 1 m or more - this area is enough for 5-6 people to dine at such a table
The second important parameter is the height of the table. Many buyers make the same mistake when buying garden furniture of small height. Usually, along with it, there are also tables, the tabletops of which are located too low, and at which it is simply uncomfortable to sit.
The most convenient height for eating is 70 cm above the ground, so it is best to choose tables for the area at this height. If you have already purchased low chairs or benches, then there is nothing you can do - you will have to select a table to match their height.
Another point - when buying a wooden table, pay attention to the gaps between the individual tabletops. If they are too large, you may have problems placing glasses or an ashtray on them
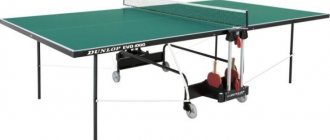
Garden table for the site. Which one to choose: folding or stationary?
Once we have decided what size a suitable garden table should be, it’s time to think about its functionality. Some homeowners prefer not to leave a table in the garden permanently, but to use lighter, folding tables that can easily be stored in the garage or shed if necessary. On the other hand, massive stationary tables for the site are more stable and durable. So which solution is better to choose?
As a rule, stationary tables are larger and heavier, and therefore more durable. An excellent example is luxury garden tables made of cast iron and polished boards. In addition, they are very stable and are not afraid of strong gusts of wind, as they weigh 30-40 kg. However, this is also their disadvantage - such tables are difficult to move to another place.
Of course, there are also lighter, fixed garden tables on the market. However, they all take up much more space compared to folding tables. The main advantage of stationary tables is undoubtedly their durability: such products are not afraid of wind, rain, snow, temperature changes and mechanical damage. True, we are talking about tables made of stainless metal, which does not rust. The durability of purely metal tables leaves much to be desired.
Folding garden tables are undoubtedly much more convenient. Firstly, because they can always be placed anywhere on the site, without any extra effort. Secondly, they are more functional. Although such tables are usually small in size and are designed for a maximum of 2-4 people, thanks to the extendable sections they can always be increased by a few more centimeters and turned into a large garden table.
In addition, stores today sell a huge assortment of folding tables: different shapes, designs, colors. Some models are already sold with the same folding seats. Just a few minutes - and you have a wonderful place in the garden to welcome all your guests. That is why it is recommended to buy folding tables and tables if you have a large area - because it is obvious that there are many more interesting places where you can sit and have a picnic.
Folding garden table
Try making a universal folding garden table for your utility room. It looks beautiful and saves space. And most importantly, it is very convenient and will help you keep your small utility unit in perfect order: everything is in sight, and nothing will get lost.
You will need:
- a piece of edged pine board measuring approximately 60 X 20 cm;
- two ready-made wooden shelf mounts;
- light yellow façade paint;
- red acrylic paint;
- small glass jars with screw caps;
- screws;
- screwdriver or screwdriver.
The scope of fantasy: table option
A heavy cable reel is a relatively heavy structure that can be lightened and turned into an outdoor table for the dacha. You will have to put a little effort into decorating, otherwise the design itself is almost ready.
The easiest way is to wrap the barrel of the product with screw twine, and thoroughly sand the top and coat it with clear varnish. Or you can take only the center itself from the coil, adding a tabletop to it, or vice versa - the base is made of metal, and the surface is made of the upper disk.
Old tires will make an excellent designer garden set: a table and ottomans with a backrest. They can be painted in your favorite color, secured together with silicone sealant or a similar adhesive composition. It is wise to make the tabletop from durable plastic or strong wood. You can cut out foam rubber on the pouf seat for comfort, covering it with fabric.
A slightly smaller pouf is made in the same way. But an interesting table will come from a long log, leveled on top for the tabletop.
Creating a furniture set for a personal plot is quite an exciting activity, and absolutely not expensive. Any old things prepared for disposal will be useful for work. Make every effort and the results will undoubtedly surprise both you and your guests!
Interesting ideas for your dacha, home, garden and vegetable garden with your own hands with photos
And now we offer interesting ideas for a do-it-yourself cottage and garden in relation to other interior items necessary for the household.
This will be a comfortable seat on which you can relax after gardening. All our interesting ideas for a summer house and garden are accompanied by photos and can be implemented using various available materials.
Make a garden ottoman from old car tires. There are practically no costs, and the effect will exceed all expectations. This ottoman is not a simple one, but an ottoman-chest. You can store garden items in it. This will definitely not happen to anyone!
You will need:
- two old car tires of the same diameter;
- thick plywood;
- beautiful textiles of your choice;
- façade paint that matches your fabric in color;
- white spray facade paint;
- “liquid nails” or silicone sealant;
- construction stapler;
- jigsaw
Photos of dacha tables
Affordable, lightweight plastic
This lightweight, inexpensive material is great for cases where furniture is not often taken outside. Plastic is not suitable for constant outdoor use, because its structure is destroyed under the influence of direct sunlight. Although if you place the furniture in the gazebo, this problem is solved.
The main operational advantage of a plastic table is its extreme lightness. Even a woman or teenager can move such furniture. If the design is also collapsible, then it is easy to store. The disadvantages of plastic are a short service life, rapid loss of aesthetics (for example, white material quickly turns yellow when used outdoors).
A table made with your own hands from plastic can be easily damaged by dropping a knife or any heavy object on it. If it is not individual elements that are assembled from plastic, but the entire structure, then the product may be unstable. This table will easily tip over, so it should only be placed on a solid, level base.
Outdoor garden tables
On a fine spring day, early summer morning or cool September evening, the table at the dacha becomes the epicenter of dacha life. The whole family gathers behind him, has breakfast, drinks tea or just chats. A correctly selected piece of furniture can create a spectacular landscape composition in a personal plot and become the most favorite place for friendly gatherings.
In order to choose and buy the right garden table, you must take into account the requirements for this product.
Namely: pay attention to its size, shape, weight, reliability of the folding mechanism and good stability. In addition, if you plan to install a wooden country table in an open area that is not protected from rain and sun, you should choose a type of tabletop that is moisture resistant and has antifungal properties
Of course, external characteristics are no less important than performance properties.
The manufacturer “M-group” offers stylish outdoor tables with a metal base and a wood top. This option is considered a classic for garden furniture and fits into almost any landscape. Here you can find original models, as well as practical standard products at low prices.
Why are our forged country tables so in demand?
Our company has been manufacturing and selling furniture since 2008. During this time, we have thoroughly studied what customers want and what furniture is in high demand. Stylish forged tables with wooden tops and classic chairs will never lose their relevance - this is the most practical option for a personal plot and a good choice for a cafe.
Tables with a metal base and a wooden top are designed specifically for outdoor placement.
They attract the attention of others, are wear-resistant and durable. Thanks to modern paints and varnishes, furniture items do not deteriorate due to temperature changes, high humidity or exposure to sunlight
By purchasing a wrought-iron outdoor table and a wooden bench, you can be sure that you will decorate your area and create a place for warm family evenings.
In our catalog on the website you will find the following models that can be purchased at a low price:
- Rectangular tables 1.5, 2 and 2.5 meters long;
- Round on 3 or 4 legs and with a tabletop of various diameters;
- Country house kits consisting of a welded frame on which wooden seats and a tabletop are attached.
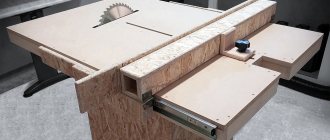
Folding table made from improvised materials
A folding table is an indispensable thing not only in the garden, but also in the garage or country house. It will fit perfectly into any interior and will not take much time and effort to produce. The main advantages of such a table are its compactness and mobility.
You can take it with you on a picnic or put it in the garden; it won’t take up much space. A folding table can be of various shapes and design complexity.
Let's consider the simplest, but at the same time reliable version of a folding table. To make it, you will need several bars cut on a circular saw and a tabletop, which can be used as a box, a sheet of chipboard, wood sawn, etc.
After processing the structural parts with a jigsaw and a grinding machine, we assemble the table, attaching the legs and foot supports to each other using a bolt. The table top will be attached to the base with self-tapping screws according to pre-applied markings. After assembly, it is recommended to apply a protective compound against chips and dirt.
Options for making country furniture
To create truly unique masterpieces of furniture, you can use unnecessary things at hand by rummaging around in a barn or garage, where you can undoubtedly find suitable consumables:
- metal barrels;
- used plastic parts;
- glass surfaces;
- other.
An old barrel lid can be cleaned of rust and treated, then covered with paint - you will get an interesting tabletop. Or you can use the iron part of a flower stand for the base (leg) of the table. It must be primed and coated with acrylic paints. Next, you need to glue the window seal to the support, and the glass - the tabletop to it, to improve fastening.
A non-wasteful owner, of course, stores pallets from sets of bricks, which can also be used as a countertop. At such a table there is no shame in inviting friends for tea or a dinner party.
Manufacturing procedure
Fill cracks and gouges and sand the table with fine-grit sandpaper, then prime everything except the tabletop. Paint the table with white paint (except the table top).
Wrap the tile in a piece of drape or other thick, soft fabric and break it with a hammer. Apply an even layer of tile adhesive on top of the tabletop and cover the surface of the tabletop with tile fragments. Trim the edges with a trowel. When your mosaic has dried a little, wipe the surface with a sponge soaked in water to remove any traces of glue from the surface.
After the glue has completely dried, treat the seams between the pieces of tile with white grout.
Paint the sides of the table top with white paint, and then decorate them, as well as the legs of the table, with gold and copper glass outlines.
Sleek, durable metal
Metal is often used in the production of outdoor furniture because products made from it can last for decades (but only if high-quality metal is used and not recycled materials). Modern forging technologies give wide scope for imagination. A forged table will look especially impressive in a courtyard with ornate metal gates, wickets, fences, and gazebos. Such products seem exquisite, weightless, elegant.
But you can make a simpler design with your own hands using standard sheets of metal and a profile. Aesthetically, such furniture is inferior to forged furniture, but it has the main advantages of outdoor metal products, namely durability and stability. Metal furniture is not afraid of cold, heat, wind, it can be used outdoors all year round.
Metal also has certain disadvantages. In particular, it is susceptible to corrosion and therefore requires special treatment to prevent rust. It can get very hot in hot weather and cool in cold weather, which creates some discomfort when using it. Metal has significant weight and is one of the most expensive materials for furniture production. Aluminum has the most affordable price, but it is inferior to steel and cast iron in strength.
Garden furniture: tables and benches
Garden tables and benches are indispensable attributes of a cozy and comfortable country life, in which it is possible to enjoy privacy in a shady corner of the garden.
How garden furniture and tables are made, you could already fully learn from the examples published above. And now we propose to make an exclusive design of a garden bench with your own hands.
A garden bench is not just a necessary thing, but a very necessary one.
It’s so convenient to care for plantings and weed, not on your knees, but sitting on a bench, especially one as beautiful as this one. Even if it stands just like that, it is already a garden decoration, no worse than any figurine.
You will need:
- a small finished bench made of wood;
- decoupage glue;
- green and gold acrylic paints;
- beautiful napkins with plant motifs;
- transparent antiseptic paint for wood of the “azure” type.
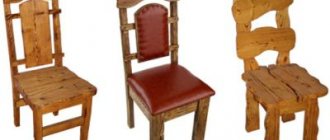
Reliable, aesthetic wood
Making an outdoor table out of wood with your own hands is the option preferred by most craftsmen, because a structure made from this material fits most organically into the country landscape. In addition, wood is easy to process, environmentally friendly, and durable. It has a pleasant texture and a special aroma.
But wood has a number of disadvantages. Thus, it is more expensive than plastic and lacks resistance to moisture and temperature changes. It is not recommended to place wooden furniture on sand or grass, because the legs will sink into the ground and rot. A table made of this material needs regular treatment with antiseptics and paints and varnishes.
To make a durable, reliable table with your own hands, it is recommended to give preference to a model made from slats. This design will be well ventilated and withstand bad weather. The types of wood most suitable for making outdoor furniture are pine, ash, beech, oak, larch, as well as linden and alder.
The last two types have another important advantage - they are able to withstand high physical loads