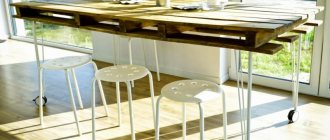
The table is an important attribute of every modern kitchen. It can be made of various materials, any shape and size. An excellent solution is to choose a table made of natural wood - a beautiful, environmentally friendly and durable product. It will become a worthy decoration for a city apartment or country house.
In this article we will tell you how to make a kitchen table with your own hands from wood according to a finished drawing. We will provide step-by-step instructions with photos and videos of a difficult, but very interesting and exciting process.
Table dimensions
Before making a kitchen product, you should determine its dimensions. In this matter, it is important to take into account some nuances. So, the length and width depend on the area of the room and the future location.
At the same time, the table should naturally fit into the existing interior and be spacious. Fully perform the functions assigned to him.
In order for a person to be comfortable sitting at it, personal space cannot be less than 80 cm. Therefore, for a family of 4 people, the optimal dimensions of the table are 100 by 100 or 90 by 90 cm (when it can be installed in the middle of the room or moved away from walls so that each household member has their own side).
If it is impossible to move the table around the kitchen or the situation does not allow it to be installed in the middle, then it is better to give preference to a rectangular shape with sides of 80 and 130 cm. Two will be placed on the long side, the rest on the short side.
A large kitchen will be decorated with a large dining table with sides of 180 and 100 cm. It can easily accommodate up to twelve people.
Small kitchen spaces are best equipped with sliding or folding structures - in which additional inserts 50–60 cm wide are placed in the middle of the table.
The length of the sliding structure reaches 2.7 m, when folded - 1.7 m. As for the height of the future wooden product, it is determined by the configuration and height of the people sitting.
Most often, dining tables are made with a height of 60–80 cm, but there are also larger designs.
Which pipes are suitable and how many are needed?
To make a table, a profile pipe with a thickness of 2 to 4 mm is suitable.
Furniture made from thinner-walled material will weigh slightly less and look more elegant. But a massive pipe can withstand high loads and last longer. In addition, it is easier to fix it at home using inverter welding.
More often they use a profile of 40×25 mm or 20×20 mm. The material is necessary for the manufacture of the frame frame and legs. Its quantity depends on the size of these parts of the product. To make a medium-sized table, you will need approximately 6.5-8 linear meters of profile.
Number of legs
After determining the dimensions of the kitchen product, no less attention should be paid to the number of legs:
- One massive leg is usually equipped with small-sized wood products that fit in a small kitchen. To give the structure rigidity and stability, use a cross-shaped strapping that can withstand increased mechanical loads;
- two legs are used for rectangular or oval tables. They are installed at an equidistant distance from one another. Most often, such stands have an elongated shape from top to bottom. They are comfortable because people sitting at the table do not hit their feet on the wood;
- The most popular are square, rectangular dining tables with four legs . This is the best solution for folding structures. To attach them, you do not need to perform complex calculations, because they are placed around the perimeter of the product. This table is strong, reliable, and very stable. The main thing is to correctly calculate the length, width of the lid and size of the legs during manufacturing. They must be of the same shape so that the furniture stands level and does not wobble during use.
Reliable fastening of the supports is ensured by blind or detachable collets. The latter option is more complex in design and allows for convenient transportation and storage of the product.
general information
A few words about profile pipes as the main material from which the table will be made. Some craftsmen are accustomed to thinking that corrugated pipe can only be used in construction or other similar areas. In fact, a profile pipe is an excellent workpiece from which you can make many things: a fence, a gate, a wicket, a railing, a canopy and much more. Including modern furniture.
A table made from profile pipes is not the only interior item that can be made. Craftsmen create chairs, shelving and even beds from corrugated pipe, and such products look very beautiful. But why is a profile pipe used?
This material has several undeniable advantages. The first is weight and dimensions. Corrugated pipes weigh little, so they are great for creating furniture. In addition, the original dimensions of the material do not cause difficulties during transportation and storage. You can throw the profile pipes into the trunk of your car and bring them home without any problems.
The second advantage is the reliability and stability of the structure. The square-section profile pipe provides the table with sufficient stability on the floor, while the structure does not sag, wobble or deform. Profiled pipes have a large margin of reliability and such a table may well survive a generation
Third - cost. It is low, even when using high-quality profile pipes. A table assembled with your own hands turns out to be several times cheaper than one from a workshop or store.
The last benefit is functionality. Tables made from profile pipes can withstand precipitation, so they can be used outdoors. Also, such a table can be assembled by a beginner who has minimal welding skills. Well, even if welding is impossible, then use bolts to connect the structure together.
Beds with soft panels at the head: stylish solution and comfort- Ideas for arranging furniture in a small room
- Is it possible to place a bed opposite the door?
Wood selection
There are many different building materials that you can use when making your own dining table for the kitchen. But natural wood is considered the best.
The main thing is to choose the right material, size, shape of the tabletop and supports, which will extend the service life and ensure the product’s resistance to rotting and various types of mechanical damage.
Natural wood varies in density and can be soft, hard or very dense.
A countertop made of soft material is easier to process, but any scratches or traces of mechanical damage remain on it. The same cannot be said about the hardest and most dense rocks.
Soft varieties are used in the manufacture of kitchen tables:
- poplars;
- pine and spruce;
- cedar;
- fir;
- alders;
- chestnut;
- juniper.
Solids include:
- nut;
- birch;
- oak;
- maple;
- plum;
- elm;
- ash.
The following are considered very dense:
- acacia;
- Erman birch;
- boxwood;
- yew.
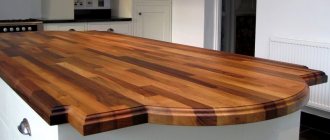
The best material for making a kitchen table yourself is oak - a high-strength, durable material that is not subject to deformation and moisture. It is easy to process and varnish.
Siberian larch and horse chestnut are no less popular. It is better to make the tabletop from pine, walnut or wenge, and the stand from acacia, birch or boxwood.
The table top can also be made from chipboard, plywood and fiberboard. The edges of such materials are laminated with vinyl film. Note that they are less durable and strong, they contain chemical components that are not harmless to human health, but are easy to process and affordable.
Modern table models
Based on their design features, there are 4 types of dining tables that you can make yourself:
- classical;
- folding;
- sliding;
- made.
A classic wooden product is:
- rectangular;
- square;
- round;
- oval shape.
The production technology is multi-stage and requires skills in using carpentry tools. You will need to not only assemble the table correctly, but also decorate it beautifully.
Round tables are placed in large and spacious rooms in the center. They take up a lot of usable space and cannot be placed close to the wall. The round tabletop allows you to use a different number of supports - one or three, four. Two stands are not suitable, because the structure will be unstable.
A rounded wooden product can be placed in a small kitchen, but the table top in this case should not exceed 80 cm in diameter. For small spaces, the ideal solution is a small oval-shaped table, which will be an excellent addition to the soft corner.
The most common option is large or medium-sized kitchen products that fit well in standard apartments. They can seat a large number of people.
If the kitchen area does not allow you to install a large round table, you should use a sliding option. When folded, it takes an oval shape.
From the outside, folding structures look like compact bedside tables. They easily attach to the wall and take up little free space. When unfolded, the table can accommodate up to twelve people. It is not easy to make; you will need special tools and skills to use them.
The simplest option is a “book”, which is most often made from laminated chipboard. Sawing of the material and preparation of the elements can be done at a specialized enterprise. Assembling a table from ready-made parts will not be difficult. The individual parts of the lid are fastened together with steel hinges. The tabletop can also be made from natural wood, but this will significantly complicate the work process.
The sliding model of the dining table is no less easy to manufacture. Its main feature is its increased dimensions by inserting one or more functional panels in the middle of the cover. The parts are combined into a single structure with screws.
As for the sliding mechanism, in previous models, due to the lack of full rollback or roller guides, some effort was required to expand the table cover. At the same time, the elements rubbed and quickly became unusable.
Today's designs of dining tables are equipped with an improved mechanism that allows the elements to “roll out” without damaging the wood surface.
The simplest is the option with two steel guides, which can also be used as drawer slides. Additional racks in the assembled state are located under the cover; they are fastened with special elements.
In factory-produced sliding structures, such sections are connected by strong hinges. They are placed under the tabletop using a special mechanism.
The prefabricated table consists of a lid and a pair of folding stands. It is their production that will require considerable patience and perseverance from the beginning craftsman. Although ready-made support options are available for sale, they can be found in a specialized furniture store.
Do-it-yourself pull-out table in the trunk
Large families often go on vacation in nature in their car. Therefore, the question often arises: how to make a folding table for a car?
We offer you a retractable version that will fit in the rear trunk of your car.
- First, remove everything unnecessary from the compartment.
- Shelves from old furniture are suitable as tabletops.
- Try the shelf in place. It is better to do the fasteners in the center, without moving to the side. If there is a loop at the end, make a cutout on the tabletop for it.
- Separately, you will have to buy a pair of guides, which are made specifically for drawers.
- To ensure that the tabletop can freely exit the luggage compartment, clamp the front wall in a vice and cut off the excess.
- Screw the counter part of the guides to the tabletop. The guides themselves are attached to planks, which can also be cut from old furniture.
- A maximum of 1.5 hours of time spent, and the dining table for the car is ready.
Organization of work, materials, tools
Carpentry work is best done in a well-lit and ventilated area. After all, the wood processing process is accompanied by the formation of a large amount of sawdust, debris and dust.
In addition, material exposed to high humidity and mechanical damage needs to be treated with protective chemicals. When dried, they release compounds harmful to human health into the atmosphere.
Having selected a room, you should prepare the necessary carpentry tools and materials:
- electric plane;
- jigsaw;
- electric drill;
- a small wooden hammer (mallet);
- cutting chisel;
- fastening tool;
- grinder;
- milling machine;
- sandpaper;
- corners;
- wooden boards;
- round brush for painting;
- polymer paint;
- epoxy varnish.
In addition, you will need a measuring ruler or tape measure, a square, a marker or a pencil.
To make a kitchen table cover, you need to prepare a chipboard or fiberboard board with a width and thickness of 70–90 cm and 4–6 cm, respectively. When a complete fiberboard sheet is not available, it is replaced with a set of wooden boards.
The legs are made from square timber of the required size. Ready-made stands can be purchased at a specialty store or construction market.
The tree is protected from rotting by a polymer emulsion. All table parts are coated several times, with a short break for drying. To fasten the parts together, a special carpentry compound BF 2 is used. It is applied to adjacent sides, and then left under weight to set for 24–36 hours.
When making a dining table yourself, it is recommended to protect all structural elements in advance - cover them with special coloring compounds or stain. The acrylic paint and epoxy varnish mixture should be stored in an airtight container.
Attaching the apron
Cut two more pieces of 5 by 20 cm board, 80 cm long, and two boards of narrower boards equal to the narrow side of the tabletop. The boards must be flush against each other. Apply wood glue to the wide part of the boards and attach them to the edges of the tabletop and screw them in place with self-tapping screws at a 45-degree angle.
Drawings, preparation of parts
Before starting to make a table, you should consider the design, shape, and dimensions. Carefully read the materials and descriptions of modern technological solutions. At the design stage, the appearance of the tabletop and stands is determined.
The product should naturally fit into the style of the kitchen, fully perform its assigned function, and not interfere with the movement of household members around the kitchen.
Before starting work, you should hand-draw on a piece of paper a step-by-step diagram of the assembly of components. You can also use ready-made drawings. But there is always the opportunity to show your own imagination, realize your sketch, while performing the necessary measurements and calculations.
In such a responsible matter, any inaccuracies or errors are unacceptable. After all, this will cause instability and unreliability of the entire structure.
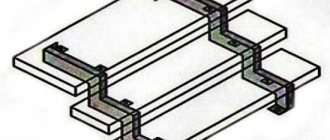
Below are photos of drawings with finished dimensions:
To make a wooden kitchen table yourself, you will need to prepare all the prefabricated elements:
- The canvas is plastered and cleaned. It is coated with antipyrines, antiseptic substances that protect it from rotting, open flames of fire, and high humidity.
- When wooden cuts , they must be well dried. Before processing, they should be carefully inspected for microcracks and other types of damage.
- The main elements of the kitchen table - the lid and supports - are transferred from the layout to a wooden sheet and carefully cut out with a jigsaw.
- The parts of the thrust legs are made several centimeters shorter. Horizontal notches are made on the stands on both sides. The processing method is determined by the type of supports for the wooden lid.
After preparing all the parts, they are assembled. The supports are secured in pairs using special jumpers. You will need to make 2 holes at an angle from the inside of the crossbars.
You need to drill holes carefully, slowly, so as not to damage the supports. The structure is fastened with self-tapping screws, which are screwed through bars and wooden stands. To fasten the stop, long jumpers are used.
The individual parts are also fastened with self-tapping screws. The legs are attached to the lid with steel bolts; they are inserted into pre-made holes of the appropriate diameter.
Making a countertop
Particular attention is paid to the lid of the dining table. It needs to be made not just beautiful, but also reliable, strong and durable.
The best option is to purchase a ready-made postforming lid - a laminated chipboard with rounded ribs.
Manufacturers today offer customers a wide variety of shades, sizes, and textures of materials.
The advantages of using such a stove in the manufacture of a kitchen table are as follows:
- high wear resistance to temperature fluctuations and external damage;
- The postforming lid has a drip tray where moisture and dirt are collected, which can then be easily removed. This ensures the product is highly hygienic;
- no additional edging of the slab is required;
- convenient processing - postforming is cut with a jigsaw;
- Due to the roundness of the ribs, mechanical stress is distributed evenly across the tabletop.
The use of ready-made material in the work significantly speeds up and facilitates the assembly process. But, of course, furniture panels and natural wood have a more solid appearance.
To make a stackable countertop on your own, you will need a hand cutter and an electric jointer. Surface treatment is best done on a milling machine. If the necessary tools are not available, then finished blanks are ordered from the carpentry company according to individual measurements.
Instructions for making your own lid:
- Wooden boards are adjusted to the required size of the tabletop. Ideally, they are the same thickness and length.
- They are laid according to the principle of brickwork - the middle of the boards should be at the joints of the two previous ones.
- After placing the boards correctly, they begin to make the table top. Contacting joints and surfaces are carefully processed and polished, coated with an adhesive composition. Leave for several days until completely dry.
- All irregularities are removed with an electric planer and sanded with fine sandpaper. The chamfers are removed, the corners are rounded.
An original solution is to decorate the tabletop with a solid block or decorative tiles. Using a milling cutter or a hand chisel, a recess is made with a depth equal to the thickness of the slab.
There is a low edge around the entire perimeter of the table - 10–30 mm. Decorative material is attached to the leveled surface with glue. The structure is reinforced with wooden blocks around the perimeter, they are placed on self-tapping screws.
How to make a tabletop from wood. How to make a tabletop.
Assembly
The finished cover is installed on the supports. A hole is made in each and metal bolts are placed in it. It is important that the holes on all parts of the legs match completely - only in this case can they be firmly connected.
To give the structure the necessary strength, a jumper is inserted between the supports, which will not allow them to diverge to the sides. For its manufacture, you can use the material of the tabletop. It is fastened with self-tapping screws at the ends of the vertical support.
After the brackets are installed, the tabletop is additionally secured with bars. The holders can be visually hidden by making them from plywood sheets or OSB.
To make the lid of the dining table look massive, the frame is lined with a frame. The rail is attached with self-tapping screws along the entire perimeter. Shallow holes for plugs are made in it every 20–30 cm.
To refine the tabletop, a solid wood strip 2–3 cm thick is used. It is attached to the chopsticks using PVA glue.
The finished lid is turned over, and legs are attached to the back side, which are secured with bolts. After assembly, you must carefully check all fastening points - there should be no gaps or distortions.
The main advantage of this design is that, if necessary, it can be quickly, simply dismantled and assembled. This is especially true when restoring a kitchen table.
After disassembly, the old coating can be removed from each element, cleaned with fine-grained sandpaper, painted and varnished again.
Useful tips
Look for upcycling materials at flea markets. In such places you can find antique doors, windows, and fittings that will form the basis of your craft. Moreover, they will cost mere pennies.
Pallets, boxes and scraps of boards and plywood can often be found on special stands in large hardware stores. The trimmings are subject to write-off, so they are given away free of charge.
You can even use waste material to create tables. For the countertop, you can use old tree stumps, metal or plastic barrels, even bottle caps or drink cans glued together.
Don't be afraid to show your imagination. Frequently visit flea markets and yard sales and let the materials tell you what you can make with them.
Exterior finishing
As mentioned above, all wooden parts used in assembling the kitchen table must be well polished so that the surface is smooth and perfectly flat. This will demonstrate the natural structure and beauty of the tree.
It is best to use high-density wood that can withstand increased mechanical loads. When there are small defects in the array, they are leveled, puttied and decorated using acrylic paint.
The finished product is given a finished appearance. This is done using stain and epoxy varnish.
The more layers are applied to the wooden surface, the more solid the finished product will look from the outside. In addition, coloring compounds protect the array from high humidity, external damage and extend its service life.
Painting work should be done in stages. The surface to be treated is cleaned of dust and dirt particles, covered with stain and varnish. To obtain the desired shade, dye is added to the mixture.
Important! Wood should be dried at a low temperature.
The table can also be painted by pre-impregnating the surface with a primer. The tone is selected according to the personal preferences of the owners.
The main thing is that the table harmoniously complements the interior. It is better to give preference to a quick-drying, water-based paint composition that does not have a sharp, unpleasant odor.
Tools
Having assessed the volume and types of work, I collected tools in accordance with the following list:
- a jigsaw, which I use to cut circles from fiberboard and chipboard;
- I will need an electric drill to drill holes for connecting furniture parts;
- screwdriver for fastening screws;
- an air compressor with a gun for blowing holes and treated surfaces;
- hammer;
- iron;
- wrench;
- improvised tools (pliers, screwdriver, metal ruler, tape measure, knife, pencil).
Required set of tools
Carving tools
Often a wooden dining table is decorated with carved ornaments. To do this you will need to prepare the following tools:
- wood carving knives - consist of an elongated handle and a cartridge in which replaceable cutters are placed;
- a set of chisels - includes sharply sharpened chisels with a cutting part of different shapes and widths. It is better to choose professional kits for work that allow you to make recesses of any depth and configuration in wood;
- light hammer (mallet) - allows you to apply neat, precise blows to the end of the cutter;
- set of burrs - for installation in the quick-release chuck of an electric drill. This device performs high-quality processing of the internal and external parts of the recess. Using sharp cutters, you can refine patterns even after preliminary machining;
- a screwdriver or an electric drill with the ability to adjust the number of revolutions - needed for working with burrs and drills;
- sander - allows you to level the wooden surface, giving it a neat, finished appearance.
Please note that the above kit is basic and is only suitable for beginners. When the project is serious, the tools will need to be purchased.
Design Features
The welding table is the main workplace of the welder. On a flat metal tabletop it is convenient to perform manual welding, cutting metal, cleaning parts, and final grinding of products. A classic DIY welding table suitable for installation in a garage or workshop. In such conditions, the overall structure serves as a grounding element, since it is entirely made of metal.
Another difference between a workbench and a regular table is its structure. It meets the criteria of practicality and safety requirements. Mandatory elements are a fireproof tabletop, tray and legs. The design can also be equipped with a lower shelf, on which it is convenient to store tools and equipment - a welding machine, a shield, an ammeter, a voltmeter, a pencil case with electrodes. Any welding equipment is manufactured and installed according to safety rules:
- above the table there is a working hood for removing gaseous substances;
- the ventilation device is mounted at a height of 1.3–1.5 m above the welding workbench;
- a copper edging is welded along the edge of the tabletop to keep the grease off the electrodes;
- The workplace is equipped with lamps operating under a voltage of 36 V.
No flammable substances or materials should be stored on or near the table.
Transferring a design to wood
To turn an ordinary kitchen table into a chic carved one, it is not enough to choose the appropriate ornament. You also need to be able to transfer it to the surface. There are several technologies.
Thus, a pattern of simple geometric shapes or straight lines from a finished sketch is translated by applying the drawing to the prepared surface. Important landmarks are marked with an awl. After which the paper is removed, the dots are connected with a pencil. Decorative elements are cut out with a jigsaw.
When the ornament is complex, the image is transferred in the following sequence:
- A sheet with a pattern is placed on the copy sheet and secured securely in the corners with buttons.
- Carefully outline the drawing with a pencil.
- The printed part is outlined on the wooden surface again.
After that, using a set of cutters and a jigsaw, the drawing is given volume and a completed external image.
Recommendations for a beginning carver
To make the pattern as neat and accurate as possible, use the advice of professionals:
- It is more convenient to apply ornaments to supports when the structure is dismantled;
- The rolled part should be securely fixed with clamps. This will ensure the surface remains motionless;
- after 20 minutes of operation, the blades of the cutters should be polished with a leather belt or fine sandpaper, which will maintain their sharpness throughout the entire process of use;
- during fine sanding, wood flour is formed; by mixing it with PVA glue, it is possible to obtain a good putty;
- when cutting dense wood, the rolled surface must be periodically treated with boiling water;
- If the finished ornament has defects (darkening), a chlorine-containing solution is used to discolor them.
How to properly cut wood, watch the video:
Wood carved organ ornament
Woodcarving Baroque Flower Ornament ►► Timelapse Wood Carving Baroque Ornament
Wood cutter. Why won't the carving work?
Esercizio 003 elemento decorativo.wmv