Polyurethane foam took its place in the construction market relatively recently, but quickly gained popularity. It is sealed, has good adhesion, does not allow electric current to pass through, penetrates into hard-to-reach places, does not rot, and has good sound, water and heat insulation properties. This is why polyurethane foam is often used when installing PVC windows. So, how can you determine whether polyurethane foam for PVC windows is better?
Key Features
Reliability of polyurethane foam parameters can be achieved by following the technological process when installing a plastic window and by choosing the right material. The characteristics of the foam must correspond to the conditions in which it is intended to be used: humidity, temperature, time of year and subsequent finishing of window slopes .
Installation of plastic windows is not complete without the use of polyurethane foam.
This modern material recently appeared on the construction market and gained its popularity along with metal-plastic structures, since the technology for their installation cannot be done without polyurethane foam. The mixture has high adhesive properties, does not allow electric current to pass through, easily fills hard-to-reach voids, is not subject to rotting and has heat and sound insulation qualities.
What are the benefits?
Repair is not an easy task, so many people prefer to turn to professionals for help. Yes, installing a new double-glazed window is difficult and too responsible, but any man can foam the slopes.
Attention
Doing the slopes yourself will allow you to save on workers’ salaries and do everything according to your own wishes.
Thanks to the foam, the seams between the window and the wall are hermetically sealed and in the future will not let in either cold air or noise from the street. People often encounter a situation where the master did not fill the space well enough, voids were formed, which then led to heat leakage.
It is impossible to see these errors visually, so experts advise checking the quality of the work performed with matches. You need to bring the flame to the seam: it should not tremble or even tremble slightly. If deficiencies are nevertheless found, the foam is re-filled so that the seams become completely sealed. On the second or third day, the excess foam is cut off and finishing of the slope begins.
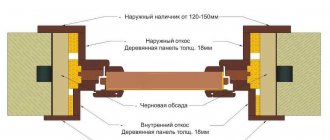
The design of slopes is carried out both from the outside and from the inside . Without completing the exterior finishing, you should not move on to the interior.
Composition and scope of application
On the modern market there are many already proven brands and unknown brands of polyurethane foam, but in essence, it is a one-component polyurethane foam sealant in aerosol packaging. The liquid prepolymer is displaced from the cylinder using gas - a propellant, which is under conditions of excess pressure.
After spraying the composition, its polymerization occurs - hardening under the influence of moisture from the air. As a result, a porous material similar to foam plastic is formed, which can be used for slopes and processed in any necessary way: cut, puttyed or plastered.
Putty and other finishing materials can be applied to the hardened foam.
This material is used for installation and repair of window frames, door frames, window sill boards, and other structures made of concrete, plastic, metal and wood. Polyurethane foam is used when installing windows and doors to seal seams and cracks.
When working with polyurethane foam, you do not need to have any special skills. It does not require the use of additional devices or sources of electricity.
Material purchase
We choose a sandwich panel as the material for our future slopes. The standard panel size is 3000 mm / 1500 mm, with a panel thickness of 10 mm. You can bring the panels home whole or ask the seller to cut them to size (the cut costs some money). It is imperative to check with the seller to ensure that the panels are from the same batch (the color of the protective film is the same shade). Next we select the edging corners. Depending on the width and complexity of future slopes, they can be from 35 mm to 50 mm. If it is necessary to replace window sills, we purchase plastic window sills and plugs (the width of the window sill is selected depending on the distance of the window to the middle of the radiator under the window).
Basic material has been purchased. For installation, you will also need a foam gun and professional foam. You can try to get by with foam and a straw, but we do not recommend this. Firstly, the quality of the foam seam in the absence of proper pressure in the cylinder leaves much to be desired. Secondly, the consumption of foam cylinders is much higher. The required number of cylinders with polyurethane foam is individual for each window, and depends on the width of the slopes and the type of house (monolith, brick). Actually, for this reason, the price of work in a brick house is slightly higher.
To seal the joints of PVC panels, use cosmofen (Liquid plastic) or silicone sealant in the color of the panels. If it is necessary to dismantle old slopes, you will need garbage bags and oilcloth for the floor (to avoid scratching the flooring).
| preparing a window opening | finished window opening |
Properties
This material is characterized by:
- the volume of foam, which indicates the size of the cylinder;
- adhesion, that is, the force of adhesion to the surface;
- foaming, which means the transformation of the composition from a liquid state to foam;
- expansion, which tells how much the volume of the foam increases during the hardening process. This indicator is important if sealing of deep seams and joints is required;
- secondary expansion.
The coefficient of expansion of foam is especially taken into account when working with deep gaps.
The indicator of secondary expansion has a negative effect and can play a cruel joke if this property of polyurethane foam is ignored. For example, when installing metal-plastic structures in the form of windows and doors, as a result of the secondary expansion of the foam, additional pressure occurs on the structural elements with their subsequent deformation. To prevent this, spacers must be installed during window installation.
Spacers prevent window deformation
Foam cannot be used for installation purposes on icy, polyethylene, Teflon, silicone and oily surfaces.
Positive qualities of polyurethane foam:
- non-passage of electric current;
- multifunctionality of use - as insulation, sealant, adhesive and soundproofing composition;
- water-repellent properties;
- fire safety class B1;
- due to its ability to significantly increase in volume, the foam effectively fills the most inaccessible places: seams, cracks, recesses, quickly hardening;
- the applied composition does not rot and is not afraid of mold;
- has high thermal insulation qualities;
- can be used for fixing water supply and heating pipes, electrical wiring;
- used as a sealant with insulating properties when installing roofing materials;
- polyurethane foam when installing windows, due to its high adhesive properties, ensures reliable fixation of window and door blocks without the use of nails and screws;
- Soundproofing qualities allow you to dampen noise from vibrations. When installing plastic windows, this property complements the quality of the design and enhances the effect of soundproof rubber seals installed in the window.
Polyurethane foam reliably fixes window or door structures
. Disadvantages:
- despite the fact that the material repels water from its surface, moisture can accumulate in its porous structure, which over time destroys the structure of the foam and reduces its performance properties;
- destroyed by direct solar radiation;
- the presence of strict requirements for the storage of cylinders - vertical position and ambient temperature from not lower than 5 and not higher than 25 degrees;
- After contact with human skin, it is very difficult to wipe off and only with the help of solvents, so it is important to use gloves when working with foam.
How to cover foam on plastic windows from the street
To close the hardened protection from the street, it is recommended to use a waterproofing agent. A multifunctional sealant or waterproofing tape with a vapor permeability effect is suitable. Using this material will allow you to neatly close the seams on the front side without overlapping.
After installing the ebb, a vapor-permeable material is installed under it. It is important to measure correctly, then cut along the length of the window frame, taking into account the margin for installation under the external slope. If the existing width is not enough, then an additional piece of tape is cut off.
Varieties
If the composition of the material from different manufacturers has slight differences, then depending on the design of the cylinder itself, the foam can be professional or household.
Professional
Professional or pistol foam is characterized by its use in conjunction with an applicator gun as a device for dosing the material . For this purpose, the cylinder design is equipped with a special working valve onto which the gun is placed.
In professional construction, foam is used with an applicator gun
The use of a dosing device allows you to deliver material portionwise into cracks and recesses, control the amount of material and save its consumption. The device itself is ergonomically designed and allows you to operate with one hand using the trigger and handle. A long thin metal nozzle allows you to feed material into the recesses. In this case, the position of the bottom of the cylinder does not matter.
The applicator gun is a professional device and therefore has a high cost. It is purchased by builders and installers whose field of activity is directly related to its use.
The applicator gun allows you to use the cylinder in any position
Modern cylinders are equipped with reusable valves. This ensures that the container is tightly closed and the contents are preserved until the next use without losing its quality or drying out. The mechanism for attaching the cylinder to the gun can also be different: the valve can be threaded and screwed onto the gun or fastened.
Household
For household use, it makes no sense to purchase a dispenser gun, since caring for it requires special aerosol solvents, which also cost money.
For one-time use, it is more advisable to use a container with a plastic tube
For occasional home use, manufacturers offer household polyurethane foam. It is also called semi-professional or manual and is represented by only one cylinder without additional devices, except for a nozzle in the form of a plastic tube, which is put on the valve before starting work.
Classification by seasonality
Depending on the temperature requirements, polyurethane foam can be:
- summer;
- winter;
- all-season.
Summer foam is recommended to be used at temperatures from 5 to 35 degrees. Winter foam is used at temperatures from 18 degrees below zero to 35 degrees plus. The presence of special additives and additives ensures the polymerization process under conditions of low atmospheric humidity. It is important to remember that the higher the air temperature, the greater the expansion coefficient of the foam and vice versa.
The expansion coefficient of foam depends on the air temperature
The all-season option is rarely seen on the shelves of construction stores, since this material is relatively new and is not produced by all manufacturers. The composition is characterized by improved qualities compared to the winter and summer versions, has an increased expansion coefficient and a high foaming rate at temperatures down to minus ten degrees.
Slope fastening
Construction, renovation, finishing are inevitable things for obtaining convenient and comfortable housing. It does not matter: the construction of frame houses or an ordinary apartment building is underway. Finishing is necessary so that the room meets the requirements and desires of the residents. Frame houses have firmly won a niche in construction with their speed of construction and affordable price. This feature allows you to celebrate a housewarming party in the shortest possible time.
Many companies offer the construction of similar structures and provide a variety of frame house designs for every taste and budget of the client. Interior decoration, installation of windows and doors is included in the cost of the project. As for the design of the rooms, all this remains on the shoulders of the client. Here the flight of fantasy depends only on him. It is up to the tenant himself to glue wallpaper, make partitions, etc., but we should not forget about such little things as door and window slopes.
Selection rules
The modern construction market offers a huge selection of these products from both well-known manufacturers and new companies. To make the right choice, it is important to pay attention to the following points.
Taking the cylinder in your hands, check it for underfilling, comparing the actual weight with the declared volume. A 750 milliliter cylinder should weigh from 850 to 920 grams. If there is not enough foam in the cylinder, the internal pressure will drop low enough and some of the foam will remain inside.
When purchasing a foam canister, you need to pay attention to the expiration date.
The percentage of secondary expansion, which occurs after a certain period of time - up to several days, is very important. It should not exceed the primary value by more than 20 percent, otherwise deformation of structures will occur due to additional load. .
The foam should adhere well to the surface, not flow off it, and have low shrinkage and elasticity. You need to purchase a bottle with a fresh expiration date.
Stages of work when foaming a window
Moisturizing the surface of walls and openings
Air humidity is of great importance in the foam polymerization process. This affects the correct reaction between its components, improves adhesion, and eliminates foam subsidence. In addition, moisturizing promotes the formation of a finely porous foam base without voids.
Before foaming, the walls of the opening must be moistened with a simple water spray. The spray reaches the required area, leaving dry the slope areas to which the vapor barrier tape will be glued. The main thing is not to overdo it with hydration. The thin walls of fine-pored foam are not able to withstand the pressure of the expelling gas. It quickly evaporates, the foam settles, and eventually voids appear.
It should be borne in mind that due to low absolute humidity, it is much more important to moisten the slope in the cold season than in the warm season.
External seam waterproofing
Despite the fact that foam is an excellent thermal insulator, it allows moisture to pass through and is destroyed in direct sunlight. Thus, it needs additional protection - external waterproofing and internal vapor barrier of window seams. This will allow the windows to be sealed with foam for the winter.
For external waterproofing, use pre-compressed sealing tape (PSUL) or vapor-permeable waterproofing tape.
PSUL is glued to the front side of the frame without tension or overlap, tightly butted on the sides and at the top until the frame is installed in the opening. The glued plastic window is carefully inserted into the opening so that the tape does not move. It is important to ensure that the PSUL fully expands before foaming the seam with polyurethane foam.
Vapor-permeable waterproofing tape is glued under low tide. It is cut to the length of the window with a margin for installation under external slopes. If the width is not enough to cover the installation seam, a tape of the same length is cut and glued to the first piece with an overlap of 20-30 mm.
Internal vapor barrier of seams
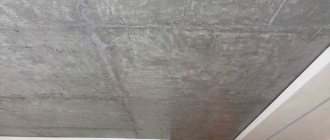
The surface of the frame and slopes must be cleaned of construction saws. The crumbling surface should be treated with a primer.
Vapor barrier tape is made of aluminum foil and butyl rubber with one or two layers of adhesive applied, covered with paper strips. This gives it elasticity. One side of the tape may have a non-woven backing for better adhesion to the plaster. The variety of tape widths makes it possible to provide reliable vapor barrier for seams of any size.
The tape is glued tightly with a narrow adhesive layer along the entire length of the window frame, without tears or peeling. The second edge of the vapor barrier tape remains unattached.
Foaming seams
To properly foam a window, the foam balloon is heated to the temperature indicated in the instructions, shaken vigorously up and down 20 times. You also need to shake it frequently during operation.
The gap between the window profile and the slope is filled with foam, while the free edge of the tape is moved back so that it does not get dirty. Gaps larger than 60 mm are filled with foam in several layers with an interval of 10 minutes. During this time it dries out a little. Moistening is carried out before the next layer.
The principle, the more, the better does not work when foaming a window, because a thick layer of foam over time under the weight of its own weight may fall out of the opening or will not absorb moisture well.
The second end of the vapor barrier tape is glued to the moistened surface of the mounting foam. It is better to glue it to the opening over the damp foam, so that it is pre-tensioned. As it expands, the polyurethane foam will stick to the tape and level it a little, which will make plastering the slopes easier.
Window sill installation diagram
Particular attention must be paid to the corner joints of vapor barrier tapes. They must be airtight.
Using these simple rules, you can easily and correctly foam your window and slopes, while achieving the greatest effect from the foam.
Rules of application
By following simple rules during work, you can ensure that the polyurethane foam when installing plastic windows will last a long time and retain its quality.
Considering that polymerization occurs in a humid environment, the surface should be moistened with water before work. As a result, hardening will occur quickly and the expansion coefficient of the foam will increase.
When working in winter, it is necessary to clear the surface of ice and frost.
Before application, shake the container vigorously for 60 seconds. In winter, the cylinder should be at room temperature.
When spraying the contents, the container should be held with the bottom up to concentrate the composite in the valve area. This will prevent a drop in internal pressure and allow the entire foam to be used.
When spraying the composition, the container must be held upside down.
When filling a seam, you need to start work from the bottom and move up with a uniform movement of the cylinder. In this case, the seam must be filled 50%. If it is very deep, then this can be done in several passes, and each previous layer should set well.
It will take approximately 8 hours for the foam to completely harden, this indicator is related to the ambient humidity and temperature.
After hardening, excess foam is cut off with a knife.
When the foam has hardened, you can cut off its excess with a knife and carry out work to protect its surface from external influences, such as moisture and sun. The foam can be plastered, puttied or painted. When installing plastic windows, it is hidden under casing or flashings.
Polyurethane foam for PVC windows: which is better?
So, now it’s clear how to choose foam. But what kind of polyurethane foam is better to use for PVC windows?
- Professional is much more reliable and convenient. In addition, professional foam has low shrinkage, that is, a decrease in volume after hardening. Low shrinkage prevents damage to the integrity of the seams, and for pistol foam it is only five to seven percent.
- Consider the ambient temperature: warmer than +5 Celsius - use summer foam, if colder -10 Celsius - winter foam. See the cans for the specific temperature range.
- Use foam from trusted and reputable manufacturers - this way you can be relatively confident in the result.
Common brands
The most common and well-established brands of polyurethane foam in the construction market are the following:
- Moment-Montazh;
- Makroflex;
- Soudal.
“Moment installation” is the most common option, produced for domestic and professional use. According to seasonality - usually all-season. It has high adhesive properties. Due to its dense and homogeneous structure, it is most often used when installing metal-plastic structures.
"Makroflex" is also often found in stores. Suitable for use on any surface. Has a low coefficient of secondary expansion. Divided according to seasonal use.
"Soudal" is not often found on sale, but this foam is worth looking for as it has excellent qualities. It is characterized by the absence of toxins and specific odor, good density and low porosity. In addition to winter and summer foam, the manufacturer produces fire-resistant options.
Important Features
Any type of polyurethane foam has two important characteristics - primary and secondary expansion . Primary expansion is how much the mass increases in volume before the end of polymerization. There are foams with both high primary expansion and low ones. Which polyurethane foam is better - with large or small expansion? It’s impossible to say for sure. They are used in different cases. Low expansion foam is good for filling small cavities, as well as for layer-by-layer filling of deep seams, when installing EPS. Large expansion is more beneficial when filling cavities, using as sound insulation, thermal insulation.
To be specific, for installing windows and doors, it is better to take foam with low expansion. Moreover, both primary and secondary. Unfortunately, this is a professional foam, so you will also need a gun.
Marking
Of course, before you install the window sill, you need to mark it. We measure the width of the window block, let it be 140 cm. We will buy a window sill 15-20 centimeters longer, since it should extend beyond the plane of the slopes by 7-10 cm (this is a matter of taste). So, we bought a 155 cm one. Let's put it aside for now.
Let's take a close look at our window opening:
Everything is fine with us, the foam layer will be about 2-3 cm. If you get more, it would be better to raise the lower “slope”, for example, with a self-leveling floor. This way the structure will be stronger (my personal opinion). Shortly before installation, the surface will need to be primed, do not forget.
Next, we must find the exact middle of the window (we have 70 cm from the edges) and, accordingly, the exact middle of the window sill (77.5 cm). In addition, we draw their central axes with a pencil. It is from them that we will set aside all dimensions so that the final result is symmetrical. As the article progresses, you will understand what I mean.
Now let's take measurements. There are four of them to remove in total, I labeled them A, B, C and D.
- A - approximately equal to the width of the window block, perhaps a little more if space allows; but no less.
- B – distance between the corners of rough slopes. As a rule, it is several centimeters larger than A.
- B is the distance between the far edge of our hero and the plane of the wall.
Under the window block there is a special groove about 2 cm deep, where it goes. You need to measure from the groove, and not from the plane of the window, be careful. Here it is also highly desirable that the wall with the window is already plastered. Let's hollow out some plaster under the “ears” and measure B so that they start “inside” the plane of the wall.
All the cut edges will then simply be covered with slopes and a wall.
- G is the total width of the window sill.
It is selected in such a way that it covers vertically no more than half the thickness of the radiator under the window.
Otherwise, in cold weather, condensation will form on the windows, since warm air from the radiator will not reach the glass. Usually the protrusion is 5-7 cm; it is not advisable to do more. Installers very often make this mistake.
This is what our window sill will look like after marking:
And after cutting it like this:
We try it on in place, insert it into the groove, manually set it approximately level, and inspect it for jambs:
Everything is in order here, you can adjust the height of the window sill. Since ancient times, wooden wedges have been used for this, but in general, anything can be used as supports. This time I conducted an experiment and used not wedges, but ordinary self-tapping screws, which I aligned with the laser.
It must be said that the experiment was only partially successful. The near edge was aligned easily and quickly, but difficulties arose with the far edge (the one that fits into the groove). After all, who installs windows in our country? That's right, Uncle Vasya. And I didn’t take into account that the windows, in fact, may not be strictly horizontal and may even bend!
I had to put improvised materials under the far edge, namely Penoplex insulation. It is necessary to ensure that there is no noticeable gap between the window sill and the window, that is, it must be pressed tightly against the window block from below.
It may be that the window goes in an arc. In this case, you need to choose the least evil. In my opinion, the main thing is the absence of a gap, and the unevenness of the surface is not particularly noticeable to the eye.
There are two requirements for the near edge: it must be strictly horizontal, and it must be lower than the far edge, that is, the window sills are placed at a slope.
The slope is usually 5-10 mm per meter. That is, for a window sill with a thickness of 60 cm, the near edge should be located 3-6 mm lower than the far one. This bias is invisible to the eye.
And it is done in order to prevent puddles, for example, when watering flowers. The water will flow down. Basically, if you don’t want to do the slope, don’t do it. I'm just describing a general case. If you use wedges, push them behind the plane of the wall so that later they are out of the way and you don’t have to tear them out.
When setting the slope, it is more convenient to use not our product itself, but cuttings from it. Insert one end into the groove, place a level on the cut and evaluate the slope. Once everything is set, we once again insert the “patient” into place and see if there are any cracks and if the required slope is ensured:
By the way, the photo shows that, firstly, I partially tore off the film from the far edge. I think it's clear why. Secondly, I aligned the central axes of the window and the sill. We see that there are no cracks. If you use wedges, there is a possibility that they may become dislodged.
To prevent this from happening, you can coat them with gypsum mortar, for example, alabaster. Then they definitely won’t go anywhere.
We can start installation.
How to use the product?
Before starting work, any surface must be prepared. Dirt needs to be removed; since the foam interacts with moisture, it is advisable to moisten the surfaces with water, but this can only be done at positive temperatures. In other cases, this action is undesirable. If work takes place outside, at sub-zero temperatures, it is necessary to remove ice and snow from the surface.
In order for the foam to readily leave the container and gain sufficient density, it should be kept in a warm room for about a day before starting work. It is prohibited to artificially heat the cylinder using an open flame. It may explode because it is under pressure.
Foam output in different cylinders
Polyurethane foam is the best idea for attaching a door frame, but when using it, you need to firmly fix the frame with supports and leave enough space for the foam to expand, otherwise you may end up with a deformed structure. You need to use the cylinder while holding it upside down. The foam must be shaken well before use.
The decision which polyurethane foam to choose for window installation remains with the buyer; the main criterion is a careful study of the packaging. Cylinders that are too light should be avoided.
Home → Windows and doors → Polyurethane foam for sealing windows: types, features
Adviсe
Since the bottom surface of the window sill is smooth, the plaster does not particularly stick to it. Therefore, a crack almost always forms under it over time. Usually everyone turns a blind eye to this, but I prefer to process it. After gluing the wallpaper, I glue it horizontally with masking tape with an indentation of about 2 mm; I take acrylic or any other elastic white sealant and apply it to the corner, immediately removing the excess with a wet sponge. The end result will look like this:
Whether to do this operation is, of course, up to you. I'm just suggesting. I can also recommend foaming the side cracks - near the rough slopes. And sometimes it happens that it blows from these places. You should also seal the window/window sill joint with liquid plastic or, at worst, acrylic.
Now that the window sill is installed correctly, you can either sit or stand on it. Nothing will happen to him.
Good luck with the renovation, new articles are coming! Subscribe to the site so you don't miss them!
When installing window sills, unfortunately, many people make a number of irreparable mistakes. To prevent them, we will consider the installation details in detail. After installing the window, all the resulting cracks must be filled with foam.
The main feature of the product is that it greatly increases in size. Foam is used for reliable sealing and thermal insulation. Thus, your living space will be isolated from noise and air from outside. But not everyone knows how to achieve the desired result.
From plasterboard
Drywall is a panel made of gypsum, covered with cardboard on both sides. This material makes the cladding strong and durable. The main advantage of drywall is its low price, which makes it very popular among craftsmen and even beginners.
For plasterboard slopes, experts use moisture-resistant plasterboards, since this is the place that is most affected by temperature changes and condensation forms. Gluing slopes from plasterboard is not difficult, but there are still differences from working with the plastic version.
Algorithm for working with drywall:
- Make all the necessary measurements: width, depth and height. Measure the latter twice - near the window and wall.
- Taking into account the results obtained, cut out the necessary parts from the drywall with a construction knife.
- Apply polyurethane foam to the slope and press the drywall for a couple of seconds. Separate the part and wait for the foam to fully expand a second time.
- Reattach the part and secure it. Can be strengthened with self-tapping screws.
- Attach metal perforated corners to the corners of the drywall.
- Finish the corners with putty. Wait until completely dry.
- Paint the slopes.
Advantages of plasterboard slopes:
- Low price.
- Long service life.
- Small amount of waste.
- Obtaining a smooth surface.
- No additional tools required.
- Versatility.
- Does not require additional use of putty or plaster.
- Protects well from environmental influences.
- Mold and mildew do not grow on it.
- Environmentally friendly.
- Easy to use.
Flaws:
- Fragility.
- Instability to sunlight.
- Inability to replace the damaged area if it is partially damaged.
- Reduces light opening.
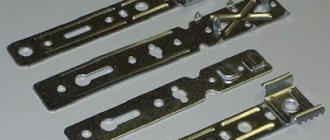
Accessories for window sill installation
- The window sill itself
- Jigsaw
- Mounting gun
- Professional polyurethane foam
- Gun cleaner
- Water level
- Dowels and screws (optional)
- Wooden wedges or their equivalents
- Primer
- Pencil
- Roulette
I think everyone knows what a jigsaw is. I'll tell you about the foam.
I recommend a professional one, for a special pistol.
Its main advantage is that when it expands, it has a minimal deforming effect on the structure, in contrast to training products with tubes.
In addition, professional compositions are much less susceptible to temperature changes.
It is the use of cheap x. neither is the main cause of humpbacked window sills in new buildings. Every self-respecting manufacturer has products for pistols: Penosil, Tytan, Macroflex, Krass and others. I usually use Penosil, but I'm not saying it's the best choice, I'm just used to it.
A mounting gun (GUN) can be purchased at any hardware store. The price range is quite wide: from about 450 rubles to 2000. If you are purchasing a tool for the home, then there is no point in overpaying, take it cheaper. But keep in mind that this is a common instrument and, like all others, it requires care. And very thorough. I wrote in detail on this topic in the corresponding article.
We'll talk about the rest of the accessories as the lesson progresses. We can get started.