The lightweight and easy-to-use metal stove “potbelly stove”, with all its advantages, has one significant drawback: low efficiency.
To heat a room, an ordinary metal potbelly stove usually spends 50-70% of its efficiency, the rest of the heat simply flies out into the chimney.
It is clear that it is very difficult to reconcile with such a situation, but unfortunately, few stove owners take radical measures to increase the efficiency of the furnace. Although, as experience shows, with a little skill and spending a little time you can get a fairly effective stove from this gluttonous design.
Advantages and disadvantages of potbelly stoves for heating
A homemade potbelly stove fits perfectly into the garage. Small sizes, affordable materials, ease of manufacture.
A homemade potbelly stove is ideal for the garage
There are several options for making a potbelly stove from scrap materials:
- Made from an old barrel. Advantages: few materials are made quickly. Disadvantages: thin walls (low heat capacity, will burn out quickly).
- Made from an old milk flask. Advantages: there is even less work here - weld the legs, weld the pipe, install the grate and drill holes in the door for air access. Disadvantages: the thickness of the walls of the flask is the same as that of a barrel.
- Made from an old gas cylinder. Advantages: the walls of the gas cylinder are quite thick and made of high-quality steel. It's easy to find the old one. There are options for manufacturing vertically and horizontally. Disadvantages: you need to be very careful during the opening process. Even after standing open for a week in the air, the cylinder can cause an explosion when cut. It is recommended to first fill the bottle with water.
- Made from metal sheet. Advantages: you can choose any sizes and materials, make a screen and make technical additions to increase the heat capacity (for example, pour sand between the walls or cover it with bricks). Disadvantages: Weight gain will require building a normal foundation.
Ensuring heat removal
It is possible to increase heat removal by creating devices that promote natural and forced convection. To ensure natural air circulation, screens are made with a guide device that allows you to create a powerful convection flow and distribute it throughout the room. The guide apparatus is made in the form of curved strips of metal, welded to the screen and directing warm air not only upwards, but also to the sides. The prepared device is attached to the oven.
The heat removal device can also be made from scraps of water supply and profile pipes. The distance from the floor to the bottom edge of the elements must be at least 15-20 cm. The pipes are welded to the stove body and covered with a screen on the sides to protect against accidental contact. A traditional potbelly stove heats the air around it by 0.5-1.0 m, and the use of such a design allows you to increase not only the radius, but also the rate of temperature rise in the room. When the body of the heating device is heated above 60 °C, a stable convection draft appears in the device, the power of which increases as the temperature of the furnace increases.
Heat removal can be increased by using fans to blow over the heat transfer surface. Both household and old car fans are used. Devices with variable rotation speeds have proven themselves especially well. They allow you to regulate the temperature and heating time of the room in various oven operating modes.
For more efficient blowing of the furnace elements, special casings are installed that allow cold air to be directed to the hottest areas of the heating device, while it can be taken from various places in the room. A potbelly stove with pipes welded into the firebox for heating air has proven itself well. A multi-speed car fan installed on a common discharge manifold allows you to effectively heat the room.
The combined use of devices for artificial airflow and natural convection can significantly increase the efficiency of a potbelly stove, which means heating the room more efficiently.
Calculation of basic parameters (with drawings and dimensions)
Despite its simplicity, for high-quality operation of a potbelly stove, you need to make some calculations. All structural elements are calculated.
Pipe
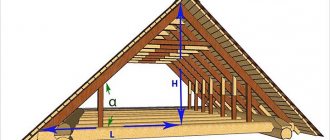
The main thing is to calculate the diameter of the pipe. If this diameter is too large, then all the heat will escape into the atmosphere. If it is small, there will be no draft, the stove will smoke. The diameter (in mm) should be 2.7 times the volume of the potbelly stove in liters. The capacity is determined without the volume of space below the grate (the height is equal to the distance from the top to the grate).
Example: height from the top wall to the grate is 25 cm, width is 40 cm, length is 50 cm, then the total volume in liters is 50 liters. The diameter of the pipe will be 50 x 2.7 = 135 mm.
There are several options for making potbelly stoves for the garage
Screen
The main task of the screen is to reflect heat inward to increase the combustion temperature. Then the gases will not cool down, but will completely burn out. The fuel must be burned by partial pyrolysis. The screen is installed at a distance of 50-70 mm from the walls on three sides. It is good to make a screen from red brick. It heats up and then gives off heat for a long time and gradually.
You can also make a water heating system throughout the garage using a potbelly stove.
Litter
Due to the fact that part of the heat is radiated downwards, the floor under the stove heats up. If it is wooden, then a fire is possible. Embers may fall out when opening the door. A bedding made of iron or other non-combustible material (for example, sheet asbestos) is required. The litter should overlap the contour of the stove at a distance of 350-600 mm.
Procedure for kindling
Experienced stokers don’t have a question: how to quickly light a stove with raw wood? They elevated their work to the level of art. Because they know that wood gives off heat at a temperature of 300 to 400 degrees. And to heat rooms it is not enough to maintain a fire at 50 °C. This will only lead to smoke.
For an optimal kindling process, experts give several recommendations on how to reduce fuel consumption and increase heat:
- It is preferable to prepare raw materials that are five centimeters smaller than the combustion chamber.
- The size of the chopped log should be approximately the same.
- It is necessary to remove all burnt ash and coals from the furnace, and clean the grates from tar and soot.
- Then check for the presence of traction, first light the paper. And look at the direction of the smoke. If everything is in order, then it will go inside the firebox, and not out.
- We begin to make a seed: we place two logs parallel to each other, and between them is a crumpled piece of paper. Sawdust and shavings are poured on top. Two more beams are placed on top of this structure. Next, we set it on fire with the blower open so that there is additional air supply.
- When the heater begins to hum, then close the lid, but not completely.
This method is suitable for dry logs, but how to light a stove with wet wood? Stokers give their recommendations:
- Chop the block lengthwise into several pieces.
- If it is a birch tree, then remove the bark, as it will interfere with the kindling.
- From the inside, pinch the splinters, which are not so wet.
- There should be a large number of such chips. Because they will have to maintain the fire for 15-20 minutes until the firebox warms up.
- Place the prepared splinters in a “hut” on the crumpled paper.
- When the fire is burning properly, you can then add thin dies.
- Wait another twenty minutes, then add the raw logs to the hot coals.
- Cover the vent and monitor the combustion process.
- Don't let the fire go out, otherwise you'll have to do it all over again. Periodically add wood to the flame.
- Watch the draft so that smoke does not enter the room.
Required tools and materials
To make a potbelly stove you need the following tools:
- welding machine;
- hammer;
- chisel;
- rags;
- Bulgarian;
- sandpaper.
Of the materials, first of all, you need to have the basics - a barrel, or a milk flask, or a gas cylinder, or sheets of metal from which the stove will actually be made.
In addition to them you will need:
- sheet material;
- steel pipes;
- door hinges;
- grate bars or reinforcement bars;
- pipe with weather vane;
- fire brick.
This list may not be complete and some may be replaced.
Fuel selection
A potbelly stove is a stove that can be heated with a variety of fuels. This is firewood, peat briquettes, etc. Waste fuel such as waste oil is often used. This type of fuel requires some modification of the stove, but is available and cheap, especially in large cities, where it is not always easy to obtain firewood. And if this is a garage where they change the oil, then there is no problem with working out. Fuel in the form of oil gives more heat and burns completely. No ash.
Firewood for a potbelly stove
Firewood for a potbelly stove can be of any kind, but there are still certain preferences.
Softwood firewood burns quickly, produces less heat and produces a lot of soot, which clogs the chimney. There is a risk of fire.
It is better to use hardwood firewood:
- birch;
- acacia;
- aspen:
- oak;
- fruit trees;
- alder.
This wood burns long and hot.
Water heating in a garage from a potbelly stove has a special advantage - you can use any available fuel to heat the stove: wood, coal, vegetable waste.
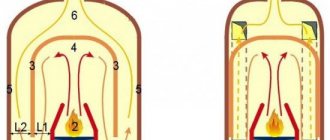
Pyrolysis boiler
Connoisseurs of high technology may be interested in pyrolysis boilers, the cost of which, although higher than usual, is not comparable in productivity to traditional systems. The owner of such a boiler saves significant amounts on firewood, since the process includes the stage of burning gas released from solid fuel. With one stack of firewood, such a boiler can operate for more than a day.
To properly heat a pyrolysis boiler, you should put a portion of wood chips and a large piece of dry paper into the scorching door, and firewood and a small amount of coal on top into the loading door. You should light a piece of paper, from which the combustion process will spread further. The door can be closed as soon as the wood chips ignite.
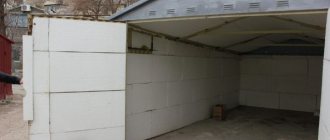
Preparatory work before assembly
Before assembly and installation, you need to choose the right location. For safety reasons, the stove must be installed in a place away from the car at a distance of no closer than 1.5 meters. Optimally in a corner away from the entrance. The walls of the garage in this place are best protected with sheet asbestos.
Assembling a potbelly stove in the garage
Chimney outlet through the roof
Diagram of the outlet of a stove chimney for a garage through the ceiling/roof:
As in the case of installing a chimney through a wall, when installing through a ceiling, preliminary assembly is first done in order to accurately mark the future passage through the roof. Once the installation hole is made, the steel penetration through the roof is installed.
Next, in the same sequence, the pipe is assembled and the passage through the roof is laid with non-combustible material. The passage of the chimney through the roof requires reliable waterproofing so as not to encounter leaks in the future. As in the first option, you should protect the pipe from moisture getting into it and insulate the outer part of the pipe to reduce the formation of condensation.
How to make a potbelly stove in the garage with your own hands
If you have the skills to perform welding work, then installing a potbelly stove in the garage will be no problem. To do this you need:
- draw a preliminary design for yourself;
- choose a place;
- conduct an audit of available materials;
- select the required amount of materials;
- find or buy what is missing;
- mark and cut according to the sketch;
- cook the stove;
- install it in place and take the pipe out.
Do-it-yourself potbelly stove for the garage is ready!
Classic stove - potbelly stove
To make a classic potbelly stove with your own hands for the garage, you need to take 10 steps:
- Make 5 blanks from sheet material: a bottom, two sides, two to form a smoke circulation.
- Mark the places for attaching the grate and smoke circulation sheets on the side blanks. Weld a reinforcement bar or angle in these places for subsequent fastening of the grate and smoke circulation sheets in these places. You can buy a standard cast iron grate or weld a grate from strips 25 - 30 mm wide of thick metal (you can use reinforcement bars, tractor fingers or pieces of pipes with a diameter of 20 -30 mm).
Classic stove - potbelly stove - Weld the side walls to the bottom. Use a builder's square to weld vertically.
- Sequentially weld the lower and upper workpieces so that a smoke channel is formed.
- Weld the lid with the welded sleeve. Install a damper in the sleeve so that the chimney can be closed. Cut and weld the jumpers.
- Make a door. Equip it with hinges and a latch. Make the door large to make it easier to remove the ash later. Secure at the front.
- Weld legs from pieces of metal pipe 8-10 cm long. Nuts can be secured inside the pipe. By screwing the bolts into the nuts, you can level the position of the stove.
- Make a chimney from a pipe. Select the pipe diameter to be no less than the calculated one.
- Secure the chimney by insulating the transition in the wall.
- Place the stove in place and adjust the height. Secure the chimney in the sleeve.
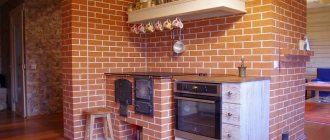
Warm brick
A potbelly stove using wood, coal and other types of fuel can significantly increase its efficiency. To do this, it is enough to build a screen of baked clay bricks around it with your own hands. If you look carefully at the drawings of such a mini-building, you will see that the bricks are laid at a short distance from the walls of the stove (about 10-15 cm), and, if desired, around the chimney.
Brick screen for potbelly stove
Bricks require a foundation. Do you want the masonry to last a long time? Then fill the base one at a time to form a monolith. It is better to take concrete as the material for the foundation, which should be reinforced with steel reinforcement yourself. It is advisable to place the reinforcement layer at a distance of approximately 5 cm from the surface of the concrete pad.
Ventilation holes are made at the bottom and top of the brickwork, which will ensure air movement (heated masses will go up, cold air flows will come from below). Ventilation also prolongs the life of the metal walls of the potbelly stove, delaying the moment of their burning due to cooling by circulating air.
Bricks laid around the stove accumulate heat and then release it for a long time, warming the air in the room even after the stove goes out. In addition, brickwork additionally protects objects surrounding the stove from fire.
If desired, you can completely lay out the stove from brick. Such a structure is advantageous in that it will last for many years without additional effort on the part of the owner. However, there are also certain disadvantages. The disadvantages of this option include the following:
- the process of laying out such a stove is quite labor-intensive and is suitable only for those people who have experience in masonry with their own hands;
- a brick stove is quite expensive, as it requires the use of fireproof materials, including fireclay bricks and special clay for mortar.
In order to get a small potbelly stove with wood, it is enough to lay out a cone measuring 2 by 2.5 bricks, 9 bricks high. In the combustion chamber, rows 2-4 are laid out of fireclay bricks. An ordinary fired clay brick is suitable for a chimney, into which you must remember to insert a stainless steel sleeve.
Whatever the method of making a miniature stove or potbelly fireplace with your own hands, whether you make them according to a drawing or by eye, the main thing is that at the end you get an effective heating device, and in an expanded configuration also a hob for cooking. Look around for suitable materials (barrels, sheet iron, etc.) and go ahead to your own homemade stove or even a potbelly stove!
Milk flask stove
Before you put such a potbelly stove in the garage, you need to know that the scale of welding work here is smaller. In fact, here the legs and the chimney pipe are welded to the body. The door remains standard. Holes are drilled in it for air flow. The grate is made from a metal rod. It is mounted horizontally at the bottom of the flask.
It is installed in the desired place and the chimney is attached to the sleeve.
Such a stove is more suitable for burning garbage than for heating.
Why increase efficiency?
The compact dimensions of the stove mean that the surface that heats up during operation is small. Not much heat flows outside and the room quickly cools down. Sometimes it seems that the return from the potbelly stove is weak.
To help it increase efficiency, several tasks are solved:
- the duration of combustion and smoldering increases;
- a sufficiently high combustion temperature is ensured;
- a high level of traction is achieved.
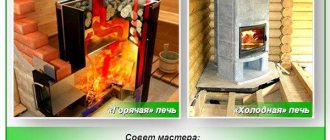
Standard potbelly stove efficiency
From a gas cylinder
How to make a potbelly stove for the garage with your own hands from a cylinder? A gas cylinder stove is made in various designs - horizontally and vertically.
When installed horizontally, the container itself is the combustion chamber. Instead of a grate, rows of holes are drilled in the wall and in this place I weld an ash pan box with a drawer. You can cut out a window and install a standard grate. A cutout for the door is made in the end part. The door can be made from this segment by hanging it on hinges and attaching a handle with a latch, or by welding a standard one. The chimney liner is welded on the opposite side.
The legs are attached at the bottom.
When installed vertically, the internal space of the cylinder is divided into two parts. At the bottom there is a round grate and an ash drawer.
A window for the door is cut out in the upper part and the chimney liner is welded. The upper semicircular part can be cut off and a metal sheet welded to form a hob.
Safe installation of the heating device
For safety, the stove is installed on a foundation or metal sheets.
When installing and operating the stove, the following safety precautions must be observed:
- install protective screens made of sheet iron under the fireplace and on nearby objects;
- insulate the passage through the wall with non-flammable compounds - clay, brick, asbestos;
- do not make right angles on the chimney, avoid horizontal sections of more than 200 cm;
- It is prohibited to melt fuel with explosive substances - alcohol, acetone, gasoline;
- keep fuel no closer than 100 cm from the operating firebox.
If possible, do not leave the potbelly stove unattended.