Wooden slats, which were once used to line the inside of railway cars, have become a sought-after material for interior decoration. A lining ceiling is one of the ways to make the interior more interesting, giving it features of exclusivity and individuality. Let's figure out what types of cladding materials exist, what to choose and how to decorate the ceiling, what design ideas are used.
Lining in a modern interior Source idei.club
Interior design features
A number of features that will further affect the overall appearance of the room.
- Products made from dark wood can visually reduce space, so they should be used in large and spacious rooms.
- On the contrary, light lining ceilings are suitable for small rooms.
- In small rooms, it is advisable to lay out the lining along, rather than across, this will make the room appear much taller.
Types of lining
This is the name of a board that is used for finishing indoors or outside a building. There is a groove on one side, and a tenon going into it on the other. Due to this, the sheathing firmly closes into a single plane without gaps, does not bend or deform over time. Shallow cuts are often made on the back side, which serve for ventilation.
Different types of lining differ in profile cross-section. Standard - smooth, with a pronounced seam between the individual boards. The calm type has smoothed corners. The blockhouse has a curved, rounded surface and is used to imitate a log. The American one has different thicknesses at the edges; when assembled, it resembles a wall made of overlapping boards or timber with a trapezoidal cross-section. Eurolining is long and narrow, has parallel cuts on the outside. There is also a double-sided option, in which both planes are front and look the same.
Lining is made from different types of wood. Pine is a budget option, has a pronounced pattern, and is often tinted or painted. Larch is resistant to moisture, making it suitable for damp rooms. Linden releases beneficial substances and has a pleasant pinkish tint. Spruce, ash, oak, aspen, beech, etc. are also used.
The boards differ in the number of knots, small cracks, unevenness and other defects. Depending on this they are divided into classes. Extra (premium) has no disadvantages, but is the most expensive. It is followed by A, B, and the most budget - C.
The sizes of all types are within the following limits:
- from 2 to 3 meters in length;
- 8-12 cm wide;
- 1.2-2.5 cm thick.
A ceiling made of wooden lining, regardless of the specific type, has similar pros and cons. The advantages of the material include:
- environmental friendliness (based on natural wood);
- beautiful appearance;
- variety of design due to the use of different breeds, tinting and coloring;
- relative accessibility of installation (no specialized skills or tools required);
- the ability to hide communications or defects in the rough ceiling under the finished ceiling;
- heat and sound insulation;
- ability to be combined with other materials;
- relatively low price.
The disadvantages include:
- reduction in level due to the peculiarities of installing a suspended ceiling (lining is mounted on top of a wooden frame);
- instability to moisture and fungus;
- flammability;
- the difficulty of changing the finish in the future if you are tired of this look.
Important! For safety, the boards are coated with fire-retardant and anti-mold impregnations. To protect against moisture, apply a layer of varnish or paint.
Wooden block base
The first step will be to secure the beams to the ceiling in a perpendicular direction to the clapboard sheathing. It is necessary to leave a distance of no more than 100 centimeters between wooden parts, and 60 centimeters between plastic parts.
The bars must be laid with the bottom edge parallel to the floor and on the same line as the others, for which a level is used.
Having secured two bars on contrasting parts of the room (with an interval of 15 centimeters from the wall), you need to check the level from the edges of the bar and in the middle.
Next, a beam is attached to the ceiling canvas with screws and dowels every 60 centimeters. As a guide, it is reasonable to stretch the cord between the bars and install the rest. Upon completion of the work, they begin to strengthen.
To make the structure more reliable, it is recommended to make jumpers between the main parts. Then, having cut the pieces (so that their length is equal to the width between the beams), we attach them to the central part of the ceiling.
But, jumpers for strengthening can be made only in places where the greatest severity is expected.
Selecting lining for the ceiling
More recently, when it came to ceiling lining, it was wooden figured strips that were meant. However, currently the construction market offers several types of lining. Based on the intended purpose of the room, material capabilities and buyer preferences, you can choose one or another material.
The material for making lining can be:
- wood;
- polyvinyl chloride;
- MDF boards.
It is worth going into more detail on each of the materials.
How to care for the ceiling
If we are talking about lining made of wood, it must be treated with antiseptic impregnations and primers that slow down the destruction of wood and prevent the development of fungus and rotting. When choosing a specific product, pay attention to its color, which should match the desired result.
Alternatively, wooden panels can be coated with a special oil, varnish or paint of your choice.
The processing option depends only on the wishes of the owner. In order for the ceiling to retain its presentable appearance longer, it is advisable to periodically wipe off dust from it. If just a damp cloth is not enough for cleaning, you can use special household products that are sold in large quantities in supermarkets.
Types of wooden lining
The main types of wood that are used for manufacturing:
- Spruce. The most budget option. Such products do not have a very expressive structure and are not very bright in color, so they are most often used for painting.
- Larch. Moisture-resistant, very durable structures, rich brown-red color with expressive texture.
- Linden. It has a golden or pink hue and is a flexible and soft breed. Such models have a long service life and release useful substances into the air.
- Pine. Practical and inexpensive look. Products made from pine have an elegant texture and soft shades from brown to pink.
The photo shows a dining room with a ceiling trimmed with linden clapboard.
Features of polyvinyl chloride lining
Covering the ceiling with PVC lining is an excellent option, since the material is very easy to handle and easy to install. However, it is worth remembering that PVC planks are fragile and very easy to damage.
There are two types of PVC lining:
- with seams;
- seamless.
Seamless lining allows you to create an almost seamless, smooth surface on which the seams between the individual planks will be almost invisible. If you want to create a surface reminiscent of eurolining, you should use panels with seams.
One of the main advantages of polyvinyl chloride panels is that they are resistant to wet environments. However, you should avoid exposing such a ceiling to direct sunlight, since under ultraviolet radiation the lining will begin to lose its original color.
Thus, the best options for finishing the ceiling with clapboard would be plastic (PVC) panels, as well as wooden planks.
Wooden lining
When finishing the ceiling with wooden paneling, the natural rustic style of the room is preserved. Wood lining is used in premises for any purpose and is absolutely safe for human health. The price of this building material varies depending on the type of wood. Most often, lining is made from alder, cedar, fir, oak, aspen, larch and other types of wood.
Pine has antiseptic properties because it is rich in resins. These substances cause mold to form on the surface of the lining. In addition, pine itself is considered a fairly smooth tree, with a small number of knots, which makes it ideal for creating lining.
Lining made from coniferous wood is considered almost universal, unlike hardwood, which is used mainly indoors. However, any wood is susceptible to moisture, so it must be impregnated with special products and provide air access to ventilate it.
Depending on the quality of the wood, there are 4 types of lining:
- Top class (extra). This board looks perfect in appearance, there are no chips, dents or cracks on it. The price of such material is very high, since it is made by splicing. At high humidity, this material begins to crack, so this lining is not used in damp rooms.
- Class A. Small knots are allowed, but there are no other defects on such material. As a rule, it is this category of lining that most consumers choose.
- Class B. There may be small defects on the surface of the board. Although such lining is usually not used in residential premises, it is best suited for cladding balconies and country houses.
- Class C. This is the lowest grade material, which has a large number of knots and defects.
Briefly about the main thing
Lining as a ceiling decor has many advantages, and, thanks to the variety of types, it allows you to beautifully decorate the interior in many popular styles. For cladding residential premises, choose material from hardwood, class A or “Extra”. In small rooms, preference is given to boards in light shades.
There are many ways to sheathe the ceiling: using a combination of materials, figured layout, false blocks. Calculating the material for the ceiling is not difficult; you can do it yourself or use an online calculator. The cladding is carried out on the frame or with glue, choosing the most suitable option.
Types of lining
In addition to the classic seamless lining, the slats of which fit tightly together, there are two more types: European and American. Each of them has its own specifics and characteristic features. We describe which ones exactly below.
Eurolining
One of the most popular types is eurolining. It is created according to Western standards with one main difference: there are gaps and gaps between the long boards. The boards do not fit closely, and thanks to this the walls become visually wider.
ltr”>Liping is a narrow and thin cladding strip, which traditionally has a long length and is easy to use and install. It can be used for both interior and exterior decoration of the house.
But there are still many important questions: what material is the lining made of? What types does it come in? What are its applications in capital improvement projects? We answer these and other questions about lining below.
How to choose material?
There are many manufacturers of this material, but the quality of the products sometimes leaves the best. To avoid making a mistake in your purchase, you should carefully inspect it during purchase. You should pay attention to every little detail.
Packaging – you should be wary if the lining is sold packed in film. This fact indicates the low quality of the product, since the seller is not allowed to tear the film and pull out the panel for inspection. Also, panels covered with film are exposed to humidity resulting from lack of ventilation . This packaging negatively affects the quality of even first-class materials.
If possible, carefully check the plate itself. Slight bending jeopardizes the result of the work performed. It is better to refuse such a product . Firstly, there will be difficulties during installation. Secondly, even after installing it, there is no guarantee that it will last long.
If visual inspection is clear, inspect the surface. Transverse waves may appear on the board. The most thorough inspection is necessary for connecting structures (grooves and ridges). Under no circumstances should they contain chips or cracks.
For inspection, it is advisable to have a clip that can detect waves. If any are found, the clamper will not be able to be installed as needed. Make sure that assembly is easy when trying to connect individual panels.
Be sure to use a device, if available in the store, to measure the moisture content of the lining . Take the time to examine your purchase - this will guarantee the final result.
When choosing a finishing material, you need to have an idea of its specifications. Wooden lining is divided into four quality categories. They have significant differences. It is impossible to choose quality materials without paying attention to them.
- Class A products are fully suitable for ceiling cladding. Errors are possible here, such as resin stains (no more than two), non-through cracks (one or two), one knot is allowed.
- Class "B" is relatively good material. Its use in residential premises is undesirable due to its aesthetic characteristics. This is an increased number of blind cracks, knots and resin stains.
- Class “C” products are of low quality. It is used for cladding only outbuildings. In this group, the criteria are completely different - falling knots, through cracks, resin pockets. However, this material is not a complete defect.
- “Extra” class products are characterized by the complete absence of any defects. This is an ideal option for finishing ceilings.
This classification is a guiding star when choosing wooden lining. The type of wood affects the performance characteristics of the manufactured product.
Material quality control
After you have decided on the type, color, and quantity of the lining and delivered it to the work site, you need to check its quality. All panels should be laid out on a horizontal, flat surface and checked to see how well they correspond to the stated characteristics. Sometimes unscrupulous sellers place defective samples inside the packaging to avoid losses due to their rejection. Of course, it is advisable to pay attention to this during the shopping process in the store.
The next step if you plan to work with wood paneling is to dry it. PVC and MDF panels do not require this manipulation. To prevent the wooden lining mounted on the ceiling from becoming deformed, it must be thoroughly dried on a horizontal surface. The minimum drying period is 2 weeks, but a longer interval is allowed. If you do not want the wooden ceiling lining to soon lose its presentable appearance, drying cannot be neglected.
Living room
All guests will certainly gather in this room and special attention should be paid to the decoration of its upper part. Decorating with slats or planks made of wood would be appropriate here, however, it is worth paying attention to their outer side.
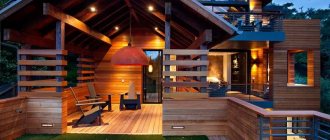
You can coat the planks with a tinted varnish, which will give the entire surface an excellent look. If you use different tones of varnish or stain for individual parts, you can eventually assemble a ceiling like the one shown in the photo below from the lining.
When the height of the walls allows, you can create a semblance of a beam ceiling, typical of Alpine chalets and hunting lodges. In this case, an excellent solution would be to contrast the colors of the beams and the main plane. It looks very beautiful, but the entire interior should be decorated in this style, then the whole picture will turn out more complete.
Design options
It is important to consider room features, such as the layout and height of the room. The layout and other nuances depend on this.
Methods for arranging lining on the ceiling
Elements are placed differently, depending on this the perception changes. When you need to expand a narrow room, the board is placed along a short wall. Sheathing parallel to the long one, on the contrary, stretches it out; this option is rarely chosen. The elements are arranged staggered, with a slight offset. In small spaces, the lining is laid diagonally, which increases the volume.
You can secure the board with a Christmas tree. This option is often used for flooring, but on the ceiling it looks unusual and attracts attention. A similar method of laying is with squares in different directions. Sometimes location options are combined. For example, in the center - diagonally, and in the corners parallel to the walls. Or in one part of the room along, and in the other - across. This is how functional areas are distinguished in the room.
From the lining you can lay out various shapes on the ceiling (for example, a star or a rhombus in the center). The rest of the space is filled with a board located at a different angle, or other materials are used. This ceiling looks very original.
Non-standard solutions
Wood cladding is also suitable for more unusual design options. In attics, ceilings with a beveled surface are sheathed with clapboard, laid across the beams. Boards are also used for other complex shapes, such as arched ones.
Lining is also used to create two-level ceilings. To emphasize the difference in heights, choose different styling options and colors.
The material is easily combined with others, for example, with painted slabs, plasterboard or stretched fabrics. Often combined ceilings are made multi-level.
Even an ordinary surface looks more interesting if you cover it with clapboard and add beams. Lay one on the border of the zones, or several parallel lines. Choose contrasting colors (dark against the background of light lining) or the same shades.
Peculiarities! The cladding is complemented with suitable lighting. In addition to the central chandelier, a variety of built-in devices and a diode strip are used.
Ceiling Design Ideas
The most interesting ceiling design ideas.
Two-level
Different levels of differences on the ceiling look interesting and unusual. With the help of such double structures, you can zone the space and give it visual complexity.
With beams and false beams
An aesthetically attractive and very original version of the ceiling design, which allows you to visually enlarge the room and favorably emphasize its style direction.
The photo shows a living room and a white clapboard ceiling decorated with beams.
Combined
The lining combines very harmoniously and stylishly with other materials. Contrasting ceiling combinations look especially successful and beautiful.
Sloped ceilings with gable roof
Wooden products are quite popular and almost irreplaceable option for covering a gable ceiling.
Turning into a wall
The ceiling structure that smoothly flows onto the wall looks very original and gives the room a more stylish and modern look.
Brushed
Such models have a pronounced woody texture and an unusual aged texture, which is obtained as a result of special treatment with metal brushes.
With an unusual middle
Such an extraordinary design will undoubtedly add brightness and originality to the interior.
Antique
To achieve this aged effect, treatments with various varnishes or stains are used.
Photos in the interior of the rooms
Ceiling models are selected in accordance with the functionality of the room.
In a private house
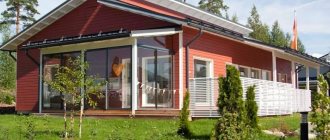
This type of finishing will create an exceptional interior in a country wooden house. High-quality eurolining not only has a beautiful appearance, in no way inferior to a natural log house, but also has a wonderful woody smell.
Kitchen
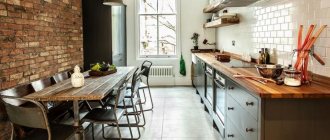
Here the lining will be especially appropriate. It is environmentally friendly, moisture resistant and easy to maintain, and brings naturalness, comfort and relaxation to the kitchen interior.
The photo shows a kitchen interior with a ceiling decorated with clapboard.
Bathroom
Noble, discreet shades of the ceiling structure in the bathroom or toilet will look very graceful and elegant.
Bedroom
To maintain a calm and peaceful atmosphere in the bedroom, you should use ceiling products in natural pastel colors. The combination of lining on the ceiling with floor or wall covering will add additional comfort, softness and warmth to the room.
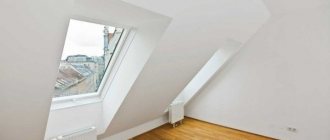
Attic
Light-colored models will help add more light, space to the attic room and simply elevate the attic floor.
The photo shows ceiling lining in light colors in the attic.
Hall or living room
Eurolining on the ceiling will make the living room especially cozy. Wooden structures in any colors will bring rhythm and dynamism to the room, and also adjust the geometry of the space.
Balcony and loggia
An ideal and very effective ceiling design option. For loggias located on the shady side, dark models are perfect; for balconies facing the sunny side, you can use light or specially bleached products, which, unlike dark ones, are not subject to fading.
Hallway and corridor
The ceiling, decorated with MDF paneling, looks elegant and acquires a special structural depth. This finishing allows not only to level the ceiling surface, but also to make it decorative and attractive.
The photo shows a hallway with a light ceiling made of clapboard.
In the gazebo
A fairly common type of finish that harmonizes perfectly and fits into the landscape design.
Veranda
This veranda covering is the most beautiful, durable, affordable and convenient solution, perfectly emphasizing the comfort of home combined with the beauty of nature.
Bedroom
Very suitable for using planks in decoration. The covering is completely natural, which means it creates a very good atmosphere, which is useful in a relaxation room. The next photo shows the ceiling in the bedroom, assembled from painted lining. This solution fits perfectly into the Provence style, which always remains popular.
In this part of the house, the combination of wrought iron furniture and stained or varnished covering parts will look very stylish. The bedroom will acquire a unique charm and a slight touch of antiquity. The photo below shows a clapboard ceiling in just such an interior.
Those people who may have allergic reactions to ethereal compounds released by some types of wood should carefully consider the choice of such material. A person spends quite a long time in the bedroom and reactions of this kind may intensify.
Decoration in various styles
Lining allows you to support and highlight the uniqueness and originality of any style direction.
Modern style ceiling
Tinted or laminated boards laid out on the ceiling in various combinations will harmoniously fit into a modern design and add even more exclusivity and creativity to it.
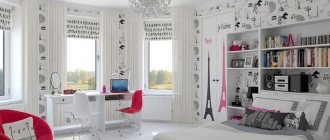
The photo shows lining laid out in squares in a modern style nursery.
Provence
Light ceiling carvings or models painted in soft pastel colors will give a Provence style room a feeling of open space.
Scandinavian
The boards located on the ceiling are especially perfect for the impeccable, laconic and unpretentious Scandinavian style. This design of a Nordic interior looks very original and stylish.
The photo shows a Scandinavian-style children's room with multi-colored lining on the ceiling.
Loft
A brushed, slightly rough lining would be appropriate here, which would perfectly emphasize the incompleteness and certain negligence of the industrial style.
Curved ceilings made of lining
They allow you to bring to life the most unique design solutions.
Diamond
The lining, laid out in a diamond shape, creates a feeling of multi-layering in the room, adding volume and dynamism to it.
The photo shows a ceiling lining laid out in a diamond shape in a bedroom interior.
Herringbone
Simple, a little trivial, but at the same time the most popular pattern that can completely change the geometry of the room and create visual illusions in it.
Squares
Not complicated, but quite an interesting pattern, giving the ceiling some proportionality.
Diagonally
This technology will be especially suitable for small spaces. It significantly enlivens the interior, brings dynamics to it and expands the small space.
Ceiling colors
Colored lining will allow you to correctly emphasize and harmonize the entire interior.
White
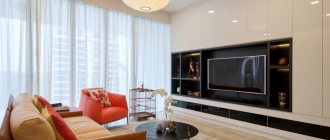
The most current and very presentable color. It looks unobtrusive and makes the room more spacious and airy.
The photo shows a small living room with a white clapboard ceiling.
Brown
This color has a special depth. It makes the ceiling a little lower, but at the same time creates a calm, cozy, warm and peaceful interior.
Blue
Brings air, freshness and comfort into the room and creates a more pleasant atmosphere in it.
Wenge
The multifaceted and very organic shade of wenge can transform any interior and add aristocracy, sublimity and elegance to it.
Two-color
This alternation of colors on the ceiling looks very impressive and unusual. With the help of a two-color ceiling design, you can not only decorate the interior, but also create a visual zoning of space in it.
The photo shows a two-color lining ceiling in the kitchen interior.
Calculation
Calculating the required amount of this material for finishing the ceiling is not difficult, but painstaking. And the calculation must be carried out carefully so that the final result does not bring disappointment in the form of additional costs (time, money, nerves). It is advisable to purchase the product with some reserve. You need to start with a clearly developed plan regarding the direction of fastening the elements. Record all this on the drawing.
With the help of these records it is easier to calculate the product consumed. The ceiling area is calculated simply: the width is multiplied by the length (as an example - ab - 3x4 = 12). For an accurate calculation, you need to know the dimensions of the selected cladding material. This data must be indicated on the packaging of the material and comply with GOSTs. By dividing the area of the ceiling by the area of one board, you will know how many panels you will need.
Ordinary mathematics. But do not forget about the nuance of fastening, that is, the presence of grooves and ridges. Here there will be a decrease in the width of each board. This calculation can be done manually. This threatens to waste a lot of time and effort.
Online calculator programs will come to the rescue. All you need is knowledge of the basic parameters of the panel - width, length, height and thickness. Based on practice, it has been noted that the results of two similar measurements do not have significant differences. The accuracy of measurements will save the budget allocated for repairs and protect against unnecessary trimmings. However, do not forget about the rule of rounding up the fractional value and adding to it 15% of the strategic material reserve .
You can immediately calculate the cost of the material. When purchasing, you need to know the parameters of the lining and the required quantity. And don’t forget about the factors that influence the cost: the price depends on the size of the lining, with accurate measurement of which it will be possible to purchase the necessary cash. Now it’s time to safely begin installation work.
How much material will be needed and what installation method to choose?
Before covering the ceiling with clapboard, calculate the amount of material for the ceiling; it is performed in two steps:
- Calculate the ceiling area by multiplying the length and width.
- The area of the ceiling is divided by the area of one die. Its size is indicated on the package, but you can measure it yourself; at the same time, make sure that you use the usable area of the lining.
The sizes and grade are indicated on the packaging Source beaver-news.ru
The resulting number is rounded up and another 15% is added “in reserve”. A similar result can be obtained using an online calculator. There are two ways to cover the ceiling with clapboard:
- On the frame. The method is suitable for rooms with fairly high ceilings. A frame, wooden or made of a metal profile, is attached to the main ceiling; the lining is fixed with nails, screws or clamps.
- On glue. The method is suitable for a wide variety of surfaces; the main thing is that the base is sufficiently smooth and free of dirt. The panels are carefully glued using the adhesive instructions.
Installation on a wooden frame Source masterpotolok.com
How to sheathe it yourself?
The process of installing a suspended ceiling made of lining is simple, so its installation can be done independently, without the help of craftsmen. Finishing is carried out in two stages: first, the supporting frame is prepared, then the cladding is done with boards.
The frame is attached as follows:
- The direction of fastening the lining is determined . If it is longitudinal, then the frame sheathing is fixed transversely; if it is transverse, vice versa. In addition, before installation, you need to set the level of the future ceiling and draw markings along which the filing will take place. The frame must be mounted 5-10 cm lower from the main ceiling. To do this correctly, it is recommended to use a laser or hydraulic level.
- After all the markings, you need to secure an aluminum guide profile around the perimeter of the room. You can join the parts using self-tapping screws and dowels. In this case, the profile must correspond to the dimensions of the structure, so it is cut and positioned along the length and width of the frame. To increase the strength of the frame, it is additionally reinforced with suspensions, observing a step of 60 cm.
- The next step in installing the ceiling is laying the lining. First, you need to nail slats to the frame, adjusting them to fit the walls, then you can lay decorative boards. At the end of the work, all joint gaps will be covered with strips, and the joints with the walls will be covered with plinths. When installing plastic lining, on the contrary, the baseboards are fixed first, and only then the panels are laid.
- The staples should be driven into the inner wall of the groove. Wooden lining is fastened with small nails, MDF panels are fastened with nails with a large head, and plastic boards are fixed to the frame using self-tapping screws and a stapler.
To learn how to attach the lining to the ceiling, see the following video.
Reasons for popularity
Lining is a thin cladding board with a characteristic tongue-and-groove fastening. The fashion for wood finishing has lasted for decades, despite the fact that there are alternative options, plastic and MDF. The reasons for the popularity of the material lie in the following features of the lining ceiling:
- Environmental friendliness. Natural material makes the space of the room especially cozy; the cladding is completely safe for health.
- Practicality. Naturalness is a long-term trend in interior design, so wooden lining on the ceiling will be relevant for a very long time.
- Easy installation. The material is light in weight, which means a minimum of effort during transportation, unloading and directly during cladding. There is also no need to strengthen the sheathing.
- Durability. If installed and processed correctly, the ceiling is durable, reliable in use and will last 15-20 years.
- Security. Wooden covering improves the heat and sound insulation of the room.
- Design possibilities. There are many ceiling design ideas using wood slats; the design can be selected for different interior styles.
Ceiling design in the dining room of a country house Source inside-lighting.ru
- Additional features. Lining will help solve additional problems, for example, hide communications or disguise an uneven surface.
- Maintainability. Replacing one or two lamellas of the lining is easier and cheaper than, for example, a sheet of MDF. If necessary, it is easy to dismantle the structure.
- Easy care. The material is not afraid of moisture and, although it is not recommended for use in damp rooms, it can be safely wiped with a damp cloth.
Ceiling lighting
A competent choice of lighting allows you to give the room a unique individual style and create a harmonious atmosphere in it.
- LED Strip Light. Due to reflection from the ceiling surface, it creates a very soft and uniform level of lighting.
- Chandelier. The chandelier located in the center of the ceiling is a continuation of the style of the room and perfectly complements and supports its concept.
- Spotlights. A convenient option that allows you to illuminate the entire perimeter of the room or highlight only certain areas.
- With backlight. Designs with built-in lighting allow you to realize the most unusual design ideas and create a beautiful play of light on the ceiling.
Preliminary work
It doesn’t matter whether you completely decorate your ceiling with clapboard or just individual elements, the surface of the covering must be perfectly flat. To achieve this, it is necessary to mark a reference line on the wall using a paint cord (chokeline).
The space between the ceiling and the paneling is determined by two factors, such as the height of the room and the size of the recessed lamps. The length of the lamp holder determines how much you need to retreat from the rough surface of the ceiling. For diode ones, 40 mm is quite enough, while for others you will need at least 70 mm.
If the surface begins to wave after a short time, this indicates improper installation. This is due to the fact that the step between the sheathing slats is greater than provided for in the instructions and exceeds 40-50 cm, which is unacceptable for a high-quality surface.
In order for the frame to hold properly, it is necessary to clearly calculate the distance between the slats. Using a chockline for this, beat off marks for installing bars or profiles.
On opposite sides of the ceiling we place marks at a distance of 40 or 50 cm, after which we mark lines along them; the direction of the frame strips should be perpendicular to the direction of your covering.
How to paint lining like bleached oak
Light shades are gradually replacing dark, cozy interiors that were fashionable until recently. One of the modern trends is the use of the “bleached oak” technique, which is a special wood coloring technology.
Light lining on the wall Source www.homeawakening.com
The purpose of this painting is to create a contrast between the shade of natural wood and the whitened surface. The more pronounced the contrast, the more valuable the result obtained.
As a result of this treatment, the wood texture is clearly visible under a thin layer of varnish, and the surface itself acquires an exquisite matte finish.
Ceiling decoration with bleached clapboard Source www.pinterest.com
Possible wood color options when using this technology:
- dark or light;
- aged surface;
- yellowish or pinkish surface;
- a grayish tint with light lilac notes (this is the most valuable option).
Unusual painting Source lesobirzha.ru
The “bleached oak” effect can be achieved in several ways:
- Use ready-made tinting (stain) “Bleached Oak” or “Rime”. It is applied twice in a very thin layer.
- Oil with wax. The color is chosen at your discretion. Can be applied in two thin layers. Can be applied once in a thick layer and rubbed in with a cloth to achieve a crisp texture.
- Pigment primer with polyurethane (name “white” or “bleached”). It is diluted in a large volume of diluent (80% of the total volume). Over time, this surface turns yellow.
- Pigment primer (acrylic). Also diluted by 80% with thinner. Retains whiteness for a long time.
Decorating a room in country style Source dizainvfoto.ru
A thin layer of paint is applied to the dry surface of the wood. The stain is usually deeply absorbed and does not apply completely evenly. Aniline paint is better suited: it applies beautifully, without streaks and dries well. The powder for making the dye must be dissolved in water or denatured alcohol.
You can use drooping dyes in acetone, but you need to be careful with them. Apply the paint in two layers, this ensures a lasting matte surface. The final stage is shellac treatment to obtain a light tint. Due to this, excess whitewash is removed.
The wax is applied evenly, then wiped with a cloth or steel wool. Then the surface is left to dry and the treatment is repeated again. Remaining wax is immediately removed.
The result of this procedure is an ultra-modern interior design in a rustic or Scandinavian style and a well-protected wood surface.
Kitchen wall decoration Source 1povagonke.ru
Modern lining on the ceiling
A variety of materials are used for interior decoration. But, despite the emergence of new materials, the demand for lining does not decrease at all.
This material looks simply excellent in the interior and in addition it is characterized by:
- Excellent look of natural wood;
- Easy installation;
- Good price.
Modern lining has evolved into a wooden one, which is perfect for a cozy room.
The lining looks great not only on the ceiling, but with its help it is quite possible to decorate completely different surfaces. It is very pleasant to be in a wooden house, because the lining is characterized by environmental friendliness, beauty and durability. When choosing the most suitable euro lining intended for decorating a house, you must pay attention to the type of wood used, its grade, and cross-section profile.
Traditionally, coniferous or deciduous wood is used for the production of lining.
Coniferous types of lining are practical, durable, resistant to high humidity and practically not subject to rotting processes. However, similar materials should not be used for finishing rooms with elevated temperatures, because wood releases large amounts of resinous substances, which can lead to fire. Deciduous lining options are easily amenable to additional mechanical processing and tinting, so it is quite possible to create a unique interior design.
Tips and tricks
In creating comfort in the house, finishing the ceiling with clapboard plays an important role.
To ensure that it remains in its original condition for a long time, remember:
- It is not recommended to get it wet;
- For cleaning, use a vacuum cleaner or a dry cloth;
- stains that appear are treated with a weak solvent;
- experts advise periodically treating the surface with antiseptics and fire retardants;
- it must be secured very carefully;
- give preference to natural materials.
A ceiling made of eurolining can be made both in a brick house and in an apartment. It is necessary to take only high-quality eurolining and install it following step-by-step instructions .
You can choose a material that has patterns. This option is most suitable for an attic or loggia, and it will also look good in the country.
The mirror lining looks stylish. You can put family photos on it. In this case, it must certainly be wide.
When laying, it is necessary, first of all, to set the guidelines correctly. This way, it will be easier to hem the lining with your own hands. The material must be placed tightly and joined together carefully. Next, it is important to nail down the paneling so that the paneling will serve you for many years.
Where can this material be used?
Finishing of this type can be used not only in country houses and outbuildings. A clapboard ceiling will look great in an apartment if you decorate it in the same way as in the photo below.
Of course, best of all, this decoration will look at your dacha or in a private house. The material is usually associated with these places and it is not surprising that many people do not imagine slatted coverings in standard urban interiors. Therefore, below we will consider examples of the use of wooden planks in an ordinary apartment.