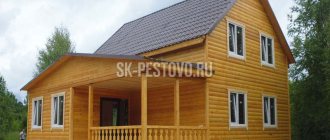
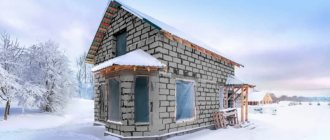
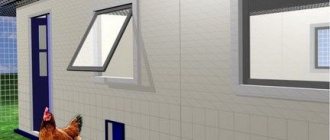
For many, flat roofing is associated with urban multi-story buildings, faceless and monotonous. But we are ready to surprise you! A flat roof in a private house will be a pleasant discovery for you if there is not much snow in your area, but the winds are quite strong. The fact is that in winter all snow accumulations from such a roof will simply be blown away. And the main thing is that not a single strong hurricane can tear off a roof that simply does not exist! And a whole ocean of possibilities opens up before you, which you can now build above your head: a cafe, a dance floor, a mini-garden and even a whole greenhouse!
The main thing is to know about all the intricacies of constructing houses with a flat roof, and everything will work out. And now we will reveal all the secrets.
Pros and cons of this design
Here are the main advantages of installing a flat roof for a private home:
- Such a roof is much smaller in area than the most gently sloping roof. And this means savings on materials.
- Such a roof is built much faster than a gable roof, and even more so a hip roof.
- Comfort and safety of all rafter work. You still have to manage to fall from such a roof!
- Convenient subsequent repairs and replacement of roofing.
- Unlike a gable roof, dismantling the old flat roofing is usually not necessary - this is additional waterproofing and protection. The new pie is made directly from the old one, which saves a lot of time and effort.
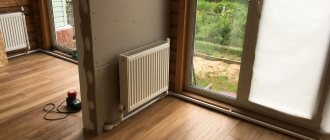
- The ability to use the roof as an additional useful area where you can plant a flower garden, make an open terrace and even build a greenhouse.
- The ability to install transparent roof elements (with careful waterproofing), and thus create a view of the night sky.
- Opportunity to build a house with a laconic architectural form. Minimalism is at the peak of fashion!
And now – about the pros and cons:
- Such a roof generously accumulates snow. After all, he now has nowhere to slide, and the snow itself often becomes the cause of leaks.
- On especially generous days, the snow will have to be removed mechanically, which often damages the roofing.
- The structure of the roof becomes more complicated: now we need gutters, which also become clogged.
- The difference is that water drains from a pitched roof quite quickly (and sometimes it does get into the under-roof space). But on a flat one it actually stands! Monitoring the moisture content of the insulation and the general condition of the roof should be regular.
- But, despite the fact that much less building materials are needed for its arrangement than for a pitched roof, a flat roof is much more complex in terms of installation. Let's just say that there are many more different subtleties and nuances that are important to know about.
That is why many have fair doubts about the reliability of such a roof. But the European and overseas experience of private residential buildings with a flat roof is successful, and therefore you can safely get down to business.
Just consider these points:
- There is much more snow in Russia than in warmer European countries.
- The only thing worse than snow is the large difference between summer and winter temperatures, which not all foreign roofing materials are designed for.
And here technology decides everything!
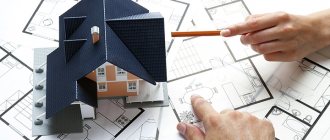
Uses and modern designs with photos
Modern technologies and materials make it possible to cover even a frame house with a flat roof, heavier than a traditional pitched one (a comparison of flat and pitched roofs can be found here).
Examples of flat roofs in private housing construction:
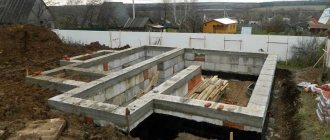
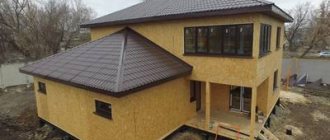
For buildings and structures, only monolithic reinforced concrete foundations are used . Such roofs offer more possibilities for use.
Examples of flat roofs of buildings and structures:
What is a flat roof?
So, what acts as the load-bearing base of a flat roof:
- Reinforced concrete slab.
- Roofing sandwich panels.
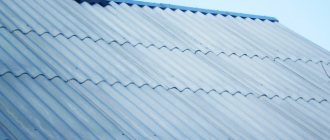
- Reinforced steel corrugated sheet.
And thanks to the fact that they learned to make a flat roof “breathable”, i.e. with internal ventilation, it has now become possible to use completely non-breathable waterproofing - roofing felt similar to it.
Any roof that we call flat actually still has a slight slope: to one side or specifically towards the drainpipe.
Here is the simplest example of a flat roof for a private home:
How to cover a flat roof
The material for covering a flat roof is selected based on its purpose.
Unused surfaces are most often covered with roofing felt and the joints are sealed with liquid bitumen.
Recently, a large number of similar materials have appeared with improved characteristics that make it possible to more reliably protect the roofing pie.
Operated surfaces require a more rigid and durable coating . At the same time, the task of hermetically sealing the insulation from external influences is not removed, so most often a sand-cement cushion and a working layer - paving slabs - are laid on top of the soft roof.
Coating
Types of flat roofing: non-exploitable and inverted
Of course, unused roofs are cheaper. And the exploited ones, which are correctly called “inversion”, include additional materials.
A separate type of flat roof of a residential building is exploitable. Those. the one on which people will walk and what objects will stand. This is the same garden, or sports ground, or summer cafe. All this creates considerable loads on the roof, and therefore its design is already different from that which is intended only to protect the house from precipitation.
So, the main difference in the design of traditional and inversion roofing is that in the first, the thermal insulation layer is located under the waterproofing, which is quite logical, and in the second, it is above it. But in the second option, the waterproofing is more protected from ultraviolet rays and temperature changes. This design is more durable and functional: you can safely lay out a lawn or lay paving slabs on it.
And now in more detail.
Unused roof: standard pie
But a person can also occasionally climb onto an unused roof - for the same repairs, for example.
Those. in a traditional flat roof, the top layer is waterproofing, and it is this that is exposed to all mechanical and temperature loads.
A separate type of it is a roof with a pressure layer, which is designed so that a person can walk on it from time to time:
Inversion roofing: reverse pie
The standard slope of an inversion roof is 5-7%. The inversion method assumes that the thermal insulation layer is already placed on top of the waterproofing, which now also serves as a vapor barrier.
Moreover, the pie of inversion flat roofs can be very different. It all depends on what you are going to arrange on the roof: a terrace, a mini-pool (and this is not uncommon) or a garden. But the base will still be common: a monolithic screed is made, which levels the entire surface, then waterproofing is laid and the whole thing is covered with insulation. And on top is a cement-sand mixture or rubber coating.
Note that active use of the roof means frequent damage to the insulating layer, which is why moisture makes its way to the insulation and freezes in winter. Over time, the entire roofing pie deteriorates, and therefore a flat roof cannot do without a ventilation system.
A cement-sand screed can even better distribute the pressure layer on the heat insulator, but it must be additionally reinforced with a mesh to prevent cracking.
Varieties and distinctive features of different types of roofs
In modern private housing construction, there are several ways to arrange a flat roof, which have some differences in the order of layers and the composition of the roofing pie.
Traditional roof
The composition of a traditional flat roof (also called soft), regardless of the slope, includes several layers:
- Base . Usually this is a reinforced concrete slab or metal profile structure.
- Vapor barrier . It is laid directly on the base and protects the overlying layer from diffuse moisture penetrating from below. The layer is made of roll or bitumen materials.
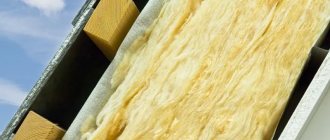
- Thermal insulation . The insulation is often one or two layers of mineral wool, polystyrene foam boards or PIR boards. It is acceptable to use expanded clay gravel or install a cement screed.
- Waterproofing . Protects underlying layers from atmospheric moisture. To organize it, bitumen-based materials are used: various rolled materials, as well as mastics or PVC membranes.
Installation of traditional roofing Source projject.ru
- Finish coating . Its role is successfully fulfilled by modern brands of waterproofing materials. The use of sheet and piece materials is not recommended - a small slope and many joints create a high risk of leaks.
See also: Catalog of companies that specialize in roof repair and design.
Operated roof
The main advantage of this design is the opportunity to obtain and profitably use additional space, in the form of a cozy relaxation corner or a place for sports. The design is a multilayer structure, the characteristics of which are prescribed in SNiP. The rules describe the procedure for arranging a roof in use; A cross-section of the pie with dimensions can be studied there. The operating coating has the following differences from the traditional design:
- A slope-forming layer is laid above the reinforced concrete base .
- Between the layer of insulation and waterproofing, a screed is made (at the correct angle) or fiberglass is laid.
Pie with tiled coating Source tupikov.ru
- Between the layer of waterproofing and the final (finishing) coating, an additional layer of protective separator (layer of geotextile) is made.
Taking into account the peculiarities of use, the layers of the roofing cake are arranged in accordance with the following conditions:
- Base . It must be rigid and capable of maintaining the integrity of the waterproofing.
- Insulation . The thermal insulation layer in such a roof is under constant load, both dynamic and static, therefore, the main requirement for this layer is to have sufficient compressive strength. If the material is not rigid enough, it is reinforced with a layer of cement screed. One of the modern solutions is PIR boards. They are rigid and strong enough to withstand the loads during operation and at the same time light, which allows them not to overload the roof structure.
- Finishing . The most popular option for finishing material is paving slabs, which are installed on special stands or a sand cushion, which allows the pressure to be distributed more evenly. If it is expected that the operation will be significant, experts recommend installing an inversion-type flat roofing pie.
Subtleties of flat roof insulation
A layer of thermal insulation for a flat roof is mandatory. For comparison: a gable roof is insulated only when a residential attic is installed underneath it, and in all other cases, a maximum of mineral wool is laid on the attic floor. But for a flat roof, insulation is always necessary.
The fact is that without a heat-insulating layer in a flat roof, condensation will constantly appear on the ceiling in the house (such a roof will turn out to be the cold part on which water vapor will rush). And this is bad not only because repairs will have to be made, but also because the entire structure deteriorates.
You can insulate a flat roof both from the outside and from the inside - the difference is small. What is more important is how many layers of insulation a particular roof needs – one or two.
Thermal insulation materials must be attached to the base of the roof mechanically, either with screws or dowels, or with adhesive. Sometimes the fastening is not used at all if the heat insulator is located outside and paving slabs or pebbles press on it.
Why two layers? The fact is that the first layer of thermal insulation on a flat roof acts as insulation; it is from 70 to 200 mm thick. And the second, from 40 to 50 mm, is designed to distribute all the loads. And it is important to calculate the thickness of both layers accurately, based on the climatic characteristics of the area and the future use of the roof itself.
With double-layer insulation, all joints should be spaced apart, in a checkerboard pattern, so as not to overlap each other. Moreover, in the places where the slabs adjoin the walls and parapet, it is additionally necessary to make heat-insulating sides. A cement-sand screed can even better distribute the pressure layer on the heat insulator, but it must be additionally reinforced with a mesh to prevent cracking.
Video description
About green roofs in the following video:
- A layer of insulation is laid ; It is appropriate to use extruded materials here.
- Geotextiles are laid (or better yet, two layers, with a profiled membrane between them, which will allow soil pressure to be more evenly distributed).
- Drainage layer . Gravel or crushed stone is used.
- A filter layer that simultaneously protects the root system of plants.
- Soil and green spaces.
Green roof design diagram Source stroyfora.ru
Green roofs, depending on the nature of operation and the amount of landscaping, are divided into two types:
- Extensive . Not designed for constant human presence. The soil layer is laid thin in thickness (up to 15 cm); Only lawn grass is sown, and flowers and ornamental shrubs are planted in pots or special containers.
Extensive green roof Source pinterest.co.uk
- Intense . If the design of the house allows you to lay a layer of soil 0.3-0.6 m thick (the total thickness of the roofing carpet reaches 1.2 m), you can set up a full-fledged garden with trees and lush flower beds on the roof. The installation of such a structure should be entrusted to professionals; Repairing a green roof made by hand is a time-consuming, problematic and expensive task.
Proper drainage system
But this is already a difficult task. Flat roofs are just bad because they are completely open to rain. But everything can be solved! The main thing is to properly organize the drainage, and for convenience, we have explained this issue for you in the following schematic illustrations:
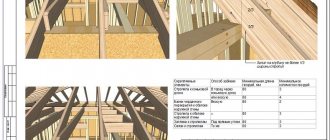
Tying piles with timber
Beam 150x150. Must have very good geometry. This is the key point. You may not find one like this.
Timber tying causes a lot of controversy because of the cuts. In short, the essence of the controversy is this:
After the cuts, only half of the rigidity remained from the timber. It should lie on a pile with a total thickness of 150 mm. The beam works like a continuous beam. Those. the maximum moment occurs in the middle of the span, and at the support a moment with the opposite sign occurs, approximately equal to 1/3 of the maximum.
In my opinion, it is better to do the strapping with a package of three boards. Although it's a little longer. But the author went this way:
They were fastened with anchors, and not with studs poured into concrete. You can attach a stud to a chemical anchor. This is much better than a steel anchor, but longer and more expensive.
The strapping took 1.5 days. I had to buy additional: 2 drills, a roll of roofing felt and 20 anchors. Paid 2080r. Total expenses after this stage are 98,350 rubles.
Internal ventilation device
Another important point when arranging flat roofs is ventilation. The fact is that if moisture accidentally gets into the insulation, it no longer evaporates - it only accumulates. As a result, the heat-insulating material rots and the waterproofing swells. And there are many reasons for leaks: damaged waterproofing, mechanical damage to the top layer of the roof, cracks and damage from frozen water.
A wet thermal insulator is also bad because it causes bubbles and cracks to appear on a flat roof in the summer heat - all due to the active evaporation of water. As a result, the roof covering also collapses. And if moisture gets under the old screed over time, then the entire roof begins to peel off. This is why a flat roof must “breathe”.
For this purpose, so-called aerators are used. They look like simple plastic or metal pipes covered with umbrella caps. They should be located evenly over the entire roof area, preferably at its highest points. The essence of this mechanism is that different pressures are created inside the roof and the air begins to create currents, simultaneously taking with it all the excess moisture vapor.
In practice it looks like this:
In addition, in any living space, water vapor rises up to the ceiling. Moreover, they often successfully overcome this barrier (the water molecule is very small) and end up in the insulation, which is bad for it. This is why vapor barrier is required. And not the kind that is usually used for attic insulation, but a dense one, made of high-quality polypropylene or polyethylene. The bitumen membrane is even more reliable.
Common mistakes and recommendations
Often, when building a roof, home craftsmen make a number of mistakes that could have been avoided. Here are some of them:
- Insufficient roof pitch causes excessive accumulation of rainwater and snow . In this case, you will have to re-cover the roofing and make a base with a greater slope.
- If the roof slope is large (more than 60), walking on it will become uncomfortable . The deficiency can be eliminated in the same way as described above.
- Developers neglect hydro- and vapor barrier . The result could be disastrous. Accumulated moisture will quickly cause the destruction of the roofing pie. Only restoration of the roof with the installation of insulating materials will help to avoid this negative phenomenon.
- Builders use raw and untreated wood . Mold and fungal formations appear, and when the wood dries, the beams may undergo screw deformation. All this will soon lead to the destruction of the roof. To avoid this, the wooden beams must be dried and treated with antiseptics before installation.
Choosing a suitable roofing covering
So, what is used as a coating for such roofs?
Option #1 - bitumen and polymer-bitumen materials
Such roofs are the least expensive for owners of private houses. We are mainly talking about roofing felt and euroroofing felt. These are rolled roofing sheets, the base of which is synthetic fabric, and the sides are bitumen. As an elastic and frost-resistant material, bitumen serves as excellent protection and waterproofing.
Moreover, laying bitumen roofing on a flat roof is absolutely simple; you only need a gas burner. The rolls are easily fused together.
But such a roof has a significant drawback - fragility. And another thing is that roofing felt does not breathe at all, i.e. It is vapor-tight, and therefore it is necessary to arrange ventilation for such a roof, unless you want the insulation to rot within a year:
Option #2 - liquid rubber
Such roofs have the great advantage that they do not contain any seams. As we have already said, the disadvantage of a flat roof is, first of all, that snow accumulates on it, which then causes leaks.
But there are some subtleties here. So, you need to take only two-component liquid rubber for a flat roof, preferably the highest quality one. And it is extremely important to apply this material correctly to a flat roof: evenly, avoiding unnecessary layers and saving in certain places. So, where the paint was applied unevenly, problems should be expected within 8-10 years.
Option #3 - PVC, TPO and EPDM membranes
Roofing membranes are valuable as a covering for flat roofs because they allow steam to escape. After all, no matter what kind of vapor barrier is used, moisture still, at least a little, gets into the insulation, not only from below, but also from above - after heavy rains, for example.
There are three types of membranes for installing such a roof: TPO, PVC and EPDM. The most popular is PVC membrane, which is also the most flammable. An EPDM membrane is more durable and affordable, but if mechanical damage occurs in it, nothing can be done to fix it, whereas a PVC membrane can only be melted with a hairdryer. In addition, the joints of the EPDM membrane must be glued with a special tape, which is much less reliable than soldering PVC sheets.
But the cheapest membrane in its sector is PVC. But it has such significant disadvantages as low resistance to ultraviolet rays and fear of contact with bitumen, various oils and even polystyrene foam, otherwise the service life will be significantly reduced.
Gluing EPDM membranes requires professional skills. TPO membrane, like PVC, is also welded with hot air. The best is not afraid of ultraviolet radiation, is more chemically resistant and can be laid directly on polystyrene foam or an old bitumen roof without geotextiles. But its service life is shorter than that of EPDM, so for installing a flat roof on a residential private house, we recommend using a PVC membrane.
So, a flat roof device with a PVC membrane is traditionally made like this:
- Step 1. We arrange a monolithic floor slab.
- Step 2. Place a tear-resistant vapor barrier film.
- Step 3. We make a bend from insulation or screed.
- Step 4. Place insulation. In private construction, this is usually 35-density foam, and on top is 50 mm XPS, which is even stronger.
- Step 5. Now geotextiles, 300-500 g per square meter.
- Step 6. Let's move on to waterproofing - this is a PVC membrane. The insulation density is enough to allow walking on such a roof. But, if you plan to make an open terrace on the roof, then you need to continue the pie further.
- Step 7. Lay the geotextile again - now directly on the membrane. We lay rubber tiles or reinforced screed 5-7 cm, on which we already lay paving slabs. To make a screed, you need ballast.
And such roofs are made of rubber, polymers or even foil. Unlike bitumen, they are durable, fire-resistant and adhere firmly to the base. A slight slope is achieved using expanded clay concrete or concrete screed.
Lumber
They took it from the sawmill. Natural moisture board. Volume 12.27 m3 for 77,350 rubles. with delivery (price 6,400 per cubic meter at the end of 2022). The author said that the market is full of offers for 10,000 rubles. per m3. But whoever seeks will always find.
Homemade antiseptic recipe
Homemade antiseptic for wood XM-11. We made it with our own hands according to GOST 23787.8-80 and it came out 4 times cheaper (4400 rubles) than in the store. Saved more than 10,000 rubles. We received an antiseptic of a higher class than the purchased one.
XM-11 is a water-soluble, 2-component, non-washable antiseptic. Odorless, colors wood greenish. Belongs to hazard class IV (low-hazard substance), non-flammable and explosion-proof. Very strong. This is how piers and pillars dug into the ground are treated.
Components:
- Sodium bichromate Na2Cr2O7
- Copper sulfate CuSo4
Proportions for 20 liters of antiseptic: 1 kg. Sodium bichromate 1 kg. Copper sulfate 18 liters of water 100 ml. 9% vinegar
The shelf life of the finished solution is 6 months. Consumption about 600 ml/sq.m. Applied with brushes. It's better to use a roller, but I didn't have it on hand. You can dig a long hole to fit the size of the board, lay down the film, pour in an antiseptic and bathe each board. They didn’t bother with the pit and the film. It is possible to cover faster with a spray gun, but penetration is worse than with a brush.
How to achieve 100% waterproofing?
The main task when installing a flat roof is to make all joints and junctions as airtight as possible. After all, such a roof is most affected by moisture, hail, temperature changes and wind-blown debris. Therefore, the sealants used to seal such joints must be of high quality and resistant to any influences. This is also a kind of expense that has to be incurred.
For the same purpose of waterproofing, it is recommended to make the slope of a flat roof at least 2%. Few? In fact, this is quite enough so that all atmospheric moisture does not linger on the surface, but flows down into funnels and pipes, and from them into the septic tank, soil or sewerage system. Therefore, even at the design stage, you need to carefully think through the future drainage system.
Moreover, the drainage system itself is made both internal and external. Thus, internal drainage is made up of fittings - funnels located throughout the roof, which receive the flowing water and direct it into pipes that go through the buildings, but are isolated from the living quarters. The only disadvantage of such a system is that the pipes become clogged with small debris and leaves, for which it is advisable to equip them with special filters and periodically clean them.
External drainage systems are already attached to the outer walls of the building. These are, of course, easier to clean when they become clogged, but in cold weather they often freeze over. For this reason, it is customary to additionally supply them with electrical heating in the form of cables.
As for the material for the internal and external drainage system of a flat roof, PVC or metal is quite suitable. Both options have their pros and cons. Thus, polyvinyl chloride does not corrode, but is more brittle than metal.
To prevent gutters from freezing in winter, equip them with roofing thermal cables.
How to do it yourself?
Stages for equipping a traditional flat roof:
- creating a foundation;
- screed formation;
- laying vapor barrier;
- installation of thermal insulation;
- laying a waterproofing layer.
The slope is carried out using a load-bearing base or additional layers of light, durable materials: concrete, foam concrete, expanded polystyrene, expanded clay. For drainage to be sufficiently efficient, the minimum slope must be from 1 to 4 degrees.
For the ceiling of a private house, I-beams are usually used that can withstand high loads.
If the linear dimensions of conventional beams are increased, their own weight will become undesirable for all structurally loaded roof elements. If the practical use of the roof is planned, concrete slabs are used as the base. An unused roof can have a base covering of wooden elements or corrugated sheets. The base is coated with a primer that eliminates roughness but provides high-quality adhesion.
All stages of flat roof construction are discussed in detail in a separate article.
Slope angle calculation
All roofs have a slope, even flat ones. Slopes are necessary for precipitation to flow into gutters and funnels . To independently determine the correct slope angle, you can use one of three methods:
- online slope calculator;
- using a protractor;
- mathematical calculations.
The results are expressed in percentages or degrees, each percentage-degree pair has its own ratio.
It is easier for a private builder to calculate the angle mathematically: divide the height of the roof by half its width, and multiply by 100:
H: (W:2) x 100 = roof pitch angle (percentage)
Using a special table, the resulting value is converted into degrees. The minimum and maximum values of the slope of a flat roof, the dependence of the angle on the materials, are regulated by SP 17.13330.2017.
Green area on the roof: fashionable and environmentally friendly
Greenery and recreation areas are often lacking not only for residents of the “concrete jungle”, but even for owners of private houses. The thing is that it is not always possible to leave the same beautiful garden furniture in the yard of the house, and beautiful rare flowers in the garden flower bed are often trampled by pets. Therefore, it is not surprising that the green area on the roof has become fashionable among cottage owners. Especially if the access to it comes directly from the bedroom and no one else can disturb your morning peace with a cup of coffee.
There has also become a fashion for some cafes to make the roof flat and put a small greenhouse on it. All the greens go straight to the table! And it’s profitable, because it’s not so easy to bring fresh dill or onions to the kitchen, and it’s economically profitable - there’s somewhere to send kitchen waste. And it is difficult to understand who borrowed this idea from whom: enterprising residents of private houses with a flat roof, or the best minds in public catering. But the fact that such an arrangement of closed ground is beneficial is a fact: rodents will not dig under the beds, insects and pests will not reach (as well as pests in the form of neighbors), and the fact that it is always a little hotter on the roof is only a plus for the same tomatoes. But the main thing is to correctly calculate the loads on such a roof during construction!
And the roofing pie is often standard: waterproofing for the ceiling, thermal insulation, geotextiles, drainage and geotextiles again. And on top you can use both soil and beds:
Or in this version for more powerful floors:
A flat roof is a huge scope for any imagination. Designers and architects love to bring to life a variety of projects for her: a garden, a greenhouse, a jogging track, a mini-beach with sun loungers, and much more. Some craftsmen even manage to make a parking lot on it!
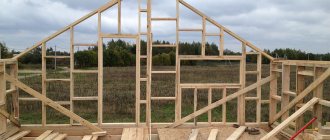
What is a frame house
This type of construction received its name only because the basis of the structure itself is a frame made of lumber: beams, boards, slats. Today there is a technology based on the construction of a frame made of metal profiles or light bent steel structures made of galvanized steel sheet. Both of the latter options are metal structures.
The principle of constructing frame houses, regardless of the building materials used, is the same:
- frame construction;
- installation of insulation between frame elements;
- covering a building from the inside or outside with slab or sheet building materials.
Roof drain installation
Drainage systems differ both in the material of manufacture and in the principle of arrangement.
They can be external or internal. Select the type of drain based on calculations.
To make an external drain, arrange everything in the following order:
- Install brackets for fixing the water inlet gutter along the edge of the roof. The distance between them is at least 70 cm.
- The gutter is cut out based on the geometry and dimensions of the roof.
- Mount the gutter on the brackets and screw it on.
- Drainpipes are installed and connected to the outlets located on the gutter.
- Installation of drainage fittings.
If the project provides for internal drainage, special attention is paid to installing funnels.
They are fixed to the roof plane in marked places. Next, install a pressure flange that secures the vapor barrier layer.
After laying the insulation, cut out holes in it for funnels.
Having joined the insulation, lay the separating layer and the funnel extension. Finally, the membrane is laid and the head is mounted.
Weaknesses of the design
Unfortunately, the flat roof of a wooden frame house has a number of limitations in use and unpleasant operating conditions. They can be divided into seasonal and permanent.
Seasonal:
Snowdrifts in winter, an abundance of leaves and small branches during leaf fall, excessive heating in summer. Due to the lack of a slope at a large angle, accumulated snow and debris must be removed in a timely manner. This requires special equipment and skill. An alternative would be to lay special thermal cables around the perimeter of the roof, which melt the snow in a timely manner and remove excess weight through the drainage system. This is a rather complex and expensive system to maintain; it makes sense to install it only if it is not possible to independently remove excess snow with a shovel.
Excessive heating can be compensated by installing solar panels. Such an investment can significantly reduce the monthly payment for electricity; in spring and autumn, solar panels will absorb all the thermal energy, preventing overheating of the roof.
Fused roofing over OSB
Controversial issues regarding built-up roofing. The “surfacing” should only be mounted on a non-combustible base: concrete screed or CBPB.
The author laid it on top of OSB. In my opinion, this is a controversial decision. It was possible to lay a PVC membrane on top of the OSB, but the author justified his choice:
Laying on other board materials with a thickness of 8 mm or more in 2 layers is allowed, as per the norms. I haven’t seen any information about flammability. Perhaps OSB is not the best solution, I agree. DSP as an alternative. But I came across a solution where people were fusing OSB in a house for 11 lyams. And the flight has been normal for 5 years now. That's why we decided to use OSB. As I see it, the main thing here is rigidity, but again, I could be wrong.
Project of this house
The project can be purchased from the author. What is included in the documentation - see this video:
Buy a project
Here you can buy the project of this house from the author - Konstantin Evdochenko. Or write to him on or Insta.
The price of the project is 10,500 rubles.
If you think that 10,500 is a lot for this amount of work, then compare: typical projects of the Z500 architectural bureau cost about 30,000 rubles. Development of such a project from scratch costs about 50-80,000 rubles.
I consider the price a gift. Plus, having this project on hand will save a lot of time and money. At the very least, the project will recoup its price.
Is it possible to do the project yourself?
As you can see, yes, you can make a frame project yourself.
How easy is Sketchup to learn and where to download
I’ll tell you for myself - I started studying Sketchup to see the invented layout in real life. On the second day I was already playing with the created layout. So it's easy to learn.
Any question you have, type it into a search on Youtube with the caption sketchup. You will always find short videos explaining how to do what you need.
One of the best channels for sketching is Silentip Design.
I personally found the program itself there - on YouTube. One guy showed how to install it, and at the same time in the description he gave a link to the “fixed” sketch. I'm not posting the link. I'm afraid to get a scolding from Google. If you can’t find it on YouTube, then look on VKontakte.
Step-by-step instructions for assembling the internal walls of the frame
Internal walls made of 100x50mm boards. At this stage, we purchased an electric stapler and film for embedded waterproofing in the amount of 1820 rubles. The total cost of the house after this stage is 107,770 rubles.
Time required: 2 people and 1 full day.
Palm nailer or hand pneumatic hammer.
Manual air hammer
The thing is great. Only 2,500 rub. Saves a lot of time. A compressor is required to operate. The author borrowed from friends.
Read the reviews. It might be wiser to take a full-fledged air gun. It's more expensive, but the wrist joints will be healthier.
Electric stapler vs manual
A stapler is needed at several stages: vapor barrier around the entire perimeter of the house, filling the roof waterproofing, windproofing the subfloor.
This costs only 1500 rubles. on Ali
Instead of a manual one, it is better to use an electric one. It is not expensive, but it saves nerves and time. The manual one constantly jams. You have to disassemble, remove the stuck bracket, and reassemble. After a few staples, everything repeats again. This is a standard situation with manual staplers even from the middle price segment. Advantages of an electric stapler:
- no delay
- lack of return
- a light weight
- Possibility to hammer in studs in addition to staples