Every owner of a plot of land, after building his house and minimally improving the site, begins to think: “Shouldn’t I get some chickens?” But, like any living creature, birds need a special home - a chicken coop. I will immediately warn those who think that building a chicken coop with their own hands is easy and simple, it is not so. As with any construction, building a chicken coop has its own characteristics.
Before deciding what material to build a chicken coop from, you need to decide whether you will keep the birds year-round or only in the summer (warm) period. To build a chicken coop, you can use timber, logs, foam blocks, aerated foam concrete, cinder blocks, etc. The main rule for setting up a poultry house is sufficient lighting and warmth. When you build a chicken coop with your own hands, the first thing you need to decide is where to build the chicken coop. To do this, you need to know the cardinal directions, prevailing winds, and specific features of the area (relief, height of groundwater, etc.).
Don’t think that building a chicken coop is as easy as building a dog kennel. The area of the chicken coop should be calculated based on the number of chickens you want to keep. If you plan to breed poultry and hatch chicks, you will need a separate room to house the incubator. A lightweight building made of timber covered with boards, this is a chicken coop only for summer poultry keeping. If you will keep chickens in the winter, then when planning a chicken coop you need to think about where grain and feed will be stored, where you will put chicken droppings, etc.
What area to build a chicken coop
When building a chicken coop with your own hands, they usually make calculations based on the heads of the birds. There should be 3-4 large laying hens (meat breeds) per 1 square meter of floor. But this does not mean that you will place 8 birds in a barn with an area of 2 sq.m. Such a small room is not enough for chickens. There is no place to turn around, no place to install feeders and drinkers, the birds will be in cramped conditions and egg production will inevitably fall.
When planning a poultry house, you should also take into account whether you will keep any other birds: geese, ducks, guinea fowl, quail. Perhaps having got chickens, you will want to replenish your chicken kingdom with other types of birds.
Where to build a chicken coop?
Before erecting buildings, you need to decide on a place for the chicken coop. It is better if you choose a place for the poultry house on a hill. Moisture will accumulate in the lowlands, the snow melts there later and the spring and autumn mud lasts longer, and the birds need a walk.
Once you decide on the location to build the poultry house, you need to correctly position the chicken coop relative to the cardinal directions. It’s good if you manage to place the windows of the chicken coop on the south side and the door on the east. Otherwise, choose a layout so that as much daylight as possible enters the coop windows. After all, the egg production of chickens depends on the length of daylight hours.
When setting up a chicken coop, remember that the house must be well ventilated. Egg production drops both when the air temperature in the poultry house is high and when it is too low. At an air temperature of +25C° they reduce their productivity by 50%. If the thermometer rises to +30C° or higher, the bird will stop laying eggs altogether.
In the garage
At the end of the summer season, many poultry farmers move their chickens to garages. Winter is not a reason to quit your business. It can grow and develop when chickens are kept in a garage.
To do this, space is freed up inside the building for an aviary for chicken walking, which is surrounded by a fence.
With this method, you need to pay attention to the equipment:
The heating system is an important element necessary for keeping chickens in a garage. It is needed to control the temperature inside the room. The farmer needs to buy a heater. It dries the litter and prevents excessive air humidity. For some chicken breeds it is not required (for frost-resistant ones)
It is important to monitor air temperature and humidity indicators due to the possible characteristics of some breeds. The organization of lighting using supplied electricity will make it possible to regulate daylight hours. The correct daily routine is an important factor in maintaining egg production at a high level
Standard daylight hours are 12 hours. Some breeds have a waking period of up to 14 hours a day. There are no windows in the garage, which excludes natural light. Because of this, it becomes impossible to do without the help of electricity. Warm bedding made of straw and sawdust. It serves as additional insulation. In summer, this layer should not exceed 15 cm, in winter - 25 cm. The hay should not be moldy or wet. Otherwise, the chickens may start to get sick.
Sometimes poultry farmers use a cage method of keeping chickens in the garage (if broiler chickens are kept).
Chicken coop foundation
All massive buildings must have a foundation and a chicken coop is no exception. The foundation will not allow the building to settle. The type of foundation for the chicken coop is chosen based on the number of floors in the room. It is possible that you will want to build a two-story poultry house and will keep not only chickens, but also geese, ducks, guinea fowl and quails.
The foundation of the poultry house should protrude 30-40 cm above the soil level and be waterproofed from the walls. In any case, the greatest attention when building a poultry house should be given to the floors.
The floor must be constructed in such a way that mice, rats, ferrets or foxes cannot enter the house. To strengthen and protect against these “freeloaders,” a special fine-mesh metal mesh is often placed in the floors. Previously, craftsmen poured concrete floors with the addition of glass to protect them from mice and rats.
When installing concrete floors, they are made with a slight slope to one side in order to make it easier to carry out general cleaning of the poultry house. The floor in the chicken coop should be located at least 20 cm above ground level.
Step-by-step instructions for building a chicken coop for 50 chickens
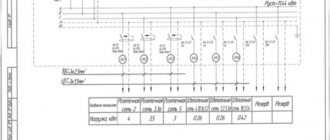
First, a drawing of the chicken coop is drawn up. Dimensions are set on it, places of ventilation, lamps, heaters, windows, doors, perches and nests are marked. When the plan is drawn up, materials are purchased, the construction phase begins.
Foundation:
- Marking. The future foundation is measured on the selected area. At the corners, steel rods are driven into the ground and connected to each other with rope. Measurements are taken of the lengths of the sides and the diagonals between the corners. All angles must be right, opposite sides and diagonals must be equal. If everything matches, pegs are driven in - the centers of future pillars. The distance between pegs is 1 m.
- Digging a hole. A hole 50 cm deep is dug along the established perimeter. Sand is compacted to the bottom with a cushion. The sides of the pit are 50 cm.
- Pouring the solution. Sand (2 parts), cement (1 part), crushed stone (3 parts) are mixed with water (1 part). The resulting composition is poured into the hole at ground level, leveled, and left for a couple of days.
- Lifting. When the concrete has dried, the columns are increased by 20-30 cm using cement and bricks or stones. With a column width of 50 cm, 2 bricks are enough for each row. Evenness is controlled by level.
- Laying the first layer of construction. The resulting foundation is lined with roofing felt, and the first row of timber is laid. For a strong connection, cuts are made in the corners.
Floor:
- Installation of lags. The beams (15 by 10 cm in cross section) are placed with edges every 1 m. It is advisable to maintain a slight slope in one direction so that later inside (for example, when cleaning) the water flows in one direction.
- Installation of subfloor. The bottom boards are laid.
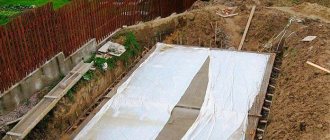
- Insulation. Waterproofing and vapor barrier is spread on the rough boards. Bars (10 by 10 cm) are driven in every 70 cm. The resulting space is filled with insulation.
- Formation of the floor. Finished floor boards are laid and secured onto the insulation.
Walls:
- Placement of bars. The beams are sequentially laid with a tongue-and-groove connection up to 1.8-2 m or higher. The coupling points are treated with flax jute oil for insulation.
- Installation of dowels. Small holes are made in the corners and perimeter every 100 cm. The dowels are driven 7 cm into the wood.
- Wall treatment. For smoothness, plaster is applied or upholstered with plywood. Surfaces are covered with lime.
- Final insulation. Cracks and holes are plugged with polystyrene foam. The floor is lined with a thick layer of straw and sawdust.
After the foundation is poured and the floor is laid, the walls begin to be erected.
Ceiling and roof:
- Formation of the attic and roof. Additional boards, beams, and rafters are installed.
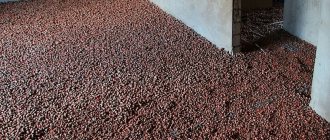
- Insulation. Expanded clay or coal slag is laid.
- Attic flooring. Finish boards are laid out, secured, and covered with impregnation.
- External roof deck. Roofing felt is laid out and secured.
It is recommended to abandon a single-cascade roof in favor of a double-cascade one. This shape allows you to create an attic, which creates more heat and allows you to store some equipment.
Final works:
- Windows are inserted.
- Doors are being installed. It is also advisable to make a closing hole for the chickens to go out for a walk.
- Internal equipment. Poles, troughs, and nests are placed around the room.
For additional protection from drafts, you can attach an external vestibule. This will create an ideal poultry house for keeping 50 chickens.
We invite you to watch a short video review of an insulated chicken coop with a walk.
It is convenient to place the flock in sections of 10-15 heads. To do this, the inside of the chicken coop is demarcated with beams and nets into improvised enclosures. The walking area is also fenced with high nets (for “flying” chickens with nylon).
Construction of chicken coop walls. Windows, manhole
Chicken coop walls
Stone and brick walls are strong, but cold and become very damp in winter. You can also make a frame house for birds. To do this, the walls are sheathed on both sides with boards (slabs, planks), and insulation (mineral wool, glass wool, slag, sawdust or peat) is laid between them.
When choosing insulation, keep in mind that it must be protected from rodents, otherwise it will turn out that you are building a house not only for birds, but also for mice. The chicken coop can also be made of logs, but all the cracks between the logs should be well caulked. The walls inside the poultry house should be as smooth as possible. This will allow you to quickly and efficiently treat walls from lice beetles and ticks.
Windows in the chicken coop
Windows are provided in the walls in advance. The room should be light; with sufficient lighting, the bird will feel cheerful. In dimly lit chicken coops, the birds are lethargic and eat poorly. The chicken coop window must be covered with fine mesh metal mesh to prevent predators. Windows should open well, because... ventilation is necessary both in summer and winter. In cold areas, the windows in the chicken coop should be double. Window sizes for adult birds are calculated based on the floor area. The window area will be 1:12 of the floor area.
Insulation and vapor barrier
The walls in the chicken coop are erected using the chosen technology. There are no nuances here. Insulation, in fact, too, but it’s worth talking about insulation, since after all, this building has its own characteristics.
Lay thermal insulation between two layers of sheathing - and here you have a winter chicken coop
Mineral (basalt or glass) wool
Insulation with mineral wool is most often done if a chicken coop for 10-20 chickens is built according to the principle of frame house construction. The assembled frame is sheathed on the outside, laying a layer of waterproofing under the material (plywood, OSB, boards). At the same time, please note that there should be a ventilation gap of 2-3 cm between the insulation and the outer skin. This can be provided by strips stuffed between the posts or stretched twine (secured with staples from a stapler). The second option is less reliable, but faster and cheaper.
To insulate a chicken coop with mineral wool, it is best to use hard or semi-rigid mats. They are cut into pieces of the required length and inserted into the spacer between the racks on the side of the room. It turns out that on the outside they rest against slats or stretched twine. The thickness of the insulation is 5-10 cm (depending on the region) and the material of the outer cladding, but in any case, when installed, it should not protrude beyond the racks. If the width of the racks is not enough, and thick insulation is needed, planks/boards are placed on top of the racks.
Example of a chicken coop frame
During construction, place the racks at such a pitch that the distance between them remains 3-5 cm less than the width of the insulation. Due to its greater width, the insulation will hold on (the elastic force works). Just be careful: measure the actual width of the roll, and do not use the number that is on the roll. There may be a difference of a couple of centimeters, the edges may bend, so as a result it will be difficult to install the insulation, as it will fall out. When insulating, try to ensure that the pieces fit together without gaps. If they do exist, fill them in thin strips. The installed insulation can be fixed using ordinary twine and staples from a construction stapler.
A vapor barrier membrane is fixed over the installed insulation. In the simplest version, this is a film with a density of 200 microns. But it’s better to take a membrane for vapor barrier. It is attached to the posts with wooden planks, using small nails or staples from a stapler. At the joints, one sheet should overlap the other by at least 15 cm. Double-sided tape is used to glue the sheets together. This results in a double seam that provides a normal degree of protection against steam penetration. Internal cladding material (plywood, OSB, gypsum fiber board, gypsum plasterboard, boards) can be mounted on top of the vapor barrier film.
Why not an option? Also insulation... All that remains is to come up with something with the floor
So, when insulating a chicken coop with mineral wool, the wall pie looks like this (from inside to outside):
- internal lining;
- vapor barrier;
- insulation;
- ventilation gap;
- waterproofing;
- outer cladding.
The sequence of layers prevents moisture from penetrating into the insulation from the inside. This task cannot be completed 100% - vapors still penetrate. Therefore, it is necessary to have a ventilation gap between the insulation and the waterproofing. Due to this, the steam trapped in the insulation escapes. It is this construction that guarantees that the insulation will work.
Polystyrene foam and polystyrene foam
When insulated with polystyrene foam and polystyrene foam, everything is a little simpler. It is itself vapor-tight, so it is not necessary to protect it from steam penetration. If a chicken coop for 10-20 chickens is built on a frame principle, you can lay foam plastic between the posts. It is cut with a fine-tooth saw (for metal) and secured using polyurethane foam with low expansion. To prevent the insulation from leaking, strips are placed along the racks on both sides. You can lay polystyrene foam and expanded polystyrene both from the street and from the room. Sheathing can be done in any order. The only thing: on the street side, under the sheathing, it is better to fix the waterproofing. Especially for polystyrene foam - it “blooms” when exposed to large quantities of moisture.
Expanded polystyrene is also used to insulate chicken coops.
If a chicken coop for 10-20 chickens is made of vapor-permeable material (foam and gas concrete, timber, logs), it must be insulated with foam plastic from the outside. There should be a ventilation gap between the wall and the insulation, which will allow moisture to evaporate from the wall. To do this, a lath 20-30 mm thick is stuffed onto the wall. Then the counter-batten is stuffed in the opposite direction. The thickness of the bars is no less than the thickness of the insulation. Foam plastic/extruded polystyrene foam is fixed between the counter-battens on the mounting foam. Then, on top, you can install the outer skin.
Chicken coop ventilation
When building a chicken coop, you should immediately provide good ventilation. Ventilation through cracks and windows is not enough for a normal chicken coop. You can arrange ventilation ducts from two wooden boxes, which will be located in opposite corners of the room. It is also necessary to consider dampers in the ventilation ducts that can be used to regulate the air flow.
Based on these recommendations, you can build a good and reliable chicken coop yourself. Set it up correctly and your chickens will feel good. Egg production will be uniform throughout the year and the bird will not cause you unnecessary worries and troubles. Watch our video about building and equipping a chicken coop.
A summer cottage or a house in the village is not only a break from the bustle of the city, but also an opportunity to provide your family with natural vegetables and fruits. Recently, there has been a tendency among summer residents to master the next step of farming - livestock farming, so that there is always fresh meat and dairy products on the table. For beginners, the easiest way to start is by raising chickens - this is not as troublesome as it might seem at first glance, and can provide your family with chicken meat and fresh eggs almost all year round. And even if you are at the dacha only in the summer season, it is possible to keep chickens from spring to autumn, as many villagers do.
Where to begin?
In order for chickens to be healthy and lay eggs well, they need to be provided with comfortable living conditions. The main one of these conditions is the proper arrangement of the chicken coop. Whether it is a newly erected building or a barn already existing on the site is not at all important, the main thing is to create a suitable microclimate inside, equip the space with everything necessary for the comfortable life of poultry. This can be done with your own hands, without the involvement of outside craftsmen. It’s probably no secret that a chicken coop must have nests, perches and feeders. But this is far from the most important thing in arranging a bird house. The growth, well-being and egg production of chickens are greatly influenced by air temperature, humidity level, ventilation and, of course, lighting.
If you decide to use an old barn, just hang a lamp there and put a feeder, then don’t be surprised that the chickens will get sick and have poor laying eggs. Neither elite food nor an advertised breed of chicken will help here. It is worth spending not so much time and effort on landscaping in order to get the maximum return as a result. It is worth considering in order all the subtleties of the proper arrangement of a chicken coop.
Making a wooden door
The background to the question is this: at our dacha we have an old chicken coop, which was once built by the previous owners of the site. We repaired this chicken coop, plastered the walls, and stocked it with chickens. We liked everything except the front door. Firstly, it was very flimsy and thin, secondly, large cracks formed in it, and thirdly, it began to rot from below. In connection with all of the above, it was decided to replace it. I should immediately note that it took us 3 days to manufacture and install the door.
The first thing we did was remove the old door and measure the opening. It turned out that the size was non-standard: 80 cm wide, 160 cm high. Apparently, the builders wanted to reduce heat loss in the room and went away from the usual height of 2 m.
There were no doors with these dimensions in construction stores. In addition, we needed a window for light; it was not made of veneer, so it would be inexpensive. What is not sold in the store can be made to order, but the manufacturing price turned out to be such that we could build another shed, so we decided that making and installing it ourselves would be cheaper.
Layout features
As when planning any structure, first of all it is necessary to calculate the space and draw up a detailed plan. This will save time and labor costs, and will also help prevent mistakes that are usually discovered already at the stage of settling animals. A chicken coop can be built from any available materials, be it wooden beams, bricks or cinder blocks. Wooden structures are the simplest and do not require additional costs. The frame is sheathed with sheets of chipboard, fiberboard or any boards that are available. If there are already outbuildings on the site, you can allocate one of them for a poultry house.
Whatever option is chosen, when planning, you should calculate the required area and space for walking. The volumes will depend on the expected number of birds, because the larger the number, the more space will be required for comfortable living. The optimal size is 3 square meters. m for 2-3 chickens. With strict space saving, these indicators can be reduced to 1 sq. m, but it should be borne in mind that crowded conditions negatively affect the fertility of laying hens. The size of the enclosure for walking, accordingly, should be many times larger. And this is justified, since chickens need activity in the fresh air:
- Laying hens should not gain weight while sitting indoors, otherwise they will stop laying eggs;
- meat chickens only gain muscle mass when moving and exercising, that is, what they are intended for.
In the greenhouse
In the absence of the necessary space for a chicken coop, farmers keep chickens in a greenhouse during the winter. It is installed and the hens are placed. Tricks that must be observed for the comfortable life of laying hens:
Regular ventilation. With the greenhouse effect, a certain microclimate is established inside the greenhouse. The air stagnates and needs to be renewed regularly. This prevents the development of diseases in chickens. Heating inside the greenhouse space
It is important that the temperature is maintained at an optimal level (+15 degrees). To do this, purchase a special heater (preferably with temperature control). You should not save space and put a lot of chickens in the greenhouse
There should not be more than 3 individuals per 1 sq. m. From mid-February, you need to take care of the presence of a nest. The hens will start laying eggs as soon as they feel the first spring sun.
Lighting and ventilation
After selecting or constructing a room, you can proceed to interior work on arranging the poultry house. Daylight and free air circulation are necessary for all living organisms to function properly. Therefore, even at the stage of developing a structure, you should consider a place for a window opening (at least one) and ventilation outlets. Typically, a chicken coop window is cut into the wall in a ratio of 1:10. This will be enough for a stream of daylight.
For the birds to live comfortably, additional lighting is required, which consists of several light bulbs. The number of light exit points depends on the size of the chicken coop and involves lighting above the feeders and perch. This is especially true in winter, when chickens can receive additional heat from lamps. For these purposes, red lamps are installed - they heat the space directly underneath, which allows the birds to be under such a mini-heater. But in the area of the nests there is no need to plan additional lighting, since the bird prefers to fly in twilight, in a calm environment, away from noisy companions at the feeder.
Ventilation is necessary for any building for normal air exchange, eliminating dampness and musty odors. This is especially true for rooms where food is stored or livestock is kept. Ventilation does not give a stable result, and in winter it is completely excluded. Therefore, even at the stage of equipping the chicken coop, you need to take care of creating ventilation holes. For small rooms designed for a dozen birds, you can limit yourself to the simplest supply and exhaust system. The air ducts are made from two ordinary plastic pipes, one of which is installed under the ceiling for exhaust, and the other is lowered to the floor 20 cm to pump fresh air into the chicken coop. To keep a large number of birds in large rooms, forced ventilation is used, which can ensure the circulation of oxygen throughout all areas of the chicken coop.
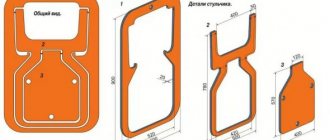
Drawings and projects
A summer chicken coop for 10-20 chickens is a small building, usually made of wood. A mini poultry house with a walk, which will house less than a dozen birds, has dimensions of 3 * 1.5 m. Moreover, this is with a walk - a fenced off area. The very room where the chickens will spend the night and lay eggs is 80-100 cm deep, 140-160 cm wide, and its height is about 1 meter.
Summer chicken coop for 5-9 chickens with walking - a very small building
For maintenance - changing bedding, cleaning - there is a door in the back wall. There is a small window covered with shutters to let in light. In general, an ideal option for a summer house for seasonally keeping a small number of chickens.
A chicken coop for 10-15 chickens is a more serious building. Dimensions double: 1*2. The height can still be kept low - all servicing can be done through a door in the back wall. There is no need to go inside. Only as a last resort.
Drawing with dimensions of a chicken coop for 10-15 chickens
For an even larger number of birds, you need to make an even larger barn for chickens. This is really a barn or a shed. You can already enter such a room.
If the winters are snowy, you will have to make high slopes and a hip roof
Please note that even the smallest poultry house should have windows. No one will install metal-plastic, but glass must be present. In a seasonal chicken coop, one glass is enough; in a winter one, it is better to install two. Moreover, the second can only be installed in cold weather. And one more thing: it is advisable to have shutters on the window. This will give you the opportunity to change the length of daylight hours.
There are designs for chicken coops of unusual shapes - in the form of a triangle or a wigwam. This type of construction is optimal. By spending a minimum of funds on construction, we get a substantial area.
Unusual shape. It turns out that the floor area is large, and the costs are very small.
This chicken coop for 10-20 chickens is built using frame technology. There are no walls as such; they are covered with soft roofing material. A very rational construction. It is also suitable for snowy regions: with such an inclination, little will be delayed.
Wall and floor finishing
The walls and roof of the poultry house should protect the inhabitants from rain moisture and drafts. When constructing a new building, these parts are prepared in advance; albeit inexpensive, but high-quality material is purchased for wall cladding and roofing. If an existing barn is used for a chicken coop, make sure that the roof does not leak and the walls are quite strong and do not form cracks. An ordinary shed made of simple boards can be sheathed on the inside with sheets of plywood or old wooden clapboard. For winter chicken coops, thermal insulation material must be placed under the skin. These can be artificial fillers or natural mixtures of clay and straw.
Remember that facing materials that birds can reach must be natural. There are no protruding pieces of polystyrene foam, hardened polyurethane foam or any other artificial fillers in the chicken coop. Birds are capable of pecking indiscriminately at any surface, which can lead to poisoning and death. After completion of the arrangement, the walls of the chicken coop must be covered with a layer of lime. Lime mortar reduces the risk of the spread of pathogenic bacteria, the proliferation of parasites, tormenting birds, and also ensures the durability of the wood.
The arrangement of the floor in the poultry house occurs in two stages and deserves special attention, since it must be warm.
- The main floor is made of concrete or wood. In the first case, hydro- and heat-insulating material is laid under the concrete screed. If the floor is planned to be wooden, then first lay out the subfloor from any substandard boards and add a layer of gravel or sand for insulation. The finished floor (the floor covering itself) should be made of smooth edged boards. They should be painted, which will extend their service life and also protect them from insects. You should be wary of advice to cover the floor of the poultry house with old linoleum. If the material is of a non-industrial category, it will quickly crumble under the blows of the beak, which means that pieces will fall into the birds’ esophagus.
- The second stage of floor arrangement is a warm bedding , which is changed as it gets dirty. The main floor, like the walls, is covered with lime for disinfection, followed by a five-centimeter layer of sawdust or sand. In winter, peat is added to this litter, making it thicker and warmer. Some farms use straw instead of sawdust and sand, but such bedding quickly gets wet and requires frequent replacement.
How to install nests and perches?
After completing all finishing work on the building, they begin to equip the interior space. For chickens, such home space consists of roosts, where the bird spends most of its time, as well as nests where it lays eggs. The perch is a horizontal pole located at least 50 cm from the floor, on which the chickens sit in a row, clasping it with their paws. For the convenience of the hens, the pole must be of a certain thickness - about 5 cm in diameter. The bird will not be able to grasp a thicker pole, and the hen will not be able to sit steadily on a thinner one. Especially considering that birds sleep on roosts. In addition, thin poles will bend under the weight of several birds.
The length of the pole is calculated based on the number of individuals. There should be at least 25–30 cm of free space for each chicken. The pole is made from a wooden beam, having previously rounded it and sanded it so that there are no knots and burrs. The perches are located at a distance of 35 cm from each other, and can be walked along a towering flat ladder. The last pole to the wall should not be closer than 25 cm.
When installing nests, you should choose the most secluded place in the chicken coop, where less light gets in, and where the bird will feel privacy and comfort. Wooden boxes with low front partitions are placed at the same height as the perches. The nest must be suitable in size for the bird and perform only one function - laying eggs.
The following sizes are considered optimal:
- width and height – 30 cm;
- depth – 40 cm.
Chickens are unpretentious in terms of nests, so in the absence of material, plastic buckets turned on their side, basins, baskets or boxes can be used. But it is better that each “house” has walls and a roof. The nests must be lined with hay or sawdust. To make it easy for the bird to climb to a height, install a narrow climbing ladder - a board with nailed transverse step bars.
High class poultry house
Living “at home on earth” is full of advantages. One of them is a great opportunity to build a poultry house, have chickens and forever give up tasteless eggs from the poultry farm. We will tell you what a really good poultry house should be like from the point of view of FORUMHOUSE participants, how to build it and equip it correctly.
Colleagues at FORUMHOUSE called the Andreysakharov poultry house “the first five-star chicken coop in Russia.” At the same time, it must be admitted that in his work on this magnificent building, Andrei was guided not by ambition, but by common sense, available materials and the desire to obtain the best result. His experience is certainly worth studying.
So, having moved out of town, Andreysakharov first formulated the technical specifications for the “chicken coop” complex, which should be:
- Independent of heating and electricity.
- Able to work for at least two weeks without the participation of the owner.
- One group of chickens should supply both eggs and meat.
- Renewal of the livestock must occur independently (periodic replacement of the rooster is possible).
Hence the requirements for construction:
- A simple design that allows you to assemble the building alone using only simple tools and materials.
- Good insulation (heaters are used exclusively in severe frosts).
- A room with a vestibule for storing tools, water and food, convenient for performing all necessary work.
Thus, it was decided to build a frame poultry house on a foundation of 4 metal piles with piping made from old pipes, with a wall thickness of 150 mm, OSB-3 sheathing 9 mm, with mineral wool insulation and additional vapor barrier inside.
Dimensions are multiples of OSB-3 sheet 2500x1250:
- Length – 3750.
- Width – 2500.
- Height from floor to ceiling – 2300.
During the construction of this chicken coop, like most chicken coops in general, materials available to the owner of the poultry house were used.
Therefore, the floor, rafters and ceiling are made of 100x100 timber, and the posts and trim are 150x50 (the author of the poultry house recommends dimensions of 150x40). Andrey also happened to receive plastic windows, which were also used in this construction.
In severe cold weather, the poultry house is provided with additional heating using a removable electric heater. The room is equipped with bunker feeders and nipple drinkers.
AndreysakharovFORUMHOUSE user
Construction is carried out using the “platform” technology, the walls are assembled on the floor and installed vertically, already sheathed. The wall material is pre-cut, all that remains is to assemble and install.
Mineral wool slabs (the cheapest material found in a hardware store) were used as insulation, which were laid in three layers 150 thick with overlap. The function of wind protection from the outside was performed only by OSB boards.
Andreysakharov
I will paint the outside with white façade water-based paint and trim it with dark slats in the style of German houses.
The ventilation of the poultry house is organized as follows: through the bird hole there is an influx of clean air, and under the ceiling between the bird room and the vestibule there is a grate into which dirty air escapes. In turn, in the vestibule there is an exhaust pipe equipped with a conventional fan. Another point: right next to the hole into which clean air flows, an oil heater is suspended on brackets. Therefore, in particularly severe minus temperatures, frosty air entering the chicken coop will immediately be warmed up by an electrical appliance.
The poultry house heater, selected from among the most budget-friendly ones, is temporarily connected using an extension cord.
The drinker is assembled on nipples on clips with rubber seals, which are simply mounted in 9 mm holes.
The bunker feeder, which holds a bag of feed, was made according to Andreysakharov’s own design. Excellent protection against food spillage.
Second chicken coop-hopper feeder
By the way, if the owners of chickens live outside the city and come once or twice a week, you can use the development of kreyl, which kept chickens in this mode for ten years.
Above the pallet with a grid of slats (it prevents grain from scattering), a box with a lid and smooth inside walls is mounted on the wall. It can be made from fiberboard with the smooth side inward. At the top, the dimensions of the box are 1 x 0.6 x 0.3 m, and at the bottom it narrows, with one side of the structure inclined, and the opposite side perpendicular to the floor, which is attached to the wall. At the bottom of the box there is a 1.5 cm wide gap into which grain is gradually poured. The distance between the pallet and the box should be such that the grain does not spill out until the chickens peck the one that is already on the pallet.
Rules for a good poultry house
During the discussion of the stages of construction of this poultry house on FORUMHOUSE, experienced chicken breeders and builders of our portal formulated the basic rules of a good poultry house.
- The shape of the room should tend to be square: a shorter wall length leads to reduced heat loss.
- Perches must be located on the same level, and not on a ladder, otherwise the chickens will try to take a higher place and crap on the others, which will lead to quarrels among the livestock and general disorder. The total length of the perch for 10 chickens is more than two meters. The distance between the poles and between the pole and the wall is 35 cm. The most convenient angle for chickens on the ladder to roost is 45 degrees.
- The chicken coop needs regular disinfection.
RikSamForumHouse Member
Before the chickens are moved in, the poultry house is treated with lime, then once every six months for disinfection.
- Often heating is not used in a well-insulated chicken coop. But the optimal indoor temperature for poultry in winter is 10-12 degrees. What kind of heater should I install in case the frost hits - below forty?
To heat the poultry house, FORUMHOUSE chicken breeders often use infrared heaters, since birds can warm up under such devices, even if the air in the room is not warmed up. Another advantage is that the IR hangs from the ceiling, and chickens definitely won’t be able to crap on it. But judging by the reviews, such a heater is one of the most dangerous, and caution is definitely required with it.
aNNuSHkaFORUMHOUSE participant
Last year, a kind person turned the IR on full, like it was cold, -20. Well, I decided to check on the chickens before going to bed, otherwise I would have had baked chickens by the morning - it was so hot!
AplicatorFORUMHOUSE Member
IR is one of the most dangerous. The safest is a convector or, finally, an oil pan, the main thing is with a thermostat.
- A chicken coop area of 6 square meters (2x3) would be comfortable for 12-15 laying hens. Such a number of chickens will provide eggs in abundance for even a large family, even in winter (provided they are well fed).
- It is optimal when there are two exits from the chicken coop, and one of them is to the paddock.
Aleksej2000FORUMHOUSE Member
You never know - catch a chicken, restore order there, and so on.
VelemForumHouse Member
Separate door, separate enclosure, tested by practice. It used to be that you were walking with a sack of wheat, you were staggering with your flat feet in your galoshes, and these were getting tangled under your feet!
- The chicken coop should have a vestibule. It protects against frost, serves to store food, tools, etc., and helps prevent chickens from accidentally jumping out into the street, which in winter can lead to frostbite of the comb and paws. Usually a hole is made in the vestibule to the attic where the hay is stored.
- It is better to place the perch opposite the window and under no circumstances in a draft. As for the material, in cold regions the best choice for a perch is a spruce pole.
KreylForumHouse Member
This is many years of village experience. People say that on such a roost the chickens' feet do not freeze.
To make the perch pole easier to grip with a chicken paw, it is rounded a little and the corners are removed with an ax.
ShayTanForumHouse Member
This is due to the structure of the paw. The square bars disrupt the grip of the “foot”, resulting in all sorts of curvatures, rickets, etc.
- Under the roost, competent chicken breeders make beds from which chicken droppings, a valuable organic fertilizer, can be easily removed with a spatula. It is convenient to place a container for chicken ash baths on the floor; in severe frosts it is covered with hay: and even if the heater cannot cope with heating the chicken coop in cold weather, the birds will feel great on the hay. The perch is usually made at a height of one meter, the shelves are 35-40 cm.
- The feeder should be in the brightest place in the chicken coop.
SperhelbrodFORUMHOUSE Member
This is not a chicken coop, but a spaceship.
- The floor in the chicken coop, raised by 50 cm, protects against rats and other rodents. Also, to protect against rodents, boards are often lined with fine metal mesh, and although, according to FORUMHOUSE participants, “mice walk through the mesh in pairs and with a flag,” it protects against larger animals. In the vestibule, the floor is simply wooden, sometimes upholstered with old linoleum, and in the main part it is insulated with foam plastic, which is also a great help in the winter cold.
In exchange for a comfortable chicken coop, laying hen owners usually expect basic gratitude from the birds: normal behavior and high egg production. This will definitely happen, but not right away.
Sperhelbrod
Chickens are complete idiots. Yesterday I watched them try to return from the run to the chicken coop (we also have to throw them out into the run, they don’t go on their own). I don’t have enough brains to understand that you can enter along the ladder. As a result, they jumped into the hole from the side.
Due to poor intelligence, chickens may not immediately understand how to climb onto shelves and perches, and huddle together for the night in a heap on the floor, experiencing seemingly insurmountable difficulties in handling nipple drinkers. To quickly correct the situation, take a rooster into your chicken family, he will quickly teach them all the wisdom.
A week on an oat diet, a change in diet, and a round white pebble (or a ping-pong ball) in the nest will help to establish normal egg production.
Many FORUMHOUSE participants began building their own poultry house by watching our video about a solid and beautiful chicken coop built with their own hands in a pine forest. Our article will tell you how to properly organize the keeping of chickens in the country, only for the summer period. Join the discussion about different types of chicken coops and their construction. Watch our video about an innovative outbuilding: a poultry house combined with a rabbitry.
How to arrange drinking bowls and feeders?
The main task in arranging a feeding area is to ensure that the bird does not scoop food out of containers, turn over drinkers and feeders, or climb into them. If you put a regular bowl, like for other animals, the chickens will fight for access to it, and the contents themselves will quickly be ruined by garbage and droppings. To avoid this and streamline the feeding process, feeders and drinking bowls are made of a closed type with a dosed supply of contents. Feeding equipment can be purchased at the store or made with your own hands from scrap materials. The simplest options are gutters with holes. You can use plastic plumbing pipes - cut out slots of suitable diameter in them, and install “elbows” along the edges into which you can pour water or add food.
A mesh metal divider is placed on open feeders so that the bird can reach the food with its beak, but not fall into the container. For stability, the equipment is attached to the wall, and its size must be in accordance with the number of pets, otherwise fights cannot be avoided. Drinkers are made from upside-down plastic bottles, but in this case you will have to put in some effort and skill. It is much easier to purchase a store-bought version with a dispenser.
DOOR MANUFACTURE
Fortunately for us, there was a lot of 2 cm thick pine planks of suitable length left in the attic of the dacha. The board was in excellent condition, well dried, smooth on one side and treated with drying oil. We will use it to make a wooden door for the chicken coop. We started by cutting 7 tesins 160 cm long with a jigsaw.
Then they put them together, measured the size 80 cm from above and below with a tape measure, drew a line on the last board, and cut off the excess width with a jigsaw. Use a jigsaw to cut lengthwise carefully to ensure an even cut. We got 7 pieces, 160 cm long, 80 cm wide, just right.
Next, we proceed to making the canvas. To connect the boards together, we bought furniture dowels and wood glue in advance.
We take one board, drill with a drill with a drill equal to the diameter of the dowel, a hole with a depth equal to half the length of the dowel. We coat the dowel with glue and drive it halfway into the edge of the board. Three dowels are enough.
We attach a second piece of wood to it, mark with a pencil the places for the holes for the dowel, and drill the holes. We again coat the dowel with wood glue and connect both boards together. Before connecting them, you need to check that the holes for the dowels match each other. Or you can initially cut the boards with a margin of length, connect them together and only then align them to the desired size. Thus, we connect all the boards together. The fabrication of the canvas is now complete.
Since we are building a wooden door for a chicken coop, we will cut out a passage measuring 20 by 20 cm in the lower left corner so that broiler chickens can enter the room even if it is closed.
The boards connected together need to be strengthened. To do this, we will use a wooden lath, 2 cm wide, 1 cm thick. Screw the lath around the perimeter, in the middle, and diagonally with self-tapping screws.
To make it light in the barn, we will cut out a place for a window. To do this, drill a hole with a drill, insert a jigsaw blade into it and cut out the excess. Let's make a window in the form of an irregular rectangle.
In order to avoid gaps and prevent cold air from entering the chicken coop, it is necessary to make insulation. To do this, take an ordinary sheet of polystyrene foam, cut it to the size of the slats with which the canvas was reinforced, and insert it between them. The cracks can be filled with polyurethane foam. As soon as the foam hardens, cut it with a knife.
We will cover the inner side with clapboard 1 cm thick. We cut the clapboard to the required length, fasten it with self-tapping screws, insert one strip into the other, thus covering the entire foam plastic. The thickness of the wooden door turned out to be 4 cm: 2 cm outer side, 1 cm internal reinforcing strip, 1 cm lining.
Now let's prepare the place for inserting the glass. To do this, take a wooden plank 2 cm wide and screw it along the inner perimeter. It turns out that there will be a gap of 1 cm on each side for the glass. At this stage, the work with the wood is finished, the rough version is ready.
The next step in making a wooden door is sanding it. We will screw a special plate for sanding wheels to the grinder, attach coarse-grain sandpaper to the Velcro and sand the wood on all sides. After that, take some fine-grain sandpaper and sand it again. To check the quality of grinding, you need to run your palm over the surface; if there are no roughnesses, then everything was done correctly.
To make the tree last a long time, we will treat it with an antiseptic. We chose Biosept ultra, with deep protection of wood in direct contact with moisture.
As soon as the boards are dry after impregnation, you can begin installing the glass. Having measured the size of the window, you need to cut the glass a few millimeters smaller so that it can easily fit into the right place. If the glass is cut exactly to the size of the window, it may not fit there. It will be very difficult to cut off an extra couple of millimeters from the glass; it is easier to enlarge the opening with a chisel. Since the width of the slats in the window space is 1 cm, the size of the glass can be easily reduced by 5 mm. We insert the glass, fill the gaps with sealant and secure the glass with glazing beads. After this, you can begin installing the door.
DOOR INSTALLATION
Before installation, we checked the door jamb. We were completely satisfied with its condition, only the threshold was a little rotten, which was later replaced. To give the wood a fresh look, it must be sanded. After sanding, we will cover everything with a protective varnish. It is also necessary to strengthen the jamb by screwing in 2 anchor screws 15 cm long on each side.
I’ll write a couple of suggestions about making and installing a new box. To assemble it, you need to put the canvas on the floor, lay out the parts around it, measure and cut off the excess part. When you assemble everything, insert 3 mm thick cardboard on each side between the box and the canvas, otherwise it won’t fit into the box later. Install it on anchor bolts, fill the cracks with foam. When installing the box, be sure to install spacers so that the foam does not change its geometry.
Let's start installing the hinges. We used regular, detachable, store-bought ones. They are left and right, they have the designations “L” and “P”. When purchasing, decide which way the door will open, buy these and make sure they are on the same side. We bought the right ones, with the letter “P”.
We separate them into 2 halves, the half with the pin is screwed to the box, the other to the canvas. Let's step back 15 cm from the top of the canvas, attach one half to the end, and outline it with a pencil. The loop should be flush with the end, strictly vertical. Now you need to use a chisel to cut a notch in the jamb.
The thickness of the product is a couple of millimeters, the depth of the recess should be made the same.
We fasten the loop to the end with 2 self-tapping screws. In the same way we will screw the second part located below.
At this moment we will need an assistant. We insert their second halves into the screwed hinges, lean the door against the frame, align it, ask an assistant to mark the places where the second parts will be screwed. We lean the hinges against the box next to the mark, and trace them with a pencil. Don't get confused, the hinges on the box should face up.
We also use a chisel to cut out a notch and fasten them with a couple of screws. Now you need to install everything in place. We check whether the canvas closes and whether the hinges are skewed. If something doesn’t suit you, you can move the hinges higher or lower, you need to ensure that the door opens and closes without interference. After making sure that everything works as it should, tighten the remaining screws.
Since our wooden door is installed on a homemade frame, we need to install a stop on the jamb so that there are no gaps. Making the stop did not take much time; for this we used wooden slats and screwed them around the perimeter.
Now everything is firmly fixed, there are no cracks. All that remains is to screw the handle with the latch.
This is how we made and installed a wooden door with our own hands. If you liked the article, share it on social networks.
VIDEO
Source
Arrangement of a pen for walking chickens
Another important aspect of arranging a comfortable chicken coop is an aviary for walking birds. As noted above, chickens need physical activity and fresh air. For laying hens this is a guarantee of good egg production, and for broilers it is an increase in the meat layer. Walking birds in an unfenced area is dangerous; they will peck and trample plantings, and there is also a risk of being attacked by other animals and birds of prey. As a rule, the size of the enclosure is calculated at 3 square meters. m per bird, and its height must be at least 2 m so that the chicken cannot fly over it. Poles are driven in around the perimeter, and the space is fenced off with a fine metal mesh. If there are birds of prey in your area, you should definitely put a net over the top of the aviary.
Useful tips
Every farmer has his own little tricks for raising chickens, and livestock breeding forums can give you some interesting farming ideas.
- Chickens need to sleep in complete darkness to get proper rest. But a problem arises with the sudden switching off of the light, since the laying hens cannot see in the dark and will not be able to settle on the roost in time. For gradual darkening, a phased power outage is used. The easiest way to purchase a dimmer for this purpose is an electronic device for adjusting the brightness of light.
- At the stage of equipping the walls, a small hole can be made at the bottom of the chicken coop door. Through it, it will be convenient for the bird to go out into the yard, and for you to clean up the dirty litter, raking the waste to the exit to the street. The size of the hole should correspond to the size of the largest individual in the chicken coop.
- There are various preparations for parasites on poultry - ticks, fleas, lice eaters, but it is easier to install a spacious container with wood ash on the territory of the poultry house. Birds will happily “swim” in it and clean their feathers, thereby freeing themselves from uninvited guests.
To learn how to properly set up a chicken coop with your own hands, watch the following video.
Poultry farming is simply impossible without a “poultry house”, because in winter, birds, including chickens, need warmth and are not able to survive in the open air. If there is a good-quality barn on the site, it may well serve as a home for chickens. Otherwise, the chicken coop will have to be built from scratch. Don’t be scared - it’s not at all difficult to do if you follow the advice of experienced poultry farmers.
So, when arranging a chicken coop, you need to pay attention to the following points:
- wall material;
- chicken coop dimensions;
- lighting;
- ventilation;
- walking hole;
- perches;
- nests
How to build
To build a good poultry house, you need to carefully consider each stage, using already prepared diagrams and drawings. Also make sure that all materials necessary for construction are ready. It will also be interesting to learn about how to build a country toilet yourself.
Necessary materials
Taking into account what type of foundation will be built for the chicken coop, several bags of cement and bricks will have to be prepared. But bitumen or mastic will perform a protective function during the construction of the foundation. The walls of the structure can be made of timber with insulation. After this, you have to think about boxes for ventilation and perches for perching. Also, to build a chicken coop you will need windows, doors, and a number of construction tools.
Step-by-step instruction
The first step is to build a foundation. In this case, it is worth choosing a strip, monolithic or columnar foundation. Such a base is durable and strong, and rodents will not be able to get through it to the birds, which spoil not only the eggs, but also the chickens themselves. Place a mesh at the bottom of the dug hole.
The next procedure is as follows:
When the foundation is completely dry, you can proceed to the construction of the walls of the future chicken coop. All actions are performed using standard technology for constructing timber walls. It is necessary to lay insulation between the base and the first crown. Next comes the installation of the floor joists. To do this, use beams with a cross-section of 10x15 cm. Lay them on edge, maintaining a distance of 50 cm. The resulting gaps must be eliminated using scraps from the same material. In the same way, lay the crowns, which are connected at the corners, using a tongue-and-groove system. Place a heat insulator between the crowns. When constructing walls yourself, you must take into account that their height should be about 2 m
At the same time, it is extremely important to achieve an even installation of the crowns, avoiding distortion. For these purposes, it is necessary to use wooden dowels. Drive them into the bars in a checkerboard pattern
A distance of 1 m must be maintained between them. When the ceiling beams have been strengthened, you can proceed to the installation of the roof. The maximum amount of heat will not escape through it, so you have to take care of its high-quality insulation. The roof itself should be gable so that precipitation can drain freely. The gap under the roof should be used for practical purposes by placing inventory or food there for storage. Now all that remains is to equip the ventilation according to the individual drawing, insulate the floor and equip the chicken coop inside. The floor in the chicken coop must be made double. In this case, the first layer consists of a rough rough board, followed by a layer of vapor barrier, and then you can proceed to installing the floor using edged boards.
Video on how to build a chicken coop:
What is the best material to make the walls of a chicken coop from?
First of all, you need to decide on the material. Both brick and foam block are suitable for building the walls of a chicken coop, but the best option for poultry farming would be a wooden shed, especially in the summer. The advantage of a wooden chicken coop is the relatively low cost of materials compared to a stone one. In addition, the microclimate in such a home is much better, since wood has the ability to breathe.
Wooden walls must be whitewashed annually with a lime solution to prevent the appearance of bird pests.
To keep chickens year-round, the chicken coop must be insulated. In winter, the minimum room temperature should not fall below 10 degrees Celsius. The rest of the time, a comfortable temperature is considered to be 15 degrees. If the temperature drops, the chickens will stop laying eggs, moreover, frostbite on their paws is possible.
What size should the chicken coop be?
The area of the chicken coop directly depends on the number of birds. For 1 sq. m, no more than 5 laying hens or a dozen young chickens are allowed.
The minimum area for 5 chickens cannot be less than 3 square meters. m.
As for floors, it is not recommended to use earthen and clay floors in poultry farming; they are easily damaged by rodents. One of the most practical flooring options is a cement screed with a fine mesh. Bedding should be placed on the screed, for example, sawdust.
What should be inside
All mobile homes share common design elements:
- Small kitchen.
- Separate paddock for walking.
- A place for nesting and resting.
There are several standard installations that can be made stationary:
- Two-tier triangular - the rectangular side is located on the ground, but the roof is made in a triangular frame. This allows the liquid to flow down during rain, there are no leaks, such a chicken coop will withstand even the cold. This design is usually calculated for no more than 5 chickens. The structure can be placed in the yard, in addition to contamination, it can be moved to another place along with the bird.
- Arched portable chicken coop - you can build it from everything left in the utility room. A large frame is made of wood, then it is covered with metal mesh. Separately, you need to make a place for sleeping; this is a small rectangle of plywood covered with a tarpaulin. For a seasonal hobby that can accommodate up to 3 people, this is enough.
These are the most popular options for chicken coops in the country if the owners come only for the season.
Chicken coop lighting
In a room for keeping chickens, it is imperative to provide window openings on the southwest side. The window size is approximately equal to ¼ of the floor area. When raising poultry in regions with harsh winters, it is necessary to make an additional winter window frame (removable).
Additionally, electric lighting must be installed in the chicken coop, and it is better to hang the lamp with a shade. The light bulb must be positioned so that the main lighting is in the area of the feeders and perches. In a semi-dark room, chickens will sleep most of the time, and their egg production will decrease.
Ventilation and walking hole
In a room for chickens, especially in an insulated chicken coop, it is imperative to provide an influx of fresh air. To do this, you can install an exhaust fan (in small rooms) or make simple supply and exhaust ventilation.
So that the chickens can move freely outside the chicken coop, a small hole must be made for them at a short distance from the floor, a size of 30x30 cm is sufficient. Of course, if the territory of the farm yard allows for the birds to walk. It must be closed with a door that can be used as a bridge.
Perches for chickens
Perches are an essential element of a chicken coop. Chickens should not sleep on the floor or in nests. For perches, it is good to use 5x6 cm wooden blocks with rounded ends so that the chickens do not injure their paws. They should be installed at a height of 50 cm from the floor. The distance between the bars must be at least 35 cm so that the bird can sit freely, and 25 cm from the last bar to the wall. One hen per roost requires 25 cm of perch.
If you make the perch bars removable, they will be easier to clean and handle.
Some poultry farmers practice ladder perches, but in this case the chickens pollute each other. It is better to place the poles vertically.
Chicken coops for the cold season
You should approach construction even more responsibly if you need a winter chicken coop. Since in such a building, in addition to the walls themselves, an optimal temperature must be maintained to ensure that the chickens continue to lay eggs.
Often, if the temperature is too cold, they may begin to hurt, and their productivity will accordingly be reduced to a minimum. That is, during construction it is worth using additional materials that will retain heat. Here, as in houses, it is allowed to use, for example, special wool, which is considered mineral and is an excellent insulation material.
Nests
A place for chicken nests should be allocated in the darkest corner of the chicken coop. The nest must be 40 cm deep in order for the hen to fit in it. The nests must be installed on a hill (40 cm from the floor). For a dozen laying hens, 3-4 nests are enough.
Chickens of different ages must be kept separately, otherwise the adult bird may offend the pullets. In addition, the hen and brood should also be separated. As for the presence of a rooster, its presence is not at all necessary if you plan to keep chickens only to obtain eggs. But for breeding domestic chickens, you can’t do without it.