Such a roof is sometimes used when implementing complex unusual projects. The three-slope structure looks original and complete in design.
The specifics of their design are clarified in advance; errors in calculation and installation are not allowed.
What is a hip roof with 3 slopes?
Some experts consider this design to be an improved type of gable roof, while others consider it a subtype of the hip roof. The essence does not change much from this - such roofs always have three inclined slopes - two triangular or trapezoidal and one hip.
The pediment in most cases is adjacent or is calculated taking into account the general asymmetry of the frame.
How to calculate elements
This design solution is widely used in practice. Most buildings with a gable roof are made in the form of extensions to the stone box of the main building. This method allows you to successfully combine the roof and brick frame of a garage made in the form of an extension, an additional wing of the building, a three-pitched terrace roof and even a canopy over the porch.
It is quite easy to calculate the dimensions and geometry using the formulas shown in the diagram from the school mathematics course.
Use Cases
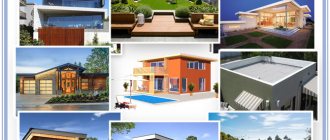
This design is not considered universal and is most often found in complex projects that combine several types of load-bearing roof frames. But if desired, roofs with three slopes can be used as independent roofs ; the options are limited only by the budget and imagination of the owners.
Extension to the house
This option is the most common - gable roofs give open or closed extensions a complete and original look.
Such a roof protects well from atmospheric influences.
With the right approach, such a roof for the extension is initially provided for by the project (at least at the stage of laying structures for attaching the frame).
If this is not possible, the slopes are held in place by corner mortgages or other equally reliable fasteners.
Main structure
The possibility of increasing the number of flat walls is positively assessed when constructing houses with attics and upper residential floors; with proper consideration of wind loads and choosing a suitable angle, such roofs are always appropriate.
Ways to increase stability are thought out in advance; as a rule, the only pediment in such houses is laid from durable materials (brick or blocks), the rafter structure, if possible, rests on the supporting structures of the house.
Good stability can be achieved by installing a vertical support from the corner end of the ridge supported by partitions or ceilings.
Raw materials for making a roof
For the construction of the truss structure and sheathing, coniferous boards are taken for work, previously prepared for work. Before choosing a material, carefully check it to ensure that there are no traces of mold, darkening or rot.
The beds, racks and mauerlat are made from timber with a section of 100x100, 150x150 millimeters.
Rafters and floor beams are made from 50 mm boards with a width of 200 mm. To prevent the boards from sagging, they are installed with the narrow side down.
A large load is placed on the sloped rafters and a rectangular beam of 100x150 millimeters is used to perform them.
Also, sloped rafters are made from spliced boards: they take a piece of board, lay it between the spliced boards and connect them with pins. The main thing in the construction of a roof is the sheathing; for it, boards from 20 millimeters are taken and placed on the rafters at a certain distance, parallel to the ridge beam. Sometimes the sheathing is made of solid plywood; this option is suitable for soft roofing.
To build any type of roof, the following materials are still needed:
- Roofing;
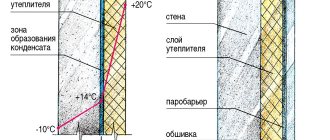
- Waterproofing and windproofing;
- Insulation;
- Vapor barrier;
Pros and cons of the design
The advantages of this design include:
- Highly decorative and original. Three-pitched roofs give extensions and separate wings a complete look, decorate houses with attic floors, verandas and terraces.
- Variety of options. Depending on the requirements for internal space, wind loads and other operating features, a gable roof can have either full or partial truncation.
Strict requirements are put forward only to the angle of inclination of the slopes; ideally, it varies between 25-45°.The structure can be hipped, without a ridge, or half-hipped, with a ridge girder.
- Good resistance to strong gusts of wind, subject to proper design.
The disadvantages are manifested in the asymmetry and complexity of the design.
Errors in selecting the orientation and inclination of the slopes and their fastening increase the initially uneven load on the load-bearing structures of the house.
Unlike a classic hip roof, a gable roof does not compensate for the pressure from the hip slope on the other side without a number of additional measures. Therefore, this roof requires the installation of additional struts or struts or reinforcement of the frame in other ways.
The design (and in most cases, the construction) of a gable roof is entrusted to specialists, which negatively affects the estimate.
Building a roof
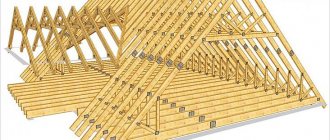
A three-pitched roof is slightly different in design from a gable roof; the difference lies in the placement of two slanted rafters, they make up the hip slope and the structures that support the rafters.
Sloping rafters are longer than side rafters and for this reason you need to take longer and thicker boards or combine standard material.
Device
Standard units include:
- Mauerlat is a thick support beam laid on the load-bearing walls of closed buildings or resting on the side posts of open ones. In independent structures it is laid around the entire perimeter of the house, in extensions it is tied to mortgages or the frame of the main building.
- Rafter frame connecting 2 slopes symmetrical to each other with ordinary legs, struts and struts, a hip system with diagonal legs, trusses and ridges, and a ridge beam, if available.
The slopes of such structures, in turn, extend beyond the edges of the walls by 40-50 cm to form a cornice overhang or are extended by fillets for the same purpose. - Lathing and counter-lattice , holding all the insulating layers of the roofing pie and the roof covering itself.
- Auxiliary elements – snow holders, drainage systems.
The main difficulties arise when choosing the slope of the slopes or designing the frame (mistakes lead to movement or deformation of the structure under its own weight, snow or strong gusts of wind).
The three-slope rafter system has a relatively large slope and is initially complex, and therefore heavier. Read about the design of the rafter system for a classic hip roof here.
At the same time, the requirements for the cross-section and pitch of the main load-bearing elements - the mauerlat and rafter legs - are not reduced; moreover, the frame must be strengthened with supports and trusses , which also increase its weight.
Building a gable roof
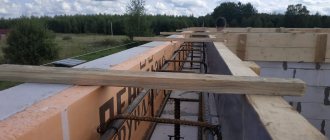
First of all, the Mauerlat is laid. Along the length of the walls and join in the corners at an angle of 90 degrees, moving towards the inside of the walls. The Mauerlat is secured to the walls with anchors; first, rolled waterproofing material is laid on the walls in two layers. The timber intended for the Mauerlat must be treated with an antiseptic. The planks are laid on the internal walls, having previously laid a waterproofing coating between the wall and the boards.
Laying the Mauerlat
Beams from boards 50x200 millimeters, possibly thicker, are laid on top of the Mauerlat. The boards are laid on the end, thereby increasing rigidity. The beams are laid in order: first the outer ones, then the intermediate ones.
The distance between the beams varies from 50 centimeters to 120 centimeters, but when insulating the ceiling with the latest materials, the distance between the beams should be left at 60 centimeters across the width of the insulating material.
Using wooden spacers, you can adjust the height of the floor beams. It is possible to lay the attic subfloor on top of the floors; to do this, you need to take strong boards; this will speed up the installation of the roof and increase the safety of the work.
Vertical racks are placed on floor beams or on beams; they are located in the center of the roof. The racks are installed and plumb, then fixed in a vertical position with jibs and temporary supports. The racks are attached to the floor beams with metal or wooden plates. The step between the posts is more than 2 meters. The posts are placed at the edge of the roof, they form a vertical pediment where the sloped rafters connect to the ridge. The ridge beam is installed on the racks and fixed with corners with overlays.
The side rafters are inclined rafters, which are fixed on top to a ridge beam, and from below to floor beams and a mauerlat. They are made according to a template: they try on a board to the place where the outer rafter leg is attached and make cuts on it; they will be a support for the ridge beam.
Using the existing template, they make the required number of rafters, attach them to the ridge beam, then install them in place and make a cut from below on each rafter leg and to the mauerlat. The rafter legs are installed on the mauerlat near the floor beams so that it is possible to connect the structure with studs. This is necessary to increase the rigidity of the truss; in this case, the distance between the rafters is equal to the distance between the floor beams.
The side rafters are reinforced with struts, which are placed at an angle of 45 degrees on the floor beams. The struts and rafters have the same thickness as the beams, and it is 50 mm. The upper part of the struts is attached to the rafters using pins.
Reinforcement of side rafters with logs
Mark the sloped rafters in place: support the timber or boards in the rack and mark the top slope cut. They cut it out, then lean it against the corner joint of the mauerlat and mark the bottom cut.
The slanted rafters are attached using corners and overlays; to strengthen the connection, the rafters are reinforced with splices - supports that form a hip slope and rest on the mauerlat from below, and on the slanted rafters from above.
Installation of sloped rafters
Sloping rafters need additional strengthening if they are long, and they are secured with racks that are installed from below and secured with trusses on the floor beams.
The temporary jibs are removed and the production of the sheathing begins after the rafter system has been installed. What you will use for the sheathing depends on the roofing covering. A sparse lathing made of 25 mm boards is suitable for corrugated sheeting and metal tiles; a plywood sheathing is suitable for soft roofing and ondulin.
This type of roof (three-slope) will enhance any structure, be it a house or a gazebo. The resistance to strong winds is significantly increased, as the hip slope is oriented towards the wind load.
Types of rafter systems
Depending on the method of arranging the ridge unit, three-pitch roofs of the hipped type are distinguished - with three triangular slopes converging at one point, and hip roofs - with a ridge girder.
The first ones are chosen when covering square-shaped extensions, the second ones - in all other cases.
Depending on the method of fastening the rafters, the following types of frames are distinguished::
- With hanging legs, resting on load-bearing walls.
- Layered, with additional vertical supports connecting the ridge girder and internal capital structures.
In the case of gable roofs, the second type is considered more stable and reliable. In particular, it is recommended to choose it when constructing such a roof on your own.
Depending on the frame material, the following systems are distinguished:
- With wooden rafters. They are considered more affordable and are more often found in private housing construction.
- With metal rafters. Such a system is selected for a large area of a gable roof or increased loads and is assembled using corners or similar fasteners.
How to make a gable roof with your own hands
A three-pitched roof is used to cover structures that are attached to a home: terraces, winter gardens and similar structures. One of the pediments is adjacent to the wall of the main building.
- Features of a gable roof
- Hip design
- Tent structure
- Advantages and disadvantages
- Types of rafter systems
- Hanging
- Layered
- Do-it-yourself construction of a gable roof
- Flooring roofing material
Types of designs
Work execution algorithm
Work begins with the preparation of materials and bases for attaching the Mauerlat. After this step by step:
- Actions are taken to fix the support beam to the load-bearing walls (with a mandatory waterproofing layer for dissimilar types of materials). The method of attachment depends on the material of the walls; in most cases, mortgages fixed with bolts are used for these purposes.
- Vertical supports are installed (if any), in particular, beams holding the ridge girder.
It is recommended to install at least one such beam at the end of the ridge, the second - near the wall of the gable or adjacent house. Fastening is carried out using braces, after a thorough check of the vertical, after which the structure is strengthened with struts. - Installation of diagonal and row rafters is carried out , supported by the Mauerlat and ridge beam.
The elements are cut out at the bottom according to proven templates, with a margin of 20-30 mm for joining and mandatory treatment of the cut edges with antiseptics and drying. The longest outer rafter, if possible, is installed first, then the corner and row legs. - Other frame elements are mounted - extensions and reinforcements . Each is fixed at a pre-calibrated angle with at least two galvanized nails or placed on metal corners. This stage takes a long time to complete, not least because of the small size of the elements and their large number.
- The frame is sheathed with lathing according to a pre-selected pattern, which in turn depends on the type of roofing.
- All layers of the cake (warmed or cold) are laid, including the coating itself.
- Work is underway to install overhangs .
The exact order depends on the method of ventilating the gable roof; in permanent residences, waste is removed through a ridge or aerators in the upper zone. In cold extensions, the roof is often made open, the overhangs are simply protected from wind and precipitation.
Read about how to build a classic hip roof here.
Laying roofing material on a gable roof
Before installing the roofing, eaves strips, abutments and valleys are installed, then gutters are attached. Next, a waterproofing film or membrane is laid. The roofing decking of a gable roof is laid parallel to the eaves with an overhang of 50 mm, which descends into the gutter. The sheets are laid from right to left, overlapping the first sheet.
If the installation is done the other way around, from left to right, then the first sheet is placed under the second. The roofing covering is securely fastened to the sheathing with roofing screws 4.8x28 or 4.8x35 at the rate of 6-8 pcs. per 1 square meter. And at the end of the installation, ridge and end strips are installed.
Important! It is necessary to move along the sheets during installation in soft shoes, stepping into the deflection of the wave at the locations of the sheathing.
Have you made a gable roof of a house with your own hands? If yes, then tell us about your experience in the comments.
Main types of attic floors
The first step is to decide on the external characteristics of the extension, which will correspond to the overall style of the house. There are some types:
- Single-level attic with a gable roof. This is an insulated attic-type room. It has a low ceiling and a small area.
- Single-level attic under a sloping gable roof. In terms of area, such a room is much more spacious, but more labor-intensive to design and more expensive in price. It has four sloped planes at different angles.
- Single-level attic with cantilevered extensions. Presents certain difficulties during design and construction. But the design allows the installation of windows in a vertical position, and the large internal space smooths out all the problems during construction. The frame of such an attic involves displacement and extension outside the house.
- Multi-level attic with mixed roof support. The most complex of attic floor designs. Requires the direct participation of specialists. Most often it is built together with a new house and is not designed for an extension to an old one.
The rafter system is the basis of any attic
Installation process
Having studied the structure of a pitched roof, it will not be difficult to build it with your own hands step by step. They start with the calculation and purchase of the necessary building materials, and then act according to the plan:
- After the box of the outbuilding is ready, a mauerlat is laid on the upper part of the side walls. Having previously waterproofed the installation site, use a long drill to make holes for the anchor bolts. The Mauerlat is treated with an antiseptic, allowed to dry, and then also drilled. Then they lay it on the wall, insert the anchors and tighten it tightly.
- The boards intended for the manufacture of rafter legs of a certain length are cut. First of all, the outer rafters (front and rear) are installed; a string is stretched between them, which serves as a guide for installing the remaining legs. The heavier the roof, the steeper its slopes, the more often the rafters are located.
- The next stage is waterproofing the rafters. To do this, use a waterproofing film, which is sold in rolls. The film strips are fastened with a construction stapler along the roof, starting from the bottom. The strips are laid not in a joint, but in an overlap of 10-15 cm.
- On top of the rafters, the waterproofing film is fixed with rivers of counter-battens. Their thickness of 3-5 cm creates a ventilation gap.
- The sheathing is nailed. Solid, if the roofing material is in rolls, does not hold its shape. Lattice if used.
- The critical phase is laying the roofing material. How to perform it correctly depends primarily on its type. For fastening, use special self-tapping screws, supplied complete with the roof, galvanized with a rubber head, which, deforming when twisted, protects the hole from moisture penetration. The roofing material is also laid with an overlap of at least 10 cm.
- All that remains is to equip the drainage system and secure the eaves and wind beams. It is recommended to use plastic clamps for the gutter, which, unlike metal ones, are not subject to corrosion and are attached directly to the wind board.
- Snow guards are installed to prevent spontaneous snow melting. They are a small cornice fixed along the lower edge of the slope.
Useful tips
It cannot be assumed that the roof over the extension is some other structure. This is an ordinary roof with all known parts, elements, assemblies and fasteners. When constructing it, you will have to make calculations to determine the loads. It is also insulated, shaped and constructed. The only thing that happens often is that this structure is smaller in size than the roof of the main house. In all other respects, this is a traditional construction option.
Therefore, pay attention to these nuances:
- the roofing material
of the extension must be exactly the same as that of the roof of the house; - all wooden structural elements are treated with antiseptics
and fire retardants: the first fights mold and fungi, the second increases the fire resistance of the structure; - roofing material is selected taking into account the angle
of inclination of the slopes; - the minimum cross-sectional size of the timber for the Mauerlat
is 150x150 mm; - The minimum cross-sectional size of rafter legs
is 150x50 mm.
Design features of a gable roof, plus the technology of its construction
The topic of the article is a gable roof. Roofing structures with three slopes are mainly used to cover extensions: terraces, verandas, winter gardens and other structures. Because one pediment of such a roof is adjacent to the wall of the main building. And although single- or double-slope structures can be erected over such buildings, the three-slope structure looks complete in its design. In the article we will talk about the types of three-pitch roofs, what elements they consist of and the rules of construction in stages.
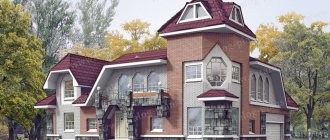
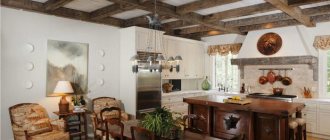
House with a garage and porch covered with gable roofs Source pinterest.com