The desire to get more free space in the bathroom or to purchase an original shower stall leads to the fact that glass blocks are gaining wide popularity among consumers and winning the attention of designers.
Durable and resistant to various influences, the blocks help create convenient structures and act as an interesting interior decoration.
Types of glass blocks
A glass block is a structure made of glass plates, inside of which rarefied air is formed, which provides the material with low thermal conductivity combined with good sound insulation. Types of glass blocks can be divided into categories based on characteristics.
1. Size
Typical sizes:
19x19x8 and 24x24x8 cm .
Some brands make rectangular blocks: 19x9x8 and 24x11.5x8 cm. The largest glass blocks that are available on the market: 30x30x10 cm. The dimensions of the smallest are: 11.5x11.5x8 and 6x14.6x8 cm. The thickness varies from 7.5 up to 10 cm, and weight 2.5-4 kg.
2. Shape
There are rectangular, square and triangular blocks with a rounded edge. They also produce hexagonal, round and L-shaped elements, which are used for corners or ends of masonry.
3. Color palette
There are no restrictions on the color scheme: the market offers both ordinary transparent blocks and those painted in all existing colors and shades.
Typically glass blocks are covered with a protective film. Under no circumstances should it be removed until installation work is completed. Otherwise, you risk scratching the coating.
4. Texture
The surface can be smooth, matte, with a relief or a carved pattern. The carving can be located on the inside, while the outside of the blocks remains smooth and glossy.
5. Decorative inserts
Details are inserted inside the structure: shells, stones, flowers, decorative figures, drawings or lighting.
Classification
Classification of glass blocks according to four parameters will help the consumer in selecting the optimal option.
- According to the degree of matting: matte, semi-matte, transparent, colored.
- For additional decoration: ombre, with a pattern, metallized, with applique.
- Shape: round, oval, square, rectangular, combined.
- Contents: hollow, with decorative filling.
- By purpose: end, corner, main, finishing.
Advantages and disadvantages
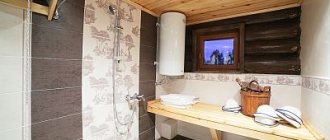
A shower stall in a bathroom is a practical and functional solution. A partition made of glass blocks will save the family budget and make the interior truly special.
This solution has a number of advantages:
- strength and stability;
- waterproof and fireproof;
- soundproof;
- the size range of blocks allows you to build fences of any shape;
- let in daylight and retain heat;
- fungus and mold do not form on the surface of the glass;
- easy to clean with regular cleaning products;
- the durability of glass blocks will extend the life of the shower stall;
- partitions made of such material do not require additional finishing.
Along with the positive qualities, there are also some disadvantages:
- such a wall cannot be drilled, therefore, if you want to hang shelves or other structures, you must lay dowels in the masonry during work ;
- it is impossible to adjust to the required size: they cannot be sawed or cut;
- the blocks are quite heavy, so large partitions can have an impact on the floor structure.
A glass block shower partition looks original, but installing such a structure requires knowledge and construction skills.
Design options for glass blocks
Glass blocks are classified according to surface texture, color scheme, the presence of lighting and additional accessories between the glass walls.
Smooth and textured
The surface of the glass can be smooth, matte or embossed. Smooth elements visually expand the space, matte elements softly diffuse light and hide the silhouette of a person in the shower. Glass with a relief pattern intricately distorts the direction of light and creates an imitation of frozen water.
Colored and transparent
In a small bathroom, it is recommended to combine colored and transparent blocks: the former will create bright accents in the center of the room, and the latter will visually increase the area of the room.
When installing the wall yourself, you should study photos of designs in advance and decide on the ratio of multi-colored elements.
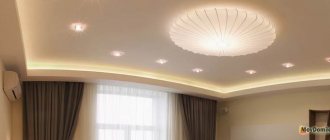
Backlit
LED lighting inside the glass blocks provides night illumination and well delineates the space. With a matte surface, the light will softly diffuse throughout the room, and with a transparent and embossed surface, it will form a bright accent. Diodes can be single-color to match the wall palette or with a gradient transition.
With filling
The internal space of the block can be filled with various decorative elements: shells, flowers, models of butterflies, etc. Instead of a three-dimensional figure, an image can be placed between the glass walls. Blocks with photographs are available upon individual order.
Photos of ready-made solutions
We have prepared for you a selection of photos of showers with partitions made of glass blocks in bathrooms of different sizes, both small and large.
Shower cabin
Of course, you can purchase a collapsible or monoblock cabin. But if you want your bathroom to look unusual, a glass block shower will suit you. This solution will help you significantly save money, room space, and time spent on renovations.
A glass block shower should be semi-matte or matte. This material can be laid on regular cement mortar or tile adhesive. Interblock spaces are masked some time after installation of the walls using conventional grout; in this case, the joints between the bathroom wall and the partition are treated with sealant.
View gallery
How to do it yourself?
Installation of shower stalls and glass block corners is best carried out during general renovation of the premises. To avoid unnecessary costs and technical re-equipment of the bathroom, a new shower stall is installed in the place of the old bathtub, so as not to re-arrange the drainage system. When laying glass blocks, the wall must be reinforced.
At the stage of designing a bathroom, even before tiling the walls, it is important to provide places for the outlet of communications under the shower mixer. And then, after completing the masonry work, install the shower stand.
Construction of a shower tray from tiles
A shower tray for a stall is constructed in several ways:
- They purchase a ready-made acrylic structure, install a tray, and trim the side with ceramic tiles.
- Build the pallet yourself from silicate or red brick.
- A monolithic base is erected using a cement-sand mixture.
- A frame podium is mounted from timber, covering it with moisture-resistant material.
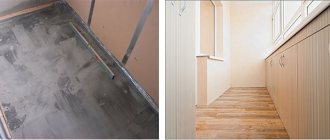
Any option for creating a pallet requires preparatory work. The bathroom floor is cleared of debris and existing cracks are filled with cement.
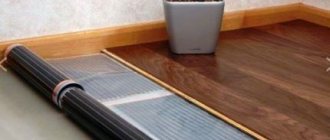
Before constructing the podium, sewerage and water supply pipes are installed, and heat and sound insulation is laid, on top of which a screed is laid. Then a waterproofing layer of coating or film material is applied. Install a shower drain.
At the next stage, the structure is installed relative to the selected option. The side of the shower tray is pre-built from brick, aerated concrete blocks or a metal profile. A cement-sand mortar is placed on top of it. After installing the pallet, lay out ceramic tiles or mosaics, followed by grouting the joints.
Laying the partition
Tools and materials
List of tools:
- drill or hammer drill;
- Master OK;
- level;
- rubber spatula;
- construction marker;
also need the following materials:
- glass blocks;
- ready-mix or cement-sand mortar;
- mounting plastic crosses;
- fiberglass reinforcement bars with a diameter of 6-8 mm;
- grout for blocks.
Oddly enough, fiberglass reinforcement can withstand greater loads than stainless steel reinforcement. It has a lower price and significantly less weight. 100 meters of such rods weigh only 4.5 kg. Therefore, it is better to use fiberglass for reinforcement .
For cement-sand masonry mortar you will need:
- cement - 1 bucket;
- fine washed river sand – 3 buckets;
- purified water – 1 bucket.
To give plasticity, add PVA glue at the rate of 200 g. for 5 buckets of cement mixture. Leave the masonry mortar for 5-10 minutes, then mix thoroughly again.
If you are going to use blocks of light shades, including transparent ones, it is better to use white tile adhesive , then the seams will look more organic.
Instructions
STEP 1. Guide frames or masking adhesive tape, which is needed to mark the installation line of the structure, is placed and secured on the cleaned surface of the pallet side or directly on the floor. The same is done on the vertical surface of the wall to which the partition will be attached.
The junction of the wall and glass blocks can be treated with sand-based primer to increase the reliability of fastening.
STEP 2. Next, you need to lay out the first rad and mark for vertical reinforcement at the junction of the glass blocks. For horizontal rods, make marks on the wall on top of the block.
The holes in the floor for the vertical guides are marked only once. For horizontal ones, mark when laying out each new row.
STEP 3. Now you should drill holes according to the marks. It is necessary to take into account that communications may pass through the wall, so you need to drill to the depth of the tiles and. It would be enough.
STEP 4. Laying begins from the wall to which the shower partition adjoins. A cement-sand mixture or glue is applied to the wall and floor, then the first plastic cross is placed in the corner. Additionally, apply the adhesive mixture to the glass block itself, place it along the markings and press it to the surface. Check the evenness of the installation; if there is a deviation, plastic wedges are inserted under the bottom.
For smooth and high-quality masonry, use special crosses for glass blocks.
The thickness of the seam depends on the size of the blocks themselves. If they are large: 19x19 or 24x24 cm, you can choose 10 mm crosses; if they are small: 11.5x11.5 cm, it is better to choose 5 or 3 mm crosses.
STEP 5. The solution is applied to the side of the next block and placed next to the first, while in the space between them a reinforcing rod is inserted into a pre-drilled hole. Then the upper surface of the blocks is smeared with glue, horizontal reinforcement is placed and placed inside the wall.
STEP 6. The next blocks are installed according to the same principle until the row ends. If the partition being erected has a restriction on only one side, then the opposite end of the reinforcement ends flush with the partition. When laying the blocks, remove excess mixture with a trowel. During this process, the evenness of the structure is periodically checked using a level.
STEP 7. After the first row is ready, perform the second and third. After laying the third row, it is recommended to take a break so that the mixture or glue has time to harden, ensuring the strength of the structure. When using tile adhesive, the break lasts 5 hours, if cement-sand mortar is used - 1 day. After the solution has dried, the remaining rows are laid out in a similar way until the partition reaches the desired height.
STEP 8. There are several ways to improve the ends of a shower partition. Firstly, there are special end rounded blocks that are placed at the end of the row.
Everything is simple here. Secondly, there are glass plates, which are attached to pre-aligned ends using mirror glue.
STEP 9. At the last stage, remove the plastic crosses and seal the gaps with a special grout mixture using a rubber spatula. Then the seams are leveled, the protective film is removed and the blocks are cleaned of dust and dirt. Acetic acid is used to remove excess glue or solution. Using water repellents, the seams are protected from water.
If the partition has a curved design, then the reinforcement bars are bent according to the shape of the wall, and the radius should not be more than 5 m. During installation, plastic crosses are placed only inside the curve. For curved partitions, it is recommended to use smaller blocks to create a smooth turn, and for strength, use more reinforcing bars.
STEP 10. When the partition is ready, you can leave the entrance to the resulting booth open, but to avoid splashes on the floor, it is better to install a glass door. To do this, measure the distance between the partition and the opposite wall, and then select a door in the store, or order individual production according to the specified dimensions.
The installation is simple. Mark the fastenings for the hinges on the wall and drill holes for the dowels. Then the door sits on its hinges.
Quality
Modern glass blocks are made from a special prefabricated material; they are glued together from two equal parts. Inside there are glass blocks, but the corrugated shape, which is located at the edges, gives them stability and strength.
View gallery
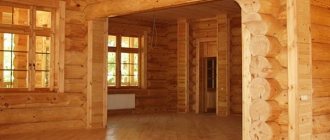
From the very beginning, this finishing material was used for the construction of windows in non-residential buildings and the construction of non-load-bearing walls. But in the current version, a wall made of glass blocks may well be load-bearing, for example, in country cottages to highlight a personal plot or winter garden.
Decorative glass blocks are characterized by special strength, heat and noise insulation, resistance to frost and moisture, and, in addition, fire safety. Although their most basic quality feature is, of course, the ability to obtain interesting lighting effects. Their smooth or corrugated surface perfectly transmits light. Once inside this structure, it breaks, making the room visually appear lighter and more spacious. Also, unlike simple glass, their surface can be matte, and this, in turn, allows the use of glass blocks in the interior of a bathroom or bathrooms.
But, having decided to use them in the interior of your home, you should take into account that sewer systems or wiring cannot be installed inside this material. Also, if the blocks are used to fill windows in a damp and small room, this may cause some difficulties with ventilating the room.
View gallery
What are glass products used for?
A house with a combined bathroom is not uncommon. If you put a small partition between the bathtub and toilet made of transparent blocks, you won’t have to turn on the electric lighting in the bathroom during the day. Glass blocks can be used to fill window openings in the bathroom. They let in enough light from adjacent rooms and do not require the use of curtains or curtains. A house with such windows can also be found in the countryside. In the interior of an apartment or house, you can create unique windows from multi-colored elements of different shapes. They can transform a home. Windows come in different heights and widths. It can be panoramic. Mirrors and small shelves are hung right on its square.
Glass blocks are not only used in the bathroom. This inexpensive material is also used in other rooms. The house can be equipped with walls between individual rooms. They can separate the kitchen-dining room from other rooms. In the interior of a home hallway, windows made from glass blocks look quite organic. Some owners of private houses make ceilings, floors and roofs from this material. The building looks airy and light.
In the apartment you can build a semicircular bar counter from translucent material with colored lighting. It will look great in the interior of the apartment.
Pallet
If you choose standard cabin dimensions, you can buy a ready-made pallet - made of acrylic, steel or cast iron.
It is somewhat more difficult to arrange the floor in a cabin with a complex configuration or if, during the design, the dimensions did not fall into the standard line.
A homemade pallet is arranged in the following order:
- Preparatory work is carried out, which consists of dismantling the old floor covering and other layers of the floor structure - right down to its base. All cracks and other defects found on the surface of the reinforced concrete slab are filled with cement and kept until it sets completely.
- The prepared site is covered with a bitumen coating.
- Insulation is laid over the waterproofing (expanded polystyrene rigid boards up to 50 mm thick are suitable). A hole is cut in it for the drain pipe.
- A drain is installed and connected to the sewer pipe.
- A rough cement-sand screed is poured (cement to sand ratio 1:3).
- Additional waterproofing is carried out using isoplast.
- During the process of pouring the finishing screed, a slope of the floor is formed (1 cm by 1 m) towards the drain.
- After curing, glue is applied to the finishing screed and the tiles are laid out.
Shower in the corner
To prevent water from spreading outside the shower stall, you can build a low side by tiling it.
What is glass block
A glass block is a closed, hollow “brick” with thin glass walls, inside of which there is rarefied air or vacuum. The wall thickness is no more than 6-8 mm, so the facing element is light - up to 2.2-4 kg.
Depending on the transparency of the glass and the texture of the surface, the blocks can transmit, scatter or refract light. To create an original light pattern, you can combine different types of blocks in your bathroom design.
The advantages of block cladding are:
- high moisture resistance, sound and heat insulation;
- easy installation, light weight;
- assortment of designs, colors and shapes of blocks;
- easy care of the material, inertness to household chemicals;
- no mold.
The only disadvantages include the need for a frame made of metal or plastic, as well as the low strength of glass blocks. The construction of a wall of large area and height can lead to cracking of the lower rows of the structure.
Curved walls made of glass blocks must have a large radius of curvature: large gaps between the elements worsen the appearance and reduce the strength of the structure.
Removing tint
It may well happen that after tinting you decide that there is no need for it, and the glue for it is usually so strong that you just can’t get rid of it. The film is applied to glass in several stages, so it must be removed in the same way. After you remove it, the problem will arise how to wash off the glue from it. The most affordable option is to use soapy water. However, it does not always help, so when deciding how to remove the adhesive from the film, you can use commercially available compounds: a special spray or a rust converter.