Garden path made from wood cuts
You can make paths in your dacha with your own hands from various available materials, but many are attracted to those made from wood cuts.
Paths made from natural materials look very unusual and beautiful, the main thing is to choose the right type of wood. Hardwoods are suitable here: oak, aspen, larch, walnut or beech. Pine can also be used, but its service life is much shorter.
Preparatory work and installation
You can buy wood cuts, and if possible, cut the log yourself. The cuts should be of the same thickness (at least 10-15 cm), since too thin ones will simply “walk” along the path.
Also, the wood must be treated with drying oil, copper sulfate or bitumen, and then dried well. If this is not done, the saw cuts will begin to rot and will also be vulnerable to pest attacks.
- We dig a trench for the future path - its depth should be 30-35 cm higher than the height of the cuts. But you shouldn’t make the width 40 cm; it will simply be uncomfortable to walk on such a path.
- We cover the bottom of the trench with any waterproofing material (you can use regular plastic film). Pour crushed stone or gravel on top to a height of 3-5 cm, level and compact.
- At the next stage, you can frame the border with logs, bars, bricks or sheet iron. But this is optional; some people just think that a path made from saw cuts without a curb looks unfinished.
- Next, fill the layer of crushed stone with sand and water it with water so that the sand layer is better compacted.
- Now we lay the saw cuts themselves as our imagination dictates, the main thing is that they “sink” well into the sand.
- The resulting voids between the cuts can be filled with earth and grass can be sown, and flowers can be planted along the edge of the path. There are many options for how to decorate paths from saw cuts at your dacha with your own hands; for this you can use any available materials.
Paths made of plastic corks and bottles
Inventive summer residents use a wide variety of materials at hand for their plots. The plastic paths, lined with mosaics, are very beautiful.
All parts of the plastic bottle are used: borders are made from the upper part, paths are laid from the lower part. If they use whole ones, then fill them with sand.
Also read: Interior doors, what to look for when choosing
To lay a path with a mosaic of plastic bottle caps, you will need a large number of them; they should be collected in advance. On average, about a thousand covers will be needed per square meter of track. But the path will be incredibly beautiful, interesting and unique.
Buy a ready-made base or make it yourself
Nowadays, there is no problem buying anything. Ready-made products for creating paths of various shapes and sizes are available in most retail outlets for gardening and vegetable gardening.
A rare configuration can always be ordered individually. The cost of most basics is within 1 thousand rubles, so the costs will not become burdensome.
Anyone who still stubbornly refuses to purchase a ready-made plastic mold can easily make an analogue on their own. A hand-made base will not provide geometric accuracy. But the path will turn out natural and original.
Creative original work is always worthy of high marks, and the master himself receives satisfaction from the process and the result.
Design of garden paths
The design of garden paths is chosen depending on:
- the type and structure of the soil on the site;
- seasonal ground movements;
- groundwater level;
- expected paving load;
- intensity of use (seasonal or year-round).
Due to their design features, garden paths, in addition to their main purpose, are able to perform another important function - drainage. To do this, their surfaces are given a slight slope, allowing rain and melt water to flow into the drainage layer of the base of the path. You can build a garden path:
- double-profile (middle above the edges) - water flows in two directions;
- single-profile (one edge is raised above the other) - water flows towards the slope.
Garden paths have not only a transverse profile, but also a longitudinal profile, which shows the difference in height along its entire length (from beginning to end). The difference in height between the edges of the track in the transverse and longitudinal profile is measured in ppm. The following values are allowed:
- 15-60 ppm for the cross slope of the path (depending on its width):
- 70 ppm or less - for the longitudinal slope of the path.
If the longitudinal slope on any section of the garden path exceeds 70 ppm, then it is recommended to install stairs for safety reasons. Otherwise the path will be too steep.
If there is a significant difference in elevation on the territory of the garden plot, a path with stair steps is arranged to make it easier to climb and descend the slope
Any track consists of the following structural elements:
- subgrade (a depression in the ground corresponding to the size of the path or site under construction);
- base, consisting of an underlying sand layer and (or) a buffer gravel-crushed stone layer. Both layers are designed to reduce the load on the subgrade, as well as to remove water from the site (drainage).
Depending on the functional purpose of the garden path, the type of base is selected. So for garden paths used during the summer season, it is enough to make a sandy base. For pedestrian paths used year-round, the base should already be gravel and sand. Entrance roads and areas intended for parking vehicles are built on a solid concrete foundation, reinforced with reinforcement.
The road surface is another mandatory structural element of any path. According to the type of coating, all garden paths can be divided into two groups:
Latest entries Indoor plants that can bloom into trouble Why is it dangerous to plant “mother-in-law’s tongue” on your windowsill Folk ways to acidify the soil and thereby increase its fertility
- hard (monolithic concrete, clinker brick, paving slabs, natural stone);
- soft (pebbles, gravel, granite screenings (crumbs), crushed stone).
In landscape design, combined paths are also used, which consist of areas with hard or soft surfaces.
Combined paths are made of bulk materials and hard surfaces, presented here in the form of individual square stone slabs
Complex technologies are used to lay special road surfaces. This includes green paths arranged on a geogrid or filled with decorative concrete. The most popular in suburban construction are rigid paths, which make it possible to implement a wide variety of style solutions for the design of a garden plot. In addition, they are more practical, as they are durable, reliable, and easy to clean. Soft paths will have to be cleared of debris longer and repaired more often by leveling the bulk material.
It is customary to classify into a separate group wooden coverings made in the form of decking, platforms, plank sidewalks, and paths made from wood cuts.
Wood cuts in the design of garden paths are used in combination with objects built from rounded logs or timber
Curbs used to strengthen the edges of garden paths allow you to:
- increase the stability of the coating;
- protect the edges of the coating from possible sliding and destruction;
- prevent the path from becoming overgrown with vegetation;
- protect lawns and flower beds adjacent to paths from trampling.
Installation of borders is mandatory for garden paths with a soft type of surface. Rigid paths are framed with curbs at the request of the owner of a suburban area.
Temporary paths
This is the simplest and cheapest option for arranging paths on the site. Unfortunately, it is also short-lived, so it is suitable only as a temporary measure - for example, for the period until normal paths made of tiles, boards or saw cuts are laid in the garden.
Important: for this type of track there is no need to prepare a bed! Bark, twigs, sawdust or shavings are poured without removing the soil!
This option is filling with bark or sawdust. Waste obtained from removing bark from trunks, large chips, bast, sawdust and shavings of various sizes are excellent for avoiding “trampling” dirt in a damp, low-lying area. The thickness of the backfill depends on how large the elements are used, but in general it is at least 3...5 cm. The backfill gradually dries out, is crushed under the weight of users and pressed into the ground. Subsequently, you can arrange a permanent path directly on this flooring.
With finely chopped bark (hardwood), with the addition of sawdust or shavings, you can make a more aesthetically pleasing path. This material is often used for mulching the soil; it is sold in gardening stores ready for backfilling.
In order for the path to remain within the specified limits, it is necessary to arrange a fence - from wattle fence (photo above left), boards or panels (right) or dense green spaces (bottom left).
Execution sequence:
- remove large debris, branches, and stones from the route. If the soil is very uneven, it is advisable to level the ground by removing large protrusions and filling in potholes;
- install fencing elements along the edges of the future path - treated with an antiseptic, coated with resin or burnt boards, wattle fence, large stones;
- fill the bed of the path with the prepared material. If there are fragments of different sizes, larger ones should be placed downward and smaller ones upward, thereby leveling the coating.
Good to know: if the path is not being made on a temporary basis, it is necessary to make an arched profile of the path by adding soil (sand, crushed stone) to the middle and compacting it. You can also make an embankment over the entire area, thereby raising the path above the level of the surrounding soil. In this case, installation of a fence is mandatory.
From the raised path, during rains and snow melting, water will flow into the ground, thereby ensuring the relative dryness of the embankment and ease of use of the path.
Useful tips
The classic option for making a garden path is the use of plastic covers. Naturally, you will need a lot of them, all identical in appearance, in order to maintain a certain style. It is recommended to prepare the base from sand. You need to compact it as thoroughly as possible, then the path will surely last a couple of years.
An alternative to tires is the use of broken tiles, which remain in abundance after most repair work.
It is very important not just to lay it out, but to position it in such a way that the surface looks as attractive as possible. Most often, a sand base is prepared, and when forming a mosaic, they act as creatively as possible
But it is important not to forget about the ease of use of the path and the fact that all its parts should have the same height. The pieces of tile must be separated by at least a small gap, and after laying they are connected with cement mortar.
Some craftsmen act differently: they start by pouring cement into the required strip, after which they begin laying the broken tiles. But this method requires the ability to work quickly and complete certainty with the design of the surface, since there is not much time to come up with it after preparing the mixture.
It is best to use paving slabs from factory materials, especially since their use does not require significant experience. If desired, such a coating can be made with your own hands.
This will require vibration machines. For 1 sq. m of coverage needed:
- Bucket of cement (grade not lower than A-Sh-400);
- Three times more sand;
- 0.2 kg plasticizer;
- Coloring agent if necessary.
It is unlikely that it will be possible to create spectacular tiles without dyes, and their consumption is relatively small, so it is unwise to save on such reagents. Experts recommend preparing for work not one, but at least two or three forms for obtaining tiles in order to radically speed up the process. The solution in the molds is compacted using a vibrating table or vibrating platform, and when the workpieces acquire the required strength, they can be used immediately.
There is a scheme that does not require compaction, but it involves the use of a large form. Immediately place the container in the chosen location, pour the prepared mixture into it, making sure that no voids appear in the material. It is permissible to combine dyes of different tones, “tailoring” the appearance of the tile to the general perception of the site.
In most cases, the tile itself becomes attractive enough to satisfy aesthetic tastes.
If the goal is to speed up the work process as much as possible, you will have to abandon paving slabs and other materials and use reinforced concrete slabs. All actions will be reduced only to choosing the right places and laying the slabs. The coating is not the most aesthetically pleasing, but it is very durable.
When preparing the path, take care of the design of the curbs. They help make the border clearer and avoid destruction of the coating. Without a border, you can lay concrete slabs or natural stone with elaborate geometry. But sand, gravel and pebbles necessarily require external fencing.
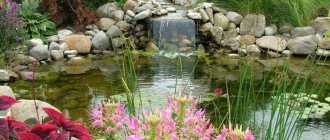
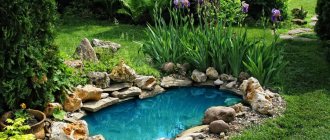
If you prefer a rustic style, it is advisable to decorate the path with wood. It is best to create curved structures using natural stone, and brick will look ideal if there are buildings made from it nearby. Lovers of original ornaments and patterns should choose paving stones of different tones. Gravel and pebble solutions are optimal in a garden with a pond.
Concrete and brick are compatible with each other. Pebbles with wood, gravel with natural stone can also be combined into an attractive ensemble. Laying gravel and small pebbles requires pre-treatment of the soil with herbicides and covering it with plastic film or agrofibre. The external border is made of tiled or brick.
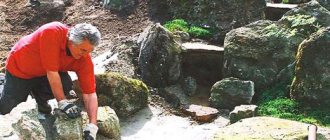
When laying a stone path there is a secret - it is better to choose those stones that have at least one flat edge. After filling the voids between the blocks, the path should be watered, sometimes it is necessary to sprinkle it with sand a second time to close the remaining gaps.
When laying paving stones, standard technology involves preparing a trench 200 - 250 mm deep. If the thickness of the coating is more than 6 cm, it will inevitably rise above ground level, which requires the use of curbs. Paving stones, even with the most insignificant defects in appearance, quickly deform and lose their characteristics.
Filling the mold
For a garden path made of concrete, you will need a higher grade of cement than for conventional buildings: M350 and higher. Firstly, the sidewalk does not experience a uniform load, but a point load - while a person walks or equipment passes. Secondly, increased exposure to environmental conditions increases the requirements for coating quality. Filling Features:
- Concrete consistency – 1:3 (cement/sand).
- The use of metal rods or mesh for screeding is inappropriate for this method of making a track. Fiber fiber is used as a reinforcing element when mixing the solution.
- Moisture penetrates into the pores of concrete, which expands and injures it when it freezes. Therefore, water is the worst enemy of the garden path. To better preserve the coating and increase moisture resistance, water-repellent additives are included in the solution. Additives create a protective layer, closing external pores.
- When pouring a path using a mold, the density and fluidity of the solution are of great importance. They are characterized by the amount of water in the composition and the quality of mixing. In order for the mixture to fill the entire volume of the plastic mold, the concrete must be sufficiently fluid (this can be seen with the naked eye). This is achieved by thorough mixing: undissolved lumps of sand and additional inclusions are not needed. The density is regulated by water: the solution should be medium - not liquid and not very dense, so that when the mold is removed, the tiles do not fall apart or spread.
- After mixing the concrete, the mixture is poured into the established form and evenly distributed into sections with a trowel.
- If necessary, the solution is added on top and the empty areas are filled again. The partitions of the form are on the same plane, so it is very convenient to level the top layer using a smoothing board, a regular board or other flat object.
- If the solution is thick enough, the concrete will not flow when the mold is removed. However, if it was not possible to prepare such a mixture, the area is given 5-10 minutes to harden (for quick setting, cement with special additives is used).
- The form is carefully pulled out and moved to a new location.
- The procedure is repeated until the entire track is ready.
- The period of hardening and setting is about 30 days, but you can walk on the sidewalk within a week (of course, driving a car is not yet recommended). Watering the concrete daily with water is a standard and effective procedure to ensure the strength of the layer.
Photo: platform made from a car mold - With the help of coloring, the garden path is given an original appearance, which puts it on par with ready-made colored tiles.
For this purpose, different paints are used: rubber, synthetic, organic, silicate, etc. The main required property is wear resistance. You can also color the solution itself when mixing: this will give the path an even and rich shade. The use of several dyes allows you to create a unique pattern from tiles of different colors.
Step-by-step instructions in photographs
Methods for decorating a concrete path: stamps and stencils
A damp concrete base is an excellent base for applying decorative relief. For example, using an ordinary metal rod you can create any geometric pattern.
But the real find for decorating is various devices. Stamps and stencils can be purchased at a hardware store or made yourself.
Polyurethane stamps are a real breakthrough in landscape creation. With their help, it became possible to apply patterns with textures of any complexity to concrete.
Metal stamps have two disadvantages: high price and limited capabilities. They are unable to reproduce complex drawings. But such a matrix gives an ideal copy of geometric shapes.
Wooden forms, like metal ones, do not differ in particular variety. But with their help you can implement interesting design ideas. For example, imitation of concrete slabs or brickwork. In addition, the manufacturing process does not take much time and is not complicated.
Conclusion
Those who have chosen stone garden paths, oh, because naturalness, like the classics, is always relevant, and the service life of a properly laid path will be more than one decade. The costs and efforts put in will pay off in spades.
If price is at the forefront of the issue, budget tracks are at your service. I like paving slabs, but the cost is confusing - homemade ones will help out. In the video - how to lay paths simply, quickly, and reliably.
Subscribe to our Telegram channel Exclusive posts every week
Styles
The same finishing material in a certain context can be a participant in retro styles and the most modern trends in landscape design at the same time. If you want to create a garden in a certain style, you should adhere to the following rules.
To decorate a site in a Mediterranean style, choose pebbles, tiles and sand. Country style goes perfectly with natural wood flooring. Forest areas are landscaped with paths made of stone, cobblestones and wood cuts. It looks interesting to use crushed bark to fill paths.
Art Nouveau especially loves floral decor and rounded, smooth lines. Eco-style prefers paths made of sand and stones, covered with fine gravel (without curbs, almost invisible in the landscape).
Wood and stone are traditional materials used for centuries to create paths
Today they are given special attention.
A striking example of a combination of a variety of materials is the high-tech industrial style in landscape design. It combines glass and metal, concrete and plastic, water and stone. These materials can be arranged randomly or symmetrically. The main thing is the presence of a clear geometric pattern. The paths are strictly straight, the turns have a strict pattern. The coating avoids texture, the color scheme is restrained and monochrome. The most popular coatings are made of concrete and marble filling with inclusions of glass elements edged with metal. The aquatic environment is presented in an original way in this technological design.
The design of paths in the Japanese style has the same striking uniqueness. If the high-tech style sharply distinguishes the natural environment and the human environment, the Japanese style includes humans in the natural landscape. The finishing materials here are natural stone and wood, plants and streams. The paths are combined with bridges and recreation areas in a classic Japanese style.
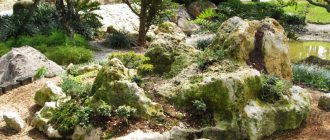
Great importance is attached to natural stone. The stone has a deep philosophical meaning and is a symbol of original ethnic design. The entire garden or a separate section of it is decorated with appropriate plants. The paths have smooth curves, the surface is decorated using pebbles, crushed stone and flat boulders.
The width can be arbitrary: from very narrow paths for contemplative solitary walks to wide dry rivers. Flat and smooth paths are combined with yielding rapids boulders.
Let’s take a closer look at what materials can be used in the construction of country communications.
Motives
Landscape architects often try to adhere to common themes in their work. Therefore, it is important that both paths and open areas or courtyards meet the same requirements. Style is also directly related to the motive, but more often it implies subordination to the architectural canons in which the house is designed. For example, a cobblestone street will look out of place next to a house in the Art Nouveau style, and a marble courtyard is too pompous for a brick cottage. If the theme of your garden is based on color, its shades will be used (for example, for raspberry - from light cherry to beige, for blue - from lilac to purple). You can also combine individual colors. For example, if your living room is decorated in blues and yellows, it's natural to expect the same color motif on the adjacent patio, with a yellow-orange path stretching beyond it, running into the distance, into the depths of the garden. And in the fall, nature itself will add yellow and orange tones. And the sky above us is blue! It is not necessary to achieve color harmony in landscape materials: it is important that they are combined with planted flowers and green spaces. There are many options here: for example, black slate looks very impressive against the background of yellow and blue flowers, and red brick emphasizes the purity of white. The dominant motif can subjugate both the entire territory of the garden and certain sections of it. For example, roses are often planted separately, with border paths drawn between them.
Cuttings of fruit plantations
During sanitary cleaning in the garden, it becomes necessary to cut down old trees. However, there is no need to rush to convert them to firewood. From the saw cuts you can create original paths that will decorate the site. Wooden dacha paths look very attractive and fit organically into almost any landscape. At the first stage, thick branches and trunk are cut into circles, the thickness of which should be at least 10 cm. Before you start laying, the tree must be processed. For this you can use drying oil. The composition should be brought to a boil and the cut should be coated on each side. After the drying oil has dried, it is recommended to re-process it.
Natural stone
At the moment, natural stone is still considered one of the status and practical materials for various coatings.
Marble, sandstone, and granite are used. Based on the preferences of the owners of the site, a stone in a light or dark shade is selected. Stone alleys have a variety of shapes, but require professionalism when laying them.
Stone that is laid in plates is incredibly in demand. It's called flagstone. An identical and affordable option is considered to be imitation natural stone, which is offered on the market in a wide range of products.
The stone alleys look great, harmonizing with the trees and shrubs growing on the site. Natural stone goes well with pebbles.
Among the advantages of stone are durability of use, a high degree of resistance to mechanical influences, aesthetics, and a variety of textures and configurations. The disadvantages include a fairly high price, slipperiness when the surface is wet, and coating with a crust of ice in cold weather.
Marking
The initial stage of arranging paths is marking the route. To do this, fill the contours of the future path with chalk or sand along the entire length and required width. The width is set slightly larger than the size of the path itself for installing formwork, curbing or installing a drainage system. They study the route again, assessing the convenience and adequacy of the track width.
It is important to take into account the view that opens from the path, think about where the water supply and electrical cables will run
To do this, they walk along the future route several times, visually representing the size of adult plants along the path, so that as they grow, they do not interfere with traffic, and the roots do not destroy the road surface. The path should be at least 2 meters away from large trees. If there are no green spaces yet (or they have not yet grown), the contour of the crown in an adult state is outlined with sand. Dimensions can be found in plant growing reference books.
It can be difficult to imagine a particular plant in the future. Then use the following technique. Place large stones, boxes, or drive a stake at the planting sites (this will help with visualization). After approval of the route, the paths begin to lay out the finishing material.
Requirements for wood materials
A prerequisite is that initially there should be no traces of rotting on the surface, since already infected wood cannot be cured with any impregnation. The exception is blue - a fungal infection of a bluish color. It does not destroy the structure of the wood, and you can get rid of it with special bleaches. The product is applied to the stain for 25-55 minutes in several layers. After treatment, the blue discolors and disappears.
Much more dangerous are spots of black, green or red color. They need to be removed as deeply as possible, and then bleaches and impregnations must be used.
Photoaging is another dangerous factor for wood. The sun's rays destroy the lignin that glues the fibers together, cracks appear, and the wood itself turns gray. To avoid this, it is recommended to use impregnations for outdoor use with a UV filter. They protect wood from harmful radiation, preserve its color and structure.
Impregnations with UV filter for wood
Preparing the base for the path
To ensure that the path is pleasing to the eye for a long time and does not become overgrown with grass, you should approach the preparatory work with special care and responsibility.
Further conditions and the implementation of the following work largely depend on the preparation of the base for the path.
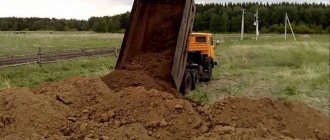
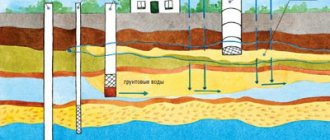
The first step is to remove the fertile layer 15-20 cm deep. If there is a natural slope of the terrain, then it is worth providing for water drainage and making a drainage trench into which water will flow after rain.
To prevent the edges of the trench from crumbling, we recommend installing boards that will limit the soil from crumbling. If you plan to install concrete curbs, then they should be installed on compacted sand using a level, fixing the curbs with iron rods, driving them to a depth of at least 20-30 cm.
After installing the curbs, a layer of gravel or crushed stone mixed with sand or cement, 5-10 cm thick, should be poured onto the bottom of the trench. The layer should be thoroughly compacted.