If you can’t look at your PVC window sill without sighing, there is an excellent solution - decorating the window sill with mosaics.
The WINDOWS MEDIA portal offers the fastest and easiest way to make an effective and practical window sill yourself - by gluing a glass mosaic on a grid to its surface. In this case, the composition can be monochromatic or cast in all the colors of a kaleidoscope. It is good to form a pattern from pieces in colors that harmonize with the color of the walls.
Peculiarities
A properly installed window sill will decorate any room. Finishing with universal tiles is a rational solution. This material is not afraid of moisture, resistant to dirt and stress. High-quality cladding increases the strength of the structure. Tile surpasses even plastic in all respects, as it does not fade, is not afraid of contamination, and is easy to clean.
An original option for the kitchen
DIY repair
You can finish the window sill yourself. Some tips:
- It is necessary to check the integrity of the base: there should be no cracks, large scratches, chips, voids or other defects on the surface.
- The best base for tiles is concrete. This finishing material fits well even on wood and plastic.
- The working surface must be well secured in the opening.
- Finishing should begin after installing the window frame and external sill.
Cutting tiles
In what cases are they necessary?
Whatever the reason, the new surface will add freshness and attractiveness to such an interior element as the window sill.
There can be many reasons for installation:
- Concrete or granite window slabs sometimes crack or chip at the corners.
- Plastic window sills, especially white ones, fade and turn yellow over time.
- Often, damage occurs from hot objects that accidentally fall on the surface, including unextinguished cigarettes.
- Traces from flower pots and water dried on the surface.
- Stains from aggressive cleaning products.
- Accidental mechanical damage.
- Scratches and marks of claws and teeth of pets.
- The desire to simply update the surface by changing the shape or color shade.
What is necessary
To lay ceramics efficiently, you need to prepare the necessary tools and consumables. The standard list includes:
- Universal primer.
- Adhesive solution.
- Tile.
- Grout for seams.
- Pliers.
- Glass cutter.
- Hacksaw.
- Building level.
- Small rubber mallet.
- Standard spatula.
For the window sill in the kitchen, porcelain stoneware is the best choice. This material has high strength.
Porcelain tiles are durable and high-density. The finished structure perfectly resists the influence of adverse factors. You can place hot dishes and heavy objects on porcelain stoneware.
Required Tools
A universal list of tools that will be required during the work process:
- Universal type soil mixture.
- Adhesive solution.
- Tile.
- Marker for marking.
- Rubbing material for seams.
- Pliers.
- Glass cutting tool.
- Hacksaw.
- Level.
- Hammer (it is better to choose a rubber one so as not to damage the materials).
- Spatula (regular one is enough).
In order not to waste a lot of time, such materials for work can be found in the same store where you will buy the tiles.
Subtleties of preparing the base
Each time cladding work should begin with this procedure. Carefully remove old enamel, putty, and other coating. You also need to remove all dust and dirt. After this, a deep penetration primer is applied to the surface. Increased attention is paid to the selection of high-quality ceramics.
If the window sill is compact, then the finishing material should be small. Elements measuring 10x10 or 15x15 cm are quite sufficient.
For large window sills it is better to choose larger tiles. In some cases, the choice can be made on elements measuring 40x20 or 30x30 cm.
It is not difficult to choose high-quality finishing ceramics. This material is available in a wide range.
Scope of application
Most often, a tile window sill is made in houses made of brick, ceramic concrete, foam concrete or cinder blocks. In these houses, the window sill, as a rule, has already been filled or a kind of blank has been made that will serve as its base. It must be thoroughly cleaned of dust and primed to increase the adhesion of the material to the base. If this is not done, the tiles may fly off within a few months.
If there is already a window sill, but you need to make a new cladding, you must first remove the old one. Next, the surface of the window sill is carefully leveled, all dents and chips are filled with putty. In order for the tiles to last for many years, you need to purchase putty, primer and glue from one manufacturer in stores.
Masonry technology
There are two options: along the entire window and perpendicularly. The choice should be based on minimizing the resulting trimming of parts. To adjust the die, you can use a classic glass cutter.
The location of the cut should be marked in advance using a marker. The trim is placed on a flat and stable base in order to trim along the marked points. During the procedure you need to press hard on the material.
It is difficult to achieve a high-quality result without a rubber hammer. Using this tool, carefully tap the ceramic product on the back side at the site of the intended cut. If such a hammer is not at hand, then you can use the handle of a spatula, which is first wrapped in a towel or thick cloth.
The required fragment is broken off with a sharp, confident movement. If the master has the necessary skill, then cutting the ceramics can be done with a grinder. This electric tool saves a lot of effort and time.
Rational approach
Traditional installation method
Before you begin installing ceramics, you need to prepare high-quality glue. The solution is applied with gentle movements to the back side of the finish and the work surface. You can use a spatula to distribute the composition. During installation, you need to ensure that the elements of the pattern match.
There must be a gap between the dies. To ensure that all the parts lie at the same distance from each other, special plastic crosses are used, which also differ in size.
Experts recommend forming a slight slope of the structure from the window to the outside. Thanks to this, it will be possible to avoid the accumulation of condensation, since all the water will flow from the base of the frame to the very edge. The end parts are mounted only after the laying of the horizontal dies is completed. Once all the tiles have been laid, you can proceed to using putty. It is more practical to use a dark shade. Popular options:
The choice of putty shade depends on the color of the tile. Once the solution has completely hardened, the window sill is thoroughly cleaned. After this, the updated surface is completely ready for use.
Attention! During work, you need to ensure that all vertical and horizontal elements are as consistent as possible with each other at the joints.
Sheathing base made of wood and plastic
The process of finishing window sills from natural materials is no different from finishing concrete surfaces. But in this case, the craftsman will have to cover the entire structure with plasterboard slabs in order to then lay the colored tiles. You can do without cladding gypsum board, but in such a situation you should use an acrylic primer, which is used to cover wooden window sills. For installation you will need epoxy glue and grout.
It is much easier to decorate plastic bases. Instead of an adhesive solution, you can use liquid nails. The reliability of adhesion directly depends on the texture of the plastic. Specialists use special compounds for laying ceramic products on plastic or wooden bases.
Advantages of the covering-overlay
Plastic covers for window sills have a whole list of advantages that make their installation profitable:
- Versatility. Installation of the lining is possible on any window sill: old or new; wooden, plastic, stone, brick, concrete.
- Variety of assortment. You can easily choose a sample that matches the color of your home decor. It can be plain or imitate wood, stone, or other materials.
- Quick and easy installation. There is no need to remove the old window sill - just glue the trim to it. You can do this yourself.
- Interchangeability. An overlay that has lost its presentation or has become boring can easily be replaced with another one if desired.
- Aesthetics. The decorative trim is made from the same material as the window frame, so together they look cohesive.
- Price. The material is inexpensive, the next purchase cannot undermine the family budget.
Installing covers on the window sills returns its attractive gloss, radically changing for the better the overall appearance of the window as part of the interior.
Original mosaic decoration
This facing material looks unusual. The installation process is more accessible than the option with ceramic tiles, since the procedure for finishing the window sill takes less free time. A correctly selected mosaic decorates the room.
The only drawback of such cladding is that there will be many seams on the surface, which can become the main reason for the rapid growth of mold and mildew. Such areas are difficult to clean from contamination. To avoid this problem, you need to use high-quality grout.
The dimensions of the mosaic can be easily adjusted. Before laying, the work surface is prepared in the same way as with tiles. At the final stage, the base should be thoroughly cleaned of dirt and construction dust.
When laying transparent mosaics, the glue should be white. Insulation of the base is carried out before finishing work.
The video shows an original version of finishing a used window sill with homemade mosaics:
Benefits of cladding
Most contractors who finish window sills with tiles highlight the following advantages:
- Visual. The apartment owner can choose tiles that suit the interior design of the room. The uniqueness of the work depends only on the imagination of the customer.
- Physical characteristics. By decorating the area near the window with ceramics, the apartment owner can avoid frequent cleaning. The tile is not so susceptible to dirt and dust and is easy to clean. In addition, it is able to withstand greater physical stress than conventional plastic.
- Duration of operation. Ceramic tiles benefit significantly when it comes to durability. In addition to the service life, the strength of the entire structure increases several times.
In short, in almost every component, ceramic or tile will be better for the home. If renovations in the house are being done “for yourself,” then it is recommended to opt for higher quality materials.
Window sill tiles
There is a wide window sill. Almost 60 cm wide. I really want to put a tile on it, size 10x10 cm. What needs to be done for this. What should I glue the tiles to? Is this option even possible? Thanks in advance for the answers.
The window sill is plastic, or what?
What a fool, I didn’t write the most important thing. Wooden window sill.
I saw this option with mosaics, the idea is not bad. But I don’t know how it will look with 10*10 tiles, but offhand mosaics are better. On a pre-screwed sheet of gypsum fiber board or gypsum board.
antipst Mosaic was my dream, but after looking at what was offered I had to refuse. Initially, the idea was to lay out the apron and window sill with mosaics. But what you like is very expensive, and what you can afford is not what you like. I found a nice 10 x 10 tile. I want to make a chocolate apron, and a beige window sill, from the same tile, the same texture for the fabric, but a different color. And I want to put it on the windowsill diagonally.
The question is what to lay the tiles on? So that it doesn't fall off the next day?
On a pre-screwed sheet of gypsum fiber board or gypsum board using tile adhesive.
Mosaic was my dream, but after looking at what was offered, I had to refuse.
If I were doing work for you, I would persuade you to use a mosaic window sill. That's why consulting exists.
Thanks for the quick response. We didn’t think about this option, but it’s really good. Another question is what to do with the end of the window sill. Should I glue tiles on it too? No other options come to mind.
antipst wrote: On a pre-screwed sheet of gypsum fiber board or gypsum board using tile adhesive.
Better than GVLV 10 mm or GKLV 9.5 mm.
2levran and what size is the end? In principle, you can do the same.
I measured it, the end is 5 cm.
Better than GVLV 10 mm or GKLV 9.5 mm.
Suitable for the author - Moisture-resistant Gypsum Fiber Sheet.
koris65 wrote: what size is the end? In principle, you can do the same.
antipst wrote: Moisture-resistant Gypsum Fiber Sheet.
Thank you for clarifying. The truth has already managed to get into the search engine in order to give my husband ready-made information. Thanks again everyone for the answers. I really like the forum. And since we do repairs ourselves, sometimes we really need advice. Finally finished the fight with paint and now there is a lot of work to do.
levran wrote: I measured it, the end is 5 cm.
This is the thickness, right? What about the length?
levran wrote: And since we do the repairs ourselves
You will regret this more than once, based on your experience. although I am the same shoemaker, I still won’t do all the work myself
Yes, thickness – 5 cm, length – 145 cm.
koris65 wrote: This is the thickness, right? What about the length?
No wonder I asked. Apparently I wanted to figure out what size tile would be better for this length.
levran wrote: And I want to put it on the windowsill diagonally.
There is a lot of hassle. The end will not come out very nicely.
Well, my husband does it very well. There is a lot of information on repairs on the internet, the main thing is to learn how to filter it. What to do if there is no other option. We bought an apartment on credit, we have two children, only my husband works now, but I want to live in cleanliness and beauty. But we made the screed ourselves, covered the window to the bathroom and the door to the neighbor’s loggia with foam blocks. Well, we learned to remove paint from the wall in every way possible, even if it didn’t come off. So in any case it will be much better than it was. But I think we will have to find workers for the bathroom and toilet.
Important nuances
The finish will look beautiful if you think it through well in advance. Create the pattern you want to see and decide what size tile will work best for you. Almost always, the best solution is to decorate the window sill with small details or mosaic tiles. They will require minimal styling skills from you and will make the whole process much easier.
Remember that the water resistance of the coating will not be complete if you choose the wrong grout. It must also have the necessary properties. Even in rooms where the humidity is within normal limits. Window openings are more susceptible to moisture, since this is where the border between the cold air from the street and the warm air inside the house is located. Condensation can easily appear. Otherwise, everything will not be so difficult to do. The design of this surface will not differ much from the laying of standard tiles.
Window sill made of tiles.
If a similar idea came to different people and in different lands, then this is a sign of healthy thought. “Schiza” usually arises in one place, and then it is “swept around” according to V. Vysotsky.
WINDOW SILL MADE OF TILES.
This means that there are more and more window sills made of tiles:
The advantages of such solutions:
- Ceramic is easier to clean than plastic.
- Cheap plastic turns yellow in the sun and changes shape.
- The main advantage is strength, despite the vulnerability of the tiles.
Especially if you consider how plastic window sills are installed (in most cases):
If you press on the foam, it will shrink. If the thickness of the foam is large, then it will compress more significantly; if you install pads, then it may not compress; if you don’t sit down and stand, then nothing will happen…. There are too many “ifs”, but that’s a different story.
Ebbs and visors of plastic windows
A plastic window is not only a double-glazed window and a frame, but also a number of additional elements, without which the window as a whole will not have a finished look and will not last for a long time.
For example, owners of PVC windows cannot do without such special devices as ebbs and canopies that will drain melt and rain water. These structures are installed on the outside of the window in its upper and lower parts, so they are invisible to the eyes of the inhabitants of the house. Ebbs and visors are designed not only to drain precipitation, but also to protect the installation seam under the window. If the seam is not closed in time, moisture will damage it, which can lead to the destruction of the wall and the window falling out. Even if you have an expensive PVC window installed without high-quality drainage, it may soon, in just a couple of years, become unusable.
Ebbs and visors can be made of plastic, tin, galvanized steel and aluminum. Today they are practically not made from tin, since it rusts too quickly, and also looks unsightly, spoils the facade of the building and allows water to pass through. Drains made of galvanized steel do not have these disadvantages, which is why they are now the most popular among consumers.
The color palette of the composition can be very diverse. In addition, such varnish helps to extend the life of the drainage system, as well as preserve its appearance. The ebb or visor covered with this composition will not fade in the sun and will be resistant to temperature changes. Window structures treated with polymer will give the appearance of the entire house a finished look.
After the all-metal sheet is painted, it is cut into pieces and given the required shape.
As you can see in the photo, the shape and size of the ebb and visor of a plastic window can be very different:
They are often made according to customer drawings.
It should be noted that ebb tides and visors are produced by both domestic and foreign manufacturers.
Those produced abroad will cost more, but this does not mean that they have better quality characteristics compared to domestic ones.
Drainage systems manufactured in Russia have a number of important advantages: low cost (and, consequently, low final price) and durability, which is ensured through the use of high-quality steel.
Compared to castings made of aluminum and plastic, steel structures are superior in a number of indicators:
- resistant to UV radiation;
- look aesthetically pleasing;
- resistant to precipitation (rain, snow) and temperature changes;
- resistant to corrosion;
- durable;
- resistant to mechanical damage;
- are inexpensive.
It should be noted that plastic moldings can also be used for installation on the outside of windows.
In addition, plastic elements are durable, do not require special care, do not fade when exposed to sunlight, and also increase the sound and heat insulation of PVC windows.
Visors and sills are easy to manufacture, but they require some work to install correctly.
This design will allow you to use drainage systems for the maximum amount of time.
The next section of the article is devoted to which slopes are best to choose for plastic windows.
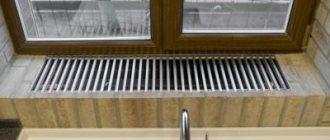
Window sill made of tiles. Peculiarities.
- The base for tiles on the windowsill must be prepared especially carefully. A lot of side light falls on the slopes. Any, even slight, difference in tiles is noticeable and attracts the eye. Due to the side light, the differences seem significant.
- The screed should be 1 cm lower (for tiles of normal thickness) than the bottom edge of the window. Then the tiles can be placed under the window block and with a minimum gap. And without sealing with silicone.
- The end of the window sill should be the same in width, and form one line along the bottom edge.
In new buildings, replacing a plastic window sill with a concrete one provides an interesting solution. The window sill (as in the photo) can already be used as a seat.
The end of the tile can be closed with a corner:
Tiled corner on the windowsill.
Some points of preparatory work before tiling:
MANUFACTURING A CONCRETE WINDOW SILL.
Another option is to lay an electric cable mat under the tiles (transfer the excess length of the heating mat along the wall to the floor). Then (perhaps) there is no need for a heating radiator and ventilation grilles on the window sill-bench.
TILE WINDOW SILL + HEATING MAT.
“Can I lay tiles on a plastic window sill?”
Can. Instead of glue - silicone or “liquid nails”. But the disadvantages of the plastic window sill remain - when pressed, the grout may crumble. You can skip the grouting, but it has its own disadvantages.
Add a comment Cancel reply
This site uses Akismet to reduce spam. Find out how your comment data is processed.
Source: 101ohibka.ru
Examples
You can appreciate the aesthetics of a tiled window sill by looking at the examples in the photo gallery.
- A neat window sill, decorated with small mosaics in classic colors: brown and beige.
- Window sill trim with square brown tiles.
- Glossy tiles for a wide window sill in pastel colors. A practical and stylish option.
- A contrasting combination of light and green mosaic tiles will decorate the window sill and refresh the interior of the room.
- A practical window sill decorated with glossy tiles. The structure can be used as an additional workspace.
See the next video for more details.
Restoration of an old window sill with insulation
Restoration of a window sill without replacing it with insulation and glass mosaic covering.
To be honest, we wanted to replace the old window sill after replacing the windows with new ones. However, when the window installers finished their work, it became clear that simply replacing the window sill would not be enough: the window frame turned out to be significantly higher than the level of the window sill. What to do in such a situation? You can replace a thin window sill with a thick kitchen countertop. But we decided to make do with a simpler and more effective solution: we will increase the thickness of the window sill using extruded polystyrene foam (EPS) and cover its surface with glass mosaic. Such a window sill will look stylish, its surface will be resistant to water, sun, high temperatures, and a layer of polystyrene foam will create additional insulation against the cold.
Before gluing the EPS sticker, we washed the window sill and primed its surface with an acrylic primer.
To improve the adhesion of tile adhesive to the smooth surface of the window sill, we attach fiberglass mesh to self-tapping screws.
After this, we glue 3 cm EPS boards, cut to the size of the window sill, onto the old window sill using tile adhesive.
Afterwards, for reliability, we fix the EPS with self-tapping screws to the old window sill.
And prime the EPS with a layer of tile adhesive over the fiberglass mesh.
The base of the new window sill is prepared. We leave it for one day to gain strength.
Then we proceed to gluing the glass mosaic sheets onto white tile adhesive. To distribute the glue, use a 4 mm comb.
We level the glued mosaic on the surface using a foam float.
Now you need to glue small parts of the mosaic to adjoin the shaped surfaces. We bite off the mosaic pieces with ordinary nippers.
And glue them onto the windowsill with tile adhesive.
A day after gluing the mosaic, we begin grouting the seams. Apply the grout with an elastic plastic spatula.
After 15-20 minutes, we begin to wipe the surface of the mosaic with a barely moistened sponge. You have to wipe the surface several times with 15-minute breaks until the surface is completely clean.
This is the new window sill covered with mosaics that we got. Previously, we made a similar window sill in the kitchen at the dacha.
In the same mosaic style we made the wall apron by the balcony door.
Source: dom.dacha-dom.ru
Options
The general name “tile” combines very different properties and types of coatings, each of which is interesting in its own way. Some types of such materials are better suited for the task, while others are worse - the complexity of processing the same tile affects it. However, it is worth considering them all:
- Tile. The solution is one of the simplest, most traditional and accessible. The main advantage here will be the choice of possible options - it is huge. The advantages also include high strength and the ability of the coating to withstand the effects of water. However, despite its advantages, tiles have a rather serious drawback - they are difficult to process and not everyone can handle it.
- The same drawback is characteristic of another similar material - porcelain stoneware. In almost every case, you will have to cut the slabs and adjust them to size. Parts made from this material have quite large dimensions and trimming will be necessary in any case. It is best to choose such a coating for wide window openings, where you can get by with a minimum amount of such work.
- Tiles made in the style of bricks look beautiful in most cases, but only when the entire interior implies the presence of similar surfaces. At the same time, there will be a lot of variations in the appearance of parts, as well as the materials from which they are made.
- Mosaic. Very interesting in appearance and the most suitable option in terms of its characteristics. When finishing the window sill with mosaic tiles, you most likely won’t have to think much about fitting - the parts are small and will “fit” perfectly into any dimensions of the surface being designed.
In addition to purchasing a suitable covering option, you will have to think about one more detail - the base on which the tiles will be laid. Most often, the base is an old window sill, which is prepared for finishing and decorated. However, you should not lay such coatings on plastic surfaces. It is better to replace them with window sills made of concrete or, as a last resort, wooden ones.
How to lay out a mosaic
Mosaic is a type of facing tile with small format elements on a supporting base. There are ceramic, glass and natural stone mosaics.
Tools
Materials
Work process
Surface preparation
| Attention! If the surface of the wall is not completely smooth, it is better to sand it using a grinder with a disc for stone or ceramics. |
- If it is necessary to remove a layer of more than 2 mm to level the surface, it is recommended to use leveling materials. The surface ready for installation must be absolutely dry, clean and level; in addition, to obtain a high-quality result, it is necessary to ensure a temperature regime ranging from 5 to 30 degrees C.