When constructing light low-rise buildings, it is economically beneficial to use a shallow strip foundation (MSLF).
They attract developers due to their simple installation, small amount of consumable building materials, combined with a high level of reliability.
We will discuss in the article what features the construction of this type of foundation has, the pros and cons of the foundation and what are the installation rules.
Advantages and disadvantages
MZLF successfully combines the advantages of buried and non-buried foundations and has the following advantages:
- high strength and reliability subject to installation technology;
- simplified excavation work that can be performed without an excavator;
- reduced amount of building materials;
- reduced labor costs for preparing concrete mortar.
There are also a number of disadvantages:
- significant restrictions on the weight and number of floors of the house.
- the need to install a complex drainage system in a heaving area;
- concrete work can only be carried out under stable temperature conditions of more than +10℃;
- The construction of the MZLF is carried out on a flat area or with a slope that does not exceed 5⁰.
Before proceeding with the construction of a shallow strip foundation, it is necessary to carry out a geological survey of the site to determine the possibility of choosing this type of foundation for a house.
In peat areas, on heterogeneous soils, at the junction of different types of soil, in conditions of high groundwater levels, it is impossible to build a shallow strip foundation.
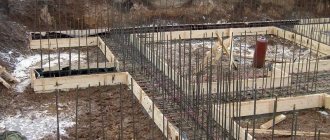
Installation of formwork at a level for future construction
What is formwork? This is a contour that limits the future rise of the house above the ground. The higher the rise, the better, as it will be warmer. Boards, OSB boards, chipboards and other flat, long materials are used as formwork. Before starting work, it is important to determine the width of the formwork, which will consist of the thickness of the walls, insulation and facing material. If in the future the floors in the house will be wooden, then it is advisable to place the beams on formwork, which requires additional space. If there is a screed, then the formwork can be made not so wide.
Shields are made from boards or other available materials and installed along the trench. The connection between the central and load-bearing walls does not overlap so that the concrete connects all the contour planes together. The formwork is placed in such a way that the concrete does not reach 5-10 cm to its edges. However, if you immediately knock off the level and fill the formwork level, it will not be worse, since at the end of the work there will be no need to raise the high brick plinth to level the base .
The formwork is twisted using self-tapping screws, so that it can be easily and simply disassembled later. Be sure to tighten the edges of the formwork together using a lath. At the bottom, install stops in the form of pegs, which should be driven into the ground and installed at an angle to the plane. This will help the formwork to better withstand the pressure of concrete from the inside.
Sometimes concrete is poured into the ground without formwork, but then you have to raise the base from blocks or red bricks.
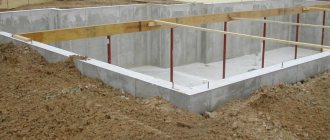
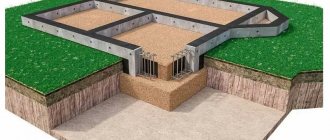
MZLF device diagram
A reinforced concrete strip must be installed around the perimeter of the base of the house, all load-bearing walls and partitions. Almost half of its height is above ground level and forms a base.
Schematically the device looks like this:
- a pillow made of coarse sand (0.3 - 0.4 m wide and 0.2 m high);
- monolithic reinforced tape (with a recess of up to 0.5 m, the width depends on the thickness of the walls, on average 0.4 m);
- heat and waterproofing along the entire length of the tape and blind area for drainage of melt and rain water;
- decorative cladding (material for cladding at the request of the customer).
Visually, the device diagram looks like this:
One of the important conditions for the possibility of constructing a shallow belt is the absence of a seismic threat above 6 points.
Briefly about the main thing
Different types of shallow foundations make it possible to speed up and reduce the cost of building a private house without compromising its reliability, even on difficult sandy and heaving clay soils. Both tape and slab made of precast or monolithic concrete are ideal for buildings made of wood, foam and aerated concrete, wood concrete blocks and other lightweight wall materials. For brick houses, a more careful calculation of loads is required. A barn, bathhouse or veranda can easily be supported by a columnar foundation with a grillage.
SNiP requirements
SNiP imposes strict requirements on the minimum depth of the foundation cushion:
- 1 m (if the soil freezes from 3 m or more)
- 75 cm (when the soil freezes to a depth of 3 m);
- 50 cm (if the soil freezes less than 2 m).
According to the standards, the reinforcement is laid in the foundation in such a way that at least 6 cm remains to the edge of the concrete pouring. The rods are connected to each other with knitting wire. Special requirements are also imposed on the distance between the reinforcement bars, as well as the spacing of the transverse reinforcement. You can learn more about the basic requirements by following this link.
As practice shows, in the regions of the middle zone the depth of the MZLF will be about 0.5 m . For small outbuildings and country houses, this value can be reduced to 0.3 cm.
Foundation installation materials and technology
The technology for installing MZLF depends on the type of building material from which the walls of the building or structure will subsequently be erected.
For a house made of expanded clay blocks
The average density of an expanded clay block is 300-900 kg/cubic.
m. This allows the use of a shallow monolithic strip base for a one-story building made of expanded clay block. Due to the high porosity of expanded clay, the foundation needs good waterproofing . All walls of the tape inside and outside along the perimeter are covered with hydrophobic substances: mineral or bitumen mastic, roofing felt or film.
A horizontal waterproofing layer is applied to the sand bed before the concrete strip is poured.
Made of brick
Brick houses have their own characteristics. Brick perfectly resists vertical loads, but it is weak in bending and stretching. In case of uneven shrinkage of the foundation or partial bulging of the soil, the walls will collapse.
Therefore, a shallow strip base is chosen for small buildings and only on dense soils that are not prone to heaving. In other situations, it is better to install a solid concrete slab , which will evenly distribute the load and prevent soil displacement.
Only a powerful solid monolithic foundation can withstand the load from a large brick or stone building.
For frame
A shallow solid reinforced concrete strip can be used as a base for low-weight frame houses on sandy, sandy loam and rocky soil.
If the area is too saturated with moisture, specialists consider the possibility of using this type of foundation.
From logs
For a log house, a reinforced foundation in the form of a shallow strip is built only on sand, stone or gravel soil.
According to construction standards, the foundation depth for regions in the middle zone on non-heaving soil will be at least 0.6-0.8 m, on heaving soil - up to one and a half meters. Therefore, choosing MZLF for heavy log houses is dangerous.
For aerated concrete
Aerated concrete has a high heat-saving ability with low weight.
Walls made of this building material can be twice as thin as brick walls with the same heat-saving effect.
Therefore, for a one-story building that is being built on normal non-heaving and slightly heaving soils, it makes sense to make the base from MZLF in order to save on the foundation.
The width of the base should be at least 0.3 m. When the soil is heaving, under the foundation it is replaced with coarse sand and compacted well.
To achieve high efficiency, the thickness of such a cushion under the tape is made at least 0.2 m, in difficult situations at least 0.8 m.
Read what else you need to know about a strip foundation for a house made of aerated concrete here.
Video description
This video shows the construction of a shallow foundation with piles and filling of the internal space of the tape:
Slab
A base in the form of a monolithic slab is more expensive, but it is more reliable. Such a foundation is often called floating and compared to a raft, whose entire plane follows the movement of the waves.
Work on its construction also begins with cleaning the construction site, removing the loose layer of soil, marking the outer corners and excavating the pit to the depth of the slab. If the groundwater level is high, then drainage trenches are dug and equipped along the outer perimeter to drain water.
Then the bottom of the pit is lined with a cushion of sand and crushed stone with a tamper. Waterproofing material is spread on the pillow with the joints glued, on top of which dense thermal insulation boards made of extruded polystyrene foam are laid. This substrate protects shallow foundations from water and freezing.
After installing the formwork along the perimeter of the future slab, a steel frame of two grids made of reinforcing bars is mounted in it. And this structure is filled with concrete with mandatory compaction using an in-depth vibrator.
Slab MZF device diagram Source smetadoma.com
It is important! Before concrete work begins, all communications must be laid and outlets made.
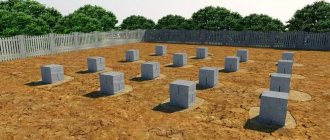
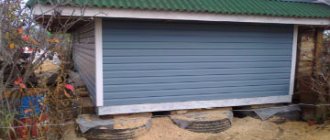
Columnar
The columnar type of foundation, especially with a slight depth, is the most unreliable, and therefore is not used in the construction of critical structures. But it is quite suitable as a foundation for sheds, gazebos and other small light buildings.
To construct it, holes are dug along the perimeter of the marked tape, surrounded by formwork, mounted in each frame and filled with concrete. Alternatively, only the underground part of the pillars is made of concrete, and the upper part is made of brick or small blocks.
Columnar foundation Source sdelai-lesnicu.ru
The pillars are connected to each other by a grillage, which is the basis for the construction of walls.
How to do it yourself?
To build a shallow reinforced strip foundation, you will need to perform the following steps:
- calculate the width of the foundation, the cross-section of the reinforcement;
- make a reinforcement drawing;
- clear away debris and plan the area;
- dig trenches;
- lay a drainage layer;
- arrange a footing or lay roofing felt;
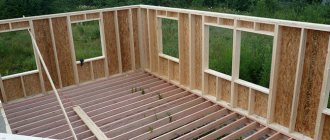
- install formwork;
- lay and fasten the reinforcement;
- insert sections of pipes for communications and ventilation;
- perform concreting of the tape;
- provide care for concrete during its setting;
- remove the formwork from the tape;
- waterproof the foundation.
Then all that remains is to make a blind area and line the foundation with waterproof material. Each stage of construction of the MZLF has its own nuances.
Necessary calculations
When calculating the foundation , it is taken into account that its laying depth is equal to the freezing depth, minus 25%.
Failure to comply with this requirement results in heaving of the soil and there is a risk of compromising the integrity of the structure.
The height of the base should not exceed the size of the underground part of the base.
To calculate the width of the structure, it is necessary to calculate the ratio of the weight load (t/m) to the calculated soil resistance (t/m2), (based on tabular data SNiP 2.02.01-83). The thickness of the sand-crushed stone platform is determined according to SNiP data.
Detailed information about the calculations in our article at the link.
Preparatory work and marking
The fertile layer is removed and the construction site is graded. At the intersections of the foundation and in the corners, stakes are driven in and a rope is pulled.
Digging a trench and arranging a cushion
The trench is dug to the required depth. Level the walls and corners if heavy equipment was used.
There is no need to plan the bottom of the trench to fanaticism. Pour a layer of clean coarse sand, without plant debris and clay. They tamp down, spilling water. Fine crushed stone is poured in and compacted as well.
A top leveling layer 50 mm thick is installed. The platform is covered with geotextiles, a footing is poured or roofing felt, folded in half and coated with bitumen, is laid.
There is a detailed article about the types of pillows and the features of the device for strip bases here.
Formwork assembly
The formwork is assembled from edged boards 25-40 mm thick. The shields should rise slightly above the tape. Be sure to inspect the cracks.
Builders practice covering formwork with plastic film . The formwork is fixed in place using external stops and internal spacers are installed.
Full information about formwork installation is here.
Reinforcement
The tape is reinforced with a reinforcement cage. Workers are considered to be horizontal rods that accept external loads. Vertical ones play a supporting role. The frame is knitted by twisting it with steel wire . The rods will have mobility and compensate for the resulting loads (when pouring concrete mortar or an earthquake). Welding will not withstand such loads.
The quality of MZLF is greatly influenced by properly executed reinforcement. It is important to correctly calculate the diameter of the reinforcement and the number of rods.
All details of reinforcement of strip bases are here.
Pouring concrete
The concreting process is carried out without interruptions, not exceeding a pause of more than a day.
Otherwise, a monolith will not work. It is advisable to order delivery of the solution or organize its continuous production on site at the required pace.
The pouring process begins from the internal areas with a smooth transition to the external perimeter. You cannot pour concrete at one point and wait for it to spread over the tape. Fill the formwork at once from different points, evenly distributing it along the length.
Next, the surface is covered with polyethylene from hot sunlight. For the first 3 days, the tape is moistened after 4 hours, then another week after 8 hours to extend the setting time of the concrete. This ensures the strength of the monolith. After 10 days, the formwork is removed. After a month, construction can continue.
You cannot shorten the time it takes to complete the concrete strip. In order for the foundation to fulfill its purpose, the tape must not be loaded prematurely.
Formwork removal and waterproofing
Removing the formwork does not mean the end of the construction of the MZLF. It is necessary to perform horizontal waterproofing using two layers of rolled roofing material and coat the side surfaces of the foundation with bitumen.
You can use any impregnating and coating materials that prevent moisture penetration. Reliable waterproofing will protect your home from destruction and mold development.
The sinuses on the outer and inner sides of the foundation are filled with sand and a blind area is created that will protect the foundation from rain and melt water. If everything is done correctly, the water will flow along the concrete strip towards the drainage well.
Insulation of the base and blind area
To insulate the base and blind area, penoplex, penofol, liquid polyurethane foam, etc. are used. Any insulation with moisture-proof properties will be suitable, depending on the developer’s budget. The tape is insulated from the inside over the entire surface, except the horizontal one.
Stages of creating a strip foundation at shallow depths (LFMG).
When working on heaving soils, it is necessary to insulate the soles of the working tape of this foundation. In conditions of sand and sandy loam, it is fashionable to insulate only the blind area.
- Calculation of tape width and reinforcement section, creation of a reinforcement project.
- Creating a trench if a house without a basement is being built.
- A pit is dug if a base is planned.
- Laying drains to remove runoff.
- Warming of the sole.
- Creating a substructure.
- Installation of formwork.
- Laying of reinforcement.
- Pouring concrete. The organization of communications and ventilation ducts is provided.
- Waterproofing of all edges of the tape after dismantling the formwork.
- For a functioning basement, the outer walls are insulated with tape.
Determination of soil composition.
This procedure can be performed without specialists. Just dig holes in different places. Examine the soil visually. Here's how to do the test:
- It easily forms into a dense ball and does not collapse when pressed with your fingers. These are signs of clay.
- If it cracks under pressure, it is loam.
- If it has partially crumbled, it is sandy loam.
- It didn't turn out to be a ball at all - it was sand.
Calculation of tape width.
Here the total load is calculated. It includes the weight values of all structures:
- base;
- floors;
- walls;
- roof;
- facing;
- insulation materials;
- partitions;
- furniture;
- living people;
- loads from wind and snow.
Wind and snow data is obtained from the weather report for your area. Typically, a width of 40-50 cm is sufficient to create a strong tape even on difficult soils.
Calculation of depth.
Here are the rules:
- A depth of 40 cm is suitable if there is protection against heaving.
- 45 cm – subject to sandy soil; groundwater is low.
- 50 cm – when the clay freezes to 100 cm.
- 75 cm – clay freezes to 150 cm.
- 100 cm – freezing at 250 cm.
There are ways to protect against swelling in winter:
- Under the sole the soil is changed to non-metallic material. Minimum layer – 40 cm.
- Drainage is created around the perimeter.
- A blind area and storm drain are installed on the surface.
- The sole and blind areas are insulated.
Shallow strip foundation based on snips in section.
The following numbers will help in the question of how much the tape should be raised above the ground:
- for the base, the tape is buried in place and rises 170 cm above the surface;
- for a modest technical underground, a height of 40 cm above the ground will do;
- to create floors on the ground, the tape is at the same level with the ground or exceeds it by 20 cm.
Advice! Any of these options allows for normal two-layer reinforcement inside the tape. At the same time, you can still arrange a protective layer of 1.5 - 4 cm.
It is advisable to use a calculator when making calculations:
At the building site, you need to tighten the cords. They are located along the outer and inner perimeter. There is no need to remove the axes here, as when working on columnar or pile foundations.
Positional criteria for marks and cords.
- The starting angle of the main facade is positioned 3 m from the site line, 5 m from the axial border of the street.
- To mark the wall of the main facade, two cords are pulled over the cast-offs. A 60-80 cm strip is placed between the pegs. These cords also reflect the edges of the foundation.
- For each wall, a right angle is determined. After which the side walls are calculated. Here the work follows the triangle method. They also require pulling the cords over the cast-offs.
- The rear façade and interior walls are determined using the same method.
Next, pits are marked for the foundations of separate structures of the building: porch, pumping equipment, stairs, stove, etc.
A level is used to align the horizontal lines of all castoffs in a single plane. Correct positions of the cords: 5-7 cm below the top side of the formwork.
Also, the tape trenches must provide for the location of insulation, drainage, and access to the external walls of the tape. To do this, the width of the trench develops 50–80 cm inside the perimeter of the building, 80–120 cm outside.
For excavation work, you can only draw the contours of the trenches. This is done on the soil using lime mortar. If there is a base, a pit is dug out. The cast-offs in the corners should not interfere with the removal of soil, which is carried out by special equipment.
Substrate made of sand or crushed stone.
Typically the substrate is formed from:
- sand, layer 20 cm, it is treated with water or compacted with a vibrating plate;
- crushed stone, the same layer, it is manually bayoneted in layers or similarly compacted.
An example of a sand cushion.
Shallow strip foundation of the house according to SNIPs.
The crushed stone layer covers the sand layer.
Shallow strip foundation of a private house according to SNIPs.
At this stage, drainage is installed along the entire strip perimeter. They should be flush with her sole. The drains are looped into a single circuit. This results in one slope towards the underground compartment where wastewater will accumulate.
With a 40-centimeter immersion of the foundation, it is possible to get rid of heaving. To do this, line the outer side of the tape with polystyrene. Required layer – 5 cm. Width – 60 cm.
When the foundation is 70–100 cm deep, it is necessary to insulate the blind area. Insulation is carried out at a level of 30-40 cm. Heaving impulses are not completely eliminated, but are reduced significantly.
As a rule, the following materials are used to create shields:
- Edged board. The minimum thickness is 5 cm. Its advantages are that it can be reused. Disadvantage: assembly takes a lot of time.
- Plywood with many layers. Its advantages: powerful resistance to moisture, strength. The downside is the huge price.
- OSB. Pros: can be used after the formwork has been dismantled, strong moisture resistance, retains geometry.
For your information! Crossbars are placed at the level of the formwork, and the cast-offs are pulled out. This way the formwork is level, both horizontally and vertically.
It is important to know! In areas of connections in shields, gaps larger than 2 mm are not allowed. The concrete base is poured without formwork. Its functions are performed by the walls of the trench.
Formwork installation options:
- Removable. The top side of the boards exceeds the design mark by 5-7 cm. The walls inside are insulated with extruded polystyrene foam.
- Fixed. Polystyrene blocks are used for assembly. The rigidity of the structure is determined by the jumpers.
The first option is more popular, because after pouring, water protection is installed on the surface. Then insulation is laid on it.
Shallow strip foundation of the cottage according to SNIPs.
An example of placing and strengthening formwork:
Screeds are used for vertical fixation of panels. Required pitch: 50 – 100 cm. Holes are placed inside the ties at different heights. The cartridges will pass through them. And in the underground side, engineering technologies will be introduced through such pipes. Above ground level, the holes will become ventilation ducts. Through them, moisture will leave the underground.
Subtleties of construction
When it is possible to mount support piles below the freezing level of the soil, a shallow strip foundation is built in conjunction with support pillars.
This option is used for damp and marshy areas, on loams, and with close-lying groundwater. This allows you to save on the supporting structure without compromising its reliability.
The following are used as pillars:
- steel pipes protected by a concrete layer;
- reinforced concrete supports;
- asbestos-cement pipes filled with concrete inside.
It is necessary to consider the arrangement of a high-quality drainage system. Otherwise, the costs of arranging the foundation will not be justified and the structure will collapse over time.
Features of construction on heaving soils
In an area where the soil is prone to baking, a foundation is built only after measures have been taken against this phenomenon. You need to be prepared for the fact that you will need to carry out expensive and time-consuming activities associated with excavation work.
A radical method is to replace the heaving layer with coarse river sand. To do this, build a pit with a depth well below the freezing level of the ground, cover it with a thick sand layer and compact it thoroughly.
For lightweight structures, the insulation method can be used to combat soil heaving. The width of the insulation is selected individually and depends on the climate in the region. It should not be less than the freezing depth.
Additional information about the features of this type of foundation on heaving soils is here.
Prefabricated base on sandy soils
A strip foundation, buried to 0.4-0.6 m, on coarse sandy stable soils will serve as a reliable foundation for most types of buildings.
The following options for its design can be considered:
- pouring concrete with reinforcement;
- installation of concrete blocks;
- rubble stone masonry.
Waterproofing the trench will help the concrete gain strength as it matures. Soil with a predominant substrate of silty sand is subject to seasonal deformations and will not act as a reliable foundation base. The MZLF must be strengthened with columnar supports.