Blind area drainage is a special device around the foundation of the house. With the help of such a system, it is possible to divert water flowing from the roof during precipitation from the base. A properly equipped system will protect the structure from premature destruction and settlement.
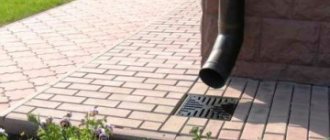
Arrangement of a drainage ditch for a blind area under the house Source gidro-1.ru
Purpose of the drainage system around the house
Drainage around the house and blind area (a waterproof covering around the perimeter of the building, located at an angle to the wall for easy drainage of water) are necessary to protect the foundation and base of the walls from the effects of groundwater and precipitation. The blind area performs an important function, but without a drainage system it is not able to effectively protect the house from moisture.
Heavy rains and melting snow raise the groundwater level. In the absence of a water drainage system, the following processes occur.
- Water stagnates in the upper layers of the soil. The soil becomes swampy and heaving. When it freezes, it expands, putting uneven pressure on the foundation. As a result, the house settles unevenly.
- At the same time, water seeps into the microcavities of the foundation and the base of the walls. When it freezes, it expands, increasing the size of the cavities. Over time, the foundation cracks, which sharply reduces the life of the structure.
- Water seeps into the basement through cracks. This causes mold growth and damage to supplies and equipment placed in underground areas.
- Further, dampness and mold spores rise to residential floors, affect walls, furniture and cause diseases in households. In cold weather, moisture in the underground causes the formation of frost on baseboards and walls.
Drainage around the garden plot is used to create optimal soil moisture on flooded lands. This gets rid of puddles and stagnant water. Allows you to grow the desired crops and get a good harvest.
Components of a drainage structure
To organize storm drainage you will need several components:
- pipes. These can be asbestos-cement or composite materials. Thick-walled plastic products are also used. The latter are considered easy to install and budget-friendly. If clogged, they are easier to maintain;
- well. This is the place where all the water will accumulate. More often they try to use a natural water intake (any nearby body of water), but if this is not possible, then they have to build a special container. A large septic tank, iron barrel or reinforced concrete sewer well is suitable for this;
- pump equipment. It will be required for almost any drainage system (even with maximum efficiency). A pump is needed to pump out remaining moisture in the ditches; if this is not done, silting will occur.
Having dealt with the main components that should be present in the drainage system in the area of the blind area, it’s time to get down to the arrangement process itself. It is based on several stages.
Types of drainage, their features and purpose
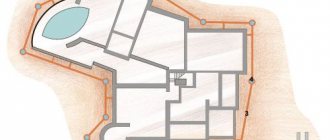
There are 2 types of drainage around a low-rise building: surface and underground; let’s look at both types:
Surface
Surface drainage and point storm drains around the house are built to collect excess moisture that falls in the form of precipitation. According to the layout of drainage pipes (drains), this type of system is divided into ring, layer, and wall.
For each specific case, a separate project is created, which takes into account the landscape, soil type, location of buildings on the site (existing or future), type of foundation of permanent buildings, level of soil freezing and many other points.
Type 1. Wall
The drainage around the winding is of the linear variety. Be built simultaneously with the foundation. Construction of the system after completion of construction is possible, but it is much more difficult and expensive.
Necessary for removing moisture from the external surfaces of the foundation. It consists of trenches encircling the foundation along the perimeter at the maximum permissible distance, in which drains are laid. The depth of the trench is 0.3-0.5 m below the foundation level.
The trenches have a slope, usually 1 cm -2 cm per 1 m, so that water flows under the influence of gravity to one lower point.
At the lowest point, the drains are connected to the inspection well. An outlet pipe is also connected to it.
Type 2. Layered
A complex, expensive and at the same time very effective way to prevent the destructive effects of water on the foundation. It is used to drain the soil under the foundation and communications when:
— a permanent structure is planned to be built directly above the groundwater lens;
— the site is located on an aquifer;
— groundwater comes to the surface under pressure;
— other methods of protection are not effective.
The plot of land is not drained in this way due to economic infeasibility.
Reservoir drainage is constructed under the foundation and connected to a wall or ring drainage system. This bond effectively removes moisture.
It is a sand cushion with a thickness of 0.3 m with prisms made of gravel or crushed stone, which are placed at a certain pitch. Also, the sand cushion can be covered with a continuous layer of gravel/crushed stone. The latter option is used when enhanced water drainage is required. The perimeter of the sand layer is made larger than the perimeter of the foundation.
The top of the drying pad is covered with perlite. Perlite prevents concrete from leaking into the gravel or crushed stone layer when pouring the foundation, maintaining its drainage properties.
Type 3. Circular
To be built to lower the groundwater level. Unlike stratum, it is used to protect the foundation from water and drain the land.
To protect the house, a ring system is laid around it at a set distance. The distance to the drains is maintained at least 5 m to prevent soil shrinkage. If necessary, strengthen the soil. The drainage depth around the house is 50 cm ± 20 cm.
To drain the site, a project is being developed that matches the topography and location of the buildings.
The principle of this drainage device around the house is similar to the construction of a wall system.
The advantage of the ring type is that it can be erected when the construction of the house is completed. Also, the ring system can be combined with wall and layer ones.
Underground (deep)
They build deep drainage around the house on clay soils when the construction of a surface system is impossible or impractical. It is a complex, sometimes multi-level system. They are built on watery lands, in lowlands and in areas located in floodplains and near floodplains.
For private houses, 3 types of underground drainage systems are relevant: horizontal, vertical, combined.
View 4. Horizontal
Consists of drains, inspection wells, and catch basins. You also need a pump to pump out water.
The principle of laying drains for an underground horizontal system is similar to laying surface linear drainage. At corner joints and at the lowest point, drains are connected to inspection wells. This is necessary in order to notice and clean up dirt in time.
Water flows through drains into reservoirs. From there it partially goes into the underlying layers of soil. The water that remains in the reservoir is pumped out with a pump for irrigation or other household needs.
Similar to surface drainage, horizontal deep drainage can be implemented in the form of a ring, wall and layer structure. The latter differs from the layered surface one in that instead of a drainage cushion under the foundation, an artificial reservoir is created, filled with gravel or crushed stone with a depth of 0.3 m. The water from it goes into the soil or into another part of the drainage system.
View 5. Vertical
It consists of water intake wells and reduction wells, with a depth of 20 to 50 meters and a pump. From the wells, a certain amount of water goes into the soil, the excess is pumped out with a pump.
Type 6. Combined
Combines the design of vertical and horizontal drainage.
On topic: Site drainage in 5 steps: how to do it yourself
What it is?
A blind area is a structure that is erected around permanent buildings to drain excess moisture. For a long time it was believed that the concrete (rigid) version of the structure was better suited for these purposes. But over time, soft blind areas have gained popularity, allowing for a long-term solution to the problem of draining water falling with precipitation or flowing from the roof. The flexible tape distributes loads more evenly; it is installed around the house both for buildings on screw piles and for options with a solid monolithic foundation, and the hidden part of such a multi-layer “pie” is always noticeably thicker than a classic concrete one.
Installation of a soft blind area is possible not only in the local area. It can also be arranged around a well or a country cottage, a warm chicken coop or a utility block. Like other types of drainage structures, soft blind areas have their advantages and disadvantages. Let's start with its obvious advantages.
- Resistant to temperature changes. When the soil freezes, the multilayer structure does not move.
- Stable geometric parameters. The flexible blind area does not shrink, therefore it eliminates possible cracking of the base and supporting elements. It practically does not require repairs or restoration throughout its entire service life.
- Compatible with membrane materials. This layer makes it possible to improve the waterproofing properties of the structure and increase its heat capacity.
- Ease of arrangement. The costs, both physical and material, in this case are not too high.
- Aesthetics. You can use various materials for decoration, plant a lawn on top, or create a flower bed.
Do-it-yourself drainage installation around the house
It is quite possible to install drainage around the house yourself. For this, basic drawing knowledge and the ability to perform simple construction and installation work are sufficient.
Before starting work you must:
- conduct geodetic and geological surveys of the site;
- determine the type of future drainage system;
- draw up a project.
This work must be performed by specialists. Without the appropriate skills and equipment, drawing up a project yourself can lead to serious mistakes. As a result, all the work will have to be redone.
If drainage is built incorrectly under the foundation, this will lead to premature destruction of the building and the need to demolish and rebuild the house.
On topic: Site drainage, step-by-step instructions on how to do it yourself in 5 steps.
Selection of materials and their estimated cost
The selection and purchase of materials is carried out when the project is ready.
For a DIY drainage system around the house you will need:
- geotextiles with a density of 100 -150 g/m2; price from 17 rub./m;
- drains; price from 50 rubles per meter of plastic pipe;
- crushed stone or gravel larger than the size of the holes in the drains; from 200 rub/m3;
- sand; from 100 rub/m3;
- plastic inspection well; from 950 rub.;
- plastic collector well; from 10,000 rub.;
- drainage sediment; submersible type from 3000 rub.;
- fitting.
Drains are made of plastic, asbestos-cement and ceramic. Preference should be given to pipes made of high-strength plastic that can withstand significant loads.
There are plastic drains on sale, wrapped in geotextile or coconut copra.
Asbestos-cement pipes are heavy and require special equipment for careful and correct installation. Ceramic ones have a high drainage capacity, however, they are fragile, difficult to install, and may not withstand the pressure of frozen soils.
What tools will you need?
Before you begin, you need to prepare your tools. You will need:
- bayonet and shovel shovels;
- garden wheelbarrow;
- level;
- roulette;
- manual rammer.
Gutter elements
Their list includes:
- Gutter Designed to collect rain and melt water from the roof.
- Gutter plug. Attaches to the ends. Directs water down the slope towards the funnel.
- Gutter connector. They are used to connect gutters to each other. Tightness is achieved through a rubber seal.
- Universal angle. Changes the direction of water flow. It needs to be fixed on the inner and outer corners of the roof.
- Pipe elbow. Often used to neatly go around building façade elements. Changes the direction of water flow through a pipe.
- Funnel. Works as a water receiver. Connects gutters to pipes. Redirects water from the catchment to the drainage system.
- Drain pipe. Designed for vertical water flow.
- Connecting coupling. Pipe fastening element. Responsible for compensating for thermal expansion.
- Drain. Drains water from the system into the soil.
- Universal clamp. Allows you to attach the pipe at the desired distance from the house.
- Metal, plastic brackets. Required for installing gutters on the roof eaves.
- Straight or side bracket extension. Used when you need to attach the gutter bracket to the rafters or roof slope.
- Adjustable angle. Suitable for right angles and up to 150 degrees.
- Clamp for fastening the pipe to the facade of the building.
- Protective grille. Prevents debris from entering the drainage structure.
- Rotating eaves eaves for wall mounting.
The number and names of elements for different types of roofs may differ and be supplemented.
How to properly make drainage around the house. Step-by-step instruction
After completing the design work and purchasing everything you need, you can begin work.
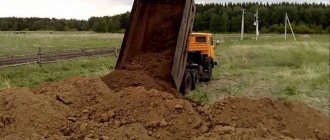
- Clearing the area. Remove debris and anything that might interfere with work.
- Preparing the trench . Dig trenches while maintaining the slope. The minimum width is equal to the pipe diameter plus 30 cm. The slope is checked by level. Its size is 1-2 cm per 1 meter.
- Backfill. Fill the trenches with sand in a layer of at least 10 cm.
- The foundation is prepared for the wells . Make a platform of suitable size, filled with sand. If the groundwater level is high, the site for the well is concreted with a 10-centimeter layer on which the well is fixed.
- Cover the trenches with geotextiles . Its edges should extend beyond the top edges of the trenches.
- Laying drains . Crushed stone is poured onto the geotextile in a layer of 10-20 cm, leveled so that the thickness is the same and the angle of inclination does not change. Drains are laid, connecting them with fittings or sockets. Connect the pipes to the “inputs” of the well. For tightness, rubber O-rings are used.
- Backfilling of pipes . An even 20-centimeter layer of crushed stone is poured over the pipes and wrapped in geotextiles.
- Backfilling with sand . 20 cm of sand is poured on top of the geotextile, compacted, and covered with soil.
- Digging a well . The wells are buried and covered with lids.
If there is a large amount of precipitation in the region, especially in summer, storm drainage trays (storm drains) are located directly above the drains. They are laid on a sand cushion.
You can see an example of laying drainage around a house in this video.
Advantages of a soft blind area
The soft blind area around the well is the most versatile and has a number of advantages over concrete or clay:
Well with roof
- When done correctly, it prevents the ring from moving, thereby preventing groundwater from entering the well.
- The soil is compacted, preventing the formation of hidden voids in which water can subsequently accumulate.
- Carrying out repair work on soft protection is much easier and has a low cost.
- Its design makes it possible to subsequently place any coating. It can be any stone, ceramic tiles, you can sow lawn grass or make wooden flooring.
- In terms of strength, a soft blind area for a well has higher strength values than concrete or reinforced concrete.
- Only the top coating is exposed to external factors. The waterproofing film itself has a service life of up to 100 years.
Purpose of storm drain
A storm drain is installed to drain rain and melt water. It belongs to the point type. It is used as an independent structure and in combination with a drainage system.
Installing a storm drain is not difficult, but it is important to design the future system well.
Selection and calculation of materials for storm drains
When the project is ready, it is necessary to purchase building materials. You will need:
- sand;
- crushed stone;
- cement;
- sealant;
- storm drains;
- water collection tanks (storm water inlets);
- pipes;
- gutters;
- sand traps;
- gratings;
- observation wells for monitoring water levels;
- adapters for turns;
- plugs;
- brackets.
Drainage trays are made from asbestos cement, cast iron, stainless steel, and plastic. For self-installation, it is better to choose plastic. It is lightweight, pliable, and does not require complex equipment for installation.
The profile of the trays comes in the form of U, U and slotted. U-shaped is the most convenient for a private home. It is quite capacious and has no corners where dirt accumulates.
The calculation of materials for a stormwater system depends on the amount of precipitation, the design of the house, the area and characteristics of the land plot.
The diameter of the drains is chosen:
85 mm – for 10 l/s
100 mm – 20 l/s
150 mm – 50 l/s
200 mm – 80 l/s
The length of the gutters depends on the height of the house.
Drainage trays and gratings are calculated based on the linear footage of the storm drain using design calculations or tape measurements.
The volume of bulk materials can be approximately calculated using the formula:
V=abc
where a, b are the width and length of the trench, respectively,
c – layer height.
For sand, it is worth taking an amendment for compaction of about 20%. For crushed stone - about 5-10%.
Wells are selected based on the amount of precipitation. They are calculated using the formula:
M = (20A)Sk,
where M is the mass of precipitation;
20 – time, in minutes;
A – precipitation intensity over a period of 20 minutes;
S is the area from which water is collected;
k is the moisture absorption coefficient of the material.
The amount of sediment mass must also be known in order to correctly select the depth of drainage trays and their number on the site.
Do-it-yourself storm drain installation
Installation of storm drains is carried out after preparing the site (collecting garbage, eliminating all unnecessary things).
- Dig trenches up to 30-50 cm deep. The trenches must be clearly aligned with the projection of the location of the drains.
- Pits are dug under the drains. They are equipped with water intakes with a capacity of 5000-10,000 ml with special containers for collecting waste.
- Plastic rotary and inspection wells are installed.
- The trenches are filled with sand. Drainage trays are laid on the sand and grates are installed.
- Every 10 meters of a straight line, at all turns and at the exit from the tray system, sand traps are placed.
- The collected water is either discharged into a ditch/storm sewer outside the site, or collected in a container and watered with it in the garden. Draining rain and melt water into sewers for disposal of household wastewater is prohibited by SNiP.
If water is discharged outside the site, permission is required from the Department of Natural Surveillance, the Central State Hydrometeorological Service, the UPN, the Fisheries Department, and the Basin and Water Management Department. It is necessary to provide the stormwater drainage design to these services. Construction should begin only after its approval.
Correct insulation technology
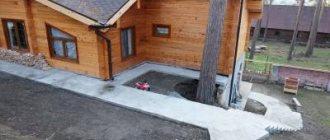
The first steps in the process of building a blind area are the same:
- Dig a ditch with a depth of ½ the depth of soil freezing (approximately 30-40 cm). The width is 20 cm greater than the width of the roof overhang. Treat the bottom with chemicals that prevent plant growth and the appearance of insects.
- Form the bottom at an angle from the building of about 10 degrees. Dig a groove along the outer edge of the trench for the drainage pipe.
- Pour moistened clay or sand up to 10 cm high into the bottom. Compact with a vibrating machine.
- Place waterproofing with an overlap of up to 20 cm on the wall.
- Pour 10 cm of crushed stone on top as drainage.
- Compact another 10 cm of wet sand.
Next, a layer of thermal insulation is laid. Each uses its own technology:
- Expanded polystyrene is laid in slabs.
- Penoizol is applied with a sprayer (special machine) evenly over the entire area of the blind area with a small backdrop on the wall. It does not form seams and creates another additional layer of waterproofing.
- The foam is laid in tiles evenly. If necessary, the material is cut and formed into the required area.
- Dronite is poured before and after expanded clay. The expanded clay itself is 10 cm thick.
After this, the process is completed with a finishing coating:
- Pouring concrete. A blind area is installed around the entire perimeter. A reinforced grid is laid on the heat-insulating layer. Next, damper joints are installed along the entire perimeter in increments of 2 meters - boards 2.5 m thick. Concrete is poured in one layer at an angle of up to 10 degrees from the house. Ironing is carried out, complete drying with periodic moistening.
- Paving slabs are made according to the same principle, only the layer of concrete is 2 times thinner and tiles are laid on top.
- The soft blind area is laid out without reinforcement or concrete. A layer of sand and gravel is poured onto the insulation and covered with geotextiles. And the final layer is placed on this coating: gravel, granite chips, drainage with lawn and others.
A layer of thermal insulation is also laid on the lower part of the wall, its height is up to 30 cm. It lies inside the expansion joint and serves as a softening elastic stop. At the final stage of construction, the insulation layer is covered with the finishing of the base.
The video will tell you about insulating the blind area with polystyrene foam:
Turnkey installation of drainage around a private house
If you are not sure that you will be able to carry out proper drainage and storm drainage around the house with your own hands, you can order turnkey work. To do this, you need to choose a reliable contractor and find out the cost of the service in advance. You can buy all materials and components for installing a drainage system from a warehouse in Irkutsk.
How to choose a contractor
When choosing a contractor, you need to consider the following points.
- Famous name. The organization or team must have a certain reputation in a given locality/region.
- Positive feedback . It is necessary to find as many reviews and information about this contractor as possible.
- Official registration with tax and other authorities. Serious contractors have the status of individual entrepreneurs or legal entities. All information about them is transparent.
- Portfolio. The customer has the right to demand examples of work.
- Agreement. It is necessary to conclude an agreement. Before signing, the document is read carefully. All unclear points must be clarified immediately. If the conditions are not satisfactory, the customer must demand that they be changed, or refuse the services of this organization.
- Acceptance. Acceptance is made after inspection.
How much does high-quality turnkey drainage cost?
The cost of turnkey drainage depends on many factors. Before drawing up the project, no one will tell you the exact cost. The approximate price of a surface linear system is from 900 rubles/linear meter. Deep - from 1500 rubles/linear meter. Deep ring-shaped drainage costs from 3,000 rubles per linear meter. Storm drains – from 1200 rubles/linear meter.
Average device price
The price depends on the volume, complexity of the soil, and the depth of the trench. A separate cost is assigned for creating a drain well:
| Type of work | Moscow and Moscow region, rub/pg.m | St. Petersburg and Leningrad Region, rub/pg.m | Krasnodar, rub/pg.m | Kazan, rub/pg.m | Rostov-on-Don, rub/sq.m |
| Deep drainage, up to 80 cm | From 1200 | 1100 | 1100 | 990 | 900 |
| Deep drainage, over 80 cm | From 2500 | 2500 | 2500 | 2500 | 2500 |
| Surface drainage | From 900 | 900 | 800 | 750 | 800 |
| Drain well | From 20000 | 20000 | 20000 | 19000 | 20000 |
The most important and useful information on the construction of blind areas is collected in this section.
Installation procedure for polymer drainpipes
To install a plastic pipe system for drainage, you need to perform work divided into several stages:
- Initially, you need to take into account that the installation of the drainage system must be done at a certain angle with a slope in the direction of flow in order to eliminate the possibility of water stagnation.
- The fastening parts of the drainage system must be installed during the construction of the building.
- Directly when installing the system, first lay gutters for drainage, connect them to each other and install funnels to collect water. Covers are installed at the ends of the gutters.
- After completing this step, the vertical part of the drainpipe is installed to the drainage funnel.
- The vertical section of the drain pipe is attached to the wall using brackets that are pre-installed.
Reset point
Before you begin designing and installing roofing and surface drainage systems, you should determine the discharge point for the total volume of water.
Depending on the location of the site and nearby infrastructure, these may include:
- natural bodies of water;
- sewer collectors;
- drainage field (several shallow holes where water accumulates and is subsequently evenly absorbed into the soil).
The drainage system is designed in such a way that the discharge point is at the bottom of the site.
If there is no slope, and the volumes of drainage are large, you will need a drainage well (how to clean it from sludge is written here) with a pump.
If the building and the surrounding area are located on a hill, everything is solved more simply - drainage trays are stretched from them to the discharge point, leading to the drainage ditch.
A common mistake many homeowners make is organizing a discharge point in close proximity to the foundation.
They spend money on installing rainwater inlets on the roof, but all the water is discharged to the ground directly below them. In this case, it makes no difference whether there is a drainage system or not, because... precipitation, collecting under the walls of the house, floods the foundation.
Water accumulates in the ground “sins” and turns into ice with the onset of frost. As it expands, it destroys concrete floors.
Therefore, the precipitation captured by the system must be drained either into a special tray or into a rainwater inlet.
It is impossible to combine surface drainage with an underground drainage system, because during heavy rainfall, precipitation will move in the opposite direction and flood the foundation.