To supply water to a private house or summer cottage, two methods are usually used: first - digging a well, second - well drilling. Both of them have a number of pros and cons. Often, the owners of dachas or small country houses decide, for convenience, to provide water supply not only to the house itself, but also to the existing technical premises: a barn or garage. If they have their own car, then it must be washed. And for this purpose, they provide an autonomous source so that you can care for the vehicle right on the spot. This will save money and not pay for car wash services.
What are water supply wells and what types do they come in?
There are 3 types of wells for water supply: Abyssinian , filter and artesian . They differ from each other in depth, performance, and design elements.
Each owner of his own garage can install a well in it . Such work can be carried out in any season of the year. It does not require very large expenses. And having a water supply in the garage will significantly increase convenience. In this case, there is no need to carry out thermal insulation and extend pipes to the room. Most often, Abyssinian wells are installed in garages. They are sources of medium depth. And in all seasons of the year, water will be supplied in sufficient quantities.
The easiest way to carry out such work is in the garage during construction, or more precisely, at its initial stage. At this time, you can choose a place for water supply, as well as for the necessary inventory and equipment.
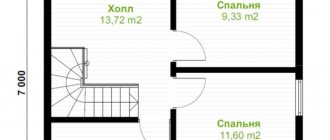
If there is a need to drill a well in an already built permanent garage, then a number of parameters need to be taken into account. The area of the room must be at least 2×2 meters , height – 3 m .
Starting and checking the system operation
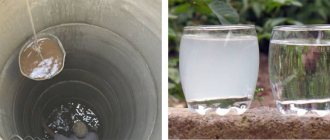
At the final stage, the operation of the entire system is regulated. After drilling is completed, muddy water appears.
Initially, before installing the filter, the well is pumped. A vibration pump will be needed. It is also important to decide where the dirty water will be drained:
- The pump is lowered into the hole, turned on and pumping water begins.
- After some time, the pump is pulled out and washed in clean water.
- The washed device is lowered into the well again.
- The procedure is repeated until clean water appears.
After the water becomes clear, the pump is changed to a well centrifugal type.
To ensure uninterrupted operation of the well, a pressure switch, expansion and storage tank, and filters are additionally installed.
Advantages
A well in a garage has many positive aspects. In particular, the following:
- The main advantage is that it will provide water constantly , because it does not depend in any way on the central water supply. And even if for some reason there is a water outage in the central system, then in a garage with a well it will always be available, without any problems; it is impossible to turn it off. In this case, the water quality will be quite satisfactory. After all, surface water, various debris and impurities will not get inside the well.
- Convenience . Thanks to it, you can wash your car at any time, there is no need to go to a car wash and pay for such a service. You can also always wash your hands after work, tidy up, etc. Water supply in the garage will save money and make it easier to care for your car.
- The well will provide the owner with water in almost unlimited quantities . And he will not have to worry that there may not be enough water for any work. On the contrary, you can, if you wish, allow even your neighbors to use the well for a fee. The source will not become scarce. And weather conditions do not in any way affect the water content in the well, i.e., in both heat and cold, it will be possible to obtain water in any volume.
- When installing a well in a garage, you will not need to carry out additional work for insulation . A certain temperature is maintained in the garage, so there is no need for such manipulations.
- A well can serve for a very long time, this period is more than 50 years . If the well equipment is cleaned in a timely manner, the water will fully comply with quality standards.
- The quality of the water is high , because various wastewater and dangerous impurities do not get into it. In this case, the main thing is to build a well in places where the soil is not contaminated by industrial waste and wastewater.
- All work on arranging water supply does not require much time . They can be completed in 1 day.
Features of drilling in the basement
We will tell you in detail how to make a well inside a motorhome with your own hands without the help of builders with extensive experience. This process is not complicated, it is carried out quite quickly, the main thing is to follow the recommendations of specialists and follow the technology for performing the work.
To get the job, get special equipment - a drilling rig. It is placed inside the garage, which will require clearing the space from foreign objects. In this case, the room must meet certain requirements: area 1.5x1.5 m, height - at least 2.5 m.
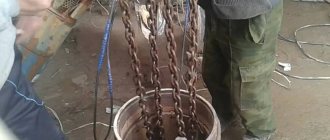
If the design parameters are less than those specified, there will be no space to install the unit, and the work itself will not be completed. After installing the drilling rig inside its steel pipe, you need to insert the impact rod. It is used to hit the steel cone at the end of the drill with great force. To soften the soil, water is poured there.
Droplets flow through the filter holes and are absorbed by the ground. The lower the drill goes, the more it is expanded using coupling connections and new pipes.
On a note! The impact rod can only be extended using a coupling connection. Pipe connections are made using couplings, winding the threads by applying a sealant on the paint. You can also connect two pipes by welding.
As drilling progresses, the impacts of the rod will intensify, so the speed of passage will also increase. The rods must be lifted from the water source manually. To do this, it is worth fixing a wheel under the ceiling surface of the garage, through which a rope is thrown to lift a heavy rod.
So you need to find an aquifer that can suck in and remove the flooded water.
If it is found, you need to remove the shock rod and place a flexible hose inside the pipe with a pump at the other end. Using a pump, the water will be drawn through a hose to the surface. After reaching the required depth, a well should be constructed, for which a caisson should be installed in the finished well, and then a filter column made of a pipe, sump, or filter.
On a note! It is possible to make a filter yourself using a filtration mesh, perforation, and casing pipe. You can also choose a ready-made model.
Flaws
However, despite all their advantages, wells in the garage also have a number of disadvantages that also need to be taken into account:
- Difficulty in maintenance . Over time, it will certainly be necessary to carry out cleaning work, since silt and all kinds of debris inevitably accumulate in the ducts. And for this you will need to completely free up space in the garage. Otherwise, it will be impossible to clean properly. The same applies to well repair if necessary.
- High price . To install a well, it is necessary to purchase quite expensive pieces of equipment, including special filters for water purification. However, in order to save money, you can do the drilling yourself by renting a special drilling rig. This work is not particularly difficult, and there is not always a need to resort to the services of professionals. By following the detailed instructions, you can install a water supply system in your garage on your own. However, if there is a complete lack of skills in handling such equipment, it is still better to invite experienced craftsmen.
- Dependence of water supply on electricity supply.
- The need to drill to a sufficiently large depth - at least 8 m .
- This type of well is not suitable for areas with deep groundwater.
Water well in the garage
Installing a water well in the garage: photo and detailed description of drilling a well.
I wash my car often; I have a Karcher in the garage, but I had to carry water in buckets. Since the groundwater level in our area is at a depth of 2 meters, I decided to make a well in the garage and install a pumping station.
Next, the entire process of installing the well is shown in the photo.
We dug a hole for the well, approximately 1.2 x 1.2 m in size and 1 meter deep.
I drilled with an ordinary garden auger, 200 mm in diameter. I drilled until wet sand came out, about a meter from the pit.
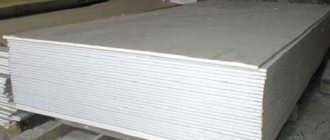
For the well, I bought PVC pipes for external sewerage (red) with a diameter of 160 mm. Specifically, 2 pipes: 2 m and 1 m. I did not take a single 3-meter pipe, because... It wouldn't be convenient in the future. And their joining is very simple and reliable through a socket with an elastic band. And the depth, taking into account the pit, is quite enough for me.
A special metal filter mesh with a very fine mesh (marked P-56) was also purchased in advance. The mesh is stainless, so it should last a long time. The price per square meter of such a mesh is about 2000 rubles.
Now we begin to modify the PVC pipe for the filter. To do this you need to drill a bunch of holes. I take a 2 m pipe. First, we make markings on the pipe itself with a marker. We retreat 25 cm from the end of the pipe and draw a strip in a circle. Because My grid is 1m long, then we measure another 90 cm from this strip and also draw a line in a circle. So I have a filtration area, and I will drill holes in it. I drew a straight line and placed marks every 10 cm. I took a 16mm diameter wood flap drill and drilled the holes. It turned out like this.
Then I drew lines every 5 cm, and moved the marks for the holes. The end result is this sieve.
Now I start wrapping the pipe with metal mesh. The mesh should protrude 5 cm on both sides beyond the outer holes. The initial part of the mesh should fall on the part of the pipe where there are no holes. So that you can rivet it.
Here you need to stretch the mesh well and twist it around the pipe. I didn't use the whole mesh, I just made a small overlap and cut off the excess. It’s just that it’s a very fine mesh, I was afraid that it could get worse. When I overlapped the mesh, I immediately riveted it in several places. And only after that I cut off the excess. I used 4.8 x 8 mm and 4.8 x 12 mm rivets.
I bought 2 rolls of electrical tape. And a roll of electrical tape went on each side. This is so that the net doesn’t lift up when I lower it.
Recommendations
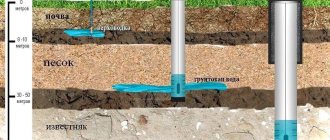
Before you begin work on arranging a well for water supply in the garage, you should definitely find out the approximate depth of water in the area. It is also necessary to determine the nature of the soil. This indicator is decisive when choosing the appropriate type of drill for such work.
It is imperative to take into account that it is extremely undesirable to install a well for water supply near garbage dumps, drainage pits, cemeteries, and places where animal corpses are buried. After all, hazardous substances can get into the water, and it cannot be used for drinking. In the garage, before starting work, it is imperative to ensure that all existing electrical wires are waterproofed in order to prevent a short circuit in the event of an accident.
Choosing hole depth
Before starting work, you need to find out what size the well will be. The depth can range from 3 to 7 meters or more. It depends on many factors. Basically, the main thing is its future location.
Depending on the depth they can be divided:
- Shallow well (up to 3 meters). This type is used exclusively for technical needs or watering the garden. The project can be completed if the well passes close to the surface of the earth. The materials and tools you will need are a drill, a siege pipe and a hand pump.
- A well of medium depth (from 3 to 7 meters). You can already drink this water. For self-installation, in addition to a drill, you need to have a shovel and time to arrange a hole (pit). A hole is a pit with dimensions of 1.5 x 1.5 x 1.5 meters, which is designed to simplify the installation of a well at a greater depth. After installing the entire structure, the pit is filled up.
- The well is more than 7 meters deep. It will solve problems with water for all residents of the dacha: not only personal needs, but also for technical purposes for watering the garden and the like.
Pipeline laying
The fifth and final step is to draw a pipeline from the well directly to the house. Work begins with the construction of a trench - it is dug below the freezing depth of the soil. The trench is compacted with sand and crushed stone - pipes from the well are laid on the resulting cushion.
For the construction of the pipeline, it is recommended to use metal-plastic, PVC or polyethylene pipes. They must be insulated. For this purpose, either a foam shell or a special heating cable can be used - the second option is more effective and reliable.
To provide even better thermal insulation, water pipes are placed either in a corrugated or regular sewer pipe of increased diameter. The power cable for the pump is also passed into it - it is subsequently connected to a power box installed directly in the house.
It is recommended to lead pipes from the well into the home through the basement, but if this is not possible, you can use external walls. But at the same time, the pipeline cannot be bent - it is better to connect individual sections of pipes using special couplings.
Connection inside the house
When the pipeline is installed in the house, pipes should be laid out and then connected to all existing water consumption points.