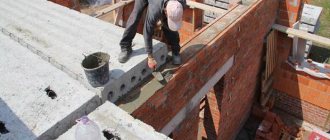
The completion of a large stage of construction work involves the installation of floor slabs on the foundation. Most often, laying reinforced concrete floor slabs on a plinth is used for brick buildings or houses and foam concrete blocks. The work on subsequent floors and types of floors are described in detail in the article “Installation of floor slabs.” Next, we will only talk about covering the basement. In order to correctly place the elements on the basement wall, it is necessary to take into account the specifics of the work.
Types of floor slabs
Floor slabs must withstand heavy loads.
Panels are made from high-quality components in accordance with manufacturing technology. The slabs can withstand heavy loads thanks to a frame made of reinforcement, therefore they are used for load-bearing barriers in normal conditions and in seismologically hazardous regions.
Products differ according to the manufacturing method in accordance with GOST 26.434 - 1985:
- PC - formwork production;
- PB is a formless method.
In the first case, ready-made formworks with installed reinforcement structures are used. Concrete of the required grade is placed in the molds, subjected to vibration, passed through steam chambers and hardened. For the frame, rod steel AT-IV, AT-V, AT-VI (stressed) and A-II, A-III (unstressed) is used. Transverse reinforcement is performed with metal mesh.
Floor slabs PB (left) and PC
Quality control confirms the properties:
- compressive strength, bending, torsion;
- compliance of planes and dimensions;
- sound and thermal insulation indicators.
Formless molding is performed on a conveyor. The conveyor moves a reinforced concrete belt, in the thickness of which steel ropes are located. The strip is molded, then insulated with a special material and heated to process temperature to speed up chemical processes. The tape is cut to size after hardening.
Formless molding has the advantage that production can be quickly switched to different panel sizes. The extrusion method is a type of formless formation that uses a smoothing mechanism to level the surface of the product and prevent cracks.
Difference by type of work and design
Floor slab structures
Hollow-core panels are installed in load-bearing floors between building levels and coverings. They resist temperature changes, have increased sound insulation, and prevent the spread of flame in case of fire. The thickness is 220 mm, round, oval or square through holes are made in the body along the length.
Ribbed products are used for coverings and floors of large areas, for example, gyms, workshops, shopping centers. The main body of the rectangular slab is flat, with stiffening ribs along the longitudinal sides. The disadvantage is that the ceiling is ribbed, but the advantage is that it is highly resistant to mechanical stress.
Solid slabs are distinguished by their large mass and high strength compared to other slab products. They are used in the construction of heavily loaded floors and basements, where there is a lot of weight and vibration forces.
Panels with oblique ends are used in frame and monolithic construction, when building from large blocks and brick stones. Monolithic products are a concrete slab with reinforcement; they are used in residential and industrial construction of buildings with strong vibration forces.
Additional solid panels are made from concrete grades M450, M500, due to which they can withstand 1 - 3 t/m². They are used in heavily loaded floors; they can be placed on plinths and foundations of industrial workshops and power plants. Lightweight floor slabs are made with numerous voids, which is why they are light in weight.
Extruded boards are widely used in various buildings; they contain 5% fewer holes than hollow-core products. In the process of formless casting, the molding mechanism pushes holes, and the product is reinforced with metal cables.
How to cover a room if the width of the slab is a little short
When covering a room, it may turn out that its dimensions are not a multiple of the dimensions of the slabs, which leads to the formation of gaps between the slabs or between the slab and the wall. You can cut out the missing piece from existing slabs, but this is time-consuming and troublesome. There are easier ways to fix this problem.
Let's take for example the case when, when installing slabs, a gap of half a meter remains between the last slab and the wall. What to do in this case? There are several options. Let's look at the simplest of them first. The gap size is 500 mm and is divided into two parts – 250 mm each. The first slab is laid at a distance of 250 mm from the wall, then all slabs are mounted end-to-end. As a result, there will be a gap of 250 mm between the last slab and the wall. A cinder block is installed into the resulting voids, from which the walls are erected. In this case, the cinder block is securely fixed, resting against the slab. The cinder block should be placed so that its holes are directed to the sides, and not up or down. The erected external wall will additionally clamp the cinder block, strengthening its fixation.
This design, although it looks unreliable, is actually quite durable. If anyone doubts the load-bearing capacity of cinder blocks, when pouring the floor screed on the second floor, the gaps can be further strengthened by installing reinforcement or masonry mesh on top of them. Rods with a diameter of 6 mm are used as reinforcement.
Another way to bridge the gap is to distribute its size between the plates. For example, there is an extra half meter and ten floor slabs, between which there are nine gaps of 55 mm each. Why 55 mm? The total value of 500 mm is divided by the number of joints - 9. The result is 55 mm.
The first slab is laid flush against the wall. The second is indented from the first by 55 mm, etc. The last slab should be pressed flush against the wall.
A board is tied under each gap, acting as formwork. Reinforcement is laid into the resulting formwork and concrete solution is poured.
Supporting the slabs
The ceiling delimits the space in the building, simultaneously absorbs the load and redistributes it to the vertical supporting elements. Horizontal slabs connect the vertical load-bearing parts of the building and ensure the stability of the house. Panel diaphragms experience operational loads from moisture, dynamics, and sound. The size of the wall support or crossbar depends on the type of product and wall material.
There are regulatory recommendations that are set out in SNiP 208.01 - 1985 “Manual for the design of residential buildings”:
- solid slabs for concrete and reinforced concrete walls, metal and reinforced concrete. crossbars - 80 - 120 mm, when supported along the entire contour, a depth of 60 - 90 mm is assumed;
- on walls made of stone and brick - 120 - 150 mm;
- for vertical fences made of vibrating blocks or slabs - 100 mm.
It is allowed to install floor slabs on strip foundations and walls made of various materials, except wooden beams and boards. A box made of low-density materials (aerated concrete, foam block, expanded clay concrete) is additionally reinforced with a reinforced concrete belt, on which the slabs directly rest.
Regulatory requirements for support depth are not always met. Recalculation of the minimum permissible value is carried out by designers and designers who have a confirmed right to develop technical construction documentation.
Such calculations cannot be done independently, because it is necessary to take into account many significant factors, for example, the level of seismicity of the building, the thickness of vertical fences and their material, the weight of equipment and people. All this data is substituted into formulas with certain coefficients, which are selected according to certain rules.
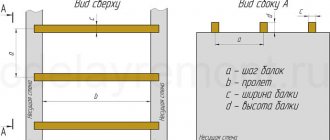
b The second method is more labor-intensive.
You can also disperse the plates, that is, make small equal distances between them.
For example, to cover a floor you need 10 slabs and there remains a hole of 500 mm (half a meter). We install the first slab from the edge of the inner wall (so that there is no gap). We install the second slab with a slight indentation of 55 mm from the first.
Ten slabs are nine joints between them. Dividing 500 mm into 9 joints we get 55 mm distance between the plates.
Next, we tie the formwork (board) from below under this hole between the slabs. We place reinforcement in the gap between the slabs and fill it with concrete.
.
.
Storage of slabs and masonry requirements
Proper storage of floor slabs
Sensitivity to humidity and porosity of the material is a factor that requires compliance with standards when storing and transporting slabs before installation work begins. Floor panels are laid after installing foundation blocks with a sand cushion, assembling a frame or erecting walls, so they often wait in line for storage on the ground.
Deformations due to violation of storage rules in the form of cracks and bends lead to dangerous destruction after laying the slabs in the installation position, so storage areas are equipped and the condition of the panels is regularly checked.
Rules for laying reinforced concrete panels for storage:
- Slate, roofing material or polyethylene should be placed on the ground at the site of injury. The substrate will protect against daily temperature changes and prevent the appearance of condensation on the concrete surface and in voids.
- After storage, the slabs are covered with similar materials. Metal sheets can be used.
- Stacking is allowed to a height of up to 2.5 m; the mounting loops are located on top of the product. Products of different purposes and sizes cannot be stored in one block.
- Wooden layers are placed after each row, placed one below the other vertically. Floor panels are stored only horizontally; inclined and vertical positions are not allowed.
The thickness of the bars should be at least half the height of the slab; spacers prevent contact of concrete with metal hinges, reduce the risk of corrosion and simplify the work of installers. The stack is positioned so that the crane boom can reach it and there is vehicle access.
Surface preparation
1. The steps of the base must not have deviations from the horizontal. If the steps are narrow, you should not increase their width with tile adhesive - this will make the structure heavier. In this case, you should install wooden formwork and fill the steps with a mixture of small-caliber expanded clay, sand and crushed stone. The surface of a brick staircase is leveled in the same way.
2. Cladding wooden stairs with porcelain stoneware is not allowed. Some experts recommend using elastic glue or adding a plasticizer to it. This won't save the situation. The structure of a wooden staircase may not withstand the load that comes from facing the stairs with porcelain stoneware. Wooden steps do not have sufficient rigidity; this will lead to the fact that over time the porcelain stoneware coating will move away from the surface.
3. Prime the base with a deep penetration primer. The primer serves to reduce the absorption of the surface. Concrete absorbs moisture well; if it is not primed, the moisture necessary for good adhesion of the tile adhesive will be absorbed into the concrete and the adhesive base will become fragile.
4. You can start covering a new concrete staircase with porcelain stoneware only after two months from the date of its manufacture.
Required tools and materials
Crane-manipulator for installation of floor slabs
Floor elements made of reinforced concrete are heavy, so truck or tower cranes are used to lift and install them. Electromechanical units are selected taking into account the mass of the panels, the load capacity of the machines, the position of the structures, the type of equipment and devices.
The cranes must be in working order and the mechanical equipment must be in good working order. The condition of machines and devices is confirmed by regulated periodic testing reports. The ceilings can be installed by workers and crane operators of appropriate qualifications, confirmed by certificates. High-altitude installers are equipped with safety belts and shoes with non-slip soles.
Tools and materials:
- electric welding machine, compressor, jackhammer, scaffolding;
- hammers, trowels, levels, hacksaws, crowbars, shovels;
- troughs for mortar to fill joints and areas where slabs are supported;
- sand, gravel, cement, floor panels.
One mounting fixture can be used to work with multiple prefabricated structures to reduce installation time. This will reduce the labor intensity of the process and increase productivity. A four-strand rope sling is used to evenly distribute lifting forces.
People should not be on the slabs while they are being lifted and moved in the air. The installation area is fenced off so that there are no unauthorized workers in it who are not involved in the installation of the floors. The laying of the next floor is done after the installation of the ceiling on the previous tier is completed.
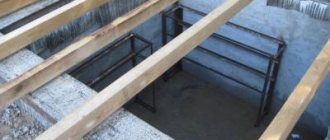
Monolithic sections with a width of more than 300 mm
If the gap between the slabs is from 100 to 300 mm, we construct a monolith with reinforcement. Options are also possible here.
Option 1
Used when formwork from below is not possible .
- We install load-bearing beams with a cross-section of 40x100 mm on the edge, in increments of 1 m, resting on adjacent slabs;
- We attach the formwork panels to the load-bearing beams with wire twists;
- We cover the formwork with roofing material or film;
- We install the reinforcement cage on the glasses so that the reinforcement is 30...50 mm above the formwork;
- We are concreting.
Option 2
If it is possible to secure the formwork from below, you can use reinforcement to construct the supporting structure.
- We construct the formwork;
- We make mounting parts from A1Ø8…12 reinforcement (depending on the width of the gap to be bridged), taking into account that there must be a distance of at least 30 mm between the bottom of the formwork and the reinforcement;
- We lay protective material on the bottom of the formwork;
- We install mounting parts;
- We lay reinforcement or reinforcement cage;
- We are concreting.
Important!
Do not settle for filling the gap between the wall and the slab with lightweight concrete cellular blocks (foam concrete, expanded clay concrete, etc.) - they do not have the required load-bearing capacity. Taking into account the arrangement of furniture along the walls, this section of the floor is subject to a large load, this will lead to the destruction of the blocks and the need for costly repairs of the floor.
Reference
The areas between the wall and the slab are sealed in the same way.
This story tells not only about sealing seams, but also about anchoring the slabs to each other:
Rules for laying floor slabs
Rules for laying and anchoring
Products are laid after installing the supporting elements of the frame and welding their embedded parts. The panels are transported by crane to the installation site in a horizontal position. Sometimes slabs are brought in transport with a shift, inclined, then they use automatic grips or tilters in the form of a frame to transfer them to the horizontal.
Scope of work according to ENiR 4-1-7 standards:
- preparing a solution for sealing joints after welding;
- lifting and installing slabs into the design position;
- checking the position of elements using instruments, correcting inaccuracies;
- welding of fillers on plates, supporting structures and among themselves on panels;
- pouring concrete into the voids of the joints.
The installation site is cleaned and the solution is spread under the supporting area. The installers take the next part of the floor and place it on a layer of mortar. Align the panel with the slings tensioned, control the horizontalness and height. The mounting hinges of previously welded elements are bent with a crowbar and a hammer to maintain the size of the support.
Before installation begins, the work is completed:
- installation of columns and control of verticality, position in height and in plan according to the drawing;
- backfilling of foundation cavities with a tamper;
- drawing up a technical map of the movement and parking of the crane;
- delivery of tools, equipment and materials to the work area.
The design gap between the slabs is adjusted in accordance with the project recommendations. The first floor slabs are installed from scaffolding, and when installing subsequent ones, workers use previously supplied elements. The panels are welded with a seam in at least three corners.
Carrying out preparatory work
Preliminary measures are intended to create conditions for further productive work and adherence to technology. The process begins with preparing the slabs and base surface.
The panels are first inspected for chips, protrusions, and compliance with geometric parameters. Detected defects are eliminated before installation work begins.
Then the ends are processed. Existing holes are closed in two ways:
- by laying bricks followed by filling with cement;
- filled with insulation, covering it with plaster.
Filling holes with bricks and cement mortar
The foundation is prepared as follows:
- using a level, determine the curvature of the base surface;
- Based on the magnitude of the differences, select the appropriate alignment option;
- when the discrepancies do not exceed 5 cm, then use a cement screed laid on a reinforcing mesh;
- for large differences, leveling is done using bricks.
The foundation assembled from blocks, before laying the slabs on it, is combined using a reinforced concrete belt.
The slabs are placed on a flat surface to minimize further costs of leveling the floor of the structure and to facilitate further construction work.
Slab cutting
Diamond blade for cutting hollow-core floor slabs
The technical project for organizing the work provides a plan for the layout of floor elements with dimensions and specifications, which simplifies the work. Sometimes the complex layout of a building precludes the use of standard panels. The slabs are cut or a monolithic floor is made on site with your own hands.
Cutting reinforced concrete products is allowed, but in compliance with the rules. You cannot cut hollow elements longer than 5 m with a thickness of 220 mm or having anchors at the ends. Any violation of the integrity of the slab has a negative impact on the strength, because The product contains reinforcement under tension to resist bending and torsion.
Cutting should be ordered at a factory with the necessary equipment to preserve the properties of the reinforced concrete element. Shortening a panel on a construction site involves a lot of physical effort. Workers wear personal protective equipment and follow safety regulations.
Cutting rules:
- size coordination is carried out when the product is located below using a circular saw or grinder, crowbar, sledgehammer, marking tool;
- a diamond disc is used that cuts reinforcement and concrete;
- the location of the reinforcing bars is preliminarily determined;
- a cut is made along the product and then across;
- concrete is knocked down with a sledgehammer, reinforcement is cut off.
The resulting voids are filled with concrete. If you need to cut a hole for a hatch or manhole, it is better to bypass such a place and make a monolithic section with the installation of reinforcement, rather than cutting the panel.
Video description
We suggest watching the following video, which will help you understand in detail the procedure for forming a hatch leading to the basement of a private house:
When cutting reinforcing elements with a grinder, you should act with extreme caution. The geometric parameters and characteristics of the tool used can cause the grinder to become jammed between the protruding parts of the reinforcement. This phenomenon may cause injury to the installer. In the absence of an autogen, a small cut is made on the sledgehammer, and then the cut site is hit with a sledgehammer.
Useful tips
You cannot install slabs with broken hinges.
The installation of slabs is constantly monitored. The quality of covering products, certificates and passports for them are checked. The correctness of storage and transportation is taken into account. During the work, compliance with the project, the quality of sealing joints and welding of embedded parts are examined. If the joints are filled with concrete in winter, the area is heated until the mixture completely hardens.
On large-scale construction, joints are checked after reaching the design strength, and the installation is checked using levels and laser levels. If there were changes to the project, detailed drawings are made, welding logs are kept, connections are sealed, and hidden work reports are drawn up.
You cannot install slabs that have broken hinges or are not cleaned of dirt or adhering layers. During the break, the raised structures are not left hanging, but are laid down after welding is completed. You cannot level the panels with a crowbar after removing the slings, nor can you move them through the air in winds exceeding 15 m/s or in fog.
Calculation and layout drawings are carried out before the construction of foundations in order to accurately determine the position of walls and columns in space and ensure the correct support depth.
Sealing the ends
There are several ways to seal the ends of slabs.
- You can use mineral wool and fill the voids of the pipes with it approximately 0.2-0.3 m deep.
- Fill the voids to 0.12-0.25 m with light concrete mortar or cover with concrete plugs.
- To fill voids, use backfill bricks on mortar and seal the surface with mortar.
Sometimes the slab is very close to the facing masonry. If there is no insulation between them and the ends are not sealed, the ceiling will begin to freeze and become covered with ice in the room. The stove will become a source of cold, and when the heating is turned on, due to a sharp temperature difference, “dew” will form on its surface. To get rid of this problem in a ready-made house, the following scheme of actions will do.
- It is necessary to drill a hole in the frozen pipes from the bottom side of the slab using a hammer drill.
- Insert a tube sloping towards the outer wall into the resulting recess and blow foam through it.
- The result should be a foam plug extending to a depth of 01.-0.2 m, which will serve as a heat insulator.
The ends must be sealed not only for slabs resting on external walls, but also for those resting on internal ones.
What are anchor ties needed for?
When the floor is erected, the slabs, after embedding, form a strong structure that creates the spatial frame of the building. The provisions of SNiP II-22-81 require taking into account anchor connections in the support units of reinforced concrete products, as well as when assembling the structure frame.
In most options, builders are faced with the question of whether it is necessary to connect the prefabricated slab to each other and to the wall. The answer to this question is obvious, since the main task of anchor ties is to prevent the possibility of shifting the frame of the structure and its floors. Which, as a rule, occurs when the structure is exposed to design loads, subsidence and distortion of the structure’s foundation, as a result of seismic activity and other phenomena.
When the construction of floors takes place in structures consisting of several floors, as well as during the construction of structures located in areas with increased tectonic movement, reinforced concrete concrete must be anchored. It is permissible not to use anchor ties during the construction of attic space in structures with one floor, in areas with favorable seismic conditions.
Slinging process
An interfloor connection is the anchoring of hollow reinforced concrete panels, which is performed after each floor, taking into account the attic and basement. In this case, the slabs are connected to each other and to the load-bearing wall. The fixation scheme depends on the presence or absence of special mounting loops on the ceilings and the base itself. If the building is built from high-density elements, L-shaped fasteners are used for slinging, the bend length of which is 30–40 cm, and they are installed at a distance of 3 m from each other. Adjacent panels are fixed with transverse fastenings, and the outer ones with diagonal fastenings.
The anchoring procedure looks like this:
- the edge of the fastening element is bent in the shape of a loop, to which the panel eye clings;
- adjacent anchors should be pulled together as much as possible, and then welded to each other and to the mounting loops;
- the seams between the panels and hinges are sealed with a mortar mixture.
In buildings built from hollow building materials, the scheme for slinging the foundations is carried out in the same way as in the previous case, but here it is necessary to lay a concrete belt around the perimeter of the building. This is a so-called ring anchor, which lies in the same plane with the floors, and it also fastens them to each other and to the walls. Such fasteners consist of a reinforced frame poured into concrete.
Using an anchor, the load-bearing panels, which are not equipped with eyes, are also tied, and then a square steel plate (50x50mm or 100x100mm) is attached to the plates, and a metal pin is welded to it. Its second end is placed in the belt. The ceiling is further strengthened by creating a connecting ligament on the inner wall. If it is necessary to strengthen the anchoring of reinforced concrete products, metal pins, reinforcement bars and hooks are used.
Strengthening the box
In case you decide to go all the way and want to add more rigidity to the resulting box. This is done, of course, at will. But we still recommend using this effective method of strengthening.
You will need to tie the slabs together with reinforcement with a diameter of 12 cm. The reinforcement is threaded into those holes in the hollow platforms through which they were previously lifted by a crane. The resulting bundle must be secured by welding along the entire length of the box.
Such prudent action will allow you to avoid any consequences of soil movement (distortion of the structure, cracks in the foundation and wall structures). But if you approach construction superficially and do not listen to recommendations, then everything will end quite disastrously.
Anchoring features
Anchoring significantly increases the safety of floors in conditions of possible tremors Source marko.ltd
We will not talk about the advisability of anchoring - everything has already been said and not only in this article. Let's just look at some of the features of this stage of installation work on the construction of buildings and structures. We are also interested in the materials and methods by which these fasteners are made.
Important! In construction, there is also such a concept as “anchoring of load-bearing walls,” which is mandatory in both low-rise and high-rise construction. But in this article we will not raise this topic, since it is quite voluminous and requires separate explanations.