The Atoll filter is a joint development of a Russian and American manufacturer and is well known in Russia and the CIS countries.
Despite the rather high cost, it is popular, and there are a number of reasons for this.
Let's look at how and why reverse osmosis filters are used, how to replace cartridges, and how difficult it is to maintain the system.
Pump advantages
- Increases filter productivity.
- Effectively purifies water with high salt content.
- The operation of the pump consumes a very small amount of electricity. The pump is equipped with a pressure sensor and a dry-running protection mode. It automatically turns off when purified water completely fills the tank.
- The pump operates very quietly, almost silently.
A reverse osmosis water filtration system with a pump is the optimal way to purify water for homes where the pressure in the water supply is low. By following our recommendations for installing and operating the filter, you will receive clean and tasty water for many years.
Features of choosing a filter for water supply
In order for the purchased filter to optimally cope with the tasks assigned to it, it is necessary to choose it correctly. They take into account the characteristics of the water and its desired quality at the outlet, pressure in the pipes and other factors.
What to consider when choosing a filter for your water supply:
- if tap water is of high quality, but the consumer wants to make it ideal, then a filter jug is sufficient, the estimated consumption is 200 liters per month;
- if the inlet water is of medium hardness and purity, then when consuming about 400 liters of water, the Aquaphor Trio filter is sufficient;
- hard tap water and consumption of more than 500 liters will require the installation of an Aquaphor Crystal filter;
- when choosing equipment, consider the presence of a storage tank - this is important for large families;
- pay attention to the filtration rate, the optimal figure is 5 liters per hour, this is quite enough for families who cook a lot or have small children;
- The pressure in the pipes matters - if it is often or constantly low, you need to buy a filter that can work efficiently in such conditions;
- For small apartments and small families, Aquaphor has a range of compact filters - they do not have a storage tank, so they take up very little space under the sink (equipped with a jug for collecting purified water).
How to choose a filter?
Before purchasing a water purification unit, the volume to be treated is determined. After all, the benefit from such a mechanism can be obtained if water is prepared for sufficiently large tanks.
A reverse osmosis filter is an effective installation that is used in aquarium farming. With its help, liquid is prepared for freshwater and marine aquariums. But you can get the most out of such an installation if you follow the rules established by experts.
Popular models
The company that produces Aquaphor filters offers consumers a wide range of different models. They differ in design features, cleaning quality and price.
The most popular Aquaphor models on the market:
- "Morion". This is a small reverse osmosis filter that can be easily placed in the sink. It contains a mineralizer, and no chemicals are used during cleaning. Can work at low water pressure - 2 atmospheres is enough. There is a storage tank of 5 liters. The pre-treatment device needs to be changed every six months, the membrane - every year and a half.
- "Favorite". A very durable and high-quality device with a durable and beautiful body - a stainless steel cylinder. Cleaning here is done using one element. Removes all impurities except toxins and poisons. The coal block is changed once every year and a half.
- "Trio". The most budget model. It consists of 3 replaceable cartridges. They are changed annually. It is recommended to renew softening cartridges every 3 months. The manufacturer offers 3 varieties of “Trio”: “Softening” - it reduces the hardness of water, making it suitable for consumption;
- “Fe” - intended for areas where the water contains a lot of iron;
- “Norma Softening” - for very contaminated water, eliminates rust, mechanical, mineral and organic impurities.
Setting various options
The operation of even such serious equipment as a reverse osmosis filter can be made more efficient by installing additional elements. Such as for example:
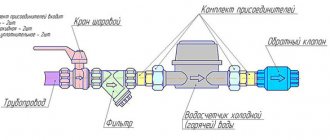
- Pressure regulator and water hammer compensator. The equipment is designed to protect water supply elements from pressure drops and exceeding permissible values at the entrance to the filtration system.
- Leak protection system. It is installed in front of the filter and shuts off the water in case of leaks or water getting on it. Minimizes risks and limits the amount of damage caused, but does not completely eliminate the possibility of leaks.
- Nitrate prefilter. Used for effective removal of nitrates, the installation location is agreed upon with specialists.
- Ice maker. It is connected through a tee into the gap in the connecting tube leading to the drinking tap.
Before installing the filter, measure the pressure in the line with a pressure gauge. For values greater than 6.6 atm, a gearbox is installed; for values less than 2.2 atm, a pump is installed, which will create greater pressure. For devices that are most often used to improve the functionality of reverse osmosis, a more detailed description is provided below.
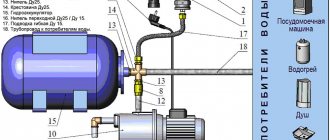
Booster pump
The membrane filter, which is the basis of the reverse osmosis system, can only fully function at a certain water pressure. If the maximum pressure does not exceed 2.8 atm, then for normal operation of the filter it is necessary to additionally install a pump. If you have to purchase additional equipment, it is better to do this from one manufacturer and be guided by the connection diagrams developed by him.
The pump is installed only in conjunction with a pressure regulation sensor, which is responsible for turning it on when the pressure drops and turning it off when it rises to the maximum. The sensor is mounted in front of the storage tank, in the rupture of the tube. If the quality of tap water is poor, a main coarse filter is installed in front of the pump.
If there is a danger of increasing water pressure in the system to 3-4 atm, then to prevent leaks, you need to install a special pressure reduction valve in front of the pump.
Installation of an ultraviolet lamp
Sometimes favorable conditions arise in a reverse osmosis filter for the rapid development of microorganisms due to an increase in water temperature or the system being idle for a long time. This leads to the fouling of prefilters with microorganisms, a decrease in pressure and a deterioration in equipment performance. And then ultraviolet filters are used to disinfect water.
The device consists of the following parts: a stainless case with a UV lamp located inside and a power supply that converts the mains voltage into the values necessary for the lamp to operate and protects it from power surges. Water passing inside the housing is illuminated by ultraviolet rays and disinfected.
The installation location of the ultraviolet lamp may depend on the goals that need to be achieved:
- to eliminate strong biological contaminants of tap water, installation is carried out at the inlet of the filter;
- To protect against microorganisms from entering the tank from the drinking tap, install a lamp in the section between the tap and the container.
For ease of installation, the lamp has two clips that help secure it to the filtration unit or any other surface.
Water mineralizer
The water that passes through the membrane filter is 90-99% purified and gets rid of any impurities, including mineral elements that are useful and necessary for the body. This water tastes sour.
Mineralizers replenish the lack of essential minerals and adjust the PH level. Mineralizer cartridges of different brands may differ in their composition and resource and enrich the water with calcium, zinc, magnesium, and other elements.
In some models of reverse osmosis filters, the mineralizer also plays the role of a filter and is installed as the last stage of purification.
Help from professionals
If you decide to trust professionals, then choose proven companies.
Please note that they have been working in this market for a long time. It would be good if they also sell components. They will be able to offer them at lower prices.
It is best to contact the manufacturer , but if such a service is not provided in your city, then it is better to order installation from large companies:
- EcoVita;
- YouDu;
- Voda-doma.
The cost of installation will depend on the complexity and amount of work. For example, you may need to drill a hole in your sink. If it is made of artificial stone, then the average cost of this service is 500 rubles.
Reference. Installing the Atoll filter itself will cost you approximately 1,300 – 1,500 rubles.
How to install?
Methods for installing a water filter under a sink vary depending on what type of device is used. Let's consider each option in more detail.
Flow option
Such equipment crashes into the water supply.
The system is fixed under the sink, and a special tap is installed on it, through which purified water will be supplied.
It is convenient if the filter is retractable.
It is imperative to determine at the initial stage the location of the water tap and how many hoses it will require.
Installation procedure:
- First, a tap is installed to supply purified water.
- A branch is made that will ensure the supply of liquid to the filter. To do this, first turn off the tap and drain the remaining water.
- Next, disconnect the metal-braided tap connected to the water supply pipe. A tee is installed at the break site, after which the thread is strengthened. A shut-off valve is installed here.
- The filter is assembled if it is disassembled. All plugs are removed from the system, hoses and cartridges are connected.
- Using a hose, the filter inlet is connected to the tee. The output is connected to a tap for purified water.
Watch the video, which describes the procedure for installing a flow filter:
With reverse osmosis
The installation process is similar to the previous option. You need to start work by turning off the water.
Installation procedure:
- It is recommended to begin installation work by connecting a tap for purified water. For this task, the package contains everything you need: clamps, nuts.
- To install a thin faucet, you will need an additional hole. It is done with a tool such as a drill, paired with a diamond-coated drill. Hole diameter – 13 mm.
- On an enamel or porcelain surface, the top layer is cleaned down to the metal base.
- Using a 7 mm drill, a hole is made in the metal base. Work should be done carefully. Then the same procedure is repeated, only a 13 mm drill is installed. Now the tap is installed with the nut tightened.
- The filter is equipped with a connection to the water supply. It includes a tap with an outlet to the tube and a special tee. The instructions indicate in what order they are connected.
- The insert is installed. Each connection is pre-wrapped with fum tape.
- The supply line is disconnected from the tap through which cold water flows.
- We attach and secure the insert. You need to screw it in carefully without damaging the tubes.
- When installing the filter, a clamp must be installed on the waste pipe, preferably above the siphon.
- We install the storage tank, after which we wrap its threads with Teflon tape. Next, a plastic tap is attached to it.
Useful video that describes the process of installing a reverse osmosis filter:
This completes the installation. Now let's figure out how to check the functionality of the systems.
Selection and preparation of a site
The main feature of all such treatment devices is interaction with one point of water consumption.
In this regard, installation should only be carried out in the kitchen. The area under the sink is suitable for such a filter This way, constant access to the system will be ensured, while it will not be conspicuous.
Do some preparatory work before you begin installation. You need to measure all the dimensions to understand how much free space is under the sink. This may influence the choice of one filter model or another.
It is important that the following conditions are met:
- You must have easy access to the flasks in order to change cartridges without problems, because this will have to be done regularly;
- The structure is located freely;
- It is required to have access to all plumbing units, because they may also need to be repaired.
Important! If there is enough space, you can install a filter under the sink. Otherwise, look for another option nearby. You may need to empty one of your kitchen cabinets.
Why is permeate post-processing necessary?
The stages of post-processing or final correction of permeate deserve special attention. As part of household reverse osmosis systems, these stages are implemented using various post-filters installed on the purified water supply line from the storage tank to the tap. There are various options for post-filters that manufacturers equip with household reverse osmosis systems, but in practice they all perform three different functions:
- correction of water taste;
- ensuring microbiological purity of drinking water;
- remineralization and pH adjustment.
Let us consider in detail each of the problems solved by various options for post-processing of permeate in household reverse osmosis systems.
Almost all household osmosis systems use post-treatment of the permeate with activated carbon obtained from coconut shells. For this purpose, the reverse osmosis system is equipped with the so-called post-carbon - an encapsulated filter filled with high-quality coconut activated carbon. When water passes through this filter, important organoleptic indicators of water quality - taste and smell - are corrected. Postcarbon makes it possible to improve the taste of water for those consumers who find permeate tasteless, and also eliminates possible extraneous odors associated with storing water in a storage tank.
The question of the need to ensure microbiological purity of water after a storage tank in household reverse osmosis arose relatively recently. To solve this problem, routine maintenance of the system is usually carried out, including washing the tank with disinfecting reagents. The problem of the presence of microorganisms in water can also be solved using certain methods of post-treatment of water.
One such method is water disinfection using ultraviolet radiation. This physical method, which has been used for many years, is not only highly effective, but also has no negative impact on the chemical composition of purified water. Until recently, the wide spread of UV was significantly hampered by the high cost and energy consumption of the method, but today a large assortment of lamps of different power, including LED (UV-LED) disinfectants, allows its use in a variety of fields. For household water treatment, UV lamps are almost an ideal option. Compact and ergonomic, they are easily installed in purification systems, ensuring uninterrupted operation and effective water disinfection.
Another physical method of water disinfection that can be used in local water treatment is ultrafiltration. The essence of water disinfection using ultrafiltration is that when water passes through a semi-permeable membrane with a pore size of 0.001 to 0.1 microns, various impurities are retained: colloids, organic substances, algae and most microorganisms. More recently, this method has mainly been used to remove colloidal impurities and suspended matter on an industrial scale. Now, interest in its use for the removal of microorganisms in domestic water treatment has increased significantly.
Today, various companies produce compact, easy-to-use ultrafiltration cartridges, which are not inferior to UV lamps in terms of disinfection efficiency. Cartridges of this type are recommended for use after the storage tank of household reverse osmosis systems to further purify water from possible microbiological contamination.
The salt content of household osmosis permeate does not exceed 15–20 mg/l. In recent years, the global medical community has recognized that demineralized water does not harm human health. However, the taste of such water is significantly different from the usual one. It is to ensure the possibility of choosing the composition of purified water that there is such an option for household reverse osmosis systems as a mineralizing post-filter, or mineralizer. In general, a mineralizer is a filter filled with crumbs of various natural minerals. Reverse osmosis permeate, characterized by a pH of 5.8-6 and low salt content, upon contact with such crumbs, slowly dissolves it and is saturated with calcium, magnesium, sodium and potassium salts to a level of 50–100 mg/l. Also, in this case, the acidity of the permeate is corrected - the pH value increases to 6.5–7.
Reviews
Over 80% of users using Yandex.Market resources evaluate these products positively; the A-550 STD filter is recognized as the most popular and proven model.
The clear advantages of the systems include:
- compactness;
- noticeable softening of water;
- absence of extraneous noise;
- availability of clear instructions;
- reliability of components.
Comments on other popular review sites are mostly positive (the emphasis is on compactness, operating efficiency and quality of components), but the cost of the systems is considered by most to be overpriced .
Opinions on forums and other resources are mixed; the work of Atoll filters with Chinese and Russian components is assessed negatively. Systems with original Pentec cartridges and Filmtec membranes do not cause any complaints; their only drawback is the price.
DIY osmosis for an aquarium
The only drawback to osmosis in aquarium farming is the high cost of the filter, but the solution to this problem is to assemble a reverse osmosis device for an aquarium with your own hands. The components can be purchased in stores, and assembly at home will take 2-4 hours. To assemble osmosis with your own hands, you will need the following items:
- Mechanical and carbon filter.
- Membrane housing.
- Membrane.
- A container for liquid passing through the device.
- Couplings, connecting tubes.
- Tap.
It’s easy to build the device yourself: the membrane is inserted into the housing and connected to the filters using a tube so that water passes first through the filter cartridges, and lastly through the membrane. One of the tubes is connected to the water supply using a coupling and a ball valve. The second two tubes are located at the end of the device: one tube must be secured in a container intended for purified water. The second tube is connected to the sewer to drain the liquid: a hole is drilled in the siphon, a gasket is glued and half rings are installed, then a tube is inserted into the hole and the bolts are tightened.
Tips for replacing cartridges and maintaining the system
Even now, when it is clear how water is purified during reverse osmosis, the diagrams do not say how often to install new components or how to generally maintain a set of devices. Let's fix this moment:
- change preliminary catchers after 90-120 days;
- membrane - after 2-4 years (depending on its condition and the end of its life);
- mineralizer – after 3-8 months.
Regularly check all elements for cracks, make sure that there are no leaks at the joints, and that the seals are not worn out or worn out beyond measure. Avoid clogging functional units and creating favorable conditions for the growth of bacteria (use the equipment regularly, maintain a suitable temperature).
Advantages of reverse osmosis installation
Note: By installing a reverse osmosis water purification system in your kitchen under the sink, you save on buying bottled water. The cost of water you will receive at home is less than 1.7 rubles. per liter in the first year after purchasing the filter, and 70 kopecks per liter thereafter (for a family of 3 people).
What kind of water is obtained after purification by reverse osmosis?
Whatever impurities are in the water, a reverse osmosis filter makes the water safe. It even eliminates pesticides, nitrates, hormones, antibiotics, bacteria and viruses. Hospitals and dialysis stations use reverse osmosis systems to remove the most difficult to separate impurities from water (micro amounts of them can be harmful to health). Due to the high degree of safety, water purified by reverse osmosis filters is best suited for preparing baby food.
Why do many people use reverse osmosis to protect against scale?
The membrane in a reverse osmosis unit does not allow hardness salts (calcium and magnesium) to pass through, which cause scale to form and equipment to break down. Therefore, reverse osmosis is the most effective means of purifying hard water. Let's compare: in sorption water filters, softening cartridges need to be changed every 1-2 months, and in reverse osmosis systems, scale will not appear during the entire service life of the membrane (1.5-2 years)
Chefs, baristas and nutrition experts recommend reverse osmosis
It is best to prepare food and drinks in soft, moderately mineralized water. Hard water is not suitable for cooking because, due to excess minerals, the water does not absorb flavors and aromas well. Water without any minerals has an unusual taste.
Water with low mineral content and a neutral pH level is beneficial for health. It is suitable for people with acid-base imbalance and sensitive digestion. Moderately mineralized water accelerates the elimination of toxins, helps us better absorb food and get maximum benefit and pleasure from it.
Design features of the system for cleaning in an apartment
It is possible to install a water filter correctly only if the purpose of each part of such a design is clear. The main elements of the product manufactured under the Aquaphor brand
are:
- Cleaning modules.
- Bracket.
- Device for connecting cold water.
- Tap.
The purification modules contain elements that filter water.
The remaining parts of the product are used to attach the filter unit under the sink, connect it and install the water tap.
Advantages and disadvantages of reverse osmosis
A high degree of purification and guaranteed quality of drinking water are the main advantages of reverse osmosis systems. It is estimated that the content of foreign substances in water purified by this method is ten times lower than the minimum permissible standard. The design features of the membrane prevent the accidental entry of contaminants into the purified water flow.
This diagram demonstrates in detail the design and operating principle of a reverse osmosis membrane, which allows you to obtain purified water - permeate - and remove the contaminated part - concentrate
This water can be safely used for drinking and cooking; it can be given to children and pets. For health, water obtained using reverse osmosis technology is much healthier than boiled tap water. Aquarists use this water to supplement the volume of aquariums without settling.
Despite the more complex design compared to conventional household filters, the installation of such systems is carried out without any problems. Everything needed for installation is usually included in the kit. Almost all elements or their modifications can be purchased separately.
The system does not take up too much space; most often the tank and a set of filters with a membrane are fixed directly under the sink. A compact drinking water tap installed on the sink usually fits perfectly into the interior.
The components of a reverse osmosis system are small in size and can usually be easily installed under a sink. The kit includes a set of narrow hoses for connecting individual elements of the system
Every few years you will have to replace the membrane, the price of which can be about $50. But calculations show that as a result, the cost of clean water will still cost the family less than purchasing drinking water from third-party suppliers.
The effectiveness of the membrane in a reverse osmosis system gradually decreases and must be replaced every few years. This period varies depending on operating conditions
At the same time, more than half of the water coming from the water supply goes into the sewer system, which to some extent affects the amount of utility bills.
But if the volume of the storage tank is selected correctly, then problems may arise for a short time only when starting the system immediately after installation or after a long period of inactivity with the storage tank empty.
All reverse osmosis filters must be replaced periodically. The deadlines for its implementation are indicated by the manufacturer. To change the cartridge, you just need to unscrew the bottom part of the filter module and install a new cartridge. The size of the replacement elements must correspond to the size of the plastic flask. Ideally, it is better to buy cartridges from the manufacturer of the cleaning system. Cartridges that have expired are disposed of; there is no point in restoring their filtration properties by washing and cleaning.
Choosing a place for installation to connect to the water supply
The installation location must comply with the following rules:
- There should be enough space under the sink so that the body of the product can be installed without squeezing or squeezing.
- The modules are placed in such a way that it is easy, if necessary, to replace the replacement cartridge of the device.
- Shut-off elements that shut off the water supply to the filter must be located within direct reach.
Fulfilling these simple requirements will allow the product to operate without affecting functionality, and servicing the filter unit will not cause any difficulties.
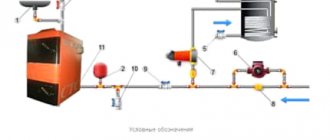
Connection diagram, operating principle of reverse osmosis
Please note that the location for the hole should be chosen based on aesthetic considerations. The pressure regulator allows you to protect equipment from water hammer that occurs during water supply interruptions
But if the dimensions of the model are unique, you may have to install only special branded cartridges, and this is not always profitable or convenient.
But not distilled, because electricity is carried by molecules of impurities and ions of substances dissolved in it. First of all, it depends on the membrane used. Having equipped the faucet with a decorative cover and a rubber washer, insert it into the hole.
The osmotic membrane will last up to 2.5 years. Regular water should be served slowly. Assemble and secure the pre-filtration unit, membrane and post-filters. Rubber sealing rings are wiped dry before installation.
Some useful tips If, after starting the system, the drinking water has a milky tint and contains small air bubbles, do not worry. This way, the water discharged into the sewer will make less noise. Filtration units are supplied assembled, but some models are delivered to the customer with dismantled cartridges, which are installed before mounting the unit on the wall. If you shake a bottle of super-chilled water, bubbles will form and it will instantly freeze.
Installing a connection insert and liquid supply to the filter To do this, you need to perform a number of actions: Turn off the tap supplying liquid to the house, open the mixer supplying cold water. Then, using the included instructions, connect the tubes. Stop the flow of liquid into the filter. You can hang the block on the inside wall of the cabinet. First, place a rubber gasket, and place the washer on it, which you will find in the kit.
Procedure: Disconnect the cold water mixer supply from the water supply. In a spacious kitchen, you can install another small sink specifically for drinking water, but such a need arises extremely rarely. After this, a connection to the sewer system is installed. Naturally, such devices are very, very expensive.
Next, follow these recommendations: Provide fluid access to the system. Installing reverse osmosis can sometimes be challenging. It will shut off the water when the storage tank is filled. Its use for cooking and drinking is impossible without the use of filters. If necessary, correct errors during connection. Operating principle of a reverse osmosis system
Requirements for replacement cartridges
To replace contaminated cartridges, use consumables of the same brand with NSF and Quality certificates. The exact service life depends on the parameters of the water being purified and the frequency of filter activation; the manufacturer recommends changing cartridges at the following frequency:
- Pre-filters – once every 3-6 months. (with a minimum set cost of 1100 rubles);
- Reverse osmosis membranes - once every 24 to 36 months. (about 1750 rubles);
- Carbon post filter – once every 6-12 months. (500 rubles).
Replacing cartridges should be entrusted to specialists; if this is not possible, work is carried out in the following sequence:
The general water supply tap and the system and storage tank taps are closed.- The drinking water tap opens and all remaining water in the filter is released.
- The flasks are unscrewed with a special wrench to remove old cartridges, the emptied containers are washed and dried.
- New filters are installed in clean and dry flasks, all elements are screwed on.
- After installing the system in its old place, the drinking tap is opened for 5 minutes to flush the filter. The leaking liquid must not be used.
When installing a new membrane and post-filter, the same preparatory steps are carried out (the taps are turned off and the water is released). When replacing the membrane, one tube is disconnected, and two post-filters are disconnected. In such cases, more time is allocated for flushing the system (10-15 minutes).
For more detailed information about replacing cartridges, please watch the video:
Preparing to install a filtration system
You need to stock up on the necessary tools in advance. Namely:
- the knife is sharp, it is better if it is a stationery knife;
- one or two adjustable wrenches up to three quarters;
- sealing thread or tape;
- tool for making holes;
- drills for 7 mm, 10 mm, 12 mm.
You also need to check whether you have all the necessary components that are indicated in the instructions. Namely:
- a tap from which clean water will flow, with everything necessary for connection;
- a key intended for the bottom row flasks;
- membrane element;
- 3 flasks and pre-cleaning cartridges;
- connection to the water supply with a coupling and tap, a clamp for drainage and a tap for the tank;
- reservoir for storing purified liquid, etc.
In order for the filter to work as efficiently as possible, additional tools are sometimes needed. If you are in doubt whether the water pressure is high enough, use a pressure gauge. If the pressure is below 3.5 bar, the reverse osmosis will not work properly.
To know exactly which filters are needed in each individual case, you can use a TDS water analysis device.
Possible malfunctions in the filter operation and ways to eliminate them
If all installation requirements are met and cartridges are replaced in a timely manner, problems rarely occur; most of them are associated with kinking of tubes and leaks.
Among the most common problems are:
Leaks that occur due to loss of tightness of pipe connections, lack of sealant, loose fittings and incorrect position of the drain clamp.- Reduced system performance due to kinked or bent tubing, or low inlet pressure. The problem can be solved by straightening the tubes or installing a high-pressure pump.
- Tank filling is low . With normal inlet pressure, functioning or updated cartridges and membrane, this problem is explained by contamination or breakage of the drain clamp (after cleaning or replacing it, the tank is fully filled).
- Noise at the drainage unit when opening the tap (goes away after reinstalling the clamp).
If the rough cleaning method is correctly selected and the parameters of the water in the pipeline comply with the data specified in the instructions, the reliability of the system primarily depends on the quality of installation.
Flushing the system
After installing or replacing the Aquaphor OSMO-50 filters (version 5), you need to flush the system. This will prevent coal dust from getting onto the membrane. To do this, you also need to use the instructions that come with the kit. First, turn off the water and open the tap on the kitchen sink.
Then you need to disconnect the JG tube from the pre-cleaner cartridge unit. To do this, the locking clip is taken out of the sleeve, pressed on the end and the tube is pulled out. It must be disconnected from the storage tank and then connected to the outlet fitting of the block with three cartridges.
The end of the tube is moistened with water and inserted into the seat until it stops. The liquid must be drained through the purified water tap. The procedure is carried out within 15 minutes. To do this, open the previously blocked flow of tap water. After this procedure, the tap is closed and the system is shut off again.
The JG tube is disconnected from the unit containing the three pre-cleaner cartridges. She is again brought to the storage tank. It is secured using locking clips. Next, the membrane is installed. If you do not follow this procedure, it will become clogged with coal dust. As a result, the throughput of the system and its cleaning properties will be minimal. The membrane will need to be changed.
FAQ
I don't know what filter model I have, DWM-101 or DWM-101S. How to determine the model and choose the right new membrane? You have a DWM-101S filter (top membrane drainage) if:
- your filter serial number is 114,992 or greater, and the production date is later than 12/21/15.
- Your filter has a K-50S membrane installed: in the upper part of this module it is painted black (“cap”), in the lower part of the K-50S module there is no hole for the drainage tube.
Where can I find the official instructions for Aquaphor Morion DWM-101S? On the Aquaphor website: “Operation manual for Aquaphor Morion DWM-101S.”
Water preparation
Reverse osmosis membrane technology assumes the almost complete absence of mechanical impurities in the source liquid. Industrial water purification in this case is ineffective, since when transporting water through pipelines, foreign particles get into it. Therefore, the reverse osmosis system must include pre-filters at the inlet to the membrane unit.
Such equipment is usually made in a universal design and consists of at least 3 types of filters: coarse and fine filters, as well as for collecting organic substances (sorption filters). Additional options include ultrafiltration, iron removal and clarification systems. Failure to use this unit results in the working membranes quickly becoming clogged, reducing the efficiency of the reverse osmosis process.
Self-installation of a water filter under the sink - instructions
Installing a water filter under a sink is not particularly difficult, but it is important to strictly follow all the requirements and rules in order for the treatment facility to work correctly. It is equally important to ensure ease of maintenance, including replacement of cartridges. Therefore, it is better to find out all the nuances in advance to avoid mistakes.
Despite the fairly simple design and principle of operation, filters of this type contain a large number of components and elements. Therefore, installing a water filter yourself should be in accordance with the complete set of the product.
The composition of the filter part is determined by the user's choice. The number of cartridges and, accordingly, purification stages is from 2 to 6, and their type is selected in accordance with the quality of the source water. Since the cost of the filter directly depends on the number of stages, in some cases it is advisable to strengthen one direction of cleaning, saving on the other.
For example, if there is sand and other types of mechanical impurities in a liquid whose composition meets quality requirements, you can do without an iron removal cartridge by installing an additional sorption filter instead.
The under-sink filter may include:
- carbon cartridges for mechanical cleaning,
- deferrization,
- mechanical filters for solid suspensions,
- softeners for removing hardness salts,
- reverse osmosis membranes,
- mineralizers that optimize the composition of the liquid,
- UV lamps for disinfection.
In addition to cleaning modules, the design is equipped with:
- bracket-console for mounting on the wall,
- a device for connecting to a cold water supply pipeline (adapter or tee) with a valve installed at the insertion point and regulating the water supply,
- gaskets for connections,
- faucet installed on the sink.
For ease of use, the kit may include a storage tank that ensures water supply, despite the decrease in pressure when passing through filters and especially through a reverse osmosis membrane.
Reverse osmosis water filter components, which may vary depending on the manufacturer and model
Read more about which water filter to choose for your sink in a separate article.
You can find out what filters for iron removal, which are often used in water treatment systems in country houses, are by reading this article.
And if you need to choose a siphon for a kitchen sink, we recommend that you first learn about their types and structure.
Installation site requirements
A special feature of the operation of such treatment structures is the ability to work with only one point of water consumption. Therefore, the installation of water filters in an apartment, and in some cases in a house, is carried out in the kitchen. The place under the sink is perfect for these purposes - the device is not in sight, but it is accessible for maintenance.
However, it is necessary to measure the dimensions of the free space and ensure that certain conditions are met at the stage of choosing a model:
- The structure should fit freely under the sink without squeezing or squeezing.
- All flasks should be positioned so that it is easy to replace the cartridge.
- Plumbing components (valves, sink drain check valve, etc.) must remain in a freely accessible area for inspection and repair.
Despite the location of the filter under the sink, there is still enough free space under it
Installing filters
The easiest way to answer the question “how to install a water filter under a sink” is to list the necessary operations and the features of their implementation one by one. By following these instructions step by step, installing a filter for water purification will not be difficult.
- Experts recommend installing a filter tap not instead of the standard one, but next to it. To do this, you will need to drill an additional hole taking into account the required diameter.
- For a branch device supplying water to the filter from a common pipeline, it is necessary to first shut off the water supply with the valve and drain the remaining liquid from the corresponding area. After this, in accordance with the diagram attached to the product, the existing cold water supply network is disconnected (in most cases this is done at the connection point of the flexible hose). Using a tee or adapter, connect the outlet to the filter. Thus, the disconnected parts will enter the two inlets of the tee, and the filter outlet will enter the third.
- If the product was not sold assembled, installing a water filter under the sink includes assembly work.
A visual diagram and all the necessary components are included in the kit. Installation diagram of a standard multi-stage filter - Plastic hoses for water inlet and outlet are connected to the assembled model. To do this, remove the plugs and retaining half-rings at the connection points.
- The tap on the sink is secured with nuts and washers.
- The hose intended for connection to the tap is placed on the piston.
- Using the installed hoses, connect the cleaning structure to the water supply and the faucet installed on the sink. The connection to the tap requires special attention. The piston inserted into the pipe is placed against the wall and pressed so that the distance between the edges of the piston and the pipe does not exceed 2 mm. The other end of the hose is threaded through the fastening nut, which in turn is screwed tightly.
- If the design provides for a drainage outlet, it must be inserted into the sewer pipe by drilling a hole in it and using the drainage clamp from the filter kit for fastening.
Installation of a reverse osmosis water filter - All threaded connections are sealed and sealed using FUM tape or flax and sealant.
Installing a water filter under a sink with your own hands also includes preparatory work before use. The new filter requires washing, during which the smallest particles of material are removed from the cartridges. Otherwise, such particles could quickly clog subsequent filters and especially the reverse osmosis membrane.
Before washing, the membrane (if the reverse osmosis stage is provided for in the design) is removed, and the storage tank is cut off from the system with a valve. After this, open the water supply and drain up to 15 liters. This is enough to remove foreign small particles.
After washing, the membrane is returned to its place, the storage tank is connected, and the entire system is filled twice, followed by draining the water. With the completion of these operations, preparation for operation can be considered complete. The installed filter is ready for use.
It is recommended to install main water filters at the entrance of the water supply to the apartment. They not only improve the quality of drinking water, but also extend the life of plumbing fixtures and water heating devices.
Under the kitchen sink you can install not only a filter, but also a sewage pump. And why it might be needed, read here.
And you will find instructions for self-installation of a shower drain in the floor here https://okanalizacii.ru/santeh_vodoprov/kabina/trap-dlya-dusha-v-polu-pod-plitku.html
Features of operation and maintenance
In order for water to be effectively purified by the selected filter, it is important to follow certain rules when using it.
- Make sure there are no kinks in the hoses.
- Replace cartridges in a timely manner (the resource can be indicated in liters or indicating the maximum allowable operating time).
- When replacing cartridges, wash the flasks with soapy water and clean water.
- Install carbon cartridges with the membrane removed, followed by washing.
- Ion exchange cartridges must be regenerated in accordance with the instructions.
Even with good washing of the installed filter, a slight turbidity of the water may appear at the initial stage of operation. This does not last long, and after the water becomes clear, you can taste it. A slight bitter taste should not be considered a sign of incorrect operation of the filter device. This taste can be caused by the material of the cartridge for removing hardness salts (desalting blocks). Usually, water also tastes bitter for a very short time - it is enough to drain it a little so that clear, clean, tasteless and odorless water comes out of the tap, optimally suitable for use in cooking and drinking.
High price segment
Atoll A-550 Max
Representative of the Premium series - reliable assembly and highly effective cleaning
Rating: ⭐️ 96 / 100
Certified materials and filters from famous brands are used in the production of the premium Atoll A-550 MAX. The model carries out five-stage cleaning, demonstrates good performance and operational reliability. The owner can choose the color of the faucet to match the kitchen interior.
Basic characteristics:
- cleaning stages - 5;
- productivity - 0.159 l/min;
- tank volume - total 12 l, useful 8 l;
- filter porosity - no data;
- required pressure - 2.8-8.4 atm;
- equipment - tank, tap, connection components;
- dimensions - 48x42x42 cm.
The model has durable flasks that can withstand strong water shocks. Wear-resistant materials and a high degree of filtration are indispensable parameters for devices operated under domestic water supply conditions.
Advantages
- Long life of membrane and cartridges
- Selecting faucet colors
- High cleaning efficiency
- Capacious storage tank
- Full set
Flaws
- High cost of mineralizer and membrane
- No pump
Aquaphor DWM 201
Water treatment system with pump and intelligent control control
Rating: ⭐️ 93 / 100
Modern design, a practical control system and a built-in pump are the main features of the DWM 201 water purifier from Aquaphor. Filtration cartridges, a pump and a storage tank are assembled in a single housing. This design greatly facilitates the installation of the device and saves space under the sink.
Basic characteristics:
- cleaning stages - 4;
- productivity - 0.25 l/min;
- tank volume - 5 l;
- filter porosity - 3 microns;
- required pressure - from 0.9 atm;
- complete set - connecting tubes, connection unit, tap, plug, clamp;
- dimensions - 37x42x19 cm.
The model has indicators that notify you when the filters need to be replaced - this is very convenient, since the working life of the cartridges is different. Intelligent control allows you to regulate water flow.
Aquaphor DWM 201 can be connected directly to a coffee machine or ice maker.
Advantages
- Cartridge resource indicator
- Built-in pump
- Intelligent Controller
- High performance
- Possibility of connecting to external consumers
Flaws
- Small storage tank
- Complaints about the noisy operation of the pump
- Possible electronic malfunctions
Atoll A-575m STD
High-quality and reliable reverse osmosis filter with a spacious tank
Rating: ⭐️ 92 / 100
The model is equipped with a carbon and polypropylene prefiltration cartridge, an American Film Tec membrane and a mineralizing postfilter. There is a large storage tank and a stylish tap.
Basic characteristics:
- cleaning stages - 5;
- productivity - 0.135 l/min;
- tank volume - full 12 l;
- filter porosity - 1 micron;
- required pressure - 2.8-6 atm;
- complete set - tap, storage tank, tee, coupling, tubes;
- dimensions - 43x42x15 cm.
A highly efficient filter is only suitable for water supply systems in which a pressure of at least 2.8 atm can be guaranteed. It will take about 1.5-2 hours to fill the tank.
Advantages
- Easy to install
- Capacious storage tank
- Good tightness of the structure
- High degree of purification
- Ease of cartridge replacement
Flaws
- No pump
- High cost of replacement filters