Any developer would like to build a reliable roof in a country house for minimal money. Usually, when asked what you will use to cover the span in a two-story stone cottage, the homeowner says that it will be reinforced concrete slabs. Either wooden beams, or, which is more expensive, pour a monolithic reinforced concrete floor. It is much less common to hear that a prefabricated monolithic floor (PCS) will be installed. This is due to the lower prevalence of this technology, as well as the traditional inertia of thinking inherent in the domestic construction market. Most people believe that conventional slabs, in the combination of “price, load-bearing capacity, ease of use for builders and speed of installation,” have no equal, and SMP is too expensive and difficult to make.
In this article we will tell you if this is true and answer the following questions:
- What are the features of a prefabricated monolithic floor?
- How much does it cost to install 1 sq. m of such overlap.
- What nuances need to be taken into account.
Why do you need a load calculation and why should it be done by specialists?
If the house design includes prefabricated floors, and the owner decides to pour a monolith, he will have to determine the parameters of the slab - the thickness of the pour, the diameter of the reinforcement, the number of rows and cell sizes of the reinforcing frame, the need to build additional supports, etc. Of course, this must also be done when constructing buildings without a design, for example, a garage with a basement.
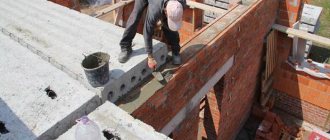
You don’t need to talk about the consequences of the collapse of ceilings, just look at the photoSource dcdn.lt
The main parameters for such a calculation are the load on the floor, the length and width of the spans, and the grade of concrete. Loads are calculated by adding all the forces acting on a unit area. This:
- the weight of the plate itself;
- the weight of the screed and all layers of floor and ceiling coverings;
- loads from partitions resting on the slab, elements of the roofing system, interfloor stairs;
- weight of stoves, fireplaces and other massive structures;
- weight of utilities;
- weight of furniture, equipment and people.
Even if you can independently determine the total load, this will not help you understand how to pour a floor slab with your own hands, what thickness to make it and how to reinforce it. Because it is necessary to take into account the resistance of materials to bending, impact loads and their other characteristics. And also know what safety margin the slab should have. These are complex calculations that not every engineer can handle.
An example of calculating a monolithic floorSource chertezhi.ru
It is no secret that in private low-rise housing construction they often do without calculations, filling the floors with a margin of thickness. A thickness of 12-18 cm is considered quite sufficient with a concrete strength grade of at least B20. Anything larger requires justification by calculations, since with an increase in the mass of the slab, the load on it and on the walls with the foundation increases.
The procedure for calculating material requirements using an online calculator
After the calculation of the monolithic floor has been made and you know its overall dimensions, you need to calculate the required amount of materials. Today, few people independently calculate the need for reinforcement and concrete, because you can use a special online calculator. It's convenient and takes just a few minutes.
Photo 5. Compaction of concrete mixture during the construction of a monolithic slab
The calculation sequence is as follows:
- Enter the grade of concrete in the special field.
- Specify the length, width and thickness of the slab.
- Fill in additional fields (for example, the length of the reinforcement and the method of its fastening) if available.
- Click the “Calculate” button.
After this, the calculation calculator will automatically display all the necessary information, which includes the volume and weight of concrete, the recommended diameter of the reinforcement for the reinforcing frame, the size of the mesh cell, the amount of overlap of the rods during reinforcement, the required number of rods in meters and kilograms, as well as data on materials for constructing the formwork .
Photo 6. Smoothing the concrete mixture after pouring and compaction
In conclusion, we would like to remind you once again that the above data is based on the recommendations of building codes and regulations and is not relevant for all objects. Our experts strongly recommend entrusting the calculation of the parameters of a monolithic concrete floor to qualified specialists, who will calculate everything taking into account the expected short-term, permanent loads and other factors.
Floor slabs PK 63-12-8 AtV (Ryazan Concrete Concrete Plant No. 2) Only new slabs from the factory. PC floor slab for all types of buildings, length 6.3 m, width…
From 8402 RUR/pieceMore details
Floor slabs PB 60-12-8 (Ryazan reinforced concrete plant No. 2) Only new slabs from the factory. PB floor slab for all types of buildings, 6m long,…
From 9656 RUR/pieceMore details
Floor slabs PK 48-12-8 AtV (Ryazan reinforced concrete plant No. 2) Only new slabs from the factory. PC floor slab for all types of buildings, length 4.8 m, width…
From 7137 RUR/pcsRead more
Floor slabs PK 35-12-8 (Ryazan reinforced concrete plant No. 2) Only new slabs from the factory. PC floor slab for all types of buildings 3.5 m long, width...
From 5153 RUR/pcsRead more
Floor slabs PK 30-12-8 (Ryazan reinforced concrete plant No. 2) Only new slabs from the factory. PC floor slab for all types of buildings 3 m long, wide…
From 4479 RUR/pcsRead more
Floor slabs PK 72-12-8 AtVt-1 (Ryazan reinforced concrete plant No. 2) Only new slabs from the factory. PC floor slab for all types of buildings, length 7.2 m, width…
From RUB 11,821/pieceMore details
Floor slabs PK 42-12-8 (Ryazan reinforced concrete plant No. 2) Only new slabs from the factory. PC floor slab for all types of buildings, length 4.2 m, width…
From 6414 RUR/pcsRead more
Floor slabs PK 58-12-8 AtV (Ryazan reinforced concrete plant No. 2) Only new slabs from the factory. PC floor slab for all types of buildings, length 5.8 m, width…
From 7930 RUR/pcsRead more
Floor slabs PC 60-12-8 AtV (Ryazan reinforced concrete plant No. 2) Only new slabs from the factory. PC floor slab for all types of buildings 6 m long, wide…
From 7996 RUR/pcsRead more
Floor slabs PK 25-12-8 (Ryazan reinforced concrete plant No. 2) Only new slabs from the factory. PC floor slab for all types of buildings, length 2.5m, width…
From RUB 3,674/pieceMore details
Structural features of a ribbed monolithic floor
Let's figure out what this type of structure is and what are the prospects for its use in private construction.
Ribbed monolithic floors consist of beams that can go in one or two directions, and a slab connected to the beams into a single structure (i.e., the beams work together with the slab resting on them). Such structures are used in the construction of buildings with large spans (industrial buildings, shopping centers, subways, water protection, utility structures, etc.).
The use of a flat reinforced concrete slab instead is due to a decrease in concrete consumption during the construction of the floor and, as a consequence, a decrease in the load on load-bearing walls and foundations. Reducing the load on the building's load-bearing structures allows architects to create structures that are more interesting in design.
Not a minor factor is the reduction in costs for pouring concrete and reinforcement. To create ribbed floors, concrete of class B15-B25 and reinforcement of the following classes are used: A240, A300, A400, B500. The choice of class depends on the implementation of a specific design task.
The production of this type of interfloor slabs is no different from other reinforced concrete structures, with the exception of the principle of using special removable formwork. You can see the schematic diagram and appearance of the structure in the figure. It is due to the shape of the formwork that the “ribs” are ultimately created.
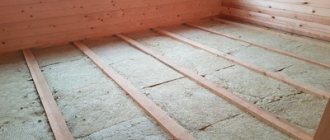
Interfloor ceilings on wooden beams - environmental friendliness combined with savings.
We have understood the general concepts. Now let's talk about the applicability of ribbed monolithic floors in the construction of cottages and country houses for permanent residence. There is a fairly large amount of information on the Internet about creating such structures with your own hands.
Such attention to the presence of “ribs” in the interfloor reinforced concrete floor is determined, first of all, by the desire to save on its construction. However, it is worth considering the following points:
- A competent design calculation is required;
- Construction companies offer for rental removable formwork and racks necessary for the production of ribbed slabs, but ordering such formwork for rent will cost much more than for a classic monolithic flat slab, which can ultimately offset the savings on concrete;
- Creating formwork with your own hands (for example, from boards or OSB boards) is a rather lengthy and labor-intensive process, i.e. you will have to take into account the high labor intensity of the work;
- In addition, the appearance of a ceiling with beams will not fit into every interior. It may have to be subsequently covered with plasterboard or other materials.
Properly laid reinforced concrete floor beams will make the structure reliable.
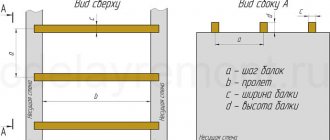
Layout of the structural scheme of the floor
The structure of a beam panel prefabricated floor includes slabs and beams supporting them, called crossbars, or main beams (Fig. XI.2, a). The crossbars rest on columns and walls; the direction of the crossbars can be longitudinal (along the building) or transverse (Fig. XI.2,b). Crossbars together with columns form frames.
In the transverse direction, the floor can have two to three spans (for civil buildings) and five to six spans for industrial buildings. The span dimensions of the crossbars of industrial buildings are determined by the general structural design of the floor, the load from the technological equipment and can be 6; 9 and 12 m with a longitudinal column spacing of 6 m. The span dimensions of the crossbars of civil buildings depend on the grid of supports, which can be in the range of 3.0–6.6 m with gradation every 0.6 m.
Advantages of prefabricated monolithic floors
● Excellent combination of price and quality. These are the most budget-friendly reinforced concrete floors. Prefabricated monolithic structures can be 30% cheaper than conventional monolithic ones. This is achieved, among other things, by reducing the cost of work, since installation is carried out very quickly.
● High speed of construction, which is especially important for those who build a house on their own. Beams arrive at the site completely ready for installation, according to the specific dimensions and configuration of the opening to be covered. Aerated concrete blocks for floors are also standard. If under a monolithic ceiling you need to build removable formwork along with auxiliary materials, then in prefabricated monolithic formwork the blocks and walls on which the ceiling rests are used.
In addition, to install a prefabricated monolithic floor, as a rule, a crane or other lifting mechanisms are not needed; all work is carried out manually (a concrete pump is required at the final stage). The weight of the beam is about 6 kg/ linear meter. A team of four people constructs a prefabricated monolithic floor with an area of 100 m2 in an average of 3 days - from installing beams to concreting.
● Possibility of installation at sites where it is difficult for heavy equipment to enter the site. This is the advantage of prefabricated monolithic floors over ready-made hollow reinforced concrete slabs. Such slabs must be transported to the construction site and installed on the walls using a crane. Moreover, delivering slabs for the construction of large spans is problematic due to the very large weight of the structures required for this.
In the case of aerated concrete walls under hollow-core slabs, you will have to make an armored belt in the masonry around the perimeter of the floor: it will distribute the load from the structure. In addition, the slabs need to be modified, for example, to create monolithic sections with embedded parts on them, to which a monolithic interfloor staircase will be attached. Finally, the maximum diameter of mounting holes for communication channels cannot exceed 100 mm. Prefabricated monolithic floors are free from all these disadvantages.
● Useful load-bearing capacity – 450 kg/m2. This is more than twice the building code requirements for floors. Prefabricated monolithic structures are rigid and stable. They provide good protection from airborne noise and meet fire safety requirements.
● Ability to cover unsupported spans up to 9 m long.
● Possibility to arrange openings of even complex shapes (with bay windows, projections, etc.), as well as balconies, consoles and other elements.
● Prefabricated monolithic – the lightest of reinforced concrete floors. Their own weight is 280 kg/m2.
● If the concreting work is done efficiently, then you don’t have to make a concrete screed on top of the floor; just a thin-layer self-leveling floor is enough. Of course, provided that there is no need to “hide” communications in the floor, otherwise a screed will be needed. For comparison: a screed with a thickness of at least 30 mm is always installed on top of hollow core slabs. This means additional work, costs money and time.
● Convenience of delivery: one truck can bring beams and blocks in quantities sufficient to cover spans of up to 200 m2. It is also possible to include floor and wall blocks in one delivery.
Let us note a few more features of prefabricated monolithic floors. Such designs are very convenient for self-builders and those who build a house with the help of a team, but without a detailed design. You contact a company that sells ready-made beams for this type of floor. The company, knowing the dimensions and configuration of the opening that needs to be blocked, develops an installation diagram itself: the number and sizes of beams, a map of their installation. All that remains is to mount the structure.
In addition, the installation of a prefabricated monolithic floor is quite simple, which eliminates many mistakes that can be made when installing a classic monolithic floor.
Another nuance. Prefabricated monolithic structures are often used in the reconstruction of buildings, when it is necessary to replace dilapidated floors. The convenience is that beams and blocks can be lifted manually; the existing frame of the building does not interfere with this. In addition, the consumption of concrete for such a floor is less than for a conventional monolithic one, which simplifies concreting even if there is a ready-made frame at home and it is difficult to supply a concrete pump.
You can get a cost estimate and buy prefabricated monolithic floors from official YTONG distributors
Laying reinforcement
- rod for fittings A500C;
- soft wire;
- roulette;
- Bulgarian.
Scheme of a monolithic floor.
At this stage, the reinforcement is laid. The first step is to take into account the sheathing scheme: 2 levels of 2 perpendicular layers, where each subsequent rod is located at a step of 0.5 m from the previous one. The choice should be made on a fairly strong, but not the heaviest rod for reinforcement, like A500C.
Initially, the rods are laid parallel to one wall every 0.5 m, then they are covered with exactly the same layer. Each joint is tightly tied with soft wire. When the first lathing is completed, using this example, a similar second layer of reinforcement is created. Under no circumstances should they be connected to each other.
The lower lathing is mounted 25 mm above the level of the formwork, while the upper one is exactly the same amount below the level of the pouring edge. For this, staples from the same reinforcement as the sheathing itself are used. The installation of brackets is carried out in the amount of 1 piece per 4 m2 (i.e., for an area of 100 m2 you will need 25 pieces), and the lathing is tied in a similar way - using soft wire. Under no circumstances should the reinforcement bars be allowed to touch the bottom or top, because this will not only reduce the quality of the manufactured slab, but will also significantly weaken the final appearance.
How to choose?
When choosing a monolithic floor to be installed in a house, it is better to take all factors into account. For a building with several floors, it is better to use removable inventory formwork, which can be easily and quickly installed on site. In the private sector, beamless structures can be used. But if the load is significant, the force of the columns and supports may not be enough.
The interfloor space filled with reinforcement frame may require additional insulation for insulation and noise reduction. In this case, the space between floors is filled with concrete with the addition of expanded clay. The option with columns is more suitable for non-residential buildings, commercial, retail buildings or spaces with an open plan. For walls made of foam blocks, it is better to use lighter floors rather than a monolithic concrete slab. If a one-piece option is chosen, load calculations must be as accurate as possible.
How to calculate costs and productivity?
Thanks to the frame structure, the use of coffered floors makes it possible to significantly reduce the cubic capacity of the building, and therefore the cost of its construction. Their arrangement at industrial, civil and administrative facilities is considered the most profitable. With their help, spans up to 6 m long are covered, and the load-bearing capacity of frame systems is up to 500 kg/m2.
The financial costs of the device are minimized due to the economical consumption of concrete. This also affects the labor intensity and speed of construction.
However, when designing such systems, it is important to take into account that in the places where columns and capitals are located, the floor must be continuous - i.e. Caisson formers are not installed in these areas.
Photo 11. The process of concreting a coffered floor
Cost calculations for a monolithic floor of this type are carried out taking into account the consumption of necessary materials and devices:
- Formwork made of metal lathing and support posts, as well as plastic caisson formers, are in most cases rented.
- Concrete - usually a “mixer” is ordered with a concrete pump to automatically supply the mixture to the floor.
- Armature for reinforcement.
However, keep in mind that no one is insured against additional and unexpected expenses.
Floor slabs PK 25-12-8 (Ryazan reinforced concrete plant No. 2) Only new slabs from the factory. PC floor slab for all types of buildings, length 2.5m, width…
From RUB 3,674/pieceMore details
Floor slabs PC 60-12-8 AtV (Ryazan reinforced concrete plant No. 2) Only new slabs from the factory. PC floor slab for all types of buildings 6 m long, wide…
From 7996 RUR/pcsRead more
Floor slabs PK 63-12-8 AtV (Ryazan Concrete Concrete Plant No. 2) Only new slabs from the factory. PC floor slab for all types of buildings, length 6.3 m, width…
From 8402 RUR/pieceMore details
Floor slabs PK 58-12-8 AtV (Ryazan reinforced concrete plant No. 2) Only new slabs from the factory. PC floor slab for all types of buildings, length 5.8 m, width…
From 7930 RUR/pcsRead more
Floor slabs PK 48-12-8 AtV (Ryazan reinforced concrete plant No. 2) Only new slabs from the factory. PC floor slab for all types of buildings, length 4.8 m, width…
From 7137 RUR/pcsRead more
Floor slabs PK 42-12-8 (Ryazan reinforced concrete plant No. 2) Only new slabs from the factory. PC floor slab for all types of buildings, length 4.2 m, width…
From 6414 RUR/pcsRead more
Floor slabs PK 35-12-8 (Ryazan reinforced concrete plant No. 2) Only new slabs from the factory. PC floor slab for all types of buildings 3.5 m long, width...
From 5153 RUR/pcsRead more
Floor slabs PK 30-12-8 (Ryazan reinforced concrete plant No. 2) Only new slabs from the factory. PC floor slab for all types of buildings 3 m long, wide…
From 4479 RUR/pcsRead more
Floor slabs PK 72-12-8 AtVt-1 (Ryazan reinforced concrete plant No. 2) Only new slabs from the factory. PC floor slab for all types of buildings, length 7.2 m, width…
From RUB 11,821/pieceMore details
Floor slabs PB 60-12-8 (Ryazan reinforced concrete plant No. 2) Only new slabs from the factory. PB floor slab for all types of buildings, 6m long,…
From 9656 RUR/pieceMore details
Installation process
As with all work, the first thing you need to do is purchase all kinds of materials and equipment. In particular, to make formwork, you will need either a collapsible structure, which can be rented from construction companies, or material for making this structure yourself.
If the installation will be done with your own hands, then for the formwork you need to prepare moisture-resistant plywood or boards. The plywood must be at least 2 centimeters thick, and the boards must be at least 2.5 centimeters thick.
When constructing a building, in some cases it may be necessary to install a special reinforcing element. It is called a monolithic belt for floor slabs. It is a reinforced concrete strip that runs along the perimeter of the building and serves as a support for the structure being constructed.
- The process of installing the slab begins with the installation of racks or supports that will support the slab during its installation and hardening. They are installed with a certain step - it is regulated by the distance between the floor beams and its size.
- Next, the longitudinal beams are installed. They need to be placed in special fastenings on previously installed supports. People call these mounts “crowns” or “forks.” When laying beams, you need to take into account that the surface of the formwork must be strictly horizontal. All beams are covered with plywood or boards. After forming the slab, these parts of the formwork will need to be removed, so it is necessary to take into account these nuances of their installation.
When the beams are laid, you can begin assembling the horizontal part of the formwork, checking the horizontal plane
It must be observed absolutely throughout the entire area. When assembling, you should pay attention to how smooth the plane will be - this determines how smooth the ceiling, which is its lower part, will be. In order to obtain a surface of the highest quality, as well as to prevent concrete from leaking into the cracks, a waterproofing film is laid. Next, the vertical elements are installed
They need to be installed so that after pouring, the edges of the slab overlap the walls with sufficient margin. The required distance is indicated in SNiP. After this, they begin to reinforce the entire surface of the future slab. Two rows of mesh made from reinforcing bars are laid. The cell of the resulting grid should be about 20 centimeters. The first layer is laid at a distance of about 2.5 centimeters from the bottom plane of the formwork. In order to raise the mesh, special plastic spacers are used.
- The second layer of mesh is mounted at the same distance from the upper plane of the future slab. To secure two layers of mesh at the required distance, special stands are bent from reinforcing bars. All layers of the mesh and all its elements are connected to each other with knitting wire.
- When the reinforcement is laid and all the formwork elements are in place, the process of pouring the mortar begins. The grade of concrete is chosen for a reason, but based on data on the expected load on the slab. Do not forget that all technological holes in the resulting slab must be fenced in advance with specially made boxes.
- After pouring the solution, it must be compacted with a special vibrating machine for concrete. This will make the poured ceiling more uniform in structure, and will also expel all air bubbles formed during pouring.
- The resulting surface is moistened within a week from the moment the solution is poured. After this, constant moisturizing is not required. But you still need to control the drying of the surface.
- It may take up to 30 days for the concrete to completely harden. It all depends on the chosen brand of concrete and the thickness of the structure being created.
After the specified period, the formwork is completely removed, and the ceiling is ready for use.
Pouring the main slab
Monolithic floor installation diagram.
- automixer with sleeve;
- cement mortar (1 cement grade 400 and above, 3 sand, volume of water - as needed);
- shovel;
- bayonet shovel;
- polyethylene film;
- water;
- crowbar.
When pouring, it is important to consider that equipment and, if possible, several people will be involved in this process. An automixer is needed for the reason that it is better not to even try to mix the solution manually, because... The slab must be poured 1 day in advance. This will help avoid delamination, which can result in cracks or even simple collapse. A prerequisite for an automixer is the presence of a sleeve for supplying the solution to the floor.
While applying the mixture, one person constantly moves with a hose in his hands, and assistants plow each level of the solution with shovels. This is required in order to release the air accumulated in the cement. This will significantly add strength to the future floor. Plowing of the lowest layer should be done with extreme caution, because... this may lead to rupture of the waterproofing. It is also worth considering that when moving, reinforcement bars will get in the way under your feet, which should be carefully walked around. No matter how securely they are secured, they can be a tripping hazard.
Movement and regular redirection of the solution flow during pouring is required in order to avoid excessive stress on the support system, because Even the strongest example of a metal spacer will not withstand pressure for long. Plus, it will give assistants the opportunity to do their jobs.
After the filling has been completed, the entire slab should be covered with plastic film for 27-29 days, and the first half of the period will need to be slightly moistened with water so that the solution gains maximum strength.
After the allotted time, the supporting structure should be removed, the plastic film should be removed, and only then the entire formwork should be dismantled using a crowbar. There is no need to make any special efforts here, because... The specificity of the plywood coating does not allow it to stick to the mortar.
In what cases is it necessary to install monolithic floors?
Monolithic reinforced concrete flooring is the most reliable, but also the most expensive of all existing options. Therefore, it is necessary to determine the criteria for the feasibility of its design. In what cases is it advisable to install monolithic floors?
- Impossibility of delivery/installation of prefabricated reinforced concrete slabs. Subject to conscious refusal of other options (wooden, lightweight Terriva, etc.).
- Complex configuration in plan with “unsuccessful” arrangement of internal walls. This, in turn, does not allow laying out a sufficient number of serial floor slabs. That is, a large number of monolithic sections are required. The costs of a crane and formwork are not rational. In this case, it is better to immediately move on to the monolith.
- Unfavorable operating conditions. Very heavy loads, extremely high humidity values, which cannot be completely solved by waterproofing (car washes, swimming pools, etc.). Modern floor slabs are usually prestressed. Tensile steel cables are used as reinforcement. Due to their very high tensile strength, their cross-section is very small. Such slabs are extremely vulnerable to corrosion processes and are characterized by a brittle rather than ductile nature of destruction.
- Combining the functions of overlap with the function of a monolithic belt. Supporting precast concrete slabs directly on lightweight block masonry is generally not permitted. A monolithic belt is required. In cases where the cost of the belt and prefabricated floor is identical to or exceeds the price of a monolith, it is advisable to focus on it. When resting it on masonry with a depth equal to the width of the belt, the installation of the latter is usually not required. An exception may be difficult soil conditions: type 2 subsidence, seismic activity, karst formation, etc.
Variant of monolith on I-beams
Scheme of a monolithic floor with beams.
- beams (I-beams);
- laminated plywood 20 mm and thicker;
- hammer with nails;
- wooden beams (100*100) and metal spacers (20 mm and thicker);
- roofing felt;
- rod for fittings A500C;
- Bulgarian;
- soft wire;
- automixer with sleeve;
- cement mortar (1 cement grade 300 and above, 3 sand, volume of water - as needed);
- shovel;
- bayonet shovel;
- polyethylene film;
- water;
- crowbar.
Concreting
Next, heavy concrete with a compressive strength class of at least B20 is poured. Pouring is carried out with a concrete pump. The concrete is compacted and leveled using a vibrating screed - electric or petrol. Some builders use deep concrete vibrators. However, experts do not recommend doing this, since there is a danger that under the pressure created by the vibrator, the aerated concrete will be “squeezed out” beyond the reinforced belt along the perimeter of the ceiling.
Concrete acquires brand strength 28 days after pouring. However, the supports can be dismantled and construction of the building can continue once the concrete reaches 70% strength. In summer this happens every other week. But you need to be sure that this happened. Therefore, the strength is measured with a special device, and only on the basis of its readings do they begin further work. Well, or wait 28 days.
On the lower floor side, the ceiling can be easily finished with one material or another. For example, plaster with a thick layer over a fiberglass mesh.
Manufacturing technology
Initially, a reinforced concrete frame is installed, and the distance between the beams must correspond to the length of the blocks used.
Expert recommendations for independent production of prefabricated monolithic floor slabs:
- Laying the blocks is done manually; each element must lie close to its neighbor.
- The 1st and last blocks between 2 reinforced concrete frames are adjusted to the inner edge of the load-bearing wall or with extension to it, but taking into account the width required to create a reinforced belt.
- The blocks of the first row along the wall are mounted with one edge on the beam, and the second on the supporting wall. If necessary, they can be filed, but be sure to lay them on the wall with this edge. In this case, the support area must be at least 20 mm.
- After installing the liners, a reinforcing mesh with a rod thickness of at least 5 mm is laid on the upper reinforcement bars of reinforced concrete frames.
At the end of this work, the ceiling is completely filled with concrete and a monolithic structure is obtained. For this, it is recommended to use concrete of a class not lower than B20. Pouring can be done either using a concrete pump or manually. Concentrated loads that occur when a large amount of compound is supplied to one place should be avoided. During the work, the mixture must be compacted using bayonet and vibrating tools. Concreting with grips is allowed, but their width must be at least 620 mm.
offers to buy a certified prefabricated monolithic floor, the price of which depends on the type of liner blocks used and the size of the structure. Contact us - in addition to the affordable cost, we guarantee free information support and provide construction materials delivery services.
Floor slab reinforcement stage
After completing the installation of the formwork, they begin to manufacture the reinforcement frame, which should consist of two metal meshes. A steel rod with a diameter of 10-12 mm is used for these purposes. A mesh with a mesh size of 200 mm should be knitted with wire with a diameter of 1.2-1.5 mm. If, to make a mesh, you have to increase the length of reinforcing bars, you must ensure that at the joints the overlap of one bar on another is at least 40 cm.
It is also necessary to comply with another standard - the overlap of the reinforcement mesh on the wall of the house should be 150 mm (brick wall) and 250 mm (aerated concrete wall). In this case, the distance between the ends of the reinforcing bars and the vertical formwork along the perimeter of the slab should be 20-25 mm.
As mentioned above, a full-fledged one involves laying two metal meshes - lower and upper. They should be located in the thickness of the slab at a distance of 20-25 mm, respectively, from the lower and upper planes of the slab.
In order to ensure the correct positioning of the lower mesh, special plastic clamps are placed under it. They must be located strictly at the intersection points of the reinforcing bars, and the distance between the clamps should be about 1-1.3 m.
The correct distance between the upper and lower mesh (120-125 mm) is ensured using special fixing supports. They are made by hand using a bending device from a metal rod with a diameter of 10 mm. The height of all such clamps must be the same and equal to 120 mm. They should be placed on the surface of the formwork in a checkerboard pattern in 1 m increments.
After this, end clamps are mounted at the ends of the frame in increments of 400 mm. To strengthen the reinforcement, both reinforcement meshes are fastened with connecting rods with bent hook-shaped ends.
Konstantin, Novosibirsk asks a question:
Hello. I had a slight hitch while building my house. Please tell me how to properly fill the floor slab yourself and what is required for this. Nowadays, reinforced concrete floors are used in construction, since structures of this kind have a very high degree of strength and can withstand large load-bearing loads. How can you fill a slab of such a floor yourself? What is needed for this and what is the sequence of actions?
The expert answers:
Hello. To learn how to properly fill a floor slab yourself, read the recommendations below. Filling the floor is carried out in several stages. Moreover, if the technology for filling the floor is violated, this can lead to very disastrous and unpredictable consequences.
To fill the floor yourself, prepare materials such as wooden beams or boards to make formwork. To fasten them you will need screws and, of course, a screwdriver to fasten the formwork parts. You will definitely need chipboards (chipboards) or sheets of metal so that the ceiling has a flat surface
Please note that the accuracy of the formwork directly affects the durability and strength of the floor itself. Therefore, if necessary, still turn to professionals for help.
Next, boards should be laid across the entire room, supported by load-bearing walls and additional installed supports. They need to be laid on edge to ensure greater strength. Supports must be installed strictly vertically to ensure maximum load-bearing capacity. Verticality can be checked using a plumb line. The distance between the boards should be about 1 meter. On top of them is a roll made of sheets of iron or chipboard. The sheets are attached to the boards with screws or nails. The main purpose of the boards is to prevent sagging and destruction of the floor itself when installing reinforcement. We advise you to use metal pipes to make the supporting structure.
For even greater strength, the floor slab must be reinforced. For this purpose, steel reinforcement is used, the cross-section of which must be strictly coordinated with the design of the house being built. The reinforcement bars should be laid longitudinally and transversely at a distance of about 20 cm from each other. The rods are fastened together with twisted wire. The ends of the reinforcement must extend beyond the edges of the load-bearing walls of the building.
Design features
As already mentioned, the beam consists of a galvanized profile (shelf), 120 x 40 mm, to which a triangular reinforcement frame is welded. The upper longitudinal reinforcement is made from a rod with a diameter of 8 mm, and the lower reinforcement is made from two rods with a diameter of 12 mm. But there is a nuance. When it is necessary to perform a long unsupported span, the beam is strengthened with additional reinforcement. At the bottom of the frame, a third longitudinal reinforcement with a design diameter is provided, for example, 25 mm for a beam 9 m long. The upper and lower reinforcement are combined into a single structure with transverse diagonal reinforcement with a diameter of 5 mm.
To fill the floor, you can use aerated concrete blocks of any density grade - D400, D500. Moreover, the density of aerated concrete has little effect on the load-bearing capacity of the floor, because the blocks act as permanent formwork, and the reinforced concrete slab is responsible for carrying the load.
The standard size of the blocks used is 625 x 200 x 250 mm. The block at each end must rest on a galvanized profile by at least 40 mm. Based on this, the pitch between the beams should be 725 mm.
The question may arise: is the structure safe, where the blocks are sandwiched between the beams? Won't they fall out? Of course not. Such floors were actively used back in Soviet times, and then the blocks were simply clamped between the beams. But due to concreting, they were connected into a monolithic whole, and there were no problems with the floors. Modern beams have shelves to hold the blocks, so the reliability of the structure is even higher.
Please note: despite being filled with aerated concrete - a material with good heat-insulating properties - prefabricated monolithic floors must be insulated if they separate warm rooms from the street.
What is a monolithic floor?
First, let's understand the properties of aerated concrete and the principles of constructing houses from this material.
Cellular concrete blocks are made from a mixture of lime, cement and sand, into which an aluminum-based chemical, a foaming composition, is added. Aerated concrete is made both by an autoclave method by actively influencing the solution poured into block molds using steam and pressure, and by a non-autoclave method. The gradation of its quality and price depends on this.
Help: Such a block weighs relatively little, retains heat well, is also fire-resistant and environmentally friendly, allowing you to build a house in the shortest possible time.
Aerated concrete requires a special approach, because the cellular structure of the blocks minimizes the strength properties and the ceiling is constructed taking this circumstance into account.
It is necessary that the weight of the structure pressing on the load-bearing supports be compensated by belt-type reinforcement, creating the rigidity of the load-bearing walls. The reinforcement is placed at the bottom, at the top and in the center, protecting the aerated concrete blocks from the pushing effect from the ceiling. The ceiling itself is also supplemented with reinforcement.
Sections of load-bearing walls must be accurately measured for deviation from a strictly horizontal line, but if such a problem does occur, then aerated concrete makes it easy to correct the situation by sawing the material.
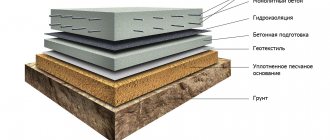
Monolithic slab
A monolithic floor in a house made of aerated concrete is placed on beams with different cross-sectional sizes covering the entire surface area. Its most important part is a frame with a reinforcing function. Metal rods with a small cross-section are fastened with wire into a single reinforcing system. It is this that will bear the greatest load, giving the concrete literally “iron strength.”
Concrete is ordered ready-made from companies specializing in the sale of building materials, or it is made independently. When manufactured independently, mixers of small dimensions are used, which reduces the quality of the design, since there is a high risk of mixing volumes of concrete with different composition ratios, which will create heterogeneity of pouring and reduce strength.
Attention! In such an important task, poor quality filling puts people’s lives at risk, so you should not experiment with the manual method of preparing the solution.
Prefabricated monolithic floor
You can use both the monolithic covering method and the method of covering aerated concrete using the prefabricated principle. This is a subtype of the monolithic method. It is suitable for a building consisting of one or two floors. The interfloor space is “stitched with beams” at intervals of 60 cm. Polystyrene concrete or expanded clay blocks are laid out on them, acting as both formwork and part of the floor. Concrete solution reinforced with reinforcement is poured on top and left until completely dry.
Finished slabs
Flooring made from slabs with voids is suitable if you are willing to spend a lot of money, since both the slabs themselves and their installation, which requires renting equipment for lifting, are more expensive. In terms of price, the situation becomes less burdensome if there is a factory nearby that produces such slabs, since you can order directly from the manufacturer, and the delivery budget will be quite acceptable. In this case, the project will cost even less than a monolithic one.
In what cases are monolithic and prefabricated-monolithic methods combined?
Prefabricated monolithic type ceilings impose certain regulations on the parameters of the building itself in terms of length and width, and the location of load-bearing walls.
This is dictated by the standard dimensions of the slabs and the fact that the slabs require support on supporting structures. That is, it is necessary to adjust the house plan and the arrangement of rooms in accordance with the standard dimensions of hollow-core slabs.
The support is made by the opposite sides of the slabs on the load-bearing walls. It is unacceptable to lay slabs on three walls, since this circumstance will incorrectly distribute the load on the foundation of the house, which is categorically unacceptable in the case of aerated concrete.
In overlap areas where it is not possible to place slabs, monolithic fragments are constructed. This usually happens due to the reduced area of the house, or in places where the ventilation system shafts from the bathroom or kitchen area are located.
The monolithic method of creating an interfloor divider is more convenient and multifunctional; it does not limit the planning of rooms and the ratio of the length and width of the building.
Choosing a concrete grade
It should be said that the issue of selecting the grade of concrete for a homemade ceiling is extremely important. After all, the wrong choice of this material promises problems with strength, decreased resistance to loads, and so on. Therefore, the recommendations of specialists in this matter will definitely not be superfluous. Let's look at what types of concrete there are today.
- Grade M100 is the lowest quality solution and is usually used before pouring monolithic structures. Typically, this option is used for pouring a foundation strip, forming a concrete pad, installing a curb, and so on.
- Concrete grade M150 is used for floors, screeds, and also for creating foundations for buildings with a small number of floors.
- M200 will be used to form floors, blind areas and screeds. Due to the high strength of the material, it is used for the production of concrete stairs.
- M250 will be an excellent solution for creating a monolith of strip foundations, as well as floor slabs.
- M300 is used to form floor slabs, as well as concrete stairs.
- M350 is used to create various monolithic surfaces, beams and pools.
Brands M400, M450 and M500 are practically not used in the construction of private buildings. They are in demand in the creation of buildings such as dams, dams, bridges and various hydraulic structures.
Programs for architects
Professional work on the design of buildings and structures is impossible without the use of technical programs for calculating floors. If building houses is your main occupation, it is worth making the effort to learn design tools.
ArchiCad program interface for floor calculations
The most common technical engineering programs in design organizations are ArchiCad, AutoCad, Lira, NormCAD and SCAD.
Advantages of engineering design programs:
- Versatility. Any of the programs can be used to construct and calculate all types of floors.
- Accuracy. The calculation takes into account a large number of factors that can affect the load and strength of the structure. Such detail in calculations allows you to obtain the most accurate data.
- Visualization. Having received the result, the builder clearly sees what and how he must install in order to obtain a guaranteed result.
- Preparation of project documentation. For professional developers, with the help of engineering programs, it is possible to prepare documentation that is accepted by all inspection bodies.
Disadvantages of engineering design programs:
- The claim that such tools are easy to learn is false. Often, their use requires special technical education, knowledge of strength materials and unified building codes.
- Volume of information: to work with engineering programs, you need to have a large amount of data, otherwise you can get unexpected calculation results.
- Access restriction: the programs are licensed; to use, you must purchase rights to use.