An uneven ceiling is a problem that apartment owners in multi-storey buildings face when making renovations. Even minor flaws will be noticeable and spoil the impression of the rest of the finish if the base is not prepared. How to level the ceiling, what methods and materials to use for this will be discussed in the article.
Classification of ceilings
The nature of the defects in the “rough” ceiling is influenced by the type of ceilings and the design of the house itself. You need to pay special attention to these parameters when it comes to a new building. Actually, the ceiling is formed from floors, which come in three types: monolithic, prefabricated and precast-monolithic. There are also more exotic types of floors, for example, aerated concrete, but we will not consider them.
- monolithic floors - typical for monolithic houses. The building structure is a single concrete structure without seams. The absence of seams reduces the likelihood of cracks at the joints. However, in new buildings shrinkage still occurs, which can lead to cracks. Monolithic buildings shrink over the years.
- prefabricated floors rest on load-bearing walls; this type of floor is most familiar to residents of panel houses. The design immediately provides for tolerances for shrinkage. Shrinkage of panel houses takes 2-3 years.
Separately, it is worth mentioning the shrinkage of brick houses; they can also have prefabricated floors; shrinkage of such a building can take from 5 to 6 years.
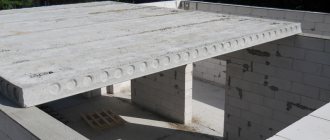
- Prefabricated monolithic floors are based on the use of hollow blocks, which are combined into a single structure when poured with concrete.
Floor on joists
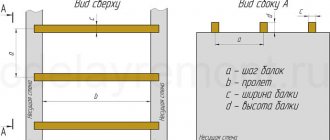
When it is necessary to create a reliable base for a wooden covering and the load on the floor cannot be significantly increased, logs or (much less often) so-called modular raised floors are used. These structures make it possible to eliminate any unevenness in the ceiling, but with a significant additional loss of ceiling height - at least 50 mm (the minimum intrinsic thickness of the structure).
The easiest way to make logs is from high-grade coniferous timber and level them using plastic wedges. Aluminum products on adjustable screw supports will cost several times more.
The tongue-and-groove floorboard is attached directly to the joists (with this design, their cross-section must be at least 50 × 50 mm), and the parquet and parquet boards are attached to plywood flooring with a thickness of 16 mm or more. It is advisable to fill the space between the joists with expanded clay, mineral wool or soft wood-fiber boards - this will improve heat and sound insulation.
Standard ceiling defects
A significant proportion of defects in ceiling coverings appear due to shrinkage. This is influenced not only by the floor itself, but by the design of the house and the foundation. Joints of different materials become the most problematic places, since elements can shrink with different dynamics. Due to deformations of the base, the finishing suffers: the plaster cracks, defects appear on the drywall.
Experts recommend starting the “rough” leveling of the ceiling only after 2–3 years, when the main shrinkage processes have completed. If it is not possible to postpone repairs in a new building, you need to carry out certain procedures to protect the surface.
To protect against shrinkage, plaster in new buildings must be reinforced.
Monolithic floors have the smoothest surface, so leveling them will be the easiest.
Prefabricated floors often have significant deviations from the horizontal. The two slabs may have different levels.
Where do the irregularities come from?
Irregularities can arise due to slabs that lie one higher and the other lower, deep seams are formed at the joints, and the horizontal plane of the future ceiling is disrupted. This problem is relevant for residents of Khrushchev.
In modern houses, monolithic concrete is often used instead of floor slabs. But even in this case, defects arise: seams, concrete sagging in places where the formwork sheets are joined, the formation of “sinks” on the ceiling surface or horizontal slopes due to unevenly aligned boards.
If you do not level the ceiling, the defects will be noticeable, and further finishing will only worsen the flaws.
Methods for leveling ceilings
The variety of ceiling leveling methods can be divided into two types: “dry” and “wet”.
- “Wet” leveling methods involve the use of materials that are adhesively bonded to the base. Examples include plastering, tiling, putty, and various adhesive modules. For “wet” methods there is a drying period
- “dry” leveling methods do not involve the use of binders that are adhesively bonded to the base. Only the frame is used, which is mechanically fixed to the base using hardware. The frame is sheathed with sheet material or serves as a basis for tensile structures. This group includes rack, cassette, tension, and suspended types of ceilings
Wet screed
Significant unevenness is usually eliminated with the help of a screed, the installation of which in a new building should be carried out according to a standard design, and in secondary housing requires prior approval from the housing inspection authorities. Before pouring a wet screed, it is necessary to reliably waterproof the ceiling with an approach to the walls, otherwise water from the solution will leak into the voids of the building structures (this can cause a short circuit in the wiring within two floors) and into the room below. In addition, when installing the screed, it is necessary to ensure insulation of impact and structural noise. Rolled bitumen-based materials with a thickness of more than 4 mm or special two-layer substrates, for example “Antistuk”, “Tekhnoelast Acoustic” or “Shumanet-100” will help to perform both tasks at once. All joints of hydro-noise insulation strips (slabs) are glued with mastic or special tape.
How to level a concrete ceiling
At the first stage of leveling a concrete ceiling, it is usually necessary to determine which method will be used. It makes sense to use wet methods in cases where there is no large difference in level (no more than 50 mm). This is due to the fact that increasing the thickness of the layer will affect the weight of the coating, which is attached to the base only by an adhesive method (glued). In addition, large differences make it impractical to use plaster when leveling the ceiling with your own hands due to the significant costs of the material.
Particular attention should be paid to preparing the base and calculating the required amount of materials. You should also take into account the age of the building: new buildings, as mentioned above, shrink, so some types of finishing cannot be done until shrinkage is complete.
If the concrete floors are prefabricated, then slab joints (rusts) are often visible on them. For wet types of finishing, the rustications need to be embroidered, filled with polyurethane foam, and then plastered or puttied. If the “dry” leveling method is used, then sealing of rustications may not be necessary, since they will still remain inside the frame of the suspended structure.
Elimination of defects
Any gap in the floor is a “loophole” for liquids. In addition, heat “leaves” from the room this way. There is no point in explaining how important it is from this point of view to put the surface in order. Nowadays there are enough products on sale that can be used to properly repair any crack. Particular attention should be paid to the joints between the floor and the walls of the room, especially external ones.
If signs of the development of putrefactive processes are noticed, then it is necessary to carry out appropriate treatment of the affected area. There are also many formulations for this. We can cite the example of copper sulfate, which is often called a proven “folk” remedy.
Ceiling preparation
With “wet” methods of leveling the ceiling, you need to be especially careful when preparing the base, because mistakes made at this stage can lead to peeling of the plaster in the future.
- removal of old plaster - if the ceiling has already been plastered, then the coating does not always need to be removed. This issue is resolved separately for each specific case, since this procedure is quite labor-intensive if you do the ceiling leveling yourself. If you hire a professional, dismantling the old coating will increase the cost of the work.
To make a decision on old plaster, it is necessary to carry out diagnostics. The reason for removing the finish may be cracks on the surface or mold stains. You should also try to tear off the coating with a spatula; if it begins to crumble, the plaster will have to be removed. You can also tap the plaster for diagnostics. If the surface “swells”, then voids have formed underneath, such a layer will be a poor base for a new finish.
To remove old plaster, you can use a hammer drill, axe, hammer or narrow spatula.
- Washing off the whitewash is a mandatory procedure before plastering work. Whitewash was commonly used in older homes. Lime whitewashes are especially dangerous: over time they crystallize and lose adhesion - the weight of the plaster can tear it away from the base
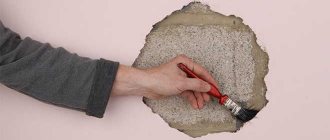
- cracks must be repaired using plaster or putty. You also need to add reinforcement; perforated tape or sickle mesh is suitable for this.
For more information about sealing cracks with putty, read the advice “How to properly seal a crack with putty: step-by-step instructions.”
- sealing rust - this architectural element spoils the appearance of the ceiling, so it must be dealt with in the same way as with cracks. Before embedding, it must be expanded by 2-3 cm. To do this, you can use a hammer drill. Then the recess is filled with polyurethane foam and puttied. A serpyanka mesh is glued onto the layer of putty, then a finishing layer of putty is applied on top
Preparatory stage
Before leveling a crooked ceiling, it is important to clean the manipulation area. The method is determined by the type of coating:
- Removal of water-based paint will be easier by pre-treating it with water and removing it with a metal spatula.
- It is possible to speed up the washing of whitewash by applying special compounds, soda ash or whitewash.
- Layers of persistent paint or enamel coatings are removed with an angle grinder with an abrasive attachment.
- Wallpaper is removed by moistening and then scraping with a spatula.
- To remove greasy stains, you should use soda ash or laundry soap.
- To remove rust, it is good to use hydrochloric, sulfuric or phosphoric acid. It is permissible to use anti-corrosion agents produced for the car.
- White or yellow stains caused by salt deposits can be removed with organic acids.
- To eliminate mold and mildew, you can purchase an antiseptic for concrete.
- Removal of dirt and soot is done with laundry soap or bleach.
The final stage of preparation is washing and priming the surface. These works are required when filling joints and sealing holes.
Ceiling markings
At this stage, you need to measure the horizontal level of the new ceiling. To do this, you need to find the most protruding point on the old foundation. To do this, you can use a long rule or a bubble level. The level must be applied in different directions and the readings checked. From the most protruding point we measure the thickness of the future ceiling and mark it on the wall. Then this mark must be transferred to all walls. To always see the level, you can screw self-tapping screws into the wall and stretch a rope between them. You can also leave a line on the wall using thread and paint.
If you have a laser level, then measuring work is greatly simplified. The device allows you to project a laser beam onto all walls in the room.
Formation of beacons
Beacons help maintain a uniform level during plastering work. The installation step is usually made so that it is no more than the length of the rule (100 - 130 cm). Galvanized slats, wooden blocks or mortar can be used as beacons.
Before installation, the appropriate locations must be marked. For convenience, you can stretch strings in these places.
In the places where the beacons are attached, small piles of mortar are glued in increments of 30 cm. You need to use the composition of the mixture that will then be used to level the ceiling.
A galvanized profile or bars are glued onto the solution. You need to press in until the level of the beacon reaches the level of the mark.
If the solution itself serves as a beacon, then you need to lay it out in a long strip, and not pointwise. The correct installation is checked with a bubble level. This method is more difficult, since it is more difficult to form an even strip of solution.
Is it worth installing the tension structure yourself?
Installing suspended ceilings is also considered the best way to level the ceiling. This method allows you to simultaneously organize the final surface finishing.
The process is carried out in several steps:
- First, marking is done. The location of the profile strips and the final ceiling height are determined.
- A person without extensive experience in this field should use the glazing bead method of attaching a baguette. To do this, holes are made in the wall and filled with dowels. Attention must be paid to the reliability of the fastening, which is designed for heavy weight.
- Now you need to fix the lamps. You need to think about the power of the lamps in advance. The wiring is laid in such a way as to avoid contact with the fabric after it is tensioned.
- The temperature in the room rises to 40 degrees. This allows the material to heat up and expand in size.
- Now the canvas needs to be secured in the profile. The process starts from the corner and spreads around the perimeter. Reliable fixation of the ends of the canvas is important. At the end of the action, all that remains is to trim off the excess.
- It remains to wait for the canvas to cool. Wrinkles that appear during the process are removed by local heating and smoothing.
This work requires a certain level of qualification and the availability of special tools. Considering the high risk of miscalculation in the absence of experience, it is better to entrust the matter to specialists.
How to choose a putty composition for the ceiling?
There are finishing and starting putties. The former have a finer grain fraction, so they can be applied in a thinner layer. The starting putty is usually laid in a layer of 10 mm to 30 mm. The finishing layer has a thickness of no more than 0.5 - 1 cm.
Also, putties vary depending on the initial readiness. Ready-made mixtures are supplied in buckets and are immediately ready for use; dry mixtures must first be mixed with water. Ready-made compositions have the finest fraction, so they are designed for laying in a thin layer. Also, ready-made formulations are not suitable for storage at subzero temperatures. Dry mixtures are more suitable for laying in a thick layer, so they are more convenient for “rough” leveling of various surfaces.
When choosing a putty, it is important to consider the conditions in which the room will be used. For wet rooms, it is better not to use gypsum-based compounds; in this case, it is better to use cement mixtures.
Cement-sand screed
Its optimal average thickness is 40 mm, the minimum local thickness is 20 mm. It is advisable to reinforce the structure with steel road mesh, and prepare the concrete from a factory mixture in bags. When the design thickness of the screed is more than 40 mm, lightweight concrete is used, most often expanded clay concrete, less often - more expensive concrete with foam glass.
It is important to dry the screed properly by covering it with film or periodically moistening it. Windows cannot be opened wide; only ventilation through vents or inclined sashes is allowed. The average maturation period for a wet screed is a month, but before laying the coating, be sure to check the residual moisture of the concrete with an electronic moisture meter.
With experienced builders, provided they use non-shrinking mixtures (for example, veber.vetonit 5000), the screed turns out to be quite smooth; it is quite possible to lay laminate and interlocking parquet boards on it (on top of the substrate).
However, often the base layer requires finishing leveling with a self-leveling solution. Usually it is carried out after 7-14 days, when sand concrete (expanded clay concrete) has gained about 70% strength, but some levelers can only be laid on a completely dry base.
Ceiling putty
The putty can be applied with or without beacons. In most cases, putty is applied after plastering to complete the leveling for painting. If you apply putty without plaster, this will significantly increase the consumption of material.
The starting putty is usually applied in several layers. The first must dry before applying the second coat. After drying, the surface is treated with sandpaper. To do this, it is convenient to fix the sandpaper on a grater or wrap it around a block. With this tool you need to make circular movements along the surface of the ceiling.
Read more about puttying walls in the advice “Putting walls with your own hands: simple step-by-step instructions.”
To apply the composition to the ceiling, use two spatulas (wide and narrow) or a spatula and a trowel. It is better to move the tool diagonally so that the layers overlap.
The finishing putty is applied after the starting layer has dried; it is needed if the surface is to be painted.
Mistakes made at work
Lack of reinforcement, improper priming and other errors lead to swelling and cracks. The plaster quickly falls off if the work is not done in good faith. Examples of errors:
- Too thin a solution may drain on a crooked base.
- The thick mixture does not adhere well to the surface, so the plaster bulges or falls off.
- The surface is not primed. In such cases, the plaster adheres less well to the surface. If you do not prime the putty before applying the 2nd layer, it is guaranteed to fall off during grouting.
- Many craftsmen believe that the primer is used only to moisten the surface, so they do not wait for it to dry or water the ceilings with ordinary water.
- Lack of reinforcing elements at the junctions of joints made of different materials.
- The absence of reinforcement often leads to the formation of cracks as a result of shrinkage.
- Some builders do not know that the reinforcement should be inside the plaster layer, and not under it. Because of this error, the solution is more easily deformed.
- Beacons cannot be left in the wall as they rust. Traces of corrosion appear on the surface after finishing.
- The solution hardens worse at temperatures below +5 degrees.
- Moisture evaporates from the mixture too quickly if the room is too hot.
When plastering, the thickness of the permissible layer must not be exceeded.
Before applying each new layer of finishing materials, you must wait until the previous one has completely dried. Haste is one of the main mistakes of inexperienced builders.
Leveling the ceiling with plaster
Plaster is used if the difference in ceiling level does not exceed 5 cm. Plastering is carried out along the beacons. In rooms with normal temperature and humidity conditions, gypsum mixtures are more often used. They have less weight per unit area, so they are well suited for ceilings.
Cement mixtures are heavier, so they are used only in rooms with high humidity, where gypsum compositions cannot be used. Plaster is applied between the beacons. The first stage is “covering”, when the solution is applied to the ceiling without leveling. The second layer is applied to those places where the thickness of the layer is insufficient.
The process of applying plaster to the ceiling is much more complicated than puttying.
When the entire ceiling space is covered with mortar, they begin to trim it using the rule. The tool is pulled along the beacons, removing excess solution. After the plaster has hardened, the beacons must be removed from the ceiling. At the last stage, the surface of the ceiling must be rubbed with a liquid solution.
List of required tools and materials
You will need:
- Spatulas of different sizes. These tools are convenient for removing old ceiling coverings, as well as applying mixtures.
- Drill with mixer attachment.
- Plates that will be used for grinding.
- Malka for mixing plaster.
- Maklovitsa and roller.
- Painting cord that allows you to mark a control line.
- Rules 2 and 3 meters long.
- Plaster or putty.
To ensure safety, it is important to have reliable mobile ladders and platforms.
Dry ceiling leveling
Dry leveling does not involve the use of binders adhesively bonded to the base. With this leveling method, some steps of preparing the base can be omitted. For example, you don’t have to embroider the rustics, as they are hidden by drywall.
For dry leveling, you need to make a frame, which is sheathed with sheet material (gypsum plasterboard, gypsum board, aquapanel, chipboard, plywood, etc.). In most cases, drywall is used, since it is the most common and affordable.
Frame marking
Marking the frame is no different in principle from marking lighthouses, but you need to immediately take into account the thickness of the frame, so we set aside 5 - 12 cm from the protruding point. If there is recessed lighting, the thickness of the ceiling will be at least 9 cm. Along the perimeter of the room on the walls we mark the location of the guide profile .
The frame for a plasterboard suspended ceiling consists of a ceiling guide profile (UD) and a ceiling profile (CD). CD profiles form a sheathing on which the drywall is fixed. The entire structure is attached to the base with hangers. Direct suspension allows you to make the ceiling thickness up to 10 - 12 cm. An anchor suspension has moving parts and is used for more complex ceiling structures. Read more about frame elements for drywall in the advice “Profile for drywall: a brief educational program.”
Frame installation
- the guide profile is attached with dowel nails to the wall. It is recommended to install hardware every 50 cm or every 25 cm if fastening is to loose foundations
- After installing the guides, you need to install and mark the placement of the ceiling profiles (CD). This will help you find the mounting points for the hangers. Each suspension must be attached with dowel wedges to the base
- Long ceiling profiles are supported on opposite guides; they are called main profiles. If their length is insufficient, then connect the two profiles using an extension cord
When installing the frame, do not install the profiles close to the walls; this will prevent the base from moving due to temperature deformations of the drywall.
- The main ceiling profiles (CD) must be spaced at 1200 mm intervals, which corresponds to a sheet of plasterboard. Cut ceiling profiles, called load-bearing ones, are installed perpendicular to the main profile. They should go in increments of 500 mm. Two perpendicular ceiling profiles are connected using single-level connectors (“crabs”) and fastened with self-tapping screws
For more information about installing a suspended ceiling, read the advice “Suspended ceiling made of plasterboard.”
Drywall installation
After installing the frame, it is sheathed with sheets of plasterboard. It is recommended to first make a layout on paper in order to understand how many sheets will need to be cut.
Each subsequent row should be offset by half a sheet. It is recommended to use 12 mm thick plasterboard for the ceiling. When cutting sheets, it is important to properly process the joints; to do this, you need to chamfer them. This operation is performed before installation on the frame using a construction knife or an edge plane. If the joints are processed when the drywall is already fixed to the ceiling, then a construction knife is used.
Drywall is secured to the frame using black self-tapping screws. The junction of the two sheets must fall on the frame profile. You must follow the rules when tightening screws. The head of the hardware should not stick out, nor should it go deep into the gypsum core, breaking through the cardboard layer. After fixing all the sheets, the joints are primed and treated with putty.
For more information about processing the joints of drywall sheets, read the advice “Sealing seams between sheets of drywall: step-by-step instructions.”
Special leveling mixtures
It is good to use the methods described above where the difference in the floor allows you to “walk around” and can reach several tens of centimeters. But how to level a concrete floor located in multi-storey buildings, where the difference is a maximum of 1-2 centimeters? In this case, it is impossible to use a solution or dry screed, since the entire technological process is disrupted. To do this, we can use a ready-made self-leveling mixture, which is sold in construction stores. To use it, you need to add water according to the instructions on the package and carefully move it using a special mixer onto a drill.
The finished mixture has a fairly liquid consistency, which is why it easily spreads over the floor surface, eliminating all unevenness. To distribute it evenly, you need to use a metal spatula. After the floors are filled, you should go over the entire surface with a special needle roller, which expels all the excess air that could get in during either pouring or leveling the mixture.
When using this method, you need to act extremely quickly, since this material tends to set very quickly. Considering the peculiarity of this material, experts recommend leveling the surface in this way with at least two people. So that one person pours it over the surface, and the other rolls it using a roller.
Despite the fact that everything dries out after 10 hours, it is best to carry out further work on arranging the floors after 1-2 acres so that everything is completely dry.
It should be noted that the described methods are very popular today, so in order to answer the question of how to properly level a concrete floor, you first need to measure the zero horizontal level, and then evaluate the entire scale of the work. In addition, you need to take into account the type of room, the time spent, and many other related issues. It is impossible to unequivocally answer which method is better, since each has its own advantages and can be used. And which one is best suited in your case, each person decides independently.
Leveling the ceiling with tiles
Tiles can be a good ceiling option depending on the material they are made from.
- ceramic tiles - used as ceiling finishing quite rarely due to their high weight. Of course, if installed correctly, there should be no problems - the tiles will be firmly fixed to the base. If there is an error or external factors (leakage from neighbors), the tile may lose contact with the base, and this is already dangerous, given that the tile has considerable weight
- acrylic tiles are a finishing material that imitates regular tiles well, while being lightweight, making them well suited for ceilings. Acrylic tiles are glued with regular glue
- foam tiles are not only lightweight, but also cheap finishing materials. Such tiles are glued with an adhesive composition. There should be no solvent in the glue, as this substance will corrode the foam.
All of the tiles listed can be laid on the ceiling, but they will not help level the surface in all cases. They will be able to hide small irregularities, and if distortions in the ceiling level are combined with deviations of the walls, then the square modular structure of the tiles will only emphasize the curvature of the geometry.
Before laying tiles, it would be more correct to first level the surface with plaster, and only then glue the tiles to it. You should definitely not glue heavy tiles onto uneven surfaces, increasing the thickness of the tile adhesive.
Semi-dry screed
It dries in no more than a week and does not threaten leaks into the apartment on the floor below (this does not mean that you can do without a waterproofing and soundproofing layer). However, not all workers have experience using this technology, which increases the risk of defects.
Theoretically, when installing a semi-dry screed, special equipment should be used - a concrete mixer, a pneumatic blower, tamping and troweling machines. But in practice, work is often carried out manually, simply trying to ensure that the water-cement ratio does not exceed 0.2 (instead of the usual 0.3-0.5). Such a mixture is difficult to lay and level, and the density and strength of concrete without machine compaction will be lower than with a traditional recipe. Therefore, reinforcing polypropylene fibers are mixed into the water (approximately 100 g per 10 l). It is still advisable to level the layer using a trowel, although it is also possible to use self-leveling levelers.
A serious disadvantage of semi-dry screed is that only its thin top layer is strong enough, so it is not suitable for some finishing coatings, such as parquet and large-format tiles.
Alternative types of suspended ceilings
Suspended ceilings are represented not only by plasterboard ceilings, but by some other structures.
The cassette ceiling consists of modular panels that are assembled on a suspended frame. This suspended ceiling option completely eliminates “wet” finishing methods, because it does not need to be painted or further processed - it is immediately ready for use. Such designs are more often found in offices and public buildings.
A slatted ceiling is another type of prefabricated modular structure that does not require additional finishing. This ceiling is available and often used in bathrooms in private apartments. The structure is formed by longitudinal slats, which are installed on hangers.
Modular raised floor
Modular raised floors help to quickly level out any differences in floor level and implement non-standard planning solutions. They are expensive and in apartments they are used mainly for solving non-standard problems, for example, constructing podiums of considerable height or laying under the floor ducts of a ventilation and air conditioning system based on low-power units.
The main parts of the raised floor are supports, stringers and slabs. The most common slab size is 600 × 600 mm, and the height of the supports varies from 50 mm to 1.5 m.
The supports can be made of plastic (hard PVC, polyamide), steel or a combination of these materials. Floor elements are mainly made from high-density chipboard with a thickness of 38 mm. To prevent the emission of formaldehyde, they are lined with aluminum foil along the plane and with PVC tape along the edges. The cost of a set of parts starts from 2200 rubles. for 1 m2.
A more environmentally friendly solution is slabs made of reinforced gypsum (on company websites you can find the name “Calcium Sulfate”), reinforced with steel sheets, but they are twice as expensive as chipboard ones.
Source