This is due, first of all, to the poor strength characteristics of the material, so it is not recommended to install it in places where the soil is weak-bearing.
Also, this version of the base is not recommended for cold climatic regions; in this case, you need to choose the building material that is most resistant to thermal changes.
Is it possible to build from aerated concrete blocks?
The use of gas block in basement structures is determined by the hydrogeological specifics of the land plot , as well as the design architectural solution of the residential property.
Base - can have a height of 0.8 to 2 m and should be located on the foundation.
Its purpose is to create a protective barrier for the entry of ground moisture and street cold and distribute the loads from building elements onto the foundation.
In many cases, it also performs an architectural function; a house, even with a low base, looks much more representative than without it. In addition, many owners arrange utility rooms, a garage, a laundry room and a boiler room in the basement.
In most cases, experts allow the construction of the building’s basement and basement floor, both from aerated concrete blocks and from monolithic aerated concrete. However, this will require a number of protective measures to be taken at the same time.
This is primarily due to the high hygroscopicity of aerated concrete. If appropriate protection is not carried out, the base will draw moisture from the ground, which is unacceptable, since negative operating conditions for the house as a whole will be created.
In terms of thermal protection, aerated concrete is a warm wall material, so the issue of thermal protection of a plinth made of aerated concrete blocks is practically solved by choosing the required wall thickness.
If the base and walls of the house according to the project are planned to be built from aerated concrete blocks or GB monolith, then it is preferable to equip them with a monolithic strip foundation.
In what cases is this not suitable?
Incorrect selection and calculation of foundation parameters lead to the appearance of cracks on the base of aerated concrete blocks, which will threaten the existence of the house. This is due to the fact that the plinth masonry made of aerated concrete is weak in bending.
And in the case when the foundation on which it rests is not rigid and stable, contains significant differences in geometry, does not correspond to the type of soil, the topography of the territory and the height of the building, then the base is capable of bending with the subsequent formation of cracks.
To prevent this from happening, it is necessary to have a professionally completed house design, according to which specialists must build the foundation and basement.
The design must take into account the characteristics of the soil in terms of the degree of heaving , the height of groundwater, as well as the individuality of the terrain in terms of the presence of slopes and elevation changes and the design load on the foundations.
For basement walls made of aerated concrete, it is allowed to build a house from lightweight wall materials, preferably from similar aerated concrete blocks. At the same time, there is a limitation on the number of floors of the house - no higher than 2 floors.
, the following should not be used for aerated concrete plinths :
- strip shallow foundation;
- columnar;
- pile-screw and any other foundations with a drainage system.
Masonry
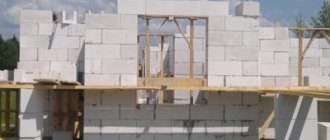
Now you can start laying the gas blocks. Initially, you need to set up the beacons and stretch the twine between them, leveling on which the blocks will lie, once again checking everything with a level, we begin the laying. The first gas blocks are laid from the corners, we install them step by step and accurately measure all the dimensions and locations of future walls. If any deviations are found, even of a couple of millimeters, then they should be corrected immediately, as this is fraught with crooked walls.
Requirements
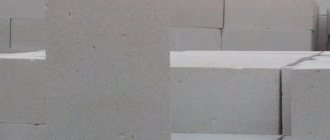
The basic document regulating the production, installation and operation of aerated concrete for the plinth is GOST No. 25485 of 1989.
The requirements are classified according to the modification and purpose of the products, while GOST allows the production of three types of aerated concrete blocks: thermal insulation - the weakest, structural and thermal insulation - medium strength and high-strength structural.
To blocks from GB
For these modifications of aerated concrete, the maximum density of products has been established :
- structural – grade D from 1000 to 1200;
- thermal insulation – grade D from 300 to 500;
- structural and thermal insulation – grade D from 500 to 900.
For durable structures, which include the plinth, it is better to choose structural aerated concrete with grade D 1000 and higher, the grade D indicator corresponds to the density of the product in kg/m3
The main characteristics of aerated concrete blocks for the plinth, grade M 1000:
- density, 1000-1200 kg/m3;
- strength class, B5.0 - B 7.5;
- thermal conductivity coefficient, 0.29 W/m2xC;
- frost resistance, F100 cycles;
- environmentally friendly;
- not flammable;
- durability over 50 years.
The calculation of the thickness of the masonry is related not only to the strength of the base, but also to the protective characteristics; thicker walls have a higher thermal resistance, which does not allow internal heat to escape from the house to the street. This indicator is calculated based on the climatic characteristics of the area.
For Moscow, according to SNIP of climatology and heating engineering - Rreq = 3.15, with the operational humidity of aerated concrete being 5% and the thermal conductivity coefficient being 0.29 W/(m2xC), the thickness of the plinth walls made of aerated concrete M 1000 should be more than 400 mm.
If, according to strength calculations for low-rise buildings, the installation of blocks of smaller thickness is allowed, then the developer must provide an additional layer of thermal protection with mineral wool or other heat insulator.
Aerated concrete blocks have a certain chemical aggressiveness due to the use of lime, which causes increased corrosion of the metal, so to reinforce the blocks it will be necessary to use either metal with an anti-corrosion coating or reinforcement made of polymer bonds.
Monolithic GB
Monolithic aerated concrete is poured into the formwork on site, the liquid solution must have similar characteristics as GB blocks :
Environmental Safety.- Fire safety.
- Strength not lower than B5.0 - B 7.5.
- Thermal conductivity coefficient, 0.20 W/m2xC.
- Frost resistance over F100 cycles.
- Durability over 50 years.
- For basement floors, the sound absorption rate is additionally normalized to at least 40 dB.
Monolithic foam concrete, unlike GB blocks, has certain limitations caused by the pouring technology and the actual dimensions of the formwork, for example, in terms of layer thickness, compliance with the proportions of preparing the working mixture, and the need for additional surface protection after removing the formwork.
To carry out monolithic work, it will be necessary to use specialized equipment - dispensers, so as not to create deviations in the design ratios of ingredients.
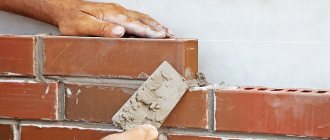
Brick plinth manufacturing technology
Having decided what a brick base is needed for, you can begin construction. Laying the base of a building does not require high qualifications or special equipment.
Material selection
It is not recommended to use sand-lime brick due to its maximum hygroscopicity. In addition to destruction from the moisture they absorb from the air and earth, they transfer it to the walls or foundation. In addition, decorative plaster, which is most often used to finish masonry, does not adhere well to their surface. the optimal choice is:
- clinker is the most durable of existing analogues, has a long service life, does not require finishing, is absolutely waterproof, but is too expensive, so it is rarely used;
- ceramic clay brick - average price, excellent decorative properties, solid modifications are used (grades not lower than M200, frost resistance F100);
- dry, semi-dry pressing - looks like ceramics, but does not fire, has lower frost resistance, is inexpensive, the masonry does not need lining;
Solid clay brick M200 is the most suitable material for the plinth.
When choosing a brick other than the walls, the plinth by default becomes an independent element of the facade design.
What tools will you need?
To build a brick plinth, you will need a standard trowel, a level, a mooring, a plumb line, a cord, and a pick. When using facing bricks, cutting is best done with an angle grinder (grinder) with a diamond blade. For the solution you will need a bucket with a shovel or a bucket with a drill and a mixer. Professionals can make do with a piece of roofing felt or a sheet of iron; it is better for a home craftsman not to risk the quality of the batches.
For facing masonry, special devices are produced that make it easier to level the pastels in each row. The only drawback of the Bricky device is its adaptation to foreign bricks, the dimensions of which are somewhat different from their domestic counterparts.
Selecting the width of the plinth
The brick plinth has a width depending on the type chosen (flush, protruding, recessed) and the thickness of the walls. For example, for a masonry of 51 cm, this value is in the range of 45-57 cm. There are options when the base is wider than the foundation - in this case, the release of brick on any side is limited to ¼ of its length (6 cm). If for the thickness of the walls a similar overlap of masonry of the first row along the base is not enough, the foundation will have to be topped up from a convenient side, increasing its width.
Construction requirements
They are established by a number of regulatory documents regarding cellular concrete and blocks made of cellular materials, as well as requirements for the foundations of buildings and structures.
Basic regulatory requirements for the construction of a plinth made of monolithic aerated concrete and GB blocks:
- The minimum height of the plinth is determined to be at least 0.8 meters.
- The need for waterproofing and heat protection work is left at 0.5 m between the base and the walls of the pit.
- In basement rooms with air humidity from 65 to 75%, the external/internal walls are hydrophobized, and at a humidity of more than 75%, a separate vapor barrier layer is installed.
- The maximum permitted crack opening width for GB is 0.2 mm for a short time.
- The permissible level of shrinkage of basement walls after drying is 0.5 mm per 1 m of masonry.
- It is mandatory to use fine-grained glue, which increases the heat resistance of the walls by up to 30% due to the absence of “cold bridges” and increases their strength characteristics.
Reinforcing structure
When constructing residential buildings, it is necessary to further increase the durability and strength of the structure. To increase strength, the process of installing reinforcing structures is used. For this purpose, reinforcing rods are used, which are tied together with wire. When using reinforcement in the manufacture of floors, the risk of cracks and chips is significantly reduced.
Concrete cannot cope with heavy loads. When there is a large load on concrete, it begins to stretch and therefore its integrity is compromised. This is why reinforcement is used. Concrete in conjunction with reinforcement creates a material that fully meets the requirements in construction and can withstand heavy loads.
Reinforcement can be made either from metal mesh or from broaching reinforcement.
To create a metal mesh, steel wire 5 mm thick is used. It is intertwined so that at the exit it presents a cellular structure. To create broaching reinforcement, steel rods, fiberglass and polypropylene are used.
Consumables and tools for construction
Block and monolithic aerated concrete differ in the method of laying, and therefore the set of tools and devices that will be needed to carry out these types of work also depends.
For monolithic aerated concrete you will need a formwork tool :
hammer;- grinder and jigsaw.
For mixing and compacting concrete mortar in formwork:
- vibrator;
- concrete mixer;
- containers for solution and a shovel for filling them;
- dispenser for supplying monolithic mortar into the formwork.
To build basement walls from aerated concrete blocks, the following tools will be needed:
- measuring set: plumb line, rope, level, steel square, ruler and tape measure;
- electric drill;
- saw for cutting blocks;
- wall chaser for creating recesses for reinforcement or laying utility lines;
- mallet;
- notched trowel and trowel;
- carriage for making smooth, uniform and thin seams;
- bucket-comb for applying an even layer in any direction;
- grater for smoothing the edges of the block and leveling the horizontal plane of the walls.
How to build it yourself?
Before designing, an individual developer must:
- conduct a soil analysis,
- calculate design loads,
- choose the optimal base parameters,
- and also prepare the site for construction.
To carry out excavation work and install a cushion, the builder needs to rent special equipment for compacting the bottom.
Construction technology:
- Marking the site and digging a pit. Transfer the building plan in natural dimensions to the work surface. Then they dig a pit and compact the bottom.
- Pillow device. A layer of geotextile is laid at the bottom of the pit, and a bed of medium-fraction gravel is laid on top, followed by compaction. The upper part of the pillow is a compacted layer of purified sand.
Waterproofing the foundation is a necessary step, since foam concrete absorbs moisture well, which reduces its strength characteristics. In your work you can use film material or sheet roofing felt.- Thermal insulation of the slab base to protect the structure from temperature changes. In most cases, extruded polystyrene foam is used, which is used to lay out a layer of waterproofing material.
- Construction of panel formwork.
- Installation of a reinforcement frame made of two chords (upper and lower).
- Filling the interior space with concrete mortar.
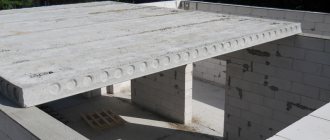
- Laying reinforced concrete slabs as close to each other as possible (when using monolithic reinforced concrete slabs).
- Pouring the concrete solution followed by bayoneting to remove air and increase the homogeneity of the mass.
- Concrete maintenance, formwork dismantling.
Step-by-step instructions for construction on a strip foundation
The basement can only be erected after the foundation has been professionally completed. The foundation for an aerated concrete plinth must have a high level according to a number of indicators:
- sustainability;
- rigidity;
- strength;
- reliability.
This design must also have waterproofing. According to experts, for an aerated concrete plinth, which traditionally has a depth of no more than 50% of the total height, the most preferable option is a recessed strip foundation ; the walls of the plinth can be made either monolithic or in the form of laying GB blocks.
Recessed strip foundation - installed below the freezing depth of the soil, which in some places reaches from 100 to 250 cm. In this regard, this foundation option is quite expensive and heavy, but nevertheless, experts recommend it when constructing a basement floor.
For example, for a foundation at a depth of 2 m of a square house with an area of 100 m2, the weight of the foundation reaches 100 tons, and the pressure it creates is approximately 0.5 kg per cm2. If the soil is weak, it will be necessary to increase the support area, so a special heel extension is made to distribute the load from the foundation and structures of the house over a larger area.
From stones
The work of laying a plinth made of aerated concrete is carried out by a team of 3 people to ensure the safety of the work and the speed of masonry, taking into account the curing time of the glue.
During the laying process, the blocks , in which case the moistened material will not absorb moisture from the working solution or glue. Beforehand, the GB blocks are cleaned of dirt, checked for compliance with the design size, and, if necessary, the sides are trimmed.
You will also constantly need to check the horizontalness of the foundation with a level; if the difference between the blocks is more than 20 mm, you will need a surface before laying. After this, the squareness of the base and the diagonals of the base are checked.
One of the main preparatory work is checking the perimeter of the future building for the correct dimensions and right angles. This is done by measuring the lengths of future walls and the corresponding diagonals.
The first row of masonry made from aerated concrete blocks is laid using mortar , having previously laid 2 layers of roll insulation on the foundation. After which the future walls are marked. This is done to level out small unevenness and differences on the outer surface.
Subsequent layers are laid with a special glue, which has a number of advantages: they reduce the cost of masonry, increase the thermal resistance of the wall and the speed of work.
Reinforcement of the seam between the insulation and the 1st row of GB blocks is also carried out; this stage will contribute to a more even distribution of the load from the base to the foundation and strengthen the load-bearing capacity of the first masonry rows.
Reinforcement is usually made with a 50x50mm masonry mesh and 4 mm wire along the entire perimeter of the future walls of the house.
Step-by-step instructions for laying a plinth made of aerated concrete blocks:
The laying begins from the corners of the house, from the highest one, the 1st stone is laid on the mortar, after which it is leveled horizontally and vertically. Install the stone at the next corner in the same way.- A cord is pulled between the corners along which the 1st row will be laid. Sometimes, to simplify the work, metal rods are driven into the corners and a construction cord is pulled between them.
- The second and subsequent rows are laid on glue.
- Glue is applied to the wall where they plan to place the next block, and to the end of the previous stone.
- Using a notched trowel, the glue is leveled and a new block is laid.
- The block is initially leveled horizontally and vertically, and then pressed against the previous stone with 2-3 gentle blows with a mallet on the end.
- Each row is performed with a bandage, ideally if it corresponds to 1/2 the length of the aerated concrete block, so that the seam runs in the middle, but not less than 15-20 cm.
- Subsequent rows, similar to the first, start from the corners.
- After laying the corners, a cord is pulled from them and a row is laid out.
- During the work process, it is necessary to constantly check the project, not forgetting to leave technological openings.
- Reinforcement is carried out in every fourth row. To do this, 2 horizontal grooves are made in the stones located in a row along the perimeter of the base, they are filled 1/2 full with glue and fiberglass or steel reinforcement is laid overlapping without breaks, then the groove is filled completely with glue and aligned with the main plane of the block.
- The last row of the plinth is secured with a brick or reinforced concrete reinforced belt and protected with waterproofing roll materials.
- The walls laid out on the ground side must be reliably waterproofed and, if necessary, insulated, after which a blind area of at least 100 cm wide and sloped towards the ground is made.
For the convenience of laying the base, GB blocks are first placed on the wall according to the diagram, and then the laying process begins. There is no need to prepare a large amount of glue, since its shelf life is very short; usually this information is indicated by the manufacturer on the glue bags.
From the monolith
There are two options for producing monolithic aerated concrete directly on the construction site or delivering already prepared mortar by truck. The technology of monolithic laying of aerated concrete involves the use of foaming agents that impart porosity to the material.
The solution is fed by concrete pumps into the formwork, which is assembled according to the design from brick, plastic or fiberglass. The pouring should proceed uniformly, avoiding bulges and voids in the thickness of the solution.
The formwork can be non-removable, for example, made of brick and collapsible. The latter should be easy to install and dismantle, and also correspond in strength to the size of the basement wall being poured.
After assembling the formwork, monolithic aerated concrete is poured. Limit beacons are pre-installed using a laser level. The mixture is laid evenly, smoothed with a spatula, and it is also tapped on the formwork to compact the solution.
Filling is carried out within one day . After completing the process, level the surface with a flat board and cover the base to harden, protecting it from the sun and moisture with polyethylene. To ensure uniform drying, they are periodically moistened with water.
During the process of pouring concrete, voids and air bubbles can be created, which significantly reduce the strength level of the base. To do this, the poured mass is compacted with a construction vibrator.
The process is stopped based on the following signs of sufficiency of compaction:
- there are no air bubbles in the solution;
- the concrete shrinkage process has stopped;
- a liquid layer has formed on the surface of the monolith; at this moment it is very important to stop the tamping in order to prevent delamination of the monolithic mass.
The rate of solidification of the monolith will depend on the volume of hardener used and the ambient temperature. Aerated concrete reaches full strength in 7-10 days, but installation of the following building structures is permitted only after 21 days from the date of manufacture.
Installation of armored belt
In some cases, more thorough reinforcement may be needed than laying reinforcement in aerated blocks. To do this, an armored belt is poured onto the laid first row of the basement floor, it allows you to evenly distribute the loads. To arrange it, you first need to install wooden formwork, into which a welded frame made of reinforcement is laid. After which, all this is poured with concrete mixture and thoroughly vibrated. An armored belt covered with polyethylene gains strength in 3-4 days, then subsequent blocks can be installed, observing all the rules of dressing and reinforcement.
Errors and process difficulties
The first mistake that inexperienced performers make is choosing the wrong material; many of them confuse foam block and aerated concrete. Outwardly, they are very similar and even have the same cut, but foam concrete for the base is strictly not allowed, for the reason that, despite its good heat resistance and water resistance, it is completely unable to bear load-bearing loads.
Common mistakes during the construction of aerated concrete plinths:
- Incorrect foundation type selected.
- The foundation was not waterproofed with rolled materials before laying aerated concrete.
- The size of the free space between the wall and the ground in the underground part of the base is incorrectly selected.
- The blocks have not been prepared; low quality material with poor geometry is used for construction.
- The levels and diagonals of the foundation were not maintained before laying GB blocks.
- The reinforcement of the first and every fourth row has not been completed.
- The block ligation scheme is broken.
- There is no armored belt on the last block row of the plinth.
- Violation in the scheme of external thermal and waterproofing of walls.
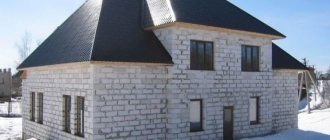
Types of aerated concrete plinths and their features
All plinths are conventionally divided into several types: protruding, flat and recessed. Each of them has its own construction characteristics and application requirements. For example, a protruding plinth is easy to identify because it lives up to its name. Such houses differ from others in that their front lower part of the external walls stands out relative to the rest of the wall. This type of plinth is used in houses that have thin walls and a basement. Considering that the walls are thin, the basement of such a house requires additional insulation.
Scheme of types of basement floors.
The peculiarities of the construction of a protruding plinth are that it requires mandatory protective drainage equipment. Of all other species, it is most susceptible to adverse environmental influences. For this reason, special requirements are put forward for its finishing materials, which must be of the highest quality. Of these features, protruding plinths are not often used in construction.
The next type of facade lower part of the external walls is a flush plinth, which is built at 1 level with the wall. It is also rarely used by builders. But the most common type of base is a sinking one. Its design is noticeably superior to other types. Its sinking design prevents excess rainfall from entering it. The waterproofing layer is protected from mechanical damage due to direct exposure to rain, hail or snow and ice.
In addition to its weatherproof design, the sinking plinth has lower costs for building materials and significantly reduces the time for its construction. It is for these reasons that builders prefer this type of lower part of the facade walls.
Pros and cons of use
Aerated concrete for the construction of a plinth should be taken at the house design stage, since this solution is not applicable to all types of houses and soil. Only professionally performed engineering and economic calculations can make a choice. whether this building material is suitable for specific construction conditions or not.
And, despite the difficulty of choosing this type of building material for a basement structure, it has many advantages :
- Easy to use, the stone is easy to process and lay, it is not heavy, which allows you to work without the use of lifting equipment.
- Thoughtful optimal size of stone reduces construction time compared to traditional brick.
- High heat and sound protection characteristics.
- Highest class in fire resistance.
- A high level of environmental safety, the radiation background of the material is lower than that of gypsum, and in terms of natural characteristics it is second only to wood.
- High biological stability without the use of antiseptics.
Negative aspects of using aerated concrete for the construction of a basement and how to minimize them:
- High moisture absorption, special protective treatment of walls is carried out.
- Fragility - this disadvantage manifests itself when a poor-quality foundation is built, which manifests itself within 2-3 years. Working with aerated concrete requires experience and compliance with all technological standards.
- Problems with fastening; equipment on such walls can be installed lightly and using special fasteners.
- Frost resistance, even if this indicator is indicated in the passport as 50, in practice it can only correspond to 25. Therefore, you need to take only material certified with frost resistance of at least 100 cycles.
- The presence of a corrosive material in the composition - lime, for metal elements and devices, for example metal heating and water pipes passing through such walls, will require anti-corrosion protection.
- An aerated concrete wall requires additional waterproofing and external cladding.
External finishing
From the outside, the aerated concrete plinth can be lined with any finishing materials (tiles, brick, stone, etc.), which will further protect the basement and the entire structure from the penetration of cold air and moisture. In addition, this solution will give the building an attractive appearance. If it was decided to make the aerated concrete base protruding, then it must be protected with a special canopy.
Subsequent work on the construction of a country house can be continued immediately after the construction of the base, because aerated concrete blocks do not shrink or deform over time. It is worth noting that you should not make an aerated concrete basement if you plan to build a tall and heavy building.
Average prices
The final costs of constructing a plinth from block or monolithic aerated concrete will mainly depend on the cost of the material and the work on its installation.
The average cost of aerated concrete blocks depends on the brand, production technology, and size. Average prices per 1 m3 for aerated concrete blocks by manufacturers in Russia:
- Bonolit/Maloyaroslavets, D500, 625 x 250 x 500 mm, 6990 rub.
- DRAUBER /Electrosteel, D500, 600 x 200 x 300 mm, pack of 50 pieces 24,000 rub.
- Bonolit/Kupavna D500, 600 x 100 x 250 mm, 6400 rub.
- Kaluga D500, 600 x 400 x 250 mm, 6000 rub.
- Ytong, D500, 600 x 400 x 250 mm, 6400 rub.
The cost of laying work depends on the construction volume and configuration of the object, the quality and size of the material, and the type of application of the masonry mortar.
Typically, the cost of work of self-organized builders is cheaper , they charge from 700-1200 rubles/m3, professional companies with a guarantee of work perform them in a higher price range from 1200 to 1700 rubles/m3, but at the same time they provide long-term warranties.
Excavation
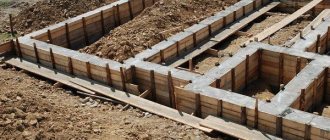
If the work on installing temporary drainage is completed, then it is necessary to begin excavation work. Dug trenches should not be left open for long.
When carrying out excavation work, it is necessary to place pegs at the base. If the soil on the site consists of chernozem, then it is necessary to remove this layer. When the clay layer begins, it is necessary to dig a trench 30 cm in size.
Earth-moving equipment is not always used to dig trenches; sometimes they prefer to dig trenches by hand. For example, trenches for installing shallow tape can be dug by hand without difficulty.
The use of technology significantly reduces operating time. When earthmoving machines are used, 2 stages of excavation work are carried out. At the first stage, the equipment digs trenches in black. At the second stage, shortfalls are eliminated and the excavation depth is checked.
When going through the first stage of excavation work, it is necessary to compact the native soil to its natural state, or if the deviation is insignificant, then the bottom must be covered with crushed granite and then compacted. It is worth taking care in advance about the location of the excavated soil, since in the process of excavating soil from the trench, its volume actually increases by one and a half times.
Carrying out excavation work
General characteristics of projects
A typical design of a house made of foam blocks with a basement most often involves the construction of the following elements:
- Basement floor with an area of 30 to 50 m2, in which storage rooms, workshops, boiler rooms, etc. are located . In some cases, a garage is also located here, but then a separate exit is provided for the car (see diagram below).
- Ground floor with living room, sitting area, bathroom and kitchen . Part of the first floor is sometimes reserved for a spacious porch or open terrace.
- Second floor with several bedrooms and sometimes an additional bathroom.
Note! In some cases, in order to save materials and optimize costs, the second floor is made into an attic, with thinner and lighter walls. In this case, special attention must be paid to high-quality thermal insulation.
As a rule, all load-bearing structures are made of foam blocks of different thicknesses. At the same time, the outside walls are finished with facing bricks, and the part of the basement floor protruding above the ground floor is finished with ceramic tiles, clinker or special siding with additional thermal insulation.
This design has a number of advantages:
- The first and most important thing is the price. The use of foam concrete blocks can significantly reduce the cost of building a house, so it is better to spend the excess on finishing and communications.
- Thermal insulation. The low thermal conductivity of foam blocks provides us with an acceptable temperature even in an unheated basement. What can we say about a full-fledged basement?
Roof installation
Mauerlats 100*150 mm are fixed to prepared studs.
We attach the rafter system to them:
- first the outer rafters;
- then the ridge beam;
- at the end are the rest of the rafters.
Then we connect the rafters together with crossbars (horizontal jumpers).
Installed rafters
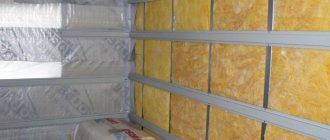
We lay out the gables along the installed rafters. The roof slope turned out to be at an angle of 45 degrees. Then boards are attached to the rafters from the inside to attach the insulation and the roof is insulated.
The photo shows the installation of mineral wool in 3 layers (total thickness 15 cm). It is covered with a windproof film on top, and a vapor barrier membrane on the outside.
Roof insulation
To install ondulin, a counter-lattice made of slats is nailed onto the rafters to create a ventilation gap, and boards are nailed perpendicularly to them in increments of 45 cm.
Main nuances
Before starting construction, it is important to clarify the nuances.
- At the basement stage, it is not necessary to install windows and doors that will be directed to the north. Since in winter there is especially a lot of snow blowing onto such a wall, this can create a large load, and doors and windows can fail.
- It is important to determine the ceiling height at zero level. The ideal parameter would be from 2.3 to 3.5 meters, and this already turns out to be a full-fledged floor, for which you need to make a deep pit. But if you arrange it lower, you will end up with a different type of room, and its functionality will be limited.
- Decide on the thickness of the walls in the base. As a rule, they are proportional to all the walls in the structure, and this is acceptable if it is located on stationary ground - in other words, on a strong foundation. When the ground is problematic, which happens very often, the wall thickness should be increased by 0.2 meters.
Depending on the type of material used, there are three main technologies for building a zero level - from wall foundation blocks (FBS), brick and monolithic concrete. We will consider only two technologies.
From FBS
This is the cheapest construction method. The blocks need to be laid as evenly as possible along the entire contour of the house to make further plastering easier. Afterwards it is important to fasten them together with a solution of cement and sand. When laying FBS, you must not forget about the holes for water and electrical wiring. If the base is only partially located under the thickness of the earth, then it is necessary to allocate the maximum area for windows so that more light enters the room during the day. For ventilation in the room, it is necessary to make holes in the blocks 0.15 meters from the ground level. Ventilation holes must be covered with mesh and covered with thick material in winter. As a result, the wall should rise 1 meter above ground level. Afterwards, a ceiling is installed on the FBS.
Made of brick
When building a zero level using brickwork, pay close attention to the brick laying patterns, since the lower rows of the masonry will take on the entire weight of the building. Therefore, the masonry must be reliable and stable.
Drainage device
When the site is based on loam, and a sand cushion is placed under the foundation, then all the moisture tends to get into the sandy zone. To understand this process, you need to know the soil filtration coefficient; this parameter reflects the speed at which the flag passes through the soil. Water tends to move from a zone with a low filtration coefficient to a less dense zone
The filtration coefficient depends on the density of the soil. For example, when sand is compacted, its filtration coefficient decreases. When backfilling a pit around the foundation (backfilling), it is recommended to choose the same soil as for the entire area or denser. We discussed the issue of choosing soil for backfilling in more detail in the article (Backfilling a foundation with sand or clay) .
When moistened, the soil becomes more heaving; besides, moistening the foundation does not contribute to a long service life, so it is necessary to arrange drainage in the sand so that water can drain from under the foundation of the house.
The first row of bricks for aerated concrete?
| Sergey Karavaev |
| View profile |
| Find more posts by Sergey Karavaev |
| Ash-ka |
| View profile |
| Find more posts by Ash |
DESIGN AND CONSTRUCTION OF ENCLOSING STRUCTURES OF RESIDENTIAL AND PUBLIC BUILDINGS USING CELLULAR CONCRETE IN THE RUSSIAN FEDERATION Part 1 (Second edition, supplemented)
6.3.11. External walls made of small cellular concrete blocks or the end of the cellular concrete floor, in order to protect against moisture, are recommended to be made with an overhang in relation to the base of the building of at least 50 mm.
It is recommended to lay the first row of cellular concrete blocks on a belt made of reinforced concrete or ceramic bricks, along a layer of waterproofing.
| Anton_Br |
| View profile |
| Find more posts by Anton_Br |
| Register |
| View profile |
| Find more posts by Register |
| Sergey Karavaev |
| View profile |
| Find more posts by Sergey Karavaev |
| Ash-ka |
| View profile |
| Find more posts by Ash |
They distorted the quote, Anton. "First row. Maybe
put on the belt.
» The word recommended
is missing from the document and is not applicable here.
There is a task: to prevent moistening of the concrete masonry from break-off moisture from the blind area and from capillary suction from the foundation. To solve this problem, using 1-3 rows of brickwork is useless. Capillary suction is eliminated by horizontal shut-off waterproofing. Moistening from splashes from the blind area is eliminated by waterproofing finishing. Think of a problem that can be solved by brickwork with a height of 75-250 mm.
Feedback form
Your request has been sent successfully!
Thank you for your request! We will contact you shortly.
- Residential houses and cottages
- Administrative buildings
- Shops, shopping centers
- Cafes, restaurants, bars
- Design of industrial buildings
- Design of agricultural buildings
- Interior design
- Dense buildings
Disadvantages of foam concrete
When choosing blocks for a plinth, foam concrete is often confused with aerated concrete. Both of these materials are made on the basis of a sand-cement mixture with the addition of substances that form pores in concrete. But the production technology of gas blocks and foam blocks is significantly different, so the final products have different densities and air permeability.
- Aerated concrete is produced using the autoclave method, which means it hardens under high temperature and pressure. The composition uses cement, lime and sand with the addition of aluminum powder, which initiates the release of gas. In the solution, a chemical reaction occurs between aluminum and oxygen. Gas bubbles rise to the surface, forming open pores.
- To produce foam blocks, foam is added to the sand-cement mortar. Under the influence of the reagent, closed pores are formed in the liquid material. The foamed solution is poured into molds under pressure and the foam blocks are allowed to harden naturally.
- In its structure, foam concrete is more heterogeneous than aerated concrete. Hollow cells inside foam blocks are formed unevenly, which makes the material brittle and unstable. In addition, the hardness of foam concrete is affected by the quality of the components, which cannot always be controlled.
- Aerated concrete foams more evenly than foam concrete. During the expansion of the material in the autoclave, the cells become homogeneous, they are distributed throughout the block. This technology produces smoother and denser blocks with dimensional accuracy of up to 1–2 mm.
- Aerated concrete is manufactured in a factory, which increases the chances of purchasing high-quality material.
What are foam blocks?
Foam blocks are large-sized lightweight bricks that consist of sand, water, cement and foam. They are obtained by introducing a special substance into the cement mortar, which causes the bubbling process. As a result of the chemical reaction, hydrogen is released, which ensures the porosity of the cement mortar. Foam concrete of various densities is produced industrially. The production of foam blocks is carried out using one of two methods. The first method is based on pouring foam concrete mixture into special molds. This technology makes it possible to obtain blocks of any shape and volume. It is used in the construction of buildings of unusual design, the facade of which has an unusual shape. The second method involves cutting the source material into pieces of the required size.
Stages of construction work
Work on the construction of houses made of foam blocks takes place in the following sequence:
- Removal of design dimensions to the area;
- Geological studies of the territory;
- Construction of the foundation;
- Installation of wooden formwork and pouring concrete;
- Casting of columns of the first floor;
- Walling.
The construction of a house made of foam concrete is carried out both in the warm and cold seasons. This material is easy to transport and affordable for a wide range of Russians. A medium-sized construction takes an average of three months. This is significantly faster than building a brick house. In addition, it is easy to make holes in foam blocks for communication systems and electrical wiring.
Photo examples of built houses