Recently, visitors to our site contacted us with a request to dwell in more detail on such an issue as the cross-section of wires in a city apartment. This is the reason for the appearance of this article, which, I hope, will be useful for those who are planning to make repairs or are simply concerned about the state of the electrical wiring in their home.
Even an uninitiated person understands that the size of the cross-section is determined by the total power of the devices connected to the intra-apartment electrical network. Its different sections are subject to different loads, according to which the thickness of the cable should be selected, which can be:
- Introductory.
- Powering an electric stove or hob.
- Serving socket groups.
- Powering lighting fixtures.
It is from the above division that I will proceed when talking about what cross-section a cable laid in a certain part of the apartment wiring should have.
If you are planning to install electrical wiring in your apartment with your own hands, be sure to read this article! It will help you avoid a large number of possible mistakes.
Section diameter is an indicator of cable power
Physical laws say that the maximum amount of current that this conductor can conduct through itself without heating depends on the cross-sectional diameter of the conductor. If you try to conduct a current more than the limit figure, this will lead to heating of the conductor, and the greater the current and the duration of the “session”, the higher the temperature.
For a residential subscriber, the above is interpreted as follows.
The diameter of the cable cross-section means the maximum permissible number of kilowatts (kW) that can be consumed in the apartment. That is, which and how many electrical appliances can operate simultaneously. The larger the diameter, the more devices can be used simultaneously without any fear for life and health. Theoretically, it is possible to “hang” more power on the cable than its diameter allows. But in this case, heating of the current-carrying conductor, damage to the insulation, followed by the effects of burnout, combustion... ignition, is inevitable.
Therefore, the choice of the cross-section of the input cable must be approached with all seriousness: after all, both the safety and ease of use of household electrical appliances depend on it.
Section calculation algorithm
There is a proven diagram for calculating the cross-section of the input cable, which is used in design. It is based on the postulate that the cross-sectional diameter of the input cable is selected depending on the expected power of all devices operating in the apartment.
Stage 1: Inventory
At the first stage, a list of electrical appliances that are present in the apartment is compiled. It is assumed what equipment will be purchased in the future and the list is expanded. Assumptions, of course, are best made with a reasonable margin for the long-term future. Each device is assigned an approximate power consumption.
You can use a table that roughly shows a list of typical household electrical appliances and their approximate power consumption.
- Voltage stabilizer for the whole apartment
- Wiring in the apartment
- How to install new electrical wiring in an apartment?
| Name of electrical appliance | Approximate power, W | Name of electrical appliance | Approximate power, W |
| TV | 300 | air conditioner | 1500 |
| Printer | 500 | instantaneous water heater | 5000 |
| computer | 500 | boiler | 1500 |
| hair dryer | 1200 | drill | 800 |
| iron | 1700 | hammer drill | 1200 |
| electric kettle | 1200 | electric sharpener | 900 |
| fans | 1000 | Circular Saw | 1300 |
| toaster | 800 | electric planer | 900 |
| coffee maker | 1000 | jigsaw | 700 |
| vacuum cleaner | 1600 | Grinder | 1700 |
| heater | 1500 | a circular saw | 2000 |
| Microwave | 1400 | compressor | 2000 |
| oven | 2000 | lawn mower | 1500 |
| electric stove | 3000 | electric welding machine | 2300 |
| fridge | 600 | water pump | 1000 |
| washing machine | 2500 | electric motors | 1500 |
| lighting | 2000 |
Stage 2: Simple Arithmetic
Next, the total cardinality of our list is calculated. The approximate power required for lighting is added, depending on the size of the apartment, the expected lighting intensity, and the expected type of lighting fixtures.
The resulting figure is an estimate of the power consumption in the apartment for the case if all devices are turned on at the same time. However, such a situation is very unlikely, and therefore in electrical engineering it is generally accepted that a maximum of 75% of the available equipment is turned on at the same time. And the resulting total power is multiplied by a factor of 0.75, and the resulting figure is taken as the basis for calculating the cross-section of the input cable.
Stage 3: Logic and Physics
Currently, electrical cable cores are made of copper and aluminum. There are formula relations that connect the maximum permissible current (and, accordingly, power) for a copper cable with the diameter of its cross-section. For standard copper cable sizes, there are calculated current and maximum power ratings for 220V and 380V AC. The following table provides these figures in a "usable" form.
| Conductor cross-section, mm | Voltage 220 V | Voltage 380 V | ||
| current, A | power, kWt | current, A | power, kWt | |
| 1,5 | 19 | 4,1 | 16 | 10,5 |
| 2,5 | 27 | 5,9 | 25 | 16,5 |
| 4 | 38 | 8,3 | 30 | 19,8 |
| 6 | 46 | 10,1 | 40 | 26,4 |
| 10 | 70 | 15,4 | 40 | 33,0 |
| 16 | 85 | 18,7 | 75 | 49,5 |
Let us assume that the calculated power of all devices is 12 kW, and with a coefficient of 0.75 - 9 kW. It turns out that you need to choose a cable for which the maximum permissible power will be at least 9 kW. For a voltage of 220 V, a cross-section with a diameter of 6 mm is required - it is capable of passing a current of 46 A and a power of 10.1 kW. For the smaller cross-section from the table - 4 mm - the maximum permissible current is 38 A, and the power is 8.3 kW. This is less than necessary, so a cable of this cross-section will not work and you should stop at a 6-mm cross-section.
If you choose a cable with a larger cross-section than necessary, this will provide a good reserve for the future (for example, the emergence of new powerful household appliances) and a reserve for wear. However, you should also not exceed the rated power too much: this will affect the cost of the input cable, and the input cable may turn out to be more powerful than the internal electrical wiring, which is not reasonable and safe.
What else is needed
A machine must be installed on the input cable, which will be tasked with turning off the power supply if the current approaches the maximum permissible level. The rating of the machine is selected slightly less than the maximum permissible current through the input cable: in this way an additional degree of protection is provided. In this example, you should install a 40 A machine.
So, the parameters of the input cable require careful selection. Errors threaten, for example, a “bottleneck” situation - when all the home electrical wiring is powerful enough, but the input cable is not able to provide the required power. The cross-sectional diameter of the input cable is selected taking into account the total power of electrical appliances that will be used in the room. In order for all the nuances to be taken into account and the input cable to serve for many years without any emergencies, it is better to entrust the reconstruction of the electrical wiring to professional electricians.
Kiev office
044-338-41-08 050-295-69-71 067-281-27-01
Our address:
Kiev, Osvoboditeley Ave., 3A, bldg.
3, off. 63 work schedule: Mon-Fri. 8:30 - 18:00 Sat, Sun. day off
Join us on Facebook
prices for cable and wire products:
If you have any difficulties at any stage of cooperation with our company, or you would like to express your wishes, suggestions for the work of our enterprise, you can send a request to the e-mail of the UkrProvod control department.
We kindly ask you to leave detailed information in your application:
- how you contacted our company: by email, by telephone, on a social network page;
- what contact information did you leave;
- what difficulties did you encounter when working with our company;
- Your contact information to respond to your request.
Your opinion is very important to us, because we are constantly working to improve the quality of service
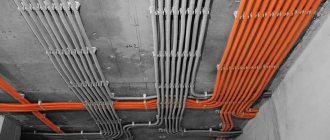
Milling aerated concrete instead of grooves
A great way to route wires into a wall is to create narrow channels using a cylindrical router bit.
Pros:
- The channel is made according to the thickness of the wire, for example, VVGng. There is no need to additionally fix the wire in the wall, just insert it.
- There is no huge amount of dust.
- No need to connect the hose from the vacuum cleaner.
- The lightweight tool ensures mobility: you only need a screwdriver with a cutter attachment.
Making a channel for the wire is very simple.
- On the wall we mark a line for the electrics.
- Mill to the required depth. For a wire for 3*2.5 sockets you need an 8 mm cutter, for a wire for 3*1.5 lighting we take a cutter with a diameter of 6 mm.
- We lay the wire.
- We plaster the walls.
How this is done is shown in the video below.
What should be the cross-section of wires in apartment wiring?
Recently, visitors to our site contacted us with a request to dwell in more detail on such an issue as the cross-section of wires in a city apartment. This is the reason for the appearance of this article, which, I hope, will be useful for those who are planning to make repairs or are simply concerned about the state of the electrical wiring in their home.
Even an uninitiated person understands that the size of the cross-section is determined by the total power of the devices connected to the intra-apartment electrical network. Its different sections are subject to different loads, according to which the thickness of the cable should be selected, which can be:
- Introductory.
- Powering an electric stove or hob.
- Serving socket groups.
- Powering lighting fixtures.
It is from the above division that I will proceed when talking about what cross-section a cable laid in a certain part of the apartment wiring should have.
If you are planning to install electrical wiring in your apartment with your own hands, be sure to read this article! It will help you avoid a large number of possible mistakes.
Conclusions and useful video on the topic
This video provides detailed information on the selection of products for organizing electrical wiring in residential premises:
Despite the wide variety of products, it is quite easy to select the necessary material for laying electrical communications. You need to carefully read the markings, tags and product certificates, pay attention to the technical characteristics and quality of the cable .
Share with readers your experience of wiring in an apartment, tell us what cable you used. Please leave comments on the article and ask questions that interest you. The feedback form is located below.
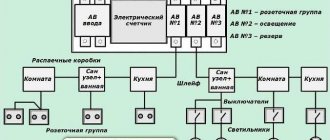
Residential input cable cross-section
The power per input cable and, accordingly, the strength of the current carried by it is limited by the amount of allocated power, determined by Energosbyt and controlled by the input machine. Its response threshold is usually 25A. Most often, in apartment buildings, incoming automatic machines are installed in electrical panels outside apartments. The cable laid from the machine inside the living quarters is precisely the introductory one, which I will now talk about.
In apartments, the cross-section of the input cable can be:
- in single-phase networks - copper cable 3 × 10 mm 2 (three-core - phase, ground and neutral; 10 mm 2 for each core) paired with a 50 A circuit breaker;
- in three-phase networks - copper cable 5 × 4 mm 2 (five-core - three phases, ground and zero; 2.5 mm 2 for each core) paired with a 25 A circuit breaker.
The power supplied may vary depending on the age of the building and whether it has gas or electric stoves. Indirect evidence of the real value of this parameter can be the nominal value of the machine at the entrance to the apartment. In any case, you will never regret if the wires indicated just above are used as the input cable.
Features of connecting the refrigerator to the electrical network
The refrigerator, unlike other household appliances such as a TV, microwave oven or light bulb, has a peculiarity - when turned on for 1-2 seconds, it consumes the so-called starting current, which is a characteristic feature of any electric motor. The magnitude of this current depends on various reasons and exceeds normal consumption by 5-8 times. Therefore, it is undesirable to connect other consumers, primarily lighting, through one long cable along with the refrigerator. When the engine starts, the voltage may drop so much that it will affect the brightness of the lamps - there will be a short-term decrease.
attention:
You need to know that in some cables the conductor intended for grounding has a smaller cross-section. Most often, its insulation is colored yellow and green.
Cable for apartment sockets
The optimal cross-section of wires serving apartment socket groups is 2.5 mm 2. This allows them to withstand currents of up to 27 A, which corresponds to a total power of approximately 6 kW. The use of conductors with a larger cross-section, for example, 4 mm 2, is impractical because:
- Such cables simply cannot fit into the terminals of socket mechanisms.
- Laying such cables is significantly more expensive and is not economically feasible.
And there is no practical need for thicker cables, because... It is rare to find household electrical appliances plugged into an outlet whose power exceeds 3.5 kW. Thus, by placing cables with a cross-section of 2.5 mm 2 in the wiring of the socket groups, you can sleep peacefully: they are able to withstand any electrical appliances, even if they operate for a long time.
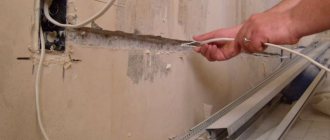
Electrical wiring under plaster: installation rules, gating, searching for hidden cables
In most cases, when installing electrical wiring, it is hidden under a layer of plaster. This method is safer and more reliable: after all, wires embedded in the wall are reliably protected from mechanical stress, moisture and corrosion. This method of laying also has disadvantages - it will be impossible to move it to another place, and it will be difficult to determine the location of the cable in the absence of a diagram.
Lighting system wire cross-section
Surely, you yourself understand that lighting fixtures place the least amount of stress on apartment electrical wiring. Therefore, a wire cross-section of 1.5 mm 2 is quite sufficient for a standard apartment in an apartment building. However, when laying the wiring, you should be absolutely sure that the total load of each lighting group does not exceed 3.5 kW. Due to the traditionally low load, all apartment lighting, as a rule, is reduced to one group, served by a 1.5 mm 2 cable.
A wire cross-section of 1.5 mm2 is quite sufficient for wiring that supplies power to lighting fixtures
So, to summarize, I’ll just remind you of the bare numbers. Most often, the cross-section of wires in a city apartment is:
- input cable – 3×10 mm 2 (single-phase network), 5×2.5 mm 2 (three-phase network);
- electric stove (hob) – 3×6 mm 2 (single-phase network), 5×2.5 mm 2 (three-phase network);
- rosette groups – 3×2.5 mm 2;
- lighting devices – 3×1.5 mm 2.
However, I must emphasize the phrase “most often” that I used. If you initially plan to install very powerful devices in your apartment, then before laying the electrical wiring you should make the necessary calculations so as not to make a mistake in choosing cables of the required cross-section. The best option is to contact a professional electrician.
DIY installation rules
Before you take up the tool, you should understand the basic rules for installing wiring.
Without following them, you can damage the walls and material, and in the worst case, cause a fire hazard. At each stage of work there are special technologies and rules. There are three stages of installation: marking, gating and laying with fastening. Of course, you should start from the first, since marking plays an important role in the process of laying electrical wiring.
Marking on the wall for the cable
It would seem that, armed with a pencil or marker, you can simply draw a diagram on the wall and there is a ready-made marking. In reality, everything turns out to be much more complicated.
First of all, you need to roughly estimate where the network will be located. It is advisable to do this away from the existing wiring or even place a new one in its place. Where the wire will pass, you will have to remove the old wall coverings, including plaster.
The wider the prepared cavity, the more convenient it is to work. It is necessary to mark the cable laying line, as well as the installation locations of switches and sockets.
Strobes
Grooves are special grooves that are intended for laying cables.
They look like artificially created recesses in the wall. On average, their depth is from 1 to 3 cm. The wall is grooved after marking has been applied. There are several ways to lay such grooves. The most accessible of all is the use of a drill with a flap drill. You can also use an ordinary (round) one, but you will have to spend more time with it. The installer drills out a channel for the wire, and then cleans the cavity with improvised means. The method is tedious, but in the absence of special equipment it is quite suitable for implementation.
The best option is to use a wall chaser. Although this is an expensive tool, it gets the job done. The main advantage is the accuracy and precision of the work. Can process walls made of any material, including brick and stone.
Cavities for sockets and switches are made exclusively with a drill, since a wall chaser will be unsuitable for these purposes.
After the cavities are completely prepared and processed, a cable channel is laid in them. It should be laid as tightly as possible so as not to create an air gap. Otherwise, it may cause a fire. You will need fasteners.
Fastening the cable to the wall
Using fasteners, the cable is fixed to the wall in a stationary position.
Therefore, it is extremely important to choose a reliable fastener made of durable material. There are 4 types of hidden fasteners placed under the plaster:
- Dowel clamps. These are plastic clamps that are attached to the base of the wall and hold the cable channel using a clamp. The advantage is reliability and ease of installation.
- Quick-drying plaster solution. The cable can be pressed with plaster in the groove. The technology has a number of negative aspects - after fixing it will not be possible to get the wire back, but strong fastening is ensured.
- Installation site. These products are made of plastic. They are attached either to an adhesive base or to screws.
- Metal ties. Buy ready-made or make your own. Durable, but will rust over time.
Wire cross-section for entry into the apartment
Hello, I would like to rehang the panel in an apartment (new building, complete renovation) and accordingly I need to lengthen the input a little. I'm thinking of replacing it completely. Thinking about the section. The input is limited by a circuit breaker in the floor switchboard at 63A. On the Internet, or rather on Mastercity, there are two links to PUE tables » > » > According to the first, I need a section of 16 squares, and according to the second, 10 is enough. The question arose, how much is needed?
Nowadays it is almost impossible to find a cable with a non-undersized cross-section, so it is advisable to choose 16 mm2, because according to table 19 GOST R 53769-2010 back-to-back 10 mm2 is 63 A
At the same time, formally 10 mm2 is just 63 A, so it is an acceptable option, however, keep in mind that the machine can pass 1.45 nominal for up to 1 hour, and for a cable over several minutes this is no longer a short-term excess of current and Overheating may occur and damage the insulation.
In short, 16 mm2 is better, but 10 mm2 is also acceptable.
Quite right - 16 squares.
Alexiy wrote: At the same time, formally 10 mm2 is just 63 A, so it is an acceptable option, however, keep in mind that the machine can pass 1.45 nominal values up to 1 hour, and for a cable over several minutes - this is no longer short-term excess current and possible overheating, which will damage the insulation.
as an option, use a -FRLS cable; it has a permissible core temperature of 90C for several hours instead of 70 and allows emergency overloads. but at the price of 16mm2 it might be cheaper.
So as not to think about it in the future. AB 40A - 6mm2 AB 50A - 10mm2 AB 63A - 16mm2 AB 80A - 16mm2
correct me if I'm wrong av 10a - 1.5 mm2 av 16a - 2.5 mm2 av 25a - 4.0 mm2 av 32a - 6.0 mm2 av 40a - 6.0 mm2 (I doubt it) av 50a - 10.0 mm2 av 63a - 10.0 mm2 av 80a - 16.0 mm2
Ok, thanks everyone. In general, if the wire is from the market, then it’s definitely 16 squares.
And a related question, so as not to clutter up with topics, is it necessary to use corrugation when laying wires in a screed? After all, the medium is fireproof, cooling is better and the diameter is smaller. VVG cable, house - monolith.
StarWind wrote: Ok, thanks everyone. In general, if the wire is from the market, then it’s definitely 16 squares.
And a related question, so as not to clutter up with topics, is it necessary to use corrugation when laying wires in a screed? After all, the medium is fireproof, cooling is better and the diameter is smaller. VVG cable, house - monolith.
The corrugation will save you in case of emergency. if a crack forms in the screed, which will easily rupture the outer sheath of the cable.
user0552 wrote: correct me if I'm wrong av 10a - 1.5 mm2 av 16a - 2.5 mm2 av 25a - 4.0 mm2 av 32a - 6.0 mm2 av 40a - 6.0 mm2 (I doubt it) av 50a - 10.0 mm2 av 63a - 10.0 mm2 av 80a - 16.0 mm2
63 A - 16 mm kV 80 A - 25 mm kV Ampere must be capitalized - this is the person’s last name.
Alexiy wrote: Nowadays it is almost impossible to find a cable with a non-undersized cross-section
Well, why: when I bought a cable for myself - and this is about 100 m, I did not hesitate to take a caliper with me and before buying I measured the diameter of the cores
Alexiy wrote: Nowadays it is almost impossible to find a cable with a non-undersized cross-section.
If you need 4mm, take the one that says “6 mm”, if you need 1.5 mm, buy it, which is passed off as “2.5 mm”, and so on. But it's better to do this:
Magirus wrote: without hesitation, he took a caliper with him and measured the diameter of the cores before purchasing
Magirus wrote: I took a caliper with me and measured the diameter of the cores before purchasing
there is an error of 0.05, and this. 1.79mm is 2.5mm2, and 1.74 is 2.35mm2 (narrower), but in real life you can easily make a mistake by a factor of ten with such a rough instrument for these measurements, and this. 1.69 - 2.25mm2 I measured 5 or more options with a micrometer - the best that was 2.4, the worst - 2 with microns (!). At the stated 2.5mm. And 6ka pvs turned out to be generally less than 5 (something around 4.7-4.8, emnip).
Tsypra, approximately, from memory, was a long time ago.
I wonder if you measured the PVC correctly?
lightning wrote: If you need 4mm, take the one that says “6 mm”, if you need 1.5 mm, buy it, which is passed off as “2.5 mm” and so on.
Most manufacturers cruelly cut the multi-core, taking advantage of the difficulty of measuring resistance and cross-section. For example, I buy PVA 2.5 and get the real 1.35. I checked one core with a micrometer and multiplied. Monofilament is not cut so cruelly.
I wrote about monocore
helios1969 wrote: there is an error of 0.05, and this. 1.79mm is 2.5mm2, and 1.74 is 2.35mm2 (narrower), but in real life you can easily make a mistake by a factor of ten with such a rough instrument for these measurements, and this. 1.69 - 2.25mm2 I measured 5 or more options with a micrometer - the best that was 2.4, the worst - 2 with microns (!). At the stated 2.5mm. And 6ka pvs turned out to be generally less than 5 (something around 4.7-4.8, emnip).
Tsypra, approximately, from memory, was a long time ago.
Well, as if I didn’t think about the error of measurements with a caliper. You're right. But I have a bar with a pitch of 0.02 mm
Well, at least the blatant bullshit is already “cut off.”
Yes, there are still many factors to take into account: we bought a VVG-NG 2 x 2.5 cable from us in Kyiv - “Odessa cable” - it looks good, it bends with effort. And then I bought more from Leroy Merlin - it’s like Dneprpetrovsk does, but in appearance - the outer shell is visually thinner and the veins bend like tin (roughly how it feels). Either some kind of alloy, or, I also read, annealed copper or vice versa. But I’m not sure - someone who knows can correct me
Curious: why after the introductory 32A is there 40A (at the surge arrester)? Or: only for the refrigerator there is an AB 16A + RCD. Hmm, it’s probably like in a decent canteen, if for some reason the RCD goes off, the food won’t go rotten? Or on the gate AB 16A + RCD (probably a 5 kilowatt motor), the same thing - roller shutters? And the garage has no RCD. In fact, the loads, at least the ones indicated, are small. Why so many lines and RCDs is unclear. Or, apparently you like 4-pole AVs, but for some reason there are 3 at the input? I'm not saying there's anything wrong. Just commenting. And another question:
MIK wrote: The meaning of 1P+N machines has been described on the site more than once.
If possible, a link where this is described: I have never seen such a description. Curious to see what people think about this. But your explanation is wrong. The sum of AB currents after the RCD should not exceed In RCD. And further:
Metall wrote: Quote Message from SKL View message In front of each 25A RCD there should be an equal current circuit breaker, or better yet with a lower rating is not correct..
In this case, SKL is right. Perhaps Mr. Metall misunderstood what SKL wrote. Usually it sounds like this: “the rated current of the RCD should be chosen equal to, or one step higher than the rated current of the circuit breaker protecting this RCD.”
Electrolamp wrote: Ampere must be capitalized - this is the person’s last name
More precisely, apparently, like this: in the rules of the Russian language, abbreviations of basic units, if it is someone’s last name, are written with a capital letter, and subordinate units with a small letter, For example: ampere - A, kiloampere - kA, volt - V, kilovolt - kV etc. In any case, that’s what I was taught about 50 years ago. Now it may be different.
Input cable to the apartment cross-section according to the standards
The cable with which a consumer object (house, apartment, workshop, store, etc.) is connected to a power source is called an input cable. Most often, the input cable is connected directly to the electrical energy meter. To protect the meter, a circuit breaker may be installed in front of it, but such a scheme must be agreed upon with the electricity supplier and reflected in the technical specifications. In this case, the circuit breaker is sealed to prevent energy from being drawn to the meter.
Chasing walls for hidden wiring
Before starting work, a diagram of the location of all switches, power appliances, sockets for them and distribution boxes is drawn up, and the location of the lines along which the gating will be carried out is determined. Such a diagram must be stored in paper or electronic form, so that in case of redevelopment, moving switches and sockets, installing hanging structures (shelves, sconces, hangers), etc., the wiring will not be damaged.
Important! Please note that, according to the rules, it is not allowed to ditch load-bearing walls and make through holes in them. Therefore, all wiring should pass only under a layer of plaster.
Marking begins with the locations of panels, sockets, switches and lamps, and then a route for the wires is outlined. All shtoby must pass strictly horizontally and vertically . Marking for them is done with chalk, pencil or marker using a plumb line, laser or regular building level.
Inclined lines are allowed only in attics and stairs, provided that they run parallel to the inclined surface. In this case, searching for damage on straight lines will take a minimum of time, and the likelihood of accidental damage to the cable, for example, when driving nails for shelves or pictures, will be minimized.
A wall chaser is a fairly expensive tool, so the grooves for wiring are usually made with a grinder and a hammer drill. First, two grooves are prepared using a grinder with a diamond wheel, and then the excess plaster is chipped between them with a hammer drill. The size of the groove is determined according to the dimensions of the wiring; usually a depth of 20-25 mm is sufficient .
The use of junction boxes in typical wiring of private houses and apartments is not mandatory. They are installed for convenience when dividing lines into separate groups. The distribution boxes are attached to the gypsum mortar so that they slightly protrude beyond the thickness of the future plaster layer.
For the socket boxes, recesses are made, which are partially filled with gypsum mixture to fix the wires. Their ends are tucked in, and the excess is trimmed so that 10-15 cm remains.
It is more convenient to install socket boxes in blocks at once. It looks more aesthetically pleasing, and they are more convenient to use. For their installation, latches (cable channels) are used. The holes are drilled in one row with a distance of 1-2 mm, the partitions between them are then removed. Socket box covers are installed last, only after finishing is completed - wallpapering or painting. In rooms with high humidity, moisture-proof sockets with grounding are used.
Input cable into the house - types of connection and choice of brand
The power supply to the house is connected from the power line, the connection is made on the nearest pole (support). In some cases, when power line supports are remote from the site (for example, they are located across the road from the connected house), it may be necessary to install an additional support.
The input cable can be laid in two ways:
by air, from the power line support to the input distribution device;
underground in a prepared trench.
Air input
. Over-the-air power supply can be carried out by cable or self-supporting insulated wire (SIP).
Most types of installation cables (VVG, AVVG, etc.) are not intended for air suspension without the use of additional support. Such a support can be a stretched steel cable or wire. In the first case, the wiring is called cable, in the second - string. The ends of the cable or string are attached to the overhead line support on one side and to the building structures at the entrance to the house on the other. The cable being laid is rigidly attached to a supporting steel cable or wire.
Bare, uninsulated wires of overhead power distribution lines are gradually being replaced by self-supporting insulated wires (SIP). Power lines with insulated wires (VLI) are more reliable. The use of SIP eliminates the most common types of damage to overhead lines with bare conductors - overlapping of wires and their shorting by foreign objects. SIP is the most preferred option for an over-the-air input wire, which can be used when connecting to both an overhead line (line with a bare wire) and a VLI (line with an insulated wire).
The aerial connection of the input cable to power lines up to 1000 volts is carried out using SIP - 2 or SIP - 4 wires. The neutral and phase conductors of these wires are insulated. The zero conductor of SIP-2 is equipped with a steel supporting core, on which the wire is suspended. SIP-4 does not have a core; when it is suspended, the load is carried by the current-carrying conductors themselves.
Underground input
. For laying in a trench, a cable is selected that can withstand the weight of the soil and the shear force that occurs during its settlement. Therefore, the most suitable for this purpose are the VBBbShv cable with copper conductors or the AVBbShv aluminum input cable. The core insulation of these types of cables is made of PVC plastic. On top of the insulated cores there is a layer of PVC or unvulcanized rubber filling and an inner polyvinyl chloride sheath. This is followed by armor made of galvanized steel tape and an external pressed-out protective hose. VBBShV and AVBBShV conductors can be made single-wire or multi-wire, and the cross-section of the conductor can be in the shape of a circle or a sector.
Features of air and underground input. The advantages and disadvantages of installing the input cable over the air and underground are reflected in the table:
over-the-air input cable
over-the-air input cable
Which is better VVGng Ls or NYM
Now that we have decided on the last cable index (LS), all that remains is to choose whether it will be the NYM or VVG option. Here, from a technical point of view and compliance with current GOSTs, there is not much difference.
Choose any type - VVGngLS or NYM, but again not a simple one, namely NYMng LS.
The NYM cable is made according to the German standard (at least it should). Previously, this cable was positioned as a desirable replacement for VVG, but with improved characteristics.
It has a round shape, which is very convenient for installation, installation and sealing of seals in distribution cabinets.
True, for high-quality cutting of such products you will need a special insulation stripper.
But buying a round VVG is not always quick. Inside NYM, between isolated veins, there is a chalk-filled porous mass.
In fact, this means almost triple insulation. However, the outer shell has a significant drawback.
It is not resistant to ultraviolet radiation, so this cable cannot be laid outside the house along the walls.
Another drawback is that it is almost impossible to find special NYMng-LS brands on the open market. The VVGngLS cable is much more accessible, cheaper and easier to manufacture.
Here's a comparison of the prices of both options in online stores. Feel what is called the difference.
Please note that we are talking only about the GOST cable, and not about those “counterfeits” manufactured according to the technical conditions invented by the plant itself. Read in detail about all the pitfalls and troubles that you will certainly encounter when working not only with cables, but also with SIP wires manufactured according to specifications in a separate article.
By the way, the cable on sale is not NYM, but NUM or NUM. This brand is also produced by cable factories, but without German VDE quality certificates. They purposefully change the name so as not to have problems with the license.
When purchasing such products, no one guarantees you how long they will last and whether they will meet all the declared characteristics in comparison with the originals. Here you act at your own peril and risk.
Some electricians claim that in order to comply with all GOSTs when installing electrical wiring in a house, the usual “correct” NYM will do. After all, its composition is practically no different from VVGng-LS.
This is not entirely true. Take a look at the technical specifications table below for a simple NYM.
It shows that there are simply no special functions that would allow it to be used in residential apartments without any problems!
That's why craftsmen, developers and electricians use VVNG LS everywhere. This is the most optimal option in terms of price and quality, fully meeting the requirements of GOST.
Input cable to the apartment
General-purpose installation cables, such as VVG, are used as the input cable into the apartment. For systems with a working and protective neutral wire, the number of cable cores must be at least three.
The apartment input cable connects the floor panel and the apartment panel. In old-type houses, there may be no internal panel, and distribution within the apartment is carried out through connection boxes. When carrying out renovations in an old apartment, it is advisable to provide for the installation of an interior panel.
Important to know: Cable entry into the apartment is carried out using a two-wire or three-wire circuit. Input into apartments of modern houses is carried out using the TN–S or TN–C–S system using three wires:
L - phase conductor;
N - working neutral conductor;
PE - protective neutral wire.
In old houses, a TN-C grounding system is implemented, in which the working and protective neutral wires are combined, that is, power is supplied through two wires - L and PEN.
How to cover the grooves
After laying the cable in the grooves, they are covered with a solution so that the electrical wiring is completely hidden. This option is acceptable for brick houses and slab buildings. For wooden houses made of logs and timber, this method is undesirable, as it is a fire hazard. It is better to cover the grooves with the same solution that will be used for plastering. In a new building without finishing, use cement plaster. It will securely secure wires in concrete, aerated concrete or brick walls.
So, let’s look at the sequence in which I seal the grooves after laying the wiring:
- The channel is first cleared of dust using a vacuum cleaner or a wide brush. Remove large debris with a brush first.
- Before laying the cable, they must be primed with a wide brush, otherwise, due to poor adhesion of the solution, cracking and loss of the solution may occur.
- To prevent the wall from absorbing moisture from the solution, it is moistened before puttying.
- Gypsum or cement-sand plaster is spread along the entire length of the channel. Alabaster should not be used for these purposes - it sets too quickly, forming lumps on the wall. The solution should be thick, this is not a fine finish, smoothness is not really needed here. Try to fill in any gaps when hiding the wire.
- A spatula is carried along the distribution, removing excess mixture.