In new buildings there are often apartments with an open plan. This is convenient, since the owners themselves determine where to place the kitchen, living rooms, and dressing room. Many combine several functions in one space. To achieve the same effect in an ordinary apartment, sometimes you have to demolish the partitions between rooms. An unusual redevelopment option is a kitchen combined with a hallway, especially if the total area of the apartment is not very large.
Zoning using partitions.
This option has both advantages and disadvantages that should be considered before starting repairs. If, however, the benefits of such a solution exceed the possible problems, feel free to proceed with the redevelopment.
The advantages of this layout
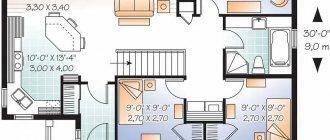
There are two ways to combine the kitchen and hallway. In any of these cases, the combined premises will have a number of advantages:
- If the kitchen is completely moved into the hallway, the usable area of the living space increases. Families who do not cook or do not attach much importance to this process can install a kitchenette near the entrance. The freed up space can be used as an office or another room;
Example of a mini kitchen.
- Removing the partition between the kitchen and the hallway will allow for more efficient use of the space in the common room. The new room has a larger area. The entrance area receives natural light. The absence of a wall makes it possible to arrange the work surface and equipment in the kitchen area more ergonomically.
Efficient use of space.
Is it possible to lay linoleum on tiles?
The answer depends on the condition of the flooring. If the tile is old, with chips, over time the linoleum in these places will be pressed and worn out. It is also important how level the floor is. The permissible difference in height is up to 2 mm per meter of length.
If the tile floor is smooth and in good condition, it is permissible not to remove it, but to glue new material on top. Be sure to pay attention to the seams. The convex ones are cut off, and the concave ones are filled with special grout and leveled. The advantages of this approach are saving time and money on removing the old coating and preparing the surface.
Attention! It is recommended to choose dense multi-layer linoleum. Suitable thickness is at least 4.3 mm.
How to properly zone space
The hallway-kitchen is a multifunctional room and therefore requires proper zoning. It is necessary not only for visual division of space. Some zoning techniques solve practical problems.
A good example of zoning.
Zoning can be done using finishing materials, light or the installation of special structures.
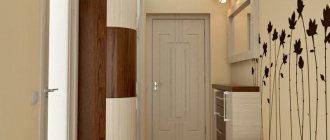
- The decoration of the entrance area and kitchen can be made of different materials. This will not only help to visually separate the two zones, but will also make the room functional. You should choose materials that will withstand temperature changes, high humidity, are wear-resistant, durable;
An example of finishing the entrance area.
- The lighting scenario must support zoning. You can install a backlit mirror at the entrance and several spotlights near the closet. The work surface in the kitchen area should be well lit; track lights are suitable for this, or in the case of an island kitchen - several lampshades on a long cord;
Well lit kitchen.
- You can visually separate the kitchen from the hallway with a plasterboard structure - columns or an arch. A glass sliding partition or bar counter is another way to delimit space without using blank walls.
Kitchen arch.
Is a substrate needed in this case?
If placed directly on ceramic tiles, a relief will appear on the surface over time (especially with wide joints). To prevent this from happening, use an additional leveling layer.
The substrate has other functions:
- floor insulation;
- noise absorption;
- waterproofing;
- preventing mold development.
In stores you can find the following types:
- Cork . Made from the bark of a special tree. Completely safe for health, retains heat and muffles sound. But the cork backing is unstable to mechanical stress and sags under heavy furniture.
- Linen . It is made from natural fiber and contains additives that enhance moisture resistance and prevent insects from infesting. Linen allows air to pass through well, so there will be no fungus either.
- Jute . Another type of substrate made from plant materials, this time Indian. The fibers remove moisture, and additional additives protect the material from rotting and fire.
- Combined . Contains flax, jute and wool and is characterized by high density.
- Leafy . This is plywood or fiberboard (fibreboard), which before installation is treated with agents against dampness and mold.
- Foil . Foamed polyethylene is covered with a layer of foil. As a result, the material provides good thermal insulation.
- Synthetic . This is a cheap but fragile option, so it is better not to use it.
Which substrate to choose depends on the type of room:
- Moisture resistance is important for the bathroom and kitchen.
- For children's and bedrooms - environmentally friendly and hypoallergenic.
- For high-traffic areas, more durable options that are resistant to abrasion and mechanical deformation are chosen.
Things to consider
When deciding to combine two rooms, you need to consider the following:
- The law prohibits moving kitchens with gas stoves. They cannot be combined with other rooms either. An option to solve this problem could be an enlarged opening with sliding partitions;
- Any redevelopment must be approved. Even moving a doorway requires permission from a specialized organization. When preparing a plan for demolishing a partition, make sure that it is not load-bearing. This will save time for you and the organization that will coordinate the project;
- Combining the kitchen with the hallway requires the installation of a ventilation system. Otherwise, all kitchen odors will be absorbed into your outerwear.
When deciding to demolish the partition between the kitchen and the hallway, weigh all the pros and cons of such a redevelopment. If the extraordinary idea of combining them is not a whim and has a basis, then you can safely get approval and begin repairs. Having thought through all the details, making the right choice of materials and furniture, the result can be a large, bright space that is comfortable and stylish.
Another example of a layout.
How to glue linoleum to tiles
For fixation, different methods are used: double-sided tape, plinth or special glue. The choice depends on the area and condition of the floor, whether the repair is durable, and how much time is allocated for the process.
Double sided tape
This method is the simplest, fastest and dust-free. The tape is glued to the tile (not to the seams), the protective layer is removed and linoleum is laid.
The tape is placed along the entire perimeter of the room, retreating from the wall the width of the future baseboard. Then, approximately half a meter from the first line, stick the next strip along the entire length of the room. This continues, in increments of 50 cm, until the entire floor is covered with parallel strips.
This installation is quick and the material can be easily removed later.
Glue
This method will take more time, but the fixation is more reliable. The coating remains smooth and holds firmly. The only negative is that linoleum will be more difficult to replace. The material will have to be glued if you expect a durable result.
Products from the following brands are suitable for linoleum:
- HENKEL: water-dispersed Thomsit R188E (on smooth tiles it is better to additionally use primer R766) or polyurethane R710;
- MAPEI;
- ARDEX.
Fastening with plinth
The easiest way to lay linoleum over tiles, but is only suitable for small rooms (up to 12 square meters). The material does not hold firmly and gradually comes in waves.
The roll is rolled out, cut and pressed against the baseboard. Heavy furniture (such as cabinets) also helps hold it in place.
Photo gallery: Examples of kitchen-hallway design
Required materials and tools
To work you will need:
- construction or utility knife;
- mounting tape;
- glue and spatula or double-sided tape;
- hard, heavy roller;
- cold welding (for seams);
- baseboard;
- threshold.
Features of heated floors
There are certain advantages of having a heated floor under the tiles:
- environmental Safety;
- favorable temperature conditions;
- increased surface area due to the absence of heating radiators;
- The warm tiles feel good on your feet.
The disadvantages include the complexity of the work and the need to carefully level the surface before installation. Also, during repair of the heating system, all tiles will need to be completely removed.
Making a joint with a flexible profile
Flexible profiles can be metal or PVC. The plastic profile consists of two parts: fastening and decorative.
For PVC profiles, the joint between floor coverings is designed as follows:
- Cut the profile to the required length.
- Secure the bottom with self-tapping screws or glue along the seam.
- Heat the decorative part in warm water.
- They are placed on the mounting profile and snapped into place.
Before starting work on finishing the floor, it is necessary to decide on the material for the joint, since it is more convenient to connect the tiles to linoleum with a flexible metal profile even at the stage of laying the ceramics.
The procedure for joining with a metal profile:
- Mark the edge of the joint.
- Give the profile the desired shape.
- Lay the tiles by cutting them along the marked groove line.
- Lay the profile simultaneously with the tile, inserting its edge into the groove of the profile.
After drying, the tile will securely hold the joining profile, into the groove of which a companion floor covering (linoleum, laminate) is inserted on the other side.
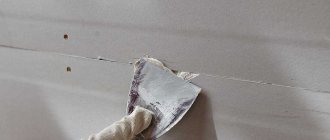
Distinctive features of hot welding
The hot welding method should be used when commercial linoleum needs to be joined. The seam is neat, although noticeable. It is distinguished by its quality. Welding requires a special tool, which is usually only available to professionals.
A special burner is turned on, and under its influence the filler cord begins to melt. It is usually made of PVC. In the molten state, it completely fills the joint. Welding is carried out at high temperatures, from 350 to 400 degrees. When the coating hardens, the excess is removed with a special knife.
To obtain an ideal seam, you first need to glue the material well, and also cut out a niche in the shape of the letter V. The resulting ditch needs to be cleaned.
Palette of shades
By placing light tiles in the hallway, you can visually move the room away. A snow-white palette, beige, grayish shades, walnut and pastel colors are excellent options for this. But such tiles on the wall require constant attention, as dirt is immediately noticeable.
However, this feature is also characteristic of a dark floor, when it is very smooth and even small scratches are visible. In addition, such a shade can significantly limit an already small space.
The best options for floor tiles in the hallway are shades of muted tones.
Pay attention to the color. Any cold and dark shades visually contribute to the removal of objects. The property of light colors is to bring them closer together.
Black
A hallway with a black floor should be spacious enough, otherwise the color will narrow the space even more. On this type of floor the damage is most noticeable. Therefore, black tiles are often combined with white tiles, arranged in a checkerboard pattern.
Gray
The most popular and winning option for the hallway, it harmonizes with any wall design. Scratches and dirt are not so noticeable on it.
Beige
Beige belongs to neutral and warm tones. Such a floor in the hallway would rather serve as a backdrop for decoration than attract attention.
Blue
The choice is controversial, which is why it is more common in two-tone floors.
In the photo, a contrasting blue border favorably complements the ornament on a white background.
Red
This color in the hallway is often used in combination with white or as part of ornaments in muted tones - pink, burgundy.
White
Glossy white looks elegant and can be combined with any shade. Bright tiles reflect light and expand the space. But for a hallway this is an excessively slippery coating, and on products with a rough surface and light grouting, the dirt will be more noticeable.
The photo shows white tiles at the entrance, combined with the walls and light wood.
Adhesive bonding of floor coverings
If you decide to join tiles and linoleum without connecting elements, then marking the seam should be done especially carefully. For straight joints, the rule is followed: laying the tiles begins from the seam, so that you do not have to cut it at the joint. Incorrectly sized tile squares are too noticeable.
For complex zigzags of the joining line, it makes no difference where the laying started - after all, the material will still have to be trimmed. In this case, it does not matter how to join the linoleum and tiles. It is enough to make preliminary markings so that too small fragments of tiles do not fall on the edges.
Procedure:
- Glue, leaving the edge part (joint).
- Roll out the linoleum, laying it with a slight overlap on the tile.
- Using the prepared template, mark the joint on the linoleum and carefully trim it.
- Lay the tiles on a dry base and make markings, checking the edge of the linoleum.
- The ceramics are cut along the intended contours, periodically checking the accuracy of the cutting by applying them to the floor.
- Glue tiles and linoleum with glue appropriate for each material.
- After the glue has dried, the joint is sealed with silicone or sealant of a suitable color.
Joining with aluminum threshold
The threshold is cut to the required length (with a grinder or a hacksaw) and screwed on with self-tapping screws. For concrete bases, first make marks at the fastening points, then drill holes for the plastic tips of the dowels.
There are models with a secret fastening method: self-tapping screws are secured with caps in a special groove of the threshold on the bottom side, and then the threshold is nailed into the prepared holes in the floor with a mallet. Such a threshold between the tiles and linoleum forms a tight, smooth fit in which debris does not accumulate (about
Parquet
Strong and durable oak parquet looks great, but it is expensive, and therefore can only be considered the best option when financial capabilities allow.
There is an alternative solution - to purchase a budget option; a beautiful floor covering is an imitation laminate.