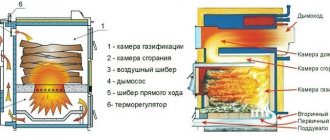
- Scaffolding
- Swing
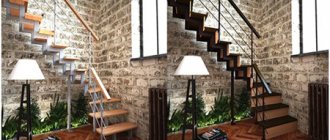
- Ladder
- Ladder
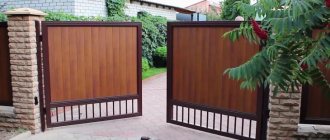
- Gates
- Gate
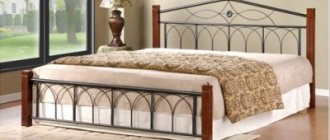
- Bed
- Bench/bench
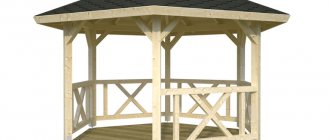
- Alcove
Structures made from profile pipes are characterized by increased wear resistance and strength. Using a professional pipe you can make a fence, a greenhouse, a swing, etc. This way you can save money and ensure your comfort.
Homemade sofa made of metal and wood
The author of this homemade product had a problem; his dog was constantly chewing wooden furniture in the house, so in the end it was decided to make it out of metal. Metal square pipes were used as the basis for the homemade project; everything is assembled quite quickly, the main thing is to correctly cut all the necessary parts in accordance with the diagram.
Materials and tools for homemade work:
List of materials:
- plywood; - square pipes; - dye; — bolts with nuts; - wood screws; - steel corner.
List of tools:
- drill; — welding with all accessories; — grinder with cutting and grinding discs; — protective equipment (glasses, gloves, etc.)
Sofa making process:
Step three. We weld the frame
At this step, the author welds all the parts into a single structure. The main thing in this matter is not to rush; accuracy is very important here. Use a ruler, clamps, preferably magnetic clamps to securely hold the parts in place before welding. When heated, the metal deforms. So, first you need to weld spotwise and only after making sure that everything is smooth, weld it completely.
When welding, in addition to a mask, be sure to wear long sleeves and pants, as you can get burns from ultraviolet radiation.
Step four. Sanding seams
To make the structure look like a single whole, you will need to sand the welds. A grinder with a grinding disc is suitable for such purposes. Work slowly, take care of your eyes and ears. Don't overwork yourself, take breaks. This work is long and tedious, but quite within the power of a person.
If the seams do not turn out uniform, all defects can always be hidden with putty, the main thing is that everything is strong.
Among other things, drill holes for the sofa legs. The author makes the legs from bolts and nuts. This makes it possible to adjust the sofa so that it does not wobble. This is a pressing question for a home with a crooked floor.
Step six. Preparation of plywood
You have to cut out all the necessary blanks from plywood. Next, we thoroughly grind the parts so that they are smooth and the edges do not have burrs. The plywood is attached to the sofa so that it is inside the steel corner. As a result, the pet will no longer be able to damage the tree.
After mechanical processing of the blanks, we take paint or stain and paint the plywood. Finally, the author covers it with a layer of varnish. As a result, the furniture looks stylish and there is no shame in placing it at home.
Step seven. Painting a metal frame
Now you can paint the frame; for such purposes you will need metal paint. It is better to coat the metal with primer first. First of all, thoroughly sand the surface of the entire frame in order to remove rust and other contaminants from it. Finally, wipe the frame with a rag soaked in acetone to remove any surface grease.
What color to paint the frame is up to you. The author decided to paint it black first, but he didn’t like this option. It was eventually repainted dark brown. It is convenient to paint with spray cans.
Step eight. Assembling the sofa
To assemble the sofa, you need to secure the plywood and put pillows on it. To secure the plywood, take wood screws and use a screwdriver to screw them into the holes drilled in the corner. At the same stage, we insert the screws and nuts into place, which allow you to adjust the sofa for stability.
Finally, all you have to do is install the cushions from the old sofa. That's all, the homemade product is ready. The sofa turned out to be strong and, most importantly, not too tough for pets. Of course, it is not very suitable for a residential building, however, it can be decorated. But it’s very good to put such furniture in a garage, workshop or country house.
With ready-made drawings and the availability of materials, everything is assembled quickly, although it took the author a whole year to assemble it from scratch.
Source
How to make furniture from a profile pipe
Homemade furniture made from pipes is a beautiful addition to interiors in high-tech, industrial, loft and other modern design styles. You can buy tables and chairs, a wardrobe and other items in furniture stores. But sometimes home-made items become the only parts that were missing to complete the project.
Step-by-step instructions for assembling a table from a professional pipe with your own hands
A table made of pipes can be an element of room furnishings and would be appropriate in a gazebo or in the garden. The product is made from a profile pipe - a lightweight structure that can be moved to a convenient place. It's easy to make.
Required tools and materials
In the process of creating the product, you will have to cut and connect metal or plastic pipes. If you have the skills of a welder, the fastest way to connect metal products is by welding. But if necessary, parts of the underframe made of profile pipes can also be fixed using a threaded method. Before work you need to collect the following tools:
- grinder or broom saw;
- welding machine or drill with drills;
- nozzles for tightening nuts or a set of wrenches;
- bolts, washers, washers or electrodes, depending on the chosen fastening method;
- professional pipe or round water pipe;
- material for the countertop (stone, furniture board, cut of a trunk, metal sheet, etc.).
Among the manufacturing options there may be loft-style tables, which will require connecting the parts with water fittings. If the product contains cold forging elements, then appropriate equipment (pipe bender) will be required.
Design and construction
Interesting ideas can be seen in city parks, in TV shows or movies, in illustrations and in furniture stores. You can come up with a product yourself, relying only on your own imagination. It is advisable to draw a structure of the desired shape and design: the sketch does not require exact dimensions, but the detail of the image is important.
Drawings and diagrams
After creating a sketch, the desired size of the product is determined and drawings begin on a convenient scale. They will help determine the amount of materials used. Drawings of homemade furniture are most often made independently. You can select diagrams indicating the dimensions and connection of parts according to the illustrations for the proposed ideas.
Work progress
According to the previously drawn up drawings, cut the base parts:
- vertical parts of legs;
- the top frame of the structure on which the tabletop will rest;
- leggings, if needed;
- decorative and additional details.
Using a pipe bender, you can make a round base or base. If you need to assemble a coffee table from pipes, on its base, under the tabletop, you can make a shelf or a press holder. You can also assemble a wall-mounted folding table or bar counter from pipes. In this case, the product will have to be supplemented with hinges and support legs on the free edge of the product. When all the parts are ready, weld the structure according to the diagrams. If you have to use a threaded connection, then holes for bolts are drilled at the edges of the crossbars and racks, as well as along the length of the elements being connected. It is important to mark them so that the fasteners connect the parts of the frame without distortion.
How to make a chair from PVC pipes?
Chairs from a profile pipe or plastic parts of a water supply system are assembled using connecting elements for them. Fittings (angles, tees, bends, etc.) are easy to purchase at plumbing stores. These parts can be installed without the use of soldering or related equipment. It is enough to have a gas key on hand.
Blueprints
A schematic image (chair, armchair made of pipes) is drawn independently or ready-made designs are used. According to the drawings, tubes of the required length are cut and the type of connecting part is determined.
Sequence of work
The chair is assembled according to general principles:
- assemble the base of the seat (round, square), using a bend or 4 corners and 4 tees to which the legs will be attached;
- install the vertical legs, if necessary, supplement them with tees for mounting the legs;
- if a chair made from pipes with your own hands does not have a back (stool), then all that remains is to attach the seat using bolts and nuts;
- if the product has a back, supplement its vertical supports with crossbars made of tubes or related materials (weave from cord, attach a wooden plank, etc.).
LED lighting for chair
Having the skills to connect and solder LEDs, the chair can be supplemented with spectacular lighting by placing mini-lamps on an unnecessary CD. For each diode you will need 2 resistors with a resistance of 120 Ohms:
- connect the tails of 2 resistors and 1 wire from the LED;
- drill 9 holes in the disk and insert the luminous part into them;
- attach the black wire to the free terminals of the resistors (twist the 3 ends);
- prepare all 9 lamps in this way;
- remove the insulation from a long piece of wire (it is equal to the circle on which the diodes are installed) and attach all the free ends of the lamps to it (without resistors);
- glue a second disk on top to hide the “filling”, bring the ends out through the hole;
- connect it to the bundle of black outputs and the power wire circuit, install the switch and connect everything to the battery.
Install the structure in a convenient place (on the back, armrest, etc.).
How to make a chair from PVC pipes with a round base?
A round chair is easy to assemble from 4-6 short pieces. When drawing up a drawing, you need to determine the desired diameter of the seat and base, and then divide the circle into equal 4-6 parts. The length of the fragment will be equal to the length of 1 strapping piece. Prepare tees to attach the legs, and use crosspieces to install the support under the backrest. The chair is assembled by connecting the segments into round contours. The lower and upper parts are united by straight vertical supports. Attach the verticals for the backrest in the right places, and its parts can be connected with tees, angles and pipe sections.
How to make a chair from PVC pipes and a fitness ball?
Based on the previous design, it is easy to create an upholstered chair. An elastic seat will replace a sports ball. The dimensions of the structure are adjusted to the diameter of the ball: it should protrude slightly above the upper frame and not fall through the bottom if the chair is lifted. Assembly is carried out according to the principles already described, but before the final connection of the parts, a ball is placed inside the base. Then they continue to work on attaching the back and armrests.
How to make benches for the street
Do-it-yourself garden furniture from a profile pipe is assembled according to the same schemes. The design of the bench can be based on a simple table frame (a parallelepiped made from pieces of hardware or plastic). Its height is changed to make it comfortable to sit down, and if necessary, it is supplemented with a backrest. Beautiful benches with bent arched legs are assembled using a pipe bender. It is enough to connect the arcs in pairs with horizontal elements of the seat base and legs.
After purchase, even if the size of the mattress is indicated by the manufacturer on the label or packaging, you must measure the length and width yourself with a tape measure. Before starting the manufacture of a metal bed, it is necessary to make diagrams and drawings of the bed base, frame and headboard. Following the drawings will ensure speed and quality of work, and will also minimize errors that affect the appearance and symmetry of the bed. Before starting work, you must purchase all the necessary materials and make sure you have the tools, including electrical ones, that will be needed during the work process.
DIY sofa: corner, straight and other models
Upholstered furniture has always been an indicator of luxury and comfort. It allows you to enjoy the comfort of home in a comfortable environment. One of the most important elements of furniture products is the sofa. It can replace a bed, act as a bed for relaxing in front of the TV or fireplace, and serve as a subject for zoning space. Without it, it is difficult to imagine the interior of many rooms, be it a living room, a director's office or a workroom intended for mental activity.
Manufacturers produce different designs, from standard stationary options to angular and rounded models. They can act as an independent item, or be equipped with a set of chairs and footrests. However, it is not always possible to select a finished product that meets the requirements. For example, the buyer may not be satisfied with the color of the material used, its quality, or the inflated price. In this case, you can make a sofa with your own hands, which will allow you to get the desired item and save your family budget.
How to make metal beds with your own hands
An iron bed is an item that can add special luxury and chic to the interior. Smooth metal curves will add aesthetics to the bedroom. An iron bed is an object that can add special luxury and chic to the interior. A person spends a third of his life sleeping. A good night's rest is the key to daytime activity, the quality of which can only be ensured by a comfortable bed.
Smooth metal curves will add aesthetics to the bedroom. Furniture stores offer a wide range of choices for this essential piece of furniture. But it is not always possible to choose exactly what you need based on all parameters. In this case, the question arises of independent production of such an important piece of furniture.
A good night's rest is the key to daytime activity, the quality of which can only be ensured by a comfortable bed.
- Connect the opposite ends of the pipe to each other using a clamp or welding.
- Drill holes exactly in the middle of each of the long sides of the rectangle.
- Align the rectangles so that their holes match.
- From the outside, insert a pin or bolt into the hole so that it goes through both pipes.
Features of making a sofa with your own hands
Creating upholstered furniture will require a person to have minimal skills in working with wood, as well as the availability of tools for carrying out work activities. The process of self-manufacturing a structure begins with drawing up a diagram, preparing the necessary materials and tools. In order for a product to meet the requirements put forward for it, to last a long time, and to look aesthetically pleasing, certain rules must be followed:
- When making a sofa with your own hands, you need to draw up a sketch of the product. If you don’t have drawing skills, you can use a ready-made plan downloaded online or taken from specialized literature. If you have no experience in creating such products, it is better to use simple forms, which will reduce the time spent on work and reduce the amount of raw materials required.
- The chosen design should be comfortable, functional, stylish.
- Don't skimp on components. The material for the frame must be of high quality and durable, the filling must be of the highest grade, the upholstery fabric must be wear-resistant and must consist of durable fibers.
- Having decided on the design and prepared all the components, you can begin assembly. In order for the finished product to serve for many years, it is necessary to be very scrupulous about the process and strictly follow the technology.
Advantages and disadvantages of homemade sofas
Self-assembly is characterized by a lot of positive aspects. The development takes place on the basis of our own ideas, which allows us to create a unique, individual design, the dimensions of which will exactly match the room. At the same time, a self-made sofa has many advantages:
- The product will cost its owner much cheaper than purchased analogues, which will help save money.
- In the process of production, a person gains experience. Having learned how to do the work, he can easily repair such structures, reupholster the fabric, and assemble more complex furniture.
- At the design stage, you can determine the design of the planned product yourself and design it in full accordance with the interior style of the room.
- The work does not require special tools or special conditions. The usual means at hand will do, and assembly can be done directly in the apartment or in the courtyard of a private house.
- Independent control of product quality will allow you to create a high-quality product.
- A handmade sofa will become a source of pride for its owner, which will amaze guests.
Don't skimp on materials. The finished product will already cost much less than one purchased in a store, and low-quality components can lead to inconvenience during operation and a short service life.
One of the disadvantages of such products is that without sufficient experience it is impossible to manufacture complex structures. The process is also labor-intensive and time-consuming. If the technology is not followed, the structure may fail prematurely.
Sofa manufacturing options
You can get an original piece of furniture for a minimal price if you make it yourself from readily available materials. Before starting work, you need to select a suitable model and assess the degree of complexity of the assembly. The design of any sofa is significantly different from a regular bed; it requires a stationary backrest and armrests. To make any frame you will need an accurate drawing. First of all, you should decide on the type of frame, material and set of functions.
From pallets/pallets
Unusual objects in the furnishings of a house or apartment create a modern, fashionable interior. A sofa made from pallets will fit into any style of room, but will look most successful in eco-design. By making a unique item yourself, you can not only save a lot of money, but also give any room a unique atmosphere. A sofa made of knocked down wooden boards looks great in the living room, hallway, kitchen, or on the terrace.
In addition to its interior purpose, a sofa made from pallets is very functional. It is easy to use. By making the seat from soft foam rubber and pillows, it can easily be turned into another sleeping place. You can get additional shelves for storing household items by covering the partitions with a sheet of plywood.
The furniture should be in harmony with the interior of the room and soft details. If the ottoman is painted with varnish, it is better to decorate it with textiles that imitate the texture of burlap; you can use light, checkered seats. Bright pillows go well with a plain dark frame. A sofa made of pallets in your country house will look homely if you make the upholstery with a floral print.
Made of wood or timber
Furniture made from natural wood is very popular. Frames are made from a variety of species. It can be expensive oak, beech, birch, walnut or budget pine. Sofas made from timber are massive, strong, durable, and have a noble appearance.
There are many schemes with various shapes and upholstery methods for novice furniture makers, according to which you can easily create a real masterpiece. The main components of a timber sofa are the following elements:
- Back. The shape can be sloping or rectangular. More often it is made hollow inside;
- Frame. Assembled from slats and timber. Increase rigidity using fiberboard sheets;
- Fabric lining. Perform according to patterns prepared in advance. If the wood is of low quality, it is better to hide its imperfections under the upholstery;
- Armrests. Must be identical in design to the back. You can make them straight and rigid, cover them with leather, and cut out any pattern with a jigsaw.
From plywood
Natural, safe plywood has high wear resistance and is unfairly considered by many furniture manufacturers to be a lower quality material. It’s easy to make an exclusive sofa from it yourself, enjoying the creative process and amazing results. Plywood is easy to work with, it is easy to cut and bend. The sheet can be given any shape without fear that it will deform or break.
There are a lot of options for making sofas from plywood. To assess your capabilities and skills, before preparing for a serious project, you can practice and make a children’s mini-sofa. The bulk of the materials can be found in any garage, shed, or balcony. For work you will need three container boxes and plywood sheets.
Having prepared the dimensions of the blanks according to the drawing, we proceed to assembly. You can connect the parts in two ways - by gluing the drawers or leaving them retractable. Then we cover the frame with a stripped sheet of plywood, fix it, and cover it with a mattress. A children's ottoman can be moved to the wall and the back made of bright pillows. Low legs will give the structure a more complete look.
From a profile pipe
A sofa made from a profile pipe is a durable, original design that is guaranteed to last for decades. This frame is universal and resistant to mechanical loads. The blanks can have an oval, square, rectangular cross-section. Thanks to the variety of shapes, you can give the finished product a wide variety of designs.
To make a long sofa from a loft-style profile, you will need several sections of pipes with a square cross-section, metal corners, and edged boards. The blanks should be cut to size in advance, any irregularities should be sanded and the necessary holes should be made. Then they are degreased and coated with a protective agent.
The sofa can be assembled by welding or bolting. Following the step-by-step instructions, you need to start by connecting the frame, installing the legs, and the back. At the final stage, lamellas and crossbars are laid. Roll-out drawers can be screwed onto the bottom. You can decorate the sofa with paint in a minimalist style or cover it with wood or textiles.
Do-it-yourself products from profile pipes: ideas
Due to its shape and unique properties, a rectangular metal pipe is in wide demand as a building material. This pipe is ideal for many tasks and can be used to create a wide variety of designs.
General information about the profile pipe
The profile pipe can be made with a rectangular, oval, or square cross-section. As a rule, the material for its production is carbon or low-alloy steel. Stainless steel is used less often for these purposes. Since profile pipes have stiffeners, they, like the products made from them, are characterized by increased strength. The resistance of such a metal frame to mechanical loads is much higher than that of a frame made from standard round pipes. Profile pipes are convenient to store and transport. Pipes with a parallelepiped cross-section take up less space when stored and are more secure than pipes in the form of a cylinder.
What can be made from a profile pipe
The profile pipe is suitable for structures of a wide variety of types. The most common are structures with a base made of a profile pipe. This material is often used to make greenhouses, gazebos, summer showers, fences, gates, furniture, stairs, canopy frames, arches, and garages.
Necessary tools for working with corrugated pipe
To cut the workpieces, you should use a circular saw - an angle grinder; a hand saw is also suitable. The parts are connected using a welding machine, but those who do not have one or are not skilled enough to handle it can take an electric drill and a set of drills for metal and wood. Also, to work with a profile pipe, you need to prepare a hammer, tape measure, chisel, screwdriver - or an electric one a screwdriver and a set of attachments, emery cloth. For those who plan to create a structure with rounded elements, it is recommended to use a tool such as a profile pipe bender.
Options for the use and application of profile pipes
Now we will look at a number of examples of the use of profile pipes for various structures.
Manufacturing furniture from profile pipes
In the design and production of furniture, the key property of profile pipes is versatility. This material is great for shelves, benches, coffee tables, hangers, open kitchens and desks. To make furniture from metal elements, you need to follow the following step-by-step instructions:
- studying the drawing of a piece of furniture, cutting a profile pipe into parts for blanks;
- cleaning cut burrs and drilling the necessary holes;
- bending frame structural elements using a tool;
- welding work to connect structural parts;
- fastening the structure using bolts;
- preparation and installation of fittings for furniture;
- installation of wooden and plastic structural elements;
- painting furniture parts.
Greenhouse frame made of profile pipe
Self-construction of a greenhouse frame from profile pipes requires a certain amount of time, money and effort, but such a structure will last for many years and, as a result, will constantly bring benefits. When planning the construction of a greenhouse, the question of choosing frame material often arises. In this case, a profile pipe is one of the best solutions. The manufacture of a greenhouse, the frame of which is made from corrugated pipe, is described here. Steel profile pipes for greenhouses are advantageous because different types of covers can be easily attached to them - in particular, polycarbonate.
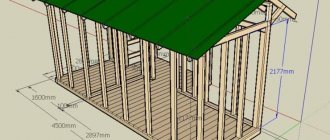
Gazebo made of profile pipe
To build a gazebo, a steel pipe with a square or rectangular cross-section is often used. The combination of the strength of the material and the rigidity of the pipes due to their shape ensures uniform distribution of the load on the gazebo, while at the same time the structure is lightweight. With this profile, the required dimensions of the gazebo can be easily adjusted, which In addition, it has a neat and stylish design. The gazebo, made of profile pipes, has many positive characteristics. The main ones are:
- ease of construction due to the absence of a massive base;
- stability and long service life;
- relatively low cash costs for the material;
- fire resistance;
- no need to carry out repairs from time to time.
Those who have a private house or just a plot outside the city often think about building a canopy. In addition, canopies made from profile pipes are often found in commercial organizations and public places, such as areas of summer cafes, parking lots, recreation areas and entertainment. The main advantage of such canopies is their ease of manufacture - you can easily make them yourself. This task does not require special skills or knowledge, you just need to do everything according to the instructions. How to make a carport is described here.
Summer shower made of profile pipes
To build a summer shower from a profile pipe with your own hands, you need to do the following:
- prepare a tank of suitable volume (about 200–300 l);
- prepare a profile pipe and make a frame of the required dimensions from it;
- make the frame sheathing from sheet material.
For a closed summer shower, pipes with a cross-section of 40x40 or 50x50 mm, or rectangular profile pipes are used. The pipes are connected to each other by welding. The casing is made of polycarbonate, plexiglass or other similar materials. Columns made of profile pipes must be concreted.
Advantages and disadvantages of profile pipe
Profile products differ from ordinary ones in their cross-section: rectangular or square. This results in a tighter fit to the surface. The presence of four stiffening ribs makes products made from profile pipes stronger and more durable. The advantages of this material include:
- lower cost compared to many types of profile fittings;
- possibility of use for the manufacture of various structures;
- thanks to the square and rectangular shape, transportation and storage becomes easier and much more convenient;
- high strength of the material and its resistance to deformation;
- With a large cross-section of corrugated pipes, their use and transportation are cheaper due to their low weight.
- With the help of such products it is possible to construct buildings with large spans, which makes this material indispensable for the construction of warehouses and retail premises, greenhouses, garages, and sports facilities.
- Thanks to the square and rectangular shape, metal products will look aesthetically pleasing, and an interesting design of structures used in the garden will be created.
The main disadvantage is the tendency to corrosion, which significantly affects the performance of profile pipes. The solution to this problem is galvanizing them.
Material advantage
It is not surprising that profile pipes are so actively used for the construction of country and home furniture - they have a number of undeniable and significant advantages.
- Thin-walled elements weigh little, so the final structure is lightweight.
- Thanks to the stiffening ribs, a table made of a profile pipe (or other piece of furniture) will be very durable and will withstand quite high loads. You can even make a workbench from profile pipes - and it will withstand almost any work for which you will use it.
- Craftsmen also consider the geometric shape of profile pipes to be very successful: thanks to their rectangular or square cross-section, they are compact for storage and transportation, easy to install and provide optimal connection to planes. Which, we note, guarantees high stability of the structure as a whole.
- One cannot but rejoice at the relatively low cost of the material, which makes it possible to save on parts without losing quality and aesthetics.
- Another attractive aspect of chairs and tables made from profile pipes is their ease of installation. Elements can be connected either using bolts or welding. Moreover, for the latter option there is no need to purchase or rent a welding machine: household equipment is sufficient for processing a profile pipe.
- Wear resistance and indifference to aggressive influences (temperature changes, precipitation, etc.) allows you to use furniture made from profile pipes outdoors.
- Products made from this material are durable. Even without additional treatments, the frame will last for several decades. And if you protect it from corrosion, it will last almost forever.
The only disadvantage of a profile pipe is the difficulty in obtaining a bend. However, this problem can also be solved: in the absence of a machine, the element can be given the desired curvature by filling it with sand during bending. If you have never taken up making furniture from this material, we recommend starting with the most primitive option. It may not be very aesthetically pleasing, but you can practice working on it, and then use it as a workbench or give it to your school-aged son as a desk - for teenagers, the furniture simply “burns”, and even a hyperactive child cannot break such a table.
Algorithm of actions
- Creation of a drawing indicating the dimensions of all elements of the planned product.
- Cutting profile pipes into parts. In the simplest version, you will need four stand legs, two short spacers and one long one. If you don’t like “extra” elements under the tabletop, you can make two short and two long parts from the corner, which will be fixed directly into the surface.
- The frame is welded or bolted together with a mandatory check for right angles between the elements. If you prefer the “invisible” option, the rectangle on which the tabletop will be laid needs to be additionally reinforced with corners.
- The table top can be cut from a fiberboard board, or from thick plastic, or you can take a ready-made one by removing it from an old table.
Any other product can be made in a similar way. The only thing that is required at the initial stage of furniture manufacturing is a detailed drawing. All the parts in it can initially be wooden; you simply replace them with elements made from profile pipes.
Interesting variations
If there is not enough space in the room or you do not want to clutter up the space in the room, we suggest building a two-legged table “fastened” to the wall. The manufacturing principle is the same, with some deviations from the theme.
- Two legs are prepared; spacer structures can be completely abandoned.
- The other two racks are replaced with strong brackets screwed directly into the wall.
- All elements are checked for perpendicularity.
- The tabletop is installed on the resulting frame.
Advice from experienced craftsmen: if you intend to use furniture made from profile pipes in your home, buy attachments for the legs at a hardware store so as not to spoil the floor covering. A table without seats is not very functional. The simplest of them is a stool. In principle, its production is basically consistent with the algorithm already described. However, for greater strength and ease of use when drawing up a drawing, you need to take into account some subtleties.
- There must be a frame under the seat so that the stool can support the weight of a person of any size.
- If the stool is high, like a bar stool, the counters must have a spacer frame. It can be welded either at a distance of 5-10 cm from the floor, or so that the person sitting can put his feet on the crossbar.
Once you have mastered making stools, you can move on to making chairs and even armchairs. The base remains the same (if you made a stool with straight legs). To get a chair, you just need to cut one of the pairs of uprights to a larger length and take care of the crossbars between the backrest supports. The manufacture of chairs will require more complex calculations. All the legs will have to be lengthened, but one pair is larger, the other, which will serve as stands for the armrests, is smaller.
Garden set
For a suburban area, if you spend a lot of time there and like to have tea in the fresh air, a good solution would be a table with a bench made from profile pipes with your own hands. The set can be placed either directly in the garden or in the yard next to the house. To make such a set, you will need:
- Pipes with a cross section of 40×25 mm with a wall thickness of 2 mm with a total length of 370 cm;
- Pipes with a cross section of 25×25 mm with a wall thickness of 2 mm with a total length of 570 cm;
- Board 25x80 mm in the amount of 11 pieces, if the length of the element is 124 cm;
- Self-tapping screws in the amount of 50 pcs. (take with reserve).
Tools that will be useful are a grinder, a drill with metal drills, a welding machine, and a tape measure. The step-by-step production is as follows.
- Pipes with a cross-section of 45x25 are cut into the required number of elements.
- The parts are welded into 2 brackets, from which a folding table should be made.
- The ends are welded with steel plugs using the mentioned apparatus.
- At the next stage, careful measurements are taken and holes are drilled in the right places.
- In accordance with the diagram, both types of profile pipes are cut - blanks are made for the bench.
- The frame parts are welded.
- The spacer is installed.
- Pipes with a cross section of 25x25 mm are cut; from them a folding leg is formed. It is executed with the letter P.
- The frame seams are cleaned and treated with an anti-corrosion compound.
- At the same time, the boards are sawn into elements of the appropriate length. They are sanded smooth and impregnated with antiseptics.
- The finished tabletop elements are attached to the frame.
The last thing to do is fix the stops with the axes and expand the ends of the pipes. Summer residents love furniture made from profile pipes, made with their own hands. This material is practical, inexpensive, and allows you to create many useful things: from furniture to a greenhouse. It is combined with other materials: wood and plastic. To make a bench measuring 2.3 x 0.6 x 0.45 m, use a profile pipe with a square section of 0.03 x 0.03 m, with a total length of 11 m. As well as boards with a length of 2.3 m, a width of 0. 06 m.
Using the product drawings provided, you can independently make a bench with a back, as well as a greenhouse from a profile pipe with square and rectangular sections of 0.2 x 0.2 m or 0.2 x 0.4 m. Considering that a rectangular pipe is suitable for a durable frame, and a square pipe is suitable for partitions .
Below are a few ideas that you can implement in your dacha. The profile pipe allows you to make gazebos of almost any adequate shape, with excellent stability and minimal weight of the structure.
Loft style table
Master class on creating a frameless model
This design is lightweight, portable, does not scratch the floor covering, and can be easily repaired if defects occur. For work you will need foam rubber and durable furniture fabric. The manufacturing process begins with drawing up a drawing. First you need to prepare the required materials and tools, namely:
- sewing machine, threads, needles;
- scissors, glue;
- measuring instruments, chalk;
- highly elastic polyurethane foam brand HR 3535, capable of withstanding mattress loads of up to 120 kg;
- flock, zippers.
Let's look at the master class step by step using the example of a folding sofa consisting of 4 pillows:
- From a standard sheet of HR 3535 foam rubber, the dimensions of which are 160x200x4 cm (length, width, height), we cut out the required size, for example, in this case, 160x90x4 is the base, 160x60x4 is the second layer (seat), 160x30x4 is the second layer (stand under the back), 160x50x4 – back. To form pillows for each of these components, you will need 6 sheets to get a sofa height of 50 cm.
- We form pillows from foam rubber, glue the sheets together, and cover them with lining fabric. This will allow them to maintain their shape and will also make them easier to install in the case.
- We sew a cover from flock. To do this, we make markings on the fabric corresponding to the dimensions of the pillows with an allowance of 1 cm, cut it into rectangles and strips, and sew them together. At the junction of the stripes and one of the rectangles we install a zipper.
- At the final stage, all that remains is to assemble all the parts of the sofa together. How the parts will be connected needs to be thought through at the planning stage. There are two main ways to attach elements. They can be sewn inside out, stitching a double strip over the joint.
Master class on creating a frame sofa
The product is intended for permanent installation. Differs in greater weight from frameless analogues. May have a complex structure. Beginners in carpentry are advised to start with simple designs, which often turn out to be the most reliable and durable. To complete the work you will need:
- wooden beam 40x40 mm, board 40 mm thick, chipboard, plywood;
- covering fabric, foam rubber;
- screwdriver, drill, jigsaw;
- measuring instruments, glue, pencil;
- hammer, hacksaw, knife;
- fasteners.
For example, let's take a look at the instructions for the simplest frame rectangular sofa:
- We will make the frame of standard dimensions: 190 cm – product length, 80 cm – backrest height, 30 cm – seat height excluding pillows.
- Let's start cutting horizontal partitions. To do this, from a board 4 cm thick, we cut out two slats 182 cm long, and 6 more - 86 cm long;
- From beams 4x4 cm we cut 4 vertical posts 76 cm long, 3 – 95 cm, 1 – 182 cm.\ All wood must be treated with stains, impregnations, varnish, and if necessary, painted.
- After complete drying, we begin assembling the frame; using a screwdriver and self-tapping screws, we connect all the elements with each other.
- After the frame is ready, we cover the seat and back with plywood, and then cover them with foam rubber.
- We wrap the structure with padding polyester, which will help hide defects and make the product softer.
- At the final stage, we cover the workpiece with fabric, fixing it with an industrial stapler.
- You can make such a design with your own hands within a week.
We do it ourselves
Having decided on the purpose of the future furniture and its mechanisms, you can begin to manufacture it. To assemble a sofa with your own hands, you need to adhere to the following plan: Stage 1 . Preparing tools. To work you will need:
- jigsaw or wood saw
- screwdriver
- furniture stapler
- sander or plane
- hammer
- sharp scissors and knife
- sewing machine
- roulette
In addition, you should stock up on basic materials:
- bars
- plywood, chipboard
- boards
- furniture foam rubber
- padding polyester or batting
- upholstery fabric
- wood glue
- self-tapping screws
- pencil
Stage 2 . Frame assembly. The production of any furniture begins with its frame. The frame of a sofa can be of various shapes and sizes, but for production at home you should not choose too complex configurations. Let's look at an example of how to make a sofa for a country house like a Eurobook, the simplest sofa with your own hands. The design of a sofa of this type will not cause difficulties even for beginners in carpentry. The frame is based on boards that will provide the necessary strength to the product. The rigidity of the structure will be given by thick plywood or chipboard sheets with which it is sheathed. Inside, the frame remains hollow, which makes the construction easier. You can make a frame using a screwdriver and self-tapping screws, which should first be coated with wood glue for greater strength. If you have leftover material from construction, you can make a sofa from timber. That is, timber will be used as a supporting structure. A more original and durable frame is made from profile pipes, but working with this material requires additional tools and skills.
If you don’t have a welding machine, use a drill with a metal drill and bolts and nuts. You need to have a file and sandpaper with you to clean the edges of the profile pipes after cutting. It's enough. You can also prepare a couple of carpentry tools if necessary.
Making a corner sofa with a pull-out mechanism
The design of such a piece of furniture, although it has impressive dimensions, will fit perfectly into any interior. The corner location helps save space. Creating an independent project has many advantages - the ability to choose the appropriate quality material for the frame and the size of the structure.
It is better to make the base from wood; coniferous timber, fiberboard, chipboard, plywood are suitable. To work at home, you will need a large space and a set of necessary tools (circular saw, furniture stapler, screwdriver).
Work should begin by preparing a drawing. The manufactured structural parts must be numbered and laid out on the floor. We start the assembly with the largest parts, gradually adding more. It is better to secure the wood with screws and glue. To fix the lifting mechanism, you need to drill holes in the bottom and screw the drawers. The finished structure is covered with foam rubber, agrotextile for tightening and upholstery.
Making a sofa book
The easy-to-use sofa model is very popular. In addition to boards, beams, MDF sheets and various consumables for its assembly, you will need to buy transformation mechanisms.
The first step is to prepare the wood for the wooden frame of the book (seat, back, armrests, drawers for linen). We twist the bars, reinforce them with transverse slats, and nail a sheet of plywood to the bottom. The resulting cells will be drawers in the sofa.
We begin assembling the sliding base from the seat. You will need to make two identical structures with slats that will hold the mattress. We cut the armrests out of chipboard boards strictly according to the size of the drawing, then we knock down a frame for them. When all the parts are ready, you can begin assembling the Eurobook folding sofa and installing the transformation mechanisms. All that remains is to make it soft and stylish using foam rubber and upholstery fabric.
Sofa from an old bath
An interesting and creative sofa can be made from an old bathtub. Functional decor will complement any room. A plastic, cast iron, or metal container is suitable for production. A particularly stylish sofa can be made from old-style models.
In addition to the bath itself, the work will require an angle grinder, cutting wheels, and enamel paints. The first step is to clean it well, remove cracked paint and rust. It is better to work outside, since the grinding process will produce a lot of metal shavings and dust.
We lay the cleaned bathtub on its side and draw the expected outlines of the frame with a marker. The depth of the recess and the width of the future sofa depend on personal preferences and the condition of the workpiece. Cut lines can be oblique, even, or semicircular.
We cut out the line with a grinder and clean the edges from burrs. Now you can move on to decorating the walls. Any metal paints are suitable for this. As legs, you can use special overhead elements that fix themselves under heavy weight, wooden blocks, or stone blocks. We make the seat from foam rubber in a cover and decorative pillows.
Table for welding work made of profile pipes
Greetings to all DIY enthusiasts, today we will look at a useful homemade product for a welder. Those who have welding know that without a table or at least some kind of metal plate, it is quite inconvenient to carry out welding work. You have to work forever on the ground, ruin the covering on the table, and so on. For welding work, you must have a welding table that will be convenient for you in height and near which you do not need to bend your back. Another advantage of the table is that you don’t have to constantly sculpt a mass onto the part, the wire of which usually gets in the way. To weld, you just need to place the product on a metal table and there will already be a mass on it. The author welded a table for himself from profile pipes. The table top is made in the form of a grate through which garbage spills onto a removable tray. The table also has shelves for a welding machine, electrodes and other tools. If you want such a table, I suggest you familiarize yourself with the project in more detail! Materials and tools used by the author: List of materials:
- rectangular profile pipes;
— OSB or similar durable sheet material; — sheet steel for the pallet; — wheels for trolleys; - steel plates; - paint for metal. List of tools:
- grinder;
- welding machine; - marker; - roulette; - vice; - clamps; - screwdriver. Table manufacturing process: Step one.
Tabletop First of all, we cut the required amount of materials to make the tabletop. It is made of two components, many pieces of pipe directly for the lattice table top, and also two more pieces of pipe as a base to which everything is welded. The author cuts the pipes with a grinder, this is long and inconvenient, since you have to cut from both sides. It would be nice to have a miter saw or similar machine for cutting pipes.
Step three. Painting
We paint the table together with the frame from a spray can, but it is important for us not to paint the top plane, since it must conduct electric current. The author sealed the top part with masking tape. Of course, steel will rust, so it would be nice to come up with a conductive coating. As an example, you can try using a thin layer of graphite lubricant; it conducts current and will prevent the steel from rusting.
Step four. Wheels
We attach the wheels from the carts to the frame of the table, choosing something more reliable, since the weight will be considerable. Thanks to these legs, the table can be easily moved along with all the equipment and parts. The author fastened the wheels with “self-drilling” screws.
Step six. Equipment installationWe install a welding machine in the compartment, attach the mass to the table, the author welded a piece of reinforcement for this. The author made a hook on the side under the “positive” wire; it’s convenient to hang the wire with the electrode holder here. In addition, there was a vice on the table, which is often needed for welding work. Well, in the remaining compartments you can put electrodes, a mask, as well as other equipment and even materials, there’s enough space. That’s all, now the table is completely ready, the homemade product turned out to be beautiful and useful. I hope you enjoyed the project and found some useful thoughts. Good luck and creative inspiration if you decide to do this again, don’t forget to share your ideas and DIYs with us!
Become the author of the site, publish your own articles, descriptions of homemade products and pay for the text. Read more here.