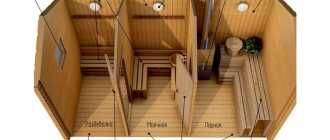
In order to move substances in liquid and gaseous states, a profile pipe is rarely used. Their main and important task and function is to reduce the weight of the erected frame structure of the proposed structure. Thanks to several available pipe ribs in square and rectangular cut versions, it has a high level of strength and reliability.
In tandem with its low weight, this ensures minimal impact of the load part on the base of the structure, and reduces the danger and life-threatening moments when creating load-bearing partitions. Installation work when creating a structure made of straight pipes is not difficult. But, with regards to arched structures made of profile pipes, in this case you will need to work hard, taking into account some of the nuances of construction. Professional firms provide assistance in creating bends of both rounded products and profile pipes. Professional workshops are equipped with special devices and tools. Of course, such services are not cheap, therefore, knowing some of the features of the bending process, as well as having basic experience, you can do all the necessary deformation processes yourself.
Preparation for construction of the structure
Before you begin installation work, you should:
- calculate the expected loads - if necessary;
- draw up detailed drawings of the canopy frame from a profile pipe - the dimensions must also be indicated on them;
- prepare a set of tools;
- select and purchase building materials.
You can build several canopy options yourself from profile products, namely:
- arched;
- single-slope;
- gable.
The appearance and shape of the future structure largely depend on the personal preferences of the owner of the dacha or house and the size of the unoccupied space on the land plot. The most rapidly erected and most compact relative to the occupied space is considered to be a shed made of corrugated steel pipe.
Video description
A master class on introducing spotlights into an arched opening is presented in the following video.
Illumination using LED strip is also possible. To do this, after covering the gypsum board, you need to make a small hole for the tape in the center of the arch. Next, insert the LED strip. After completing work on the arch, close the opening with an acrylic translucent decorative panel.
LED lighting looks unusual and stylish Source pinimg.com
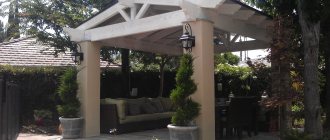
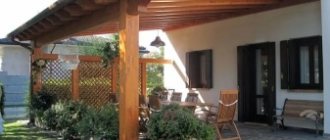
Approximate calculation of a canopy made from a profile pipe
As an example, the initial data can be taken as the size of the building 6x9 meters. In front of one of its sides there is a free area with sides of 7 and 9 meters. Along the wall of a house 9 meters long, it is planned to build a canopy with an overhang of 6 meters (read: “Preliminary calculation of a canopy from a profile pipe, instructions for making trusses”).
As a result, the canopy area is 6x9 meters. In this case, the height of the edge that will be raised is 3.5 or 3.6 meters, and the low one is 2.4 meters. As a result of the difference between heights, the angle of inclination will be 12-13 degrees.
To determine the degree of probable loads, wind and snow maps of the specific area where the land plot is located are used. Based on the above data, do-it-yourself drawings of a canopy made from a profile pipe are made.
In addition to the fact that you can draw them yourself, there are special computer programs. To achieve maximum accuracy when carrying out calculations, it is advisable to be in the place where the structure will be placed at this time.
Canopy elements made from profile products
The design has several main elements, including:
- racks;
- mortgages;
- base plates;
- arches;
- guides;
- roof;
- others - these could be, for example, lighting and drainage systems.
For the manufacture of racks and poles, both profile pipes and products with a round cross-section are suitable. The latter option has a significant drawback, which is the more complex configuration of the support and fastening units of the elements.
To ensure mating of frame parts located at an angle of 90 degrees, the ideal solution is the square shape of pipe products. This type of section provides an equal degree of rigidity in both directions - longitudinal and transverse.
To build a canopy from a profile pipe of any shape based on a drawing, welding is used, as well as threaded or bolted types of connections. When creating trusses or purlins, experts recommend using rectangular products, since they are subject to a significant load in the transverse direction, namely from top to bottom. In this case, there is practically no effort along the axis.
Ceiling base
Ceiling base
Box around the perimeter of the ceiling:
Profile boxes
So, the answer to the question of how to make a frame for a plasterboard box.
DIY assembly instructions:
- We retreat along the wall from the ceiling plane 5-7 cm, put a point in one of the corners of the room.
- Focusing on the set point, use a water level to place points in all corners of the room.
- Connect the dots with lines.
- We fasten the guide rail along the lines.
- We retreat from the wall along the ceiling the distance that will be the width of the box, put a point and repeat the action along the entire perimeter.
Advice! If you don't know how to draw the angle in the lines correctly, use a construction square.
- We attach guide rails along all the lines.
- If the box is wider than 50 cm, place points along the rail along the perimeter of the wall at a distance of 0.5 m from each other.
- From the profile on the ceiling, measure the distance to the horizon of the future box and, in accordance with the obtained value, cut pieces of the carrier rail with a “lip”.
- We insert the finished pieces into the grooves on the ceiling “lip down” and connect the metal.
- We take the guides and attach them along the entire perimeter to the “lip” with grooves to the walls.
- We also put marks on these guides every 0.5 m and connect them along the ceiling (with a cord with paint) with the marks on the walls. In the center of each line we attach a suspension to the ceiling.
Now you can measure the distance from the rail on the wall to the guide profile, which is attached to the vertical pieces with a “lip”. Based on the obtained figure, cut a piece of the carrier rail, insert it into the grooves of the guides and screw it on. Repeat this operation around the entire perimeter.
When leveling the base plane, use a standard rule or level.
Characteristics of profile pipe products
In order to build a canopy frame from a profile pipe and make all the necessary calculations, you should determine the characteristics of the manufactured pipe products. For products with a square cross-section, the required values are given in special tables.
For rectangular pipes, the maximum load size is calculated on the larger side. The result can also be seen in a specially compiled table, where, in addition to the desired value, the span length and pipe dimensions are indicated.
Complex design solutions
Nowadays, arches with unusual shapes are becoming increasingly popular.
Naturally, frames designed for arches in the shape of a regular arc are not suitable for such unusual and original designs. To make a complex bend or give an original shape to an arch, you need to do the same with the frame itself, which is much more difficult. Arches are often made in the Gothic, Rococo and other styles that are experiencing a revival these days.
Creating such original openings on your own can be a rather difficult and almost impossible task, so it is best to seek help from professionals.
Calculation of values for canopy posts
When selecting the parameters of the racks, they first calculate the loads exerted and draw a detailed drawing. The rigidity of the product is affected by the width and thickness of its walls, which in turn depend on the length of the product.
For example, when choosing which profile pipe to use for a canopy, you can use either a thick-walled product with a small cross-section, or one with thin walls, but with a large shelf width.
It should be taken into account that the vertically directed load exerted on the rack by the canopy floors is insignificant and therefore a thin corrugated pipe will withstand it without the slightest deformation. The diagram of a canopy made from a profile pipe must contain the exact dimensions of each element. Quite often, a garage frame from a profile pipe is made using the same method.
For buildings with average parameters, the best option would be products with a cross-section ranging from 50 to 100 millimeters. If racks are located frequently, it is acceptable to reduce the size of the pipes used. In the case where a lean-to canopy has four supports, then large-section pipe products will be used.
Installation of a wooden frame for a plasterboard arch
Making a wooden frame for your plasterboard arch is also easy. True, for this you will still need plywood and wooden blocks. Measure the width of the doorway, subtract the thickness of the drywall and plywood, and you will get the thickness of the wood pieces you need. Draw the arc of the arch on the plywood and cut it out using a jigsaw.
A frame for a plasterboard arch made of plywood and bars screwed to it.
Using 5-centimeter self-tapping screws, attach wooden blocks to the plywood to serve as the frame of the arch. Then fix the arch in the doorway using long self-tapping screws screwed in every 15 cm.
Drywall attached to a wood frame.
The last step is to attach the second plywood wall and cover the plywood with drywall. The latter must be secured using drywall screws.
Trusses as frame elements
Trusses serve as an additional connecting part when arranging a canopy. They give the frame greater stability and strength (read: “How to make a frame from a profile pipe for a house - theory and practice”). You should draw a special drawing for them. According to the standards, calculations are required for pipe trusses with an inclination angle of more than 6 degrees. But experts believe that you need to start from 8 degrees.
The fact is that in winter, fallen snow will accumulate on the roof surface at a slight angle of inclination. The optimal value is 15 - 20 degrees. This slope of the roof slope is suitable for coverings made of corrugated sheets, slate, plastic, polycarbonate and other modern materials.
Farms can take the following form:
- triangular;
- arched;
- rectangular;
- broken;
- trapezoidal.
Inside the trusses, racks, purlins, braces, and struts are additionally installed. The drawing must indicate both the dimensions and the list and quantity of materials that will be required.
Since the trusses consist of hollow parts, the weight of the frame for arranging the canopy will be insignificant. Horizontally, they are fastened together crosswise using elements made from profile metal products with a small cross-section (read: “Characteristics of fasteners for profile pipes, “Crab”, clamps, advantages of use”).
Next, install a sheathing of timber 50 millimeters high. It is needed to fix the roof covering. Wooden beams should be pre-treated with an antiseptic or painted to prevent damage to the wood.
Construction of the structure
Installation work is carried out in stages:
- Before making a canopy from pipes, first prepare the foundation.
- Then the materials listed in the drawing are measured and cut.
- Trusses are made.
- The side walls of the structure are assembled.
- Connect roof trusses and finished sections.
- Check the correct assembly of the elements using a level and tape measure.
- Mount and securely fasten the frame to a previously prepared area.
- Metal surfaces are treated with protective compounds.
- Prepare materials for roofing, install them and fix them.
- Trim off excess roofing.
- They restore order in the surrounding area.
When preparing the foundation for the structure, soil is removed from the places where the supports from the profile pipe will stand. A layer of crushed stone is poured onto the bottom of the dug holes. Then, in order to secure the racks, a mortgage is installed on which bolts are welded. If desired, reinforcement is used to add additional strength to the structure.
Video description
In this video you will learn a little more about the features of using arches in the kitchen:
An arched opening in the living room is a decorative element. It gives the interior a solemn, formal look. To achieve this goal, complex designs with niches, inserts of additional lighting, stucco molding, and even built-in decorative columns are used.
Spectacular and majestic columns in the arched doorway in the living room Source www.freelancejob.ru
The hallway and corridor always need more space. Therefore, the arched opening should be as wide and high as possible. In addition to the practicality of this design, this will visually enlarge the room.
Selection of materials and preparation of tools
The main requirement for the quality of profile pipe products is strength. To ensure the stability of the load-bearing parts of the structure made from them, you need to select pipes with minimum parameters equal to 80x80 millimeters. For additional elements, the optimal cross-sectional size will be 40x20 millimeters.
To determine the amount of roofing material, first calculate the area of the surface to be covered, and then increase the result obtained by 5%. Fastening is carried out with roofing bolts and special gaskets.
The structure is assembled in one of the following ways:
- Welding . But for this you need not only to have a welding machine with electrodes, but also to know how to properly weld a canopy from a profile pipe. Without skills, such work cannot be done.
- Using threaded connections . This requires metal corners and mounting bolts.
- Using special clamps.
A do-it-yourself canopy costs much less than a purchased one. It will meet the requirements subject to strict adherence to the technology of its construction.
Step-by-step instructions with photos: the fastest way
Do-it-yourself plasterboard arches are made in different ways. This takes a minimal amount of time. Having decided on the shape, we proceed to installation. We attach a frame to the prepared opening, cleared of peeling plaster and relatively leveled, according to the dimensions of the future arch. It is made from a drywall profile or a dry wooden block of a suitable size. Sometimes, if the wall is narrow, you can only choose wood.
A profile frame is screwed to the selected dimensions
To begin, we cut out a rectangle from drywall to the size of the future arch, find its middle, mark it, and then temporarily screw it into place. We retreat from the edge 12.5 mm - the thickness of the plasterboard sheet. If the adjacent walls are already plastered, add a couple more millimeters of putty so that the surface can be leveled.
Screwed the drywall into place
Now we take a piece of profile or hard corner and set aside half the width of the opening from one edge. At this point we make a hole in the corner and insert a nail into it. We stick this nail into the middle of the doorway we marked earlier on the sheet. It turns out to be a kind of compass, with which it is easy to draw an ideal line.
Device for outlining an arc
By changing the mounting height you can get a more or less high arch. If you need a flatter curve, increase the length of the “compass”.
Using a corner we draw an arc
Having removed the sheet, we cut out an arc along the outlined contour. This can be done with a special drywall saw, a metal saw with a fine tooth for a smoother edge, or a jigsaw (there will be a lot of dust). If the cut is not very even, smooth it out using sandpaper attached to a grater. With this device we achieve a perfectly even curve of the shape we need. We fasten the cut fragment of the arch - the side wall - back into place.
We fix the cut out fragment
If everything is smooth, there are no distortions or irregularities, on the other side of the opening we attach the same sheet of drywall as a few steps earlier - a rectangle or square, depending on the shape. It must be fixed strictly vertically. Now we transfer the shape of the arch onto it. We take a square, at a right angle and press one side against the drywall, onto which we transfer the arch, and the other side against the arch. Having aligned the square perpendicularly, mark a point with a pencil. We make such points along the entire arc. The more often they are done, the easier it will be to draw the line and the more accurate the match will be - the less you will have to grind down.
Transfer the arch shape to another sheet of drywall
Why is it so difficult and not just to make a copy of the first sheet? Because few openings are symmetrical. As a result, installing the second sheet so that the lines of the arch coincide is very problematic.
Having marked all the points, remove the sheet, draw a line, and cut along it. We install it in its original place. Now we take the smoother again with sandpaper and now we smooth both edges until they match completely. One point - the trowel should be wider than the opening so that both walls of the arch are captured in one pass.
Level both walls at the same time
We measure the length of the arc, cut out a piece of the profile of the same length, make notches on the walls every 3-4 cm. This tape will need to be secured along the arch arch on one side and the other.
How to cut a profile for an arch
We fasten it with self-tapping screws, carefully, pressing the profile and holding it with a block, not with your fingers: it’s easy to get the screw into your fingers. By the way, you need to wear gloves when working with the cut profile. If you don’t, you’ll definitely cut your hands.
We fasten the notched profile, simultaneously giving it the shape of an arch
By the way, the back of the profile can be aligned along the edge - it’s easier to work this way, but the joint will still have to be sealed later. Screw the strip to the other side in the same way.
This is a bottom view - profiles are attached to the sides
There is a second way to attach the profile - attach it to a quick-setting universal glue, such as liquid nails. This method is acceptable if the opening width is small. If the arch is thick, the glue may not be able to withstand the mass of drywall that will be attached from below.
The next step is to attach the jumpers. First, the depth of the arch is lost, 1-1.5 cm is subtracted from it. This will be the length of the lintels. Cut profile pieces of this length.
Jumpers are cut from the same profile
At the places where the jumpers are attached, the “petals” are cut off, and the prepared fragment is installed and secured. It should not rest against the walls, it should be located approximately 5 mm from the back. Jumpers are needed to make the structure more rigid, otherwise it “walks” when pressed.
Fastening jumpers
Next, you need to cut out a rectangle from drywall that will cover the structure from below. Its width is determined simply - from the outer edge of one sheet of plasterboard to the outer edge of the second sheet. The length is measured with a flexible tape (can be a tailor's tape) or a tape measure with an assistant. We attach this sheet with self-tapping screws to the arch frame. The sheet has to be bent, but read how to do this a little lower - closer to the end of the article.
We attach a strip of gypsum board to the arch
Next came the finishing work: a special corner is attached to the corner, everything is puttied using the usual technology: first the starting joints and corners, then the finishing one.