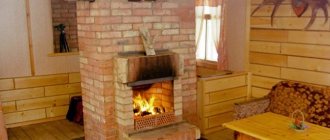
The humidity and temperature of the air, comfort and benefits for the body depend on the stove in the bathhouse. A sauna stove must be equipped with a tank for heating water, a chimney and a heater pocket for stones.
If you have a great desire to build a sauna stove with your own hands, and not to hire specialists, be sure to read this article several times, you can even print it out on a piece of paper and use it directly as a cheat sheet. At the same time, you will save significantly and gain invaluable experience, which will allow you to build similar structures for money in the future. External decoration plays an important role, because a bathhouse is a place of relaxation, both physical and moral, and the appearance of the stove plays an important role in this! After external finishing, the stove in your bath should become its “highlight”, an exclusive decoration that is simply pleasant to look at, like a painting.
The sauna stove is placed either with a combustion door into the adjacent room, or directly into the steam room, where firewood is stored. Naturally, it is better for the firewood to be supplied from the next room; if the size allows you, do just that.
Water tanks are mounted either behind the stove body on supports (floor or wall mounting), or they are mounted directly above the stove firebox. At the same time, a stationary floor mounting of the tank is safer than a wall mounting.
Using metal sauna stoves
For many years now, metal stoves have been competing with traditional heating structures made of bricks. They are installed both in private households and in bathhouse buildings.
The demand for metal units is explained by the presence of important advantages:
- heating for a short time;
- affordable price;
- high thermal conductivity;
- there is no need to build a high-strength foundation;
- simple installation process.
The last advantage is especially important for those who plan to make such a device themselves. But for this you need to be able to read the drawings of a metal sauna stove. You should also know that if such a unit is used irrationally or the technology for its manufacture is not followed, there is a high probability of a fire.
The main stages of making a potbelly stove
1. All the details are marked on a sheet of metal: 6 steel rectangles for the walls of the oven, 1 rectangle for creating a smoke reflector, plates for the grate and latch for the door. 2. Cut
sheet metal can be found at any metal depot. The guillotine, unlike the grinder, allows you to cut (chop) it more accurately. In this case, there will be no need to do straightening (alignment of sheets).3. The furnace body is made in the form of a rectangle. Their sides are joined together at an angle of 90° and welded together.
4. To avoid mistakes, the furnace box is first only tacked by welding in several places, and only then, after checking its horizontal and vertical positions, its seams are welded.
Important! All connections in the body are thoroughly welded; To check the seams for leaks, you can coat the joints with chalk or kerosene. 5
Welding seams are cleaned with a wire brush.6. The internal space of the potbelly stove is divided into three parts: the firebox, the smoke circulation chamber and the ash pan. To separate the firebox from the ash pan, a grate is laid between them, on which the fuel will be placed. To do this, at a height of 10-15 cm from the bottom of the stove, 5x5 cm corners are welded on the sides and on the back of the box. On which the grill will be located
5. Welding seams are cleaned with a wire brush.6. The internal space of the potbelly stove is divided into three parts: the firebox, the smoke circulation chamber and the ash pan. To separate the firebox from the ash pan, a grate is laid between them, on which the fuel will be placed. To do this, at a height of 10-15 cm from the bottom of the stove, 5x5 cm corners
. on which the grille will be located.
Advice.
It is better to make the grate from 2-3 detachable parts. Otherwise, when replacing a burnt grate, it will be difficult to remove it from the firebox.
7. The grate is welded from thick steel rods or strips 30 mm wide. They are attached to 2 stiffeners - rods with a diameter of 20 mm. Since the grates burn out over time, it is better to make such a grate removable.
Manufacturing of grate
8. At a distance of 15 cm from the top of the box, two strong rods are welded, on which one or two removable reflectors
– thick-walled sheets of metal that will delay the flow of hot gases and send them for afterburning. However, they should not completely block the oven. To allow hot smoke to enter the chimney, an indent of about 8 cm is made from the front (for the first sheet) and back of the stove.
Diagram of the passage of gases in a simple potbelly stove and stove with an installed reflector
9. Next, the upper part of the box is welded, and then a hole for the pipe
.
7b322d8423a7dadf138a51c55e6975c2.jpe b7cefa9acf3137f0016fdbcbaff2b0fa.jpe 9f6cac380670ce1bd8016126517b4cb8.jpe
5c442439af9dde1c6eab9f7923ded6d5.jpe
fd2d612e384629fa06d7f9f58324af72.jpe
Pipe hole
10. The front part of the stove with holes cut in it for the firebox doors and ash pan is welded last. 11. The size of the firebox door must be sufficient to allow fuel to be added and grates to be changed without effort. The hole for the ash pan is made a little smaller. 12. The hinges are welded first to the door, and then to the body of the potbelly stove. They can be bought ready-made or welded from two tubes of different diameters. Door handles can be made from a strip of metal or rod.
Important! When attaching the doors, you should fit them to the body as tightly as possible; To do this, they are straightened (leveled) and cleaned with an emery wheel. Wedge latches closing the doors are adjusted to the body as tightly as possible
13. You can cook food or heat water on such a stove. To do this, a hole of the required diameter is cut in the upper part of the box. Stove burner
.
which will be inserted into this hole can be purchased at any hardware store.14. For ease of use, the structure is installed on legs
or a welded stand made of pipes.15.
The chimney pipe is connected to the stove using a sleeve
.
16. For inserting a gate valve
. to regulate the smoke output, two holes are drilled in the pipe. A metal rod is inserted into the holes and bent at 90°. A metal “penny” is attached to it in the center of the pipe - a gate, the diameter of which should be slightly less than the diameter of the pipe itself by 3-4 mm.
Gate valve for adjusting smoke output
Design features of modern metal furnaces
The simplest example of a DIY metal sauna stove design is considered to be a potbelly stove. It consists of a box equipped with a pipe and a door. Its main disadvantage is insignificant heat transfer with high fuel consumption. Therefore, now the potbelly stove is used extremely rarely.
Modern metal units have a higher fire safety class. They are made from sheet material, the thickness of which does not exceed 4-5 millimeters. They have a thermal chamber for filling stones (read: “How to place stones in a sauna stove correctly, which stones are best to use”). Often their design solution provides for the possibility of installing an additional water tank with a volume of up to 70 liters.
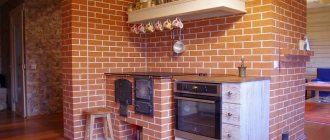
In order to ensure uniform heating of the air in the unit and reduce its fire hazard, the lining is made with fire-resistant bricks. If there is no need to create a particularly strong foundation for the furnace, it will be sufficient to have a large base, which can be a cement slab covered with tiles, or a metal sheet, or fire-resistant brick.
Classification of furnace units
Most often, homemade stoves are made with cooking surfaces.
According to the characteristics of the device they are made:
- chamber;
- duct;
- bell-shaped
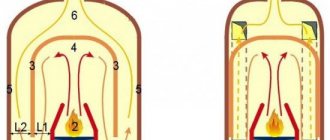
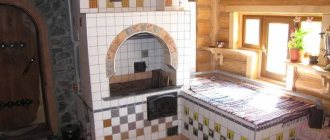
In chamber stoves, flue gases enter a special chamber and are completely burned there due to natural circulation. Their design creates a similarity to the burning of an ordinary fire in a confined space. In domestic models, the combustion compartment is connected to the afterburning compartment into a single module called the crucible. Its vaulted shape ensures complete combustion of fuel. An example of such a design is the classic Russian stove.
In a ducted unit, the flue gases first burn out, then gradually cool down and move through the channels located between the partitions. When moving, they give off heat to the furnace body. There is no afterburning inside until the temperature in the combustion chamber reaches 400 degrees. The efficiency of these devices does not exceed 60%.
In a bell-type furnace, combustion products move to the roof of a special bell and linger there, burning out completely. Then the gases sink to the bottom and give off heat to the body. To kindle such a unit, it is enough to warm up only a small area of the hood. Its efficiency can be 75%.
Construction of metal furnaces
If you carefully examine the drawings of metal sauna stoves with dimensions, then according to their design solutions they can be divided into several varieties:
- Closed type units . The compact dimensions of these stoves allow them to be installed in small bathhouses used by family members. To increase the heat capacity, the structures are lined with refractory bricks on the outside and inside using metal fasteners. A grate for stones is placed in their middle part.
Types of fuel and types of stoves
Bathhouse appliances differ in the type of fuel used for their operation:
- Wood burning units . They appeared earlier than other types of metal furnaces. They require a considerable amount of firewood to release thermal energy, and they also need constant care. Typically, they are preferred by those bathhouse visitors who can wait until the room warms up and then slowly enjoy the fragrant steam and warmth coming from natural wood.
- Electrical devices . In this case, the design of a metal sauna stove consists of several main components: a body equipped with a heating element, and special heat-insulating elements.
- Gas units made of metal . They are rightfully considered the most modern and reliable designs; they are equipped with a thermostat to regulate power. The safety of gas appliances is ensured by a safety device that is instantly activated when the gas supply is turned off or reduced.
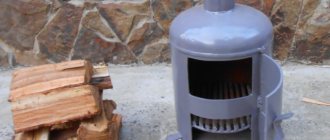
Simple heater for a summer house
Such a heating metal stove is well suited for quickly providing heat to a small bathhouse or even a sauna.
The main advantages are that it is mobile and easy to manufacture.
Preparing for vaping takes 1.5 hours, the walls heat up quickly. One caveat - you need to attach 2 chimneys to the stove. The first will participate in heating the room itself, the second will remove carbon monoxide.
What does the oven consist of:
- Steel - iron sheets of at least 3 mm.
- It is better to make the firebox from thicker steel -6 mm.
- The kit also includes latches and a metal grill.
This structure can be assembled using a welding machine. Such sets are purchased in a disassembled state, the instructions are already included. Designing a metal stove will not be difficult, as it will fully comply with fire safety rules.
Advantages and disadvantages of metal stoves
To understand the characteristics of metal units, you need to analyze their advantages over permanently installed brick structures.
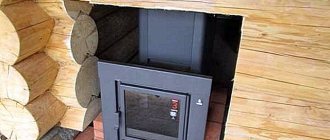
Unlike stoves made of bricks, metal heating units are distinguished by their mobility and compactness and therefore are the optimal solution for small bathhouse buildings. The manufacture of a metal sauna stove can be carried out anywhere and then moved to the desired room for installation.
There are two main design solutions for metal units:
- Hot type ovens. These devices are ideal for use in bathhouses that are not visited regularly, for example, in a summer cottage. Despite their rapid heating, it is not recommended to install them in constantly used bathhouses. The fact is that when using such a heating unit, it is possible to overheat the air in the room due to the inability to control the temperature of its heating.
- Cold type ovens. They are considered the best choice for installation in heated rooms. These units warm up quickly, but unlike the previous version, they are equipped with a system that controls the temperature. It is difficult to get burned when touching them, since their walls rarely heat up to more than 50 degrees.
To summarize, the advantages of metal units for baths include:
- Small dimensions, which is clearly confirmed by the drawing of a metal sauna stove. They are indispensable for small bath buildings.
- There is no need for preliminary construction of a massive foundation. It will be enough to arrange a lightweight version of the foundation, which will speed up the construction of the bathhouse and its commissioning.
- Affordable price. The metal unit is distinguished by its ease of self-production; it does not require additional costs. It’s not difficult to find drawings of a metal sauna stove with your own hands. A large number of them can be found in specialized literature and on the Internet.
It is impossible not to note the disadvantages of metal heating structures:
- Inability to accumulate thermal energy and, as a result, rapid cooling. In these devices, the combustion process must be maintained continuously.
- Inability to heat large rooms.
- The need to install double walls with an air gap between them. This is required to prevent heat stroke while in the bathhouse.
- The fire safety of metal units is lower than that of brick stoves, and therefore the protection of their lining from the inside should be strengthened.
Long-burning boiler principle
Before reviewing the unit, you need to understand the principle of its operation. The bubafonya stove runs on solid fuel - wood. Before you start burning it, you need to prepare the wood. In the boiler it is heated to 250 degrees Celsius using paper ignition.
When charring, wood decomposes into simple chemicals: gases and vapors. When the temperature reaches 300o Celsius, the gaseous components ignite, accelerating the thermal reaction.
To protect against fire, and also to prevent it from spreading throughout the entire container, a protective screen is provided on the fireplace. A damper is used to regulate the temperature. When turned off, the air supply stops, as does the combustion process.
e73a5161b278f1b9b6cce9d093acdbd7.jpe b91f0cbcde1d75943e45664645a35bcc.jpe c66866520f2ead98723282e8dfc82f03.jpe c3e999ec2fa9779517be1a04935 82877.jpe
The meaning of the shape of a sauna stove
The performance of the unit and how convenient it is to operate depend on this parameter. As practice shows, stoves with a cylindrical shape and a shaped or horizontal design are in high demand.
But the most convenient to use are rectangular units. The reason for this is the presence of corner zones, which rarely become as hot as possible. As a result, there is an opinion that such a frame helps maintain the shape of the stove. In addition, the uniformity of heating of the unit depends on this parameter.
Proper heating also affects the stability of a metal heating structure. This is confirmed by the fact that the walls of round and cylindrical furnaces are reinforced. And although the high degree of stability of the rectangular structure is explained by the presence of cold corners, it still loses its original shape over time.
Independent construction of a metal furnace
Stage 1 . The metal structure being manufactured will have a closed heater and in order to use water and get steam it is necessary to open the door slightly. To make a sauna stove from a pipe, first prepare materials and tools. To simplify the manufacturing process, you will need a diagram of a stove for a metal bath.
You need to have at your disposal:
- sheet of steel with a thickness of at least 8 millimeters;
- grate;
- a metal pipe with a diameter of 50-60 centimeters with a wall thickness of about 10 millimeters;
- 10 mm rod;
- doors and latches for arranging a blower, heater and firebox;
- water tap;
- approximately 2 meters of pipe, of which 90 centimeters will be required for the firebox, 60 for the tank, and 50 centimeters for the manufacture of the necessary parts.
The tools you need to prepare are a welding machine and a grinder.
Stage 2 . For further work you will need a long piece of pipe. First of all, a blower with parameters of 50x200 millimeters is cut out in it. Above the hole located on the inside of the pipe, you need to weld a mount intended for the grate. To do this, you need to take a metal plate that is equipped with eyes. Grate boxes are always available in specialized stores.
Stage 3 . Now they begin to create the firebox. First, a hole is made with parameters of 250x200 millimeters. The fastenings required for installing the stove rods with a diameter of at least 10 millimeters should be welded on top. They can be replaced with grates for round-shaped units. You can buy such products in the same place.
Stage 4 . A hole is created on the opposite side of the structure. Water is poured into it. Next, stones are placed in the heater. For example, diabase and soapstone are used. Flint, granite and mica-containing stones cannot be used.
Stage 5 . A hole is created in the cover intended for the heating unit for mounting the chimney pipe, which is then placed in place. Next, it is recommended to additionally install a water container. To do this, weld the last piece of pipe onto the heater and attach the tap to its lower part. When operating the unit, smoke will begin to move through the pipe and heat the water without bringing it to the boiling point.
Stage 6 . Finally, a lid is made for the heating tank. It is made in accordance with the cross-section of the pipe and cut in half. In the first part, a hole is made for the chimney pipe and then welded to the tank. The second half is equipped with hinges and a handle and therefore the free part of the lid can be removed if necessary.
Creation of sand-clay composition
After preparing the base, the next step is mixing clay and sand. It would seem that why exactly such a composition is needed if there is cement, but the answer is obvious - the cement mortar is completely unable to withstand exposure to high temperatures. That is why all designs of a brick heater stove for a bathhouse require a sand-clay composition.
The best clay for laying a stove in a bathhouse can be obtained at a depth of about half a meter. Naturally, the material must be thoroughly cleaned and soaked for several days before use. For soaking, you can make a small groove next to the bath. It is necessary to prepare not only clay, but also sand - it must be cleaned of various impurities and thoroughly sifted so that there is no debris in the masonry joints.
The clay is kneaded directly in front of the slave. Experienced stove makers use a special “oar” for these purposes, which is perfect for these purposes. Next, water is added to the clay, and it all mixes well until it becomes sour cream. Moistened sand is added to the clay mixed with water.
To determine the quality of the resulting solution, a dry and clean stick is lowered into it, and the result is determined by the following criteria:
- If a layer of mixture less than 1 mm thick has stuck to the stick, you need to add clay;
- If the thickness of the adhering layer exceeds 3 mm, sand is added;
- If 2 mm of the mixture adheres to the stick, then the solution is suitable for use.