The arrangement of suburban areas near private houses is not complete without the construction of reliable and beautiful fences, and such structures must necessarily have gates. Even if the owner does not yet have a personal car, the gate will allow guests’ cars to enter and various goods to be delivered to the site by truck.
There is no need to rush to make a final decision; carefully read the maximum number of different options, analyze them taking into account your own wishes, terrain features and the size of the site.
It is imperative to take into account financial possibilities, because the cost of existing options differs significantly. By the way, what is more expensive is not always the best in practice from an operational point of view.
DIY gates: drawings, photos and videos
Why it is better to make swing gates with your own hands from a profile pipe
The width of my gate should be 4.10 m. This is exactly the distance between the supporting posts of the fence made of corrugated sheets. The span is quite large - each leaf should be 2.05 m wide. To ensure rigidity, I decided to use a steel profile pipe for the frame.
Since the outside cladding of the gate is made of corrugated sheets screwed to the frame with self-tapping screws, the frame itself had to be made rigid only in a plane perpendicular to the area of the gate. Simply put, so that the wind does not break it. And the frame should not fold in the corners, since the sheets will provide it with decent additional strength.
The simplest option, it would seem, is to make a frame from wooden blocks, connecting them with galvanized strips on self-tapping screws. Sheets are also easier to screw to wood than to metal. However, the wood will have to be protected from rot and mold and the coating will have to be renewed regularly. The gate is on the street all year round.
A profile pipe with a cross-section of 40 x 20 mm, even with a wall thickness of 1.5 mm, already has sufficient rigidity for a length of up to two meters. I used a pipe with a wall of 2.0 mm. The weight of each canvas increased slightly. In addition, thick metal is easier to weld, especially for beginners. Thin walls are easy to burn through. For welding, I used a regular semi-automatic welding machine and electrodes 2.5 mm thick.
Foundation installation
Since the mass of brick pillars is significant, it is necessary to pour a strong strip foundation. All work must be performed using appropriate technology.
First, holes are dug for mounting two supports. The depth depends on the level of soil freezing. This value will be different in each region.
The next step is to make a pillow, which includes sand and crushed stone. First, sand is poured, the thickness of the layer should exceed five centimeters. It is compacted well. A 15 cm layer of crushed stone is poured on top, which is also compacted.
A frame is made using reinforcing bars. They are laid in horizontal and vertical directions. They are tied with knitting wire, maintaining a step of 20 cm. Then the reinforcement frame is inserted into the hole made. After that, the installation of steel pipes is carried out, playing the role of the supporting frame of all brick pillars. Installation work must be carried out level, after which the pipes are well secured.
A concrete solution is prepared, for which it is necessary to pour the following into a concrete mixer:
- cement;
- sand;
- crushed stone
All components are mixed very thoroughly. Water is added to the mixture and mixed until a concrete mixture is obtained.
The process of pouring the foundation for the gate
The resulting solution must be concreted into the pits with pillars and wait several days until the concrete has completely hardened. Installation of the pillars can begin after the foundation has completely dried, but not earlier than half a month.
Drawings of swing metal gates made of corrugated sheets and required materials
So, it's time to tell you what configuration I chose for my gate. The dimensions were determined simply. I assigned the height of each canvas in accordance with the height of the profiled sheet - 2000 mm. Width – 2030 mm, taking into account centimeter gaps for free movement of the sashes. If they were made end to end, in the summer they might not close, having expanded due to heating. The coefficient of thermal expansion of the metal is quite high.
As I have already indicated, corrugated sheets should take on the main role in ensuring rigidity. This made it possible to abandon long diagonal braces, saving almost six meters of metal pipe (see drawing).
Metal braces will be useless after corrugated sheets are attached to the frame
But horizontal strips will have to be installed at the middle of the height of the sash, otherwise, at a height of 2 meters, the rigidity of the sheet will not be enough.
I simply strengthened the frame in the corners in small sections. At the same time, it was possible to reduce the weight of the gate, reducing the load on the hinges. But an intermediate horizontal girder had to be placed in the middle of each sheet, otherwise the sheets might not withstand the wind load and bend.
Already during the manufacturing process, the idea suddenly occurred to me that it would be nice to add a gate to the gate. It is inconvenient to open even one of the doors outside each time to walk. Having removed the frame of one of the canvases, I also welded the frame of the gate into it.
So, for the work I needed the following materials:
- profile pipe 40 x 20 x 2 mm for swing gates – 22.0 linear. m;
- profile pipe 40 x 20 x 2 mm for installing a gate - 10.0 linear. m;
- profiled steel sheet 1200 x 2000 mm – 4 pieces;
- fence screws 5.5 x 19 mm – about 120 (including about 20 pieces that had to be added due to the design of the gate) pcs;
- hinges – 3 pairs (including 1 pair for the gate).
I deliberately indicated separately the consumption of materials for the gate - if you make a gate without it, you will get an even more budget-friendly option. However, as practice shows, cheap is not always good.
The tools I used were quite accessible:
- angle grinder with grinding and cutting discs;
- a welding machine with a couple of kilograms of electrodes;
- screwdriver (it can be replaced with a low-speed electric drill);
- hammer;
- square;
- roulette;
- pencil;
- level;
- plumb line;
- clamps.
All materials must be prepared in advance - during the manufacturing process, adjustments may be required “on site”.
Advantages and disadvantages
When deciding how to make a gate, it is important to take into account all the features of different designs, which will allow you to choose the most suitable option. The main criteria are the availability of free space on the site, ease of use, and the degree of complexity of installation. The swing system has its advantages:
- simple installation;
- long-term operation;
- minimal care;
- reliability;
- various design options, the ability to use any material for the manufacture of sashes;
- There is no need to specially strengthen the base; with the sliding option, in this case rollers are used and the soil will have to be poured with concrete.
You can complicate things a little by connecting a drive to them. This simplifies their operation, but complicates the installation process and increases costs. There is a need to allocate more space to install a swing structure. You are the owner of a small plot or it is already occupied (with a garden, vegetable garden or other buildings), and there is a sidewalk on the street side, you will have to install a sliding option due to lack of space.
Making metal swing gates with your own hands
Before assembling the gate, I cut blanks from corrugated pipe to size. I made the connections in the corners of the frame end-to-end at right angles - no 45° angles. Firstly, this would significantly complicate the work, and secondly, moisture would still form in a confined space, which, in the absence of ventilation, would inevitably destroy the gate from the inside.
It is necessary to weld swing gates from a profile pipe by securely fixing the position of all elements. It is advisable to lay everything out on a flat area or place wooden blocks at the corners. All elements must be located in the same plane.
First you need to “grab” all the corners by welding, and after the welds have cooled, scald them. If each corner is welded independently, separately from the rest, the fabric will “lead” and it will turn out to be twisted, not flat.
If the welds turn out neat, they don’t need to be sanded, but I still smoothed the joints with a grinder.
In order for the welds to be strong and beautiful, it is necessary to prepare them for installation. To do this, you need to chamfer the edges. Then the electrode metal will evenly fill the “weld pool”, ensuring a reliable connection.
It is easier to insert the gate into a ready-made welded sash. If you connect all the parts at once, it will be difficult to ensure that the corners remain straight.
Sheets of corrugated sheets must be mounted on the frame after the latter has been completely installed. If you assemble the doors entirely and then install them, they will be much heavier, and the wind, even a small one, will interfere with the work - the windage is very high.
If the doors open inward
It is believed that opening the gate into the yard is a standard scheme. Therefore, any drive will be suitable for this project. So, if the support pillars are made of steel, then it is preferable to use a linear drive. It’s a completely different matter if you have brick supports and swing gates are located in the center of the column. In this case, a linear actuator is not suitable. You will have to install and buy a lever electric drive. The automation itself is mounted on poles, and the levers will allow you to open swing gates, even if the distance from the pole to the gate is 200 mm.
Do-it-yourself installation of hinges on swing gates made of profile pipes
For swing gates of a fence or garage, there are special hinges that are welded to the frame and to the leaves. They are usually machined from steel, and to ensure ease of movement, a steel ball is installed inside. Installing hinges on swing gates with your own hands is quite simple. However, I had to complicate the design a little.
The fact is that the width of the road at the gate is small. If the gate leaves are not opened all the way out, entry into the site will be difficult. And the larger the car, the more difficult it is to enter. Therefore, the doors should open almost to the plane of the fence - 180°. At the same time, they also need to be fixed somehow, but more on that below...
If you simply weld the hinges to the frame of the sash and to the fence, then the sash may not open 180°. A corrugated sheet screwed on the outside will interfere with this. Therefore, I had to modify the hinges a little, moving the axis of rotation 40 mm outside the fence. For this I used sections of the same professional pipe.
When installing hinges, it is important to achieve a position of the valves in which opening and closing will occur without resistance. Since I installed the swing gates with my own hands alone, I thought it over carefully. To do this, I connected two frame doors using clamps with a four-meter wooden block, placing them in the same plane.
I just pulled the beam tightly towards the corrugated pipe. Having installed this “tandem” in the gate frame and also secured it with clamps, I began attaching the hinges.
Installation begins with marking the mounting points. The closer the hinges are to the upper and lower corners of the sash, the less load there is on them. It is imperative to take this arrangement into account, because the service life of the products depends on it. As a result of correct installation of the hinges, the open doors do not interfere with the passage at all.
Types of structures
We will not consider specific options, but will only talk about the main types of structures from the point of view of engineering solutions.
Table. Types of gate designs
| Gate type | Description of the design, strengths and weaknesses |
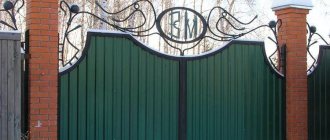
| Swing | The simplest and most common design is made of wood or metal. Blind doors are used to fence areas; in public organizations, lattice doors are most often used. The latter allow you to view the enclosed space. Swing gates can be double-leaf or single-leaf. The former are much lighter and require less free space to open. For ease of use, one leaf may have an entrance gate. Design characteristics are improved through the use of special forged or stamped elements. Installation of automatic drive and remote control is possible. The disadvantage is that the width of the driveways or site features does not always make it possible to install gates of this type. |
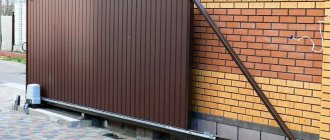
Sliding | More modern and complex designs are used as an addition to the fencing of prestigious buildings. When opening, the gate slides parallel to the fence, due to this, space is significantly saved; the design can work even when the car has approached the gate closely. The structure is much more complex than swing doors, they require powerful foundations, and have special elements that must be made in specialized mechanical workshops. To manufacture sliding gates, you need to have practical skills in performing various types of work, from structural calculations to welding and construction. Each stage is very important; errors can cause critical consequences. Correcting them requires a lot of time and effort. Sliding gates come in hinged and cantilever types - the former are used to a limited extent and most often in industrial and warehouse facilities. |
It is easier to make swing gates with your own hands; we will consider this option in more detail.
Drawing up a drawing
DIY swing gate lock
A gate lock is necessary in any case. Firstly, so that they are not opened by the wind, and secondly, there is no need to make gates if they can be opened without effort. As a lock, I used a section of profile pipe from the remains of the frame. It turned out not so much as a lock, but just a deadbolt.
The lock is a bar made of corrugated pipe, simply inserted into brackets made of steel angles 2 mm thick. The rigidity of this design has withstood heavy winds more than once. The disadvantage is that when the wind sways the gate a little, the pipe “moves out” of the corners. Within a day, such a bolt can simply open. I simply fixed this - I screwed in two locking screws along the edges of the corrugated pipe.
For convenience, I attached an additional corner to one of the doors. Now it is convenient to place the pipe on it when opening the gate. Previously, you had to hold it in your hands.
I mounted the lock on the inside of the gate, so it is impossible to open it from the outside, from the street, without “tricks.” To do this, you must first enter the site through the gate. And it closes with a regular padlock.
Everything is simple, but at the same time quite reliable. In addition, it is useless to protect yourself from evil people with locks and doors in this way, but such a bolt saves you from stray cats and dogs.
Typical error
When you attach gates to brick supports with your own hands, one characteristic mistake is made. Mortgages are welded directly to a metal post in order to secure the future gate. But only two pillars should have mortgages; they are simply not needed on the rest. The gate will not be highly reliable, since it simply will not be held in place by small sections of brick from which a metal rod sticks out.
To install the gate when the pillars are made of brick, you need to first make a layout and mark those pillars that will become the main support of the gate. The gates are mounted using electric welding, which is cheaper than gas welding. It does not form an influx of metal.
Do-it-yourself stopper for swing gates
Having made a lock for the gate to keep it closed, you need to think about how to fix the gates in the open position. If this is not done, the wind simply will not allow you to use the gate. In any case, it will be unsafe. Of course, you can always ask someone to hold the doors. It will be reliable and safe, but... inconvenient. And there is not always someone nearby who you can ask.
Therefore, I took the presence of a gate stop seriously. And he came up with the simplest solution - he mounted two wind hooks on the fence in the place where the corrugated pipe runs. One for each door.
And on the sash itself I strengthened the return loop. It turned out reliable.
In order not to “miss” the fastening location, I first screwed the return loop to the vertical gate post. Then, having hooked the hook, I found the desired position for the hook on the fence run and secured it. It is necessary that the “response” on the sash is a centimeter and a half below the hook itself.
This way it won’t fly out if the collar sways in a strong wind. This is a simple installation of a stopper. And when the gate is closed, the hooks do not bother anyone.
Homemade gates have served me for many years now and I believe that this is an option for those who do not want to overpay a lot. The price of swing gates with a wicket including installation starts from 15 thousand rubles. And that's just for the frame. In my case, a very large gate cost “turnkey” only 7,540 rubles, even taking into account painting the frame with “Hammerite” paint. I took the prices for building materials at the Vimos trading house as a basis. The result was quite a budget swing gate for a dacha or suburban area.
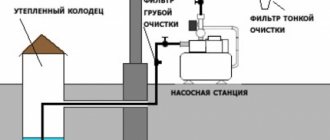
How to install poles
The choice of options for installing metal shutters is small - a profile pipe or brick pillars with embedded elements made of metal with a reinforcing core. Sequencing:
- Marking. During the construction of the fence, the territory of the fenced object is marked. At the same time, the installation locations of the pillars are determined. The optimal width is considered to be 3 m for gates and 1 m for wickets.
- It is recommended to consider the option of concreting the supports. The metal structure weighs a lot, and over time it can warp. In any case, the pipes are lowered to a depth of 1.5 m. It is better to make holes with a garden drill. Their width should exceed the dimensions of the pillars. For example, if pipes 100 by 100 by 5 mm are used, dig a hole 200 mm wide.
- Sand and crushed stone are poured onto the bottom. The height of this layer is no more than 200 mm.
- Install the pole and secure it with spacers. Multidirectional metal crossbars can be attached to the base of the support. At this stage, a building level and plumb line are used. These tools allow you to align a metal pipe vertically.
- The pillars are concreted. The foundation will take several days to dry. It is periodically moistened with water.