Against the background of traditional log huts and more practical structures made of profiled timber, frame houses for living are the most in demand. This is explained by the simplicity and speed of their construction, the absence of shrinkage, as well as low loads on the foundation.
Also, thematic designs are visually attractive. When placing a bet on a frame house, all that remains is to decide on its type.
Configuration of frame houses
At first glance, frame houses look the same. However, upon careful analysis of their construction technology, it turns out that the corresponding buildings are:
- Frame-panel;
- SIP panels;
- Power;
- Half-timbered.
Each type has a specific frame and walls, which means the operational properties of frame houses differ.
Selection of materials for construction
In a residential building, the use of chipboard and expanded polystyrene is not recommended . When heated, chipboards emit formaldehyde vapors, which can adversely affect people's health. If for some reason you decide to use these materials, you should carefully look at their labeling.
Useful: How to choose a one-story frame house project for year-round living and seasonal recreation
Super E slabs are suitable; they meet all requirements and have a confirming certificate. It is permissible to use materials marked E1 for finishing work, but it is prohibited to use E2 in residential premises.
The harmlessness of expanded polystyrene is controversial. Although many experts assure it is safe, when heated it can release harmful substances. Materials with the letter C at the end of the marking number (for example, PSB-S) are prohibited from being installed in residential buildings.
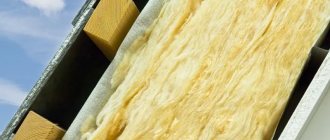
The safest insulation is mineral wool. One of the new products is ecowool, but its installation requires special equipment.
Frame-panel houses
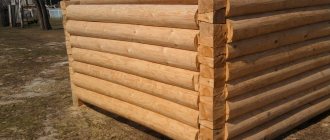
The corresponding structures have a rigid frame that can withstand significant loads for decades.
The walls of a frame house of this type serve as shield fencing. They are made of OSB (oriented strand board). The advantages of using thematic boards are obvious:
- Consistent and operational installation;
- Possibility of detailed dismantling;
- Suitable for filling gaps between the inner and outer skins with polystyrene foam for thermal insulation;
- Low loads on the foundation and supporting frame.
In the finished structure, you can immediately carry out interior decoration, installation of doors and windows, because its frame and walls do not shrink.
This frame-panel house is relatively cheap thanks to OSB, which is recycled lumber.
Features of the use of each type of finish
You can choose many materials for finishing a frame house. First of all, the choice depends on the budget and quality of the walls. If they have unevenness or defects, it is easier to hide them using chipboard, OSB or drywall. These materials are used for primary cladding, and are also used to implement complex design ideas, since it is easy to cut out various shapes and elements from them.
When carrying out finishing work, you can choose wallpaper, lining, flexible stone, decorative plaster, ceramic tiles or liquid wallpaper. If all the actions will be performed by yourself, then you should first stock up on the necessary tools, decide where the switches and sockets will be located, and apply safety precautions. So, further details about each finishing option.
Interior finishing with plasterboard
Drywall allows you to hide not only uneven walls, but also hide communication nodes. This material is one of the lightest and easiest to install. Getting started is installing profiles. It is recommended to make a distance of 60 cm between them. This is the best option, which will save time on installation and ensure reliable fastening of the drywall. Thus, a space is formed between the wall and this material, which can be used to insulate the frame house inside using foam plastic or mineral wool.
When finishing walls with plasterboard, the stages of work are as follows:
- Mark the line along which the starting profile will be installed and fastened to the wall.
- Complete installation of the frame on which the drywall will be attached.
- Laying the existing cable along the walls in special channels (PVC pipes or plastic boxes).
- Laying insulation.
- Laying drywall on the profile, fixing it with self-tapping screws.
- Putty the joints between the sheets and further grout with fine-grained sandpaper.
Using OSB
OSB boards are a mixture of fibers and wood chips glued together with adhesives and resins. This material is strong and impact-resistant. OSB boards have a certain classification:
- OSB-1. They are used in the production of furniture, for rooms with a standard level of humidity.
- OSB-2. They are used indoors with a standard level of humidity; this is the basis for fine finishing.
- OSB-3. Used in rooms with high humidity.
- OSB-4. They are used for external cladding as a basis for further façade finishing.
It is better to use a wooden frame for such slabs. Fastening is carried out using spiral nails 5 cm long or similar self-tapping screws. The distance between them should be about 15 cm. Due to the effects of temperature changes, it is necessary to leave a gap of 1-2 cm between the wall and the panel. The final stage is plastering and finishing with fine-grained sandpaper. In addition, OSB can be coated with several layers of varnish. It is worth considering that when painting or plastering panels, additional priming of the walls is required. OSB-3 and OSB-4 boards can also be used for flooring. In this case, the fastening is carried out on the logs.
Wooden panels
Chipboard is a material that is characterized by reliability, durability and relatively low price. This type of cladding is popular for good reason. Its advantages are as follows:
- cleanliness during installation;
- a beautiful decorated look that allows you to use this finish as a finishing touch.
There are 4 ways to attach chipboard to a wall.
Useful: Chipboard finishing: technology and scope of application
Option 1. Lathing - installation is carried out on the lathing when space is required between the wall and the sheets or it is necessary to hide uneven walls.
Option 2. Hardware - use nails or screws for installation. Attaches to a flat wooden surface.
Option 3. Profile - installation is carried out on aluminum profiles on uneven wall structures. The use of laminated material makes the structure moisture resistant.
Option 4. Adhesive - using an adhesive composition is the simplest and fastest way, however, when dismantling the slabs will be damaged, in addition, they must first be primed and treated with an antiseptic.
Using wallpaper
Wallpaper is one of the most common and familiar materials. On the market now you can find not only ordinary paper wallpaper, which is environmentally friendly and allows the walls to breathe, but also other types. Paper wallpaper does not tolerate water and moisture and easily loses its attractiveness when exposed to sunlight or mechanical action.
There are vinyl coverings that are resistant to mechanical stress, tolerate moisture well, and in some versions also allow walls to breathe. Acrylic wallpapers have the same characteristics, but in comparison with vinyl they are less durable. Non-woven and fiberglass coverings are usually used instead of plaster, after which paint is applied to them.
Application of decorative plaster
For the interior decoration of a frame house, one of the good solutions is decorative plaster. It can easily hide any imperfections in the rough cladding. This type of cladding looks attractive and makes it very easy to change the interior of the room at any time by painting it.
The advantages of plaster include moisture resistance and the absence of the ability to absorb odors. This makes it advantageous to use in the kitchen. One thing you need to understand is that such work is painstaking and takes longer than other options. Therefore, when using it in all rooms of the house, the finishing process may be delayed.
Installation of ceramic tiles
Tile is an ideal choice for the kitchen, bath, and area near the fireplace. It is durable and can withstand heavy loads, so it is perfect for laying on the floor. The choice of colors, patterns, and design works on the market is very large, which allows you to make the interior exactly according to your preferences and tastes. In this case, the surface for laying ceramic tiles must be perfectly flat.
The work requires certain skills, but the process itself is not complicated:
- First of all, the surface is primed.
- A special adhesive intended for tiles is applied.
- Ceramic tiles are placed on top.
- Its position is checked using a building level; if necessary, it is adjusted with a rubber hammer.
- For uniform jointing, plastic crosses are installed between the tiles.
Wooden lining
Wooden lining essentially has all the characteristics of wood. This is an environmentally friendly, durable material that has the beautiful aesthetic appearance of natural wood. The material is not afraid of temperature fluctuations and mechanical damage. Its advantages also include additional noise and heat insulation. However, to ensure durability, it is necessary to periodically treat wooden lining with special means, otherwise it may be susceptible to rotting. In addition, the cost of the material is high, especially since preliminary preparation of the walls is required.
The work on installing wooden lining is identical to the case with drywall. First of all, the installation of a wooden block or metal profile is carried out. Next, the material is attached to the frame using self-tapping screws or finishing nails.
Plastic lining
Unlike wooden lining, plastic is a good choice for rooms with high humidity, for example, a bathroom or kitchen. In addition, a variety of colors will allow you to realize any design idea. The care and installation of this material is quite simple. To install plastic lining, you first need to attach the sheathing. The lining is mounted on it using self-tapping screws or a stapler. Each strip has special grooves that you need to get into when attaching one strip to another. Work begins from the corner of the room or starting area.
Frame houses made of SIP panels
The technology for constructing these structures is similar to the previous one, but instead of standard OSB, SIP panels are used.
The latter are an improved version of OSB. Their peculiarity lies in their multilayer nature, where OSB acts as the outer and inner layers, and filler serves as the inner filling.
Therefore, turnkey frame houses made from SIP panels are built quickly, without requiring the installation of thermal insulation yourself.
Turnkey construction of houses: the right decision- Artificial stone countertops
- Combisystem Gardena
The construction technology of SIP-panel frame structures welcomes:
- Monolithic foundation;
- Installation of strapping beams;
- Installation of floors;
- Organization of the second floor and attic if necessary.
External and internal works
The fifth step, also the final one, is to perform various external and internal work.
The first step is to install utility networks and communications: heating, water supply, electricity, sewerage, ventilation, etc. Next, windows and doors are installed - you left openings for them at the stage of building the box. Then the exterior finishing is done. There are several options here:
- vinyl siding;
- block house;
- lining;
- decorative plaster;
- a natural stone.
Working with all these materials is quite easy. The main thing is accuracy: so that you don’t have to dismantle the material later due to inconsistencies and unaesthetic appearance, always start finishing from the corner.
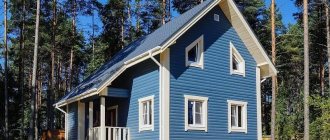
Panel house with a gable roof
Next, internal work is carried out, namely insulation and cladding.
For thermal insulation, use mineral wool - it is durable and can withstand a wide range of temperatures. To begin, cover the walls and subfloor with waterproofing - lay parchment paper on them, securing it to the work surfaces with slats. Then prepare the mineral wool and lay it on the walls and floors, securing it with wooden blocks. The latter are recommended to be laid vertically.
Next, lay the finished floor. As a rule, different variations of wood finishing are used for this: parquet, flooring, edged boards, etc. And after that, you can safely move on to covering the internal surfaces and finishing the space.
Fast, reliable, cheap - this is how you can characterize the construction of a panel house. As you can see, the technology for its construction is indeed very simple and accessible. So, if you have been thinking about your own home for a long time, but are afraid to take on the construction of a traditional building, perhaps a lightweight alternative in the form of a panel house is just your option.
Power frame houses
Both OSB and SIP panels can be used to cover the frame of these structures. But the supporting base must be extremely strong.
This can be achieved in different ways:
- Strengthening the load-bearing part with racks, crossbars, jibs and beams;
- Using timber made of durable wood - cedar, ash, oak;
- Impregnation of the array with antiseptics and fire retardants.
Unless a one-story frame house is not too demanding for additional reinforcement.The corresponding operations can be performed with frame panel-panel and SIP-panel houses so that they become more stable by default.
- Which staircase to choose for a private house to the second floor: types and varieties of material
High pressure washers
- Well in the house: advantages and disadvantages
Half-timbered frame houses
These houses came to us from Europe. The costs for them are the highest. But if the future owner of the corresponding design values aesthetics, then you can give up on its high cost.
Among other frame structures, half-timbered houses stand out:
- Visual lines of a dark frame against the background of a white facade;
- Dark tiled roof;
- The presence of two floors and an attic.
The contrast of the stained massif with the light cladding dictates that half-timbered houses be called “gingerbread”.
However, sometimes designers suggest using glass-ceramic slabs and a metal frame so that the finished structure takes on a modern look.In each of the two proposed methods, the load on the foundation is small compared to that observed in the construction of brick or cinder block houses.
Parallel layout
In some cases, home owners have to give preference to this option for arranging furniture. This has to be done if you plan to create a special design. If the door is located opposite the window, then household appliances and furniture should be placed on both sides.
Parallel layout is convenient when all the necessary things should always be at hand. You can always find what is hidden in the functional drawers of the kitchen unit.
Parallel placement of kitchen furniture in a narrow room
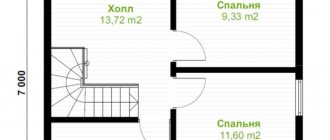
Frame houses - which project to choose
Guided by photos of frame houses alone, one can only recognize the living area, number of storeys and cladding.
How to build a house with a garage - interesting layout options with advice from experts (photos and videos)Which flexible tile is better? The answer to this and related questions is in the review, find out what the difference is and what is better yourself! (Photo and video)
- The best wooden houses - look at the photos for layout options and functional house designs!
But designing thematic structures requires paying attention to other equally important things:
- Place for construction - groundwater level, distance from utilities, panoramic view;
- Type of foundation – light pile-screw, columnar, strip-monolithic;
- The building materials used are load-bearing elements, fastening elements, heat insulators.
The foundation and the building materials used are already more responsible for the reliability of the future structure.
Although if the technology of a frame house is transferred to inexperienced craftsmen, then even the strong “backbone” and “sole” will sooner or later give way.
Linear placement of the kitchen
Budget linear kitchen project for a small house
The linear option for placing furniture is perfect in cases where family members spend little time in the kitchen.
This layout takes up very little space and has everything you need to prepare a light breakfast.
But not more.
This can be easily fixed with additional drawers.
If your home has high ceilings, you can also add a mezzanine for storage.
Stages of construction of frame houses
The sequence of the thematic event has some similarities with the construction of structures from cinder block, brick and other building materials, but requires less effort:
- First, the design takes place based on the characteristics of the area and the type of frame house;
- Then the foundation is built;
- The next step is strapping to organize the supporting frame;
- Next comes the construction of the frame with the installation of floors and roofing;
- After installing the “skeleton”, you can work on the walls, sealing them and laying utilities;
- Finally, all that remains is to install the doors and windows, as well as take care of the interior lining.
Obviously, the construction of frame houses does not require the use of complex equipment for transporting and installing heavy building materials.
The fact is that the bars can be assembled on site without the use of welding. The same goes for wall panels, doors and windows.
Perhaps the most important stage is organizing the foundation. But even it is relatively simple: the lightweight frame and panels do not put much pressure on top, which makes it possible to limit oneself to available building materials for the construction of the foundation, provided that groundwater flows at a great depth - 20-50 meters.
Foundation
Wooden structures are quite light, so there is no need for a deep foundation for a frame house. If you plan to make the base with your own hands, then you have to:
- For a strip foundation, dig a 2-meter trench (the depth may vary depending on the climate).
- We level the trench and install formwork from edged boards. The formwork should rise 40 cm or more above the top edge. We use boards from 3 to 6 m long, 20-25 mm thick. You will need nails 70-80 mm and a block of 50×50 mm in cross-section.
- We line the bottom a third of the depth of the trench with bricks, stones, etc. Fill with sand (20 cm).
- We moisten, after compaction we add sand. We repeat these steps until the sand stops compacting.
- We make a frame from reinforcement, pipes, channels, angles, etc.
- We prepare a solution from cement M-500 (25 kg), sand (75 kg), fine gravel (125 kg) and water (12 l).
- Pour the mixture into the trench and compact it.
Article on the topic: Is it possible to take a steam bath with eyelash extensions?
Photos of the best frame houses
Did you like the article? Share

0