Gate hinges are a simple device that serves to attach gates to posts, as well as for easy opening and closing. The reliability of the design and ease of operation depend on the choice of this mechanism.
Hinges are mainly equipped with swing structures, which can be quite heavy. Therefore, special attention must be paid to the quality of installation, namely the fastening of hinges. A person who knows how to handle electric welding can weld hinges on the gate themselves, but those who do not have such skills are recommended to turn to professionals.
Welding rules
In order to prevent the gate from sagging and to avoid problems with its operation in the future, all work must be carried out taking into account certain features. Therefore, first of all, special attention should be paid to:
- The integrity of the weld, which must be continuous, that is, without gaps.
- Welding depth - the loop must be welded along the entire plane adjacent to the support.
- Axial location - all hinges on the sash must be in one straight line so that the load on the seams is distributed evenly.
- When determining the number of hinges, if the gate is massive, it is recommended to supplement the design with another pair.
- Dimensions - all measurements are made using tools designed for this purpose, and not “by eye”.
Beginning of work
Before welding begins, you need to place the future gate leaves in the garage opening. This is done in order to achieve the correct position of the sashes and determine the scope of work. At this stage, be patient and, if possible, have an assistant. Only after you have achieved an even position of the valves can you proceed to the welding itself. The peculiarity is that it is extremely rare to carry out this type of work in a horizontal position. And making a vertical weld can be difficult even for experienced craftsmen. Taking this fact into account, welding should be carried out with special care, describing circular movements and, as it were, lifting the metal.
At first glance, this type of work seems complex and requires special skills. However, it is quite possible to perform it, following the rules and having a certain skill. The most important thing is to take your time when performing work and carry out actions in accordance with the plan.
You need to measure approximately 20-25 cm from the top and bottom of the canvas and mark it with a pencil or chalk. To prevent the hinges from baking, they need to be lubricated, for example with grease, or small pieces of wood the size of a match should be placed. This trick will help avoid jamming during operation and generally simplify the process. We weld the hinges to the gate. At the initial stage, you should not completely weld the hinges. You just need to lightly grab them by welding
It is important to remember that the lower half of the part is welded first. For those who use the welding machine for the first time, you need to remember that the loop is welded in the direction from the bottom to the top, and the movement of the electrode should be smooth and without breaks. After the first seam is completed, the gate needs to be opened and checked using a builder's level or laser level to see how well it opens and closes
You can finish the work if you are satisfied with the result. An ideally installed structure should open without effort or additional noise. Repeat all these manipulations for the remaining parts.
Places where welding was done must be carefully sanded using a grinder. The final stage is priming and painting the gate in the chosen color.
Welding technology
It will be much easier to weld the hinges correctly if you follow the rules of the sequence of the technological process. The sequence of work is as follows:
- installation of plates;
- gate installation;
- welding of hinges.
Now we will analyze each of the stages separately, using the example of circular loops (turned).
Video: How to properly weld hinges with your own hands.
Installation of plates
Platik is a metal mounting plate that serves both to distribute the load evenly and to simplify welding work. The size of the plate and its shape depend on the weight and dimensions of the valves.
It turns out that in order to correctly install the loop, you need to weld such a plate to it. This is done with a continuous seam, without gaps. Experienced welders can weld without plates, which is quite acceptable, but the fastening will not be as reliable.
Preparatory process
Let's consider one popular visor option - arched with polycarbonate. Using this option as an example, you can make canopies with your own hands from other materials. You are already sure what the shape of your visor will be, and you have prepared a sketch of the product, you can start manufacturing. For this you will need:
- square or rectangular steel pipe, size 15 * 15 mm or 20 * 20 mm;
- polycarbonate (to cover the visor)
- square or round metal rod (for making forged elements);
- welding electrodes;
- rivets (for fastening polycarbonate);
- primer coating for metal elements;
- paint (enamel PF - 115);
- metal cutting discs;
- anchor bolts.
Read also: Homemade vibrator for concrete from a hammer drill video
From the tools and equipment you need a welding machine, grinder, grinding wheels, hammer drill, screwdriver or rivet gun, tape measure, level and plumb line.
Gate installation
Before welding the prepared hinges, it is necessary to install the gate in the opening. This must be done in the way they should be on a permanent basis. For installation, use a long building level or plumb line.
The gates are aligned in all planes: vertically, horizontally. Only after making sure of their correct location several times can you move on to the next stage.
Welding hinges
This process seems complicated only at first glance, but with a little practice you can do everything yourself.
This is done as follows:
- The hinge is lubricated with automotive lubricant (solidol, lithol, etc.), this contributes to their smooth and easy operation after installation.
- Thin linings up to 5 mm thick are prepared; this is mainly required for turned hinges.
- Markings are made - the loops should be located at a distance of 30 cm from the top and bottom.
- The hinges are welded in several places, first to the sashes and then to the pillars. After checking for closure and opening, welding continues until a solid, even seam is formed.
- After the seams have cooled, they must be sanded and primed or painted.
This technology is used by almost all door installers.
Basic truths
The process of installing hinges can be considered using the example of a metal gate. In order for it to properly perform its main functions, a number of conditions must be met when welding hinges:
- Provide a gap between the support post and the gate frame, which should be 3-5 mm.
- Provide a gap of several millimeters between the hinge and the gate frame by welding plates - metal plates of the required thickness - to the hinge. In total, for each loop you need two strips, the length of each of them is 2 mm less than the length of half.
- The optimal distance from the edge of the gate to the loop is 15-20 cm. If you need a middle loop, then it is located exactly in the middle between the outer loops.
First, the lower part of the fastener (with the pin) is welded to the post, then the upper part (with the groove) is welded to the sash.
A properly assembled structure should have the following parts:
- a loop;
- plate; wicket frame;
- support pillar;
- lower part (with pin);
- upper part (with groove).
This design consists of several elements.
All loops must be coaxial, that is, their centers must be on the same straight line. The alignment requirement is extremely important. It is on its compliance that it depends on how evenly the weight of the gate will be distributed on the fastenings and, accordingly, how long they will last.
To work, the master will need:
- welding machine;
- metal plate for making plates;
- Bulgarian;
- hammer;
- plumb line;
- oil for lubricating hinges;
- protective equipment - mask, gloves, overalls.
At the preparatory stage, you should mark the gate frame and sash, determining the places where the hinges will be welded. Clean them from dust, dirt, and rust. To do this, you can use a wire brush and solvents. Next, a similar treatment is performed on the surface of the hinges, and lubricant is applied to their inner part.
The traditional welding method involves the installation of plates at this stage, for which it is recommended:
- Take 2 identical plates of the required thickness and length. Place them so that there is a gap of 2-3 mm between them.
- Place the bottom part of the loop on them.
- Weld the loop to one of the plates (in this case, to the right one).
- Do the same for the top of the hinge and weld it to the left plate.
- Then you need to install the shutters in the working position and fix them.
- The plates with the lower part of each hinge are spot welded to the post, then the upper hinge elements are inserted into the lower parts and spot welded to the sash. After checking the alignment of the hinges and the operation of the gate, final welding is carried out along the contour of the plates.
Tips and tricks
Incorrect welding can lead to problems during further operation; to prevent this from happening, you should listen to the following recommendations:
- Before starting work, make and study a schematic drawing; if all the details are taken into account in advance, then the risk of redoing the finished structure will be much less;
- straight hinges are welded to the gate laid on a flat surface;
- You can open gates with newly welded hinges after the seams have completely cooled;
- on round posts the loop extends 5 mm outward, on rectangular posts it is welded flush;
- the welding seam should go from bottom to top.
Welding without unpleasant consequences
To ensure successful welding of hinges to gates, follow these recommendations:
- do not work with a faulty welding machine;
- you can cook only after the paint has completely dried;
- clothing should not contain traces of grease, gasoline, oil or any other flammable liquids;
- Do not cook parts under pressure;
- Do not hang rags soaked in flammable liquids on the welding machine cylinder. This often caused a fire.
Types of loops
Hinges for fastening swing gates can vary in shape, number of sections and method of fastening. The most reliable, and therefore the most popular, method of fixation is welding.
All other loop parameters depend on the type:
- Cylindrical hinges – equipped with a support bearing, designed for gates of light weight. Permissible load – 400 kg. Attached by welding.
- Cylindrical with reinforcement - they differ from the previous ones by the presence of a special plate to distribute the load between the sash and the post. Maximum load – 600 kg. Fastening by welding and screws.
- Through hinges are used where it is not possible to use welding or a screw connection. They are fastened in the following way: the post is drilled through, and the connection to the sash is made with nuts. Maximum load – 200 kg.
- Three-section overlays - designed for massive sashes, with them there is no risk of sashes sagging or squeaking, and opening will be smooth. In addition, such structures are famous for their increased burglary resistance.
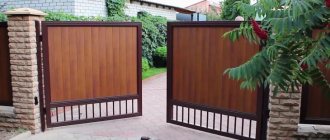
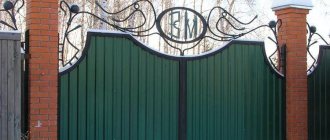
- Zhikovinas (forged hinges) - in addition to their direct purpose, also serve as decoration, giving the gate a special colorful look. Mainly used for wooden structures.
- Hinge - boom, hinged or half-hinged - used for heavy and thick gates, doors or wickets. Available: regular, curly and removable. The best option for massive garage doors.
- Adjustable – design features allow you to change the height of the sash. They are used if there is a high probability, under any circumstances, of displacement of the support posts. Withstand load – up to 200 kg.
Cold Forging Tools
TORSION (Twister) - Twisting tool
With their help, tetrahedral rods or strips of metal are twisted in the longitudinal direction. The result is twisted columns, which are also called torsion bars.
Estimated cost 9000 rub.
SNAIL tool for curls
Device for forming flat curls of different sizes for gates. Market value from 15,000 rubles.
Bending machines or benders.
Bending machines or benders. Allows you to bend rods or reinforcement at the required angle anywhere. Estimated cost 12,000 rubles.
Cold forging machine
With the help of Gnutik, you can roll an arc of almost any radius in several steps. The price for this is low productivity and repeatability of elements. Market value from 6,000 rubles.
Rolling press
Devices for processing the ends of parts - inertial stamping machines or other home-made devices.
A press is needed to form the ends of the rods. This machine works on the principle of a flywheel; first, by rotating the bar with weights, the screw striker is pulled back until it stops. After this, a replacement stamp is inserted into the slot and the workpiece is placed. Next, quickly spin the bar in the opposite direction and leave it to rotate freely. Finally, the striker hits the stamp shank strongly, due to this, a force sufficient for stamping is developed.
Flashlight
On this device, the rod is also twisted in the longitudinal direction, but it is also additionally bent in the transverse direction. It turns out something similar to a flashlight (basket). Hence the name of the device.
Selection of loops and their quantity
If you decide to use welded hinges to install the gate, you can choose from several types:
- the simplest and most inexpensive option is a split cylinder with a rotating axis in one part and a cavity-cap in the other. Such hinges require periodic lubrication, without which they quickly begin to creak;
- The most popular are hinges of the same design, but improved with a ball or bearing on which the axis rests. They can be either two- or three-section;
- Another option is the same hinges with metal plates welded to each part.
For reference! Welded hinges most often have a round cross-section and, when assembled, resemble a cylinder. But their cross-section can also be teardrop-shaped, with a sharp point along the walls. The shape does not affect the performance characteristics of the products in any way; it is selected solely on the basis of ease of installation: for some it is easier to weld some, for others it is easier to weld others.
However, it is not enough to know how to weld hinges to the gate - first you need to calculate the load on them and decide on the quantity. This is not difficult to do if you know the weight of the sashes.
Hinges without plates can withstand a maximum of 400 kg depending on their diameter and the length and thickness of the metal. And hinges with plates that take on part of the load are designed for a more impressive weight - they can withstand up to 600 kg.
Knowing the design load on the hinges and the weight of the structure, you can determine the required number of hinges. Of course, there will not be less than two of them per sash. And in the case of heavy gates, the number of canopies is increased to 3 or 4. An additional hinge is installed just below the top one, which bears the main load.
By the way, you can strengthen ordinary hinges yourself by welding to them plates cut from thick metal of a suitable size. The weld must be continuous.
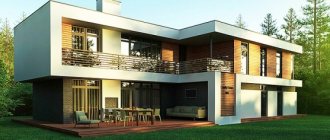
On our website you can get acquainted with the most popular projects of houses with a garage - from construction companies presented at the exhibition of houses "Low-Rise Country".
Purpose of the product
Hinges, or awnings, are devices with which gates are opened. The mechanism consists of several elements. They rotate around their axis and ensure the operation of the gate. The principle of free rotation underlies all types of locking mechanisms. This quality makes them an indispensable part of the gate.
After installation
To choose the right gate awnings, you need to take into account the following:
It is better to purchase loops in a specialized store. Only large retail outlets have all the necessary documents: a quality certificate, a guarantee from the manufacturer and a hinge installation diagram. This does not always guarantee the quality of the product 100%, but if you are not satisfied with the product, it can be returned or exchanged. You should buy a mechanism taking into account the weight of the swing gates. Each type of canopy is designed for a specific load that it will withstand. It is advisable to choose with a margin of safety. For example, for a sash weighing 200 kg, take a device designed for 300 kg. Take into account the location of the house for safe operation of the gate. Some types of hidden swing mechanisms prevent the gate from opening completely. This is inconvenient when leaving the yard, since open doors interfere with street traffic.
You need to use gate canopies with the correct connection method
Hinges are welded onto metal sashes, and screwed onto wooden sashes with bolts or self-tapping screws. Therefore, it is important to know what material the sashes are made of. It is worth paying attention to the material from which the canopy is made. This affects the service life. Products made of plastic or thin metal will not last long on heavy sashes
Over time, they will begin to warp and jam. If you select such loops, then this must be taken into account.
Installation option
Loop welding technology
Before we talk about how to weld hinges on gates, it is worth taking a closer look at the conditions necessary for their normal operation.
Even if the load is calculated correctly, the hinges may not be able to cope with it if their position deviates even slightly from the vertical. They will quickly fail. And the second point: there should be a small gap of 1-2 mm between the hinge body and the support post so that the metal parts of the post and the mating part of the canopy do not touch or rub against each other. The same gap should be left on the side of the sash.
Where to buy or order
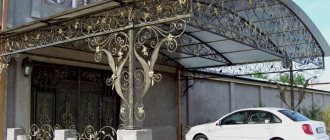
Currently, forged awnings are used quite widely . They are installed above swimming pools, above cars, above porches. And in the countryside, they perfectly protect firewood for barbecues, etc. from getting wet. The high demand for metal structures gives rise to a wide range of solutions offered by manufacturers.
Employees of the companies that are collected in the section “Where to buy or order forged awnings” provide customers with a wide range of products to choose from. Tags: wrought iron entrances, wrought iron carports, wrought iron canopies over the porch
Video description
To understand what we are talking about, watch the video
The nuances of installation on supports of different sections
The supporting posts on which the sashes are hung can be round, square or, less commonly, rectangular in cross-section. There is a difference between how to properly weld gate hinges to round posts or supports made of profile pipes.
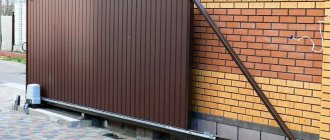
- If the profile pipe has smooth edges without bends or distortions, then it will be easy to cope with the task of how to properly weld gate hinges to square posts. They are installed on the outer plane of the support.
- In the case of a round support, you must first decide in which direction the doors will open. Then they find the most protruding line (the middle of the pillar relative to the opening) and step back from it a few millimeters outward - in the direction of plowing. 5-6 mm is enough for the wicket or gate leaf to move smoothly and without jerking around the axis of the canopy. Since it is more difficult to weld hinges on gates to round posts than to square ones, here you need to be especially careful and attentive, maintaining the same indentation size for all hinges.
General information
What is it for?
Some buildings were originally planned without this auxiliary element. But this does not mean that the project was not correct; simply, if you have a canopy, you will create additional convenience for using the garage space.
Advantages and functional purpose of the visor:
This is the main advantage, which lies in blocking the entry of moisture into the locking mechanism. This significantly increases service life and ease of use.
Protection from precipitation.- Saving light sources. If there is a light bulb above the garage door, the canopy will provide a reliable shelter from damage and moisture.
- Improvement of departure. In winter, the exit will not be so covered with snow or covered with ice. And in the warm season, this will be excellent protection from the sun if you carry out repair work with the garage door open.
- Decorative element. If the canopy is made in the same style as the main building, this will give a unified exterior and make the appearance of the buildings better, more harmonious.
If there is a canopy over the gate, you will get a comfortable opening of the gate, the hinges and gate will not be exposed to excessive moisture, and at sub-zero temperatures the mechanisms will not freeze.
Types of garage visors
Before you make a canopy over the garage door, you should learn about all the types of awnings, since this niche is diverse. Unlike ordinary cooperative buildings, making it yourself will give you the opportunity to make not only a canopy with a protective function, but also with decorative overtones, and also show off your design talents.
There are the following types of canopies:
- Single-pitch is the simplest and most popular design. This is a flat canvas, which is installed at a slight slope from the main building.
- Gable – this model is easy to use and reliable. In this design, precipitation will roll not forward, but to the sides.
- Arched ones are effective and easy even for self-production, but during construction you should use only those roofing materials that are distinguished by their flexibility.
- Hip roofs provide complete protection from all sides, but for this you will have to worry about the complexity of implementation, and besides, the configurations of such roofs are diverse.
When choosing a suitable canopy model over the garage, be guided by the appearance of the building as a whole. It will be good if you use only the same roofing materials to maintain the architectural style. To make a garage canopy with your own hands, take note of all the useful recommendations from this article.
Video description
See how it looks in this video:
- loops with twisted wire are pressed against the block and the post and are also fixed in a vertical position;
Important point! The ground cable of the welding machine is attached to the part of the canopy that will be welded. If you install it on a support, then as a result of resistance welding, the halves of the loop can adhere to each other.
- the loops are welded to the supports at 2-3 points;
- in the same way, they grab the second (upper) part of the hinges to the frame or leaf of the doors;
- when the tacks have hardened, the gate is checked for opening - it should swing open 180 degrees without jamming or warping;
- if everything is in order, the sashes are closed again, fixed and the hinges are welded onto the finishing surface with a continuous seam from the bottom up;
- the cooled seams are cleaned of scale with a hammer and sanded with a grinder to give a more aesthetic appearance. But this work must be done carefully so as not to damage the joint.
Do not open the gate until the welds have completely cooled and gained strength.
This might be interesting ! In the article at the following link, read about how to make a gate.
Shapes of visors
Having decided on the material, you can decide on the design. Without experience, you need to realistically assess your strengths and fantasies so as not to spoil the external perception of the entire house. Here are some simple ideas:
- Single-pitch structure over a gate. Elementary installation, but if there is a lot of snow in the region, it is worth maintaining the angle of inclination.
- Gable canopy - has the advantage of protecting the gate during periods of precipitation at any angle.
- The arch is in demand because it looks beautiful and is easy to create, even without experience.
- Dome - you will have to think about it here, since several different parts are made, and then assembled into a single whole. But the protective functions are maximum.
- Direct canopy - a more durable material is chosen for it. The frame is carefully thought out.
Variety of shapes
- The most acceptable option is a slide-shaped device. Its installation is quick and easy.
- Model in the shape of a house. Its installation takes more time, but the structure is more durable.
- An arched canopy installed above the gate, made of sheet steel, perfectly emphasizes the exterior of the structure.
- Direct design, for the manufacture of which monolithic polycarbonate is used.
- Convex canopy, or awning. An original and beautiful device that gives the gate sophistication and uniqueness.
Types of loops and their properties
The gate lasts for more than one year. At the same time, it must provide reliability and a good level of protection, and the hinges that hold it must:
- turn without effort;
- do not make sounds;
- don't hang out;
- be strong.
The quality of the product, the reliability of the manufacturer and the permissible load are important.
If you hang heavy sashes on weak elements, they will quickly fail. Sometimes the number of loops increases to six instead of the standard four.
- Cylinder-shaped (drop-shaped) - the design has a support bearing, is not used for light gates, load - up to 400 kg.
- In the form of a cylinder with an amplifier - the design includes a support bearing, and for reinforcement there are plates that are designed for better load distribution. For such loops the maximum load will be 600 kg. They are fastened by welding or screws and are suitable for swing gates.
- Through - this type of hinge is used when it is not possible to weld them or use screws. To fix such a hinge, you need to drill through the post, and it will be attached to the sash using nuts. Can withstand a maximum of 200 kg.
- Three-section - for very heavy large sashes. They are highly resistant to burglary. They are secured by welding.
- Forged (zhikovina) - the installation of hinges of this type has been used since ancient times. In addition to the fact that they perform their function well, these loops are very decorative. It is best to use them for wooden gates.
- Arrow hinge – made of steel, with hinges, suitable for heavy gates made of thick metal. They can be made curly. They are most widespread when used on garage doors.
- Adjustable - provide for changing the position of the sashes in height. They are usually used when the support posts can change their position. The maximum load of these loops is 200 kg.
Advantages
Forged carport. Photo Blacksmith shop
The popularity of forged canopies is primarily due to their many advantages:
- reliability;
- strength;
- easy installation;
- sophistication;
- variety of design;
- individual approach;
- durability;
- multifunctionality;
- solidity;
- wind resistance.
Metal structures have both practical and decorative advantages . Therefore, forged canopies appeal to customers who prefer to choose rational and bright design solutions.
Weld the hinges correctly
When choosing hinges, be sure to take into account the characteristics of the gate material, its length and weight. A competent approach will help to complete the work efficiently.
We weld the hinges to the round posts
Not every welder understands how to properly weld hinges on gates and gates: round posts have their own characteristics. First, special plates must be welded to the hinge, and this is done using a continuous, even weld.
Welding is always performed at the site where the swing gates will be installed. To install the sashes vertically, you need to use a plumb line. In other words, the doors should stand exactly as they will remain later. Accurate measurements must be taken to avoid various defects.
The video explains how to properly weld hinges on gates and gates with your own hands.
The most labor-intensive part of this process is the vertical seams: they cannot be done without plates. First, the lower hinges are welded. The bayonet part is attached using gentle movements of the electrode from top to bottom.
To check whether the doors open correctly, you can use a laser level.
It will show the location of the axis; if there are no distortions, we continue. Let's consider the stages of welding work:
- the sashes should be vertical, a plumb line will help check the location;
- you need to make sure that the hinge is parallel to the edges of the sash;
- then we weld the hinges to the posts, to the fabric of the structure, after which we clean the seams well with a grinder.
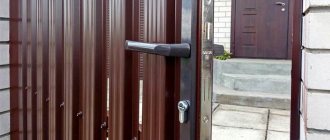
We weld hinges to gates made of corrugated sheets
If the gate is made of corrugated sheets, then you need:
- Make jumpers parallel to the top.
- Fix them.
- By their location, they should divide the canvas into three equal parts.
- Weld the elements.
- Cover them with corrugated sheets.
Installing hinges on a profile fence is slightly different from the classic version, which does not have any additional complications and does not require unnecessary effort. But you will have to do the following:
- make two small jumpers that are inserted parallel to the long sides and secured at the top and bottom;
- the distance should be for three such parts;
- We weld hinges to the jumpers.
The profile is screwed onto already installed elements. If you do this earlier, then during welding it will burn out and lose its aesthetic appearance. To perform such work, the best option would be to use garage door hinges. Each welded loop can withstand a fairly large load.
We weld the hinges to the stone fence
Mounting plates make the task easier: thanks to them, the load on the curtains will be reduced. Before attaching them, you need to take into account the parameters of the gate. You need to use plates whose dimensions, shape and thickness will correspond to the weight and quality of the sashes. Mounting plates can also serve decorative purposes.
Welding gate hinges involves fastening two metal objects together. And if the fence is made of stone or brick, then you need to very carefully calculate the size and weight of the gate. After this, support pillars are installed. Channels or I-beams are used as supports; they ultimately hold the sashes.
Correct installation of embedded parts
Let's consider the order of work performed:
- If straight parts are purchased, they are first welded to the sashes while they are lying on the ground.
- The sashes are installed vertically near the pillars and the hinges are grabbed from below.
- Then they are put on the welded lower parts of the loops.
- In a suspended state, you need to try to open the sash.
- If the sashes work flawlessly, then make a few more welds on the hinges.
- Then the doors are closed, placing something stable under them so that they do not sag in the future.
- After finishing the work, the seams need to be cleaned using a grinder.
If the hinges are not secured correctly, the gate will move and will not open. The stone pillars on which the canvases will be hung must have a thick pipe inside. Rods or pieces of reinforcement are welded to this pipe. They will serve as mortgages. They can be easily screwed or driven into concrete or stone.
Experts are sure that it is better to hide welding inside the masonry. The best way is considered to be hammering or screwing rods or fittings through the holes. The post must be drilled vertically. If you do it horizontally, it will not last long.
Functions of the canopy over the gate
- Many property owners are seriously concerned about the security of their home and for this reason equip their entrance doors and gates with security cameras. The camera is a complex piece of equipment and should not be allowed to get wet. The canopy will protect all devices located in this area; camera, intercom or bell.
- The canopy will help extend the life of the gate itself, protecting it from fading and corrosion, which can be caused by any type of precipitation.
- During heavy snowfalls, the canopy will protect the area in front of the gate; you won’t have to waste time removing snow just to go outside the house.
- Everyone is familiar with the situation when it is impossible to open a lock in severe frost. The canopy will protect the lock mechanism from moisture, which means you won’t have to come up with any means to open it.
- Well, of course, the design of the gate is not the last argument in favor of building a canopy or canopy.
Read also: Which electrodes are better for the Resanta 220 inverter