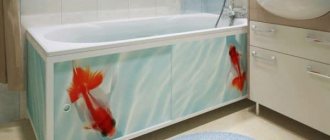
The decorative panel under the bathtub gives the bathroom a finished look. To decorate it, you can choose a plastic or acrylic design. However, they will cost a lot, especially if the bowl has a non-standard shape.
It will be cheaper to build this screen yourself from tiles, which are glued onto a specially prepared frame. In addition to financial benefits, this decor option will fit perfectly into the interior of the room - they try to choose ceramic finishes in accordance with the walls and floor.
Let's figure out how to make a screen for a bathtub - we'll describe the methods of arranging the base for tiles and the technology of facing work. We have supplemented the information with visual photo instructions and videos that will help you carry out all the finishing processes yourself.
Solid screens for bathtubs
A simple and inexpensive decor option. The model is a frame made of monolithic material (brick, plastic, plasterboard, plexiglass), lined with tiles.
The permanent screen is durable and easy to maintain, but has a big drawback: to provide access to communications (in the event of a plumbing breakdown or water leak), it is necessary to dismantle the structure; the space under the bathtub is inaccessible for use.
A blind screen requires the presence of plastic pipes that are not subject to corrosion; before installing the element, make sure that the plumbing is in good working order.
With inspection window or door
The model is a stationary partition with a technological hole left during installation, providing access to check the operation of the sewage system. The window is left open or a door is hung (with a push, sliding or swing opening mechanism).
Sliding
Installation of this type of structure allows you to maintain full access to the pipes. The screen is a frame frame with sliding or hinged doors (with a roller or sliding opening mechanism), mounted on the floor or legs.
The hinged model looks harmonious with the bathroom cabinets, pencil cases and bedside tables, designed in the same style. The disadvantage of the design is the loss of space when opening doors, which is important for small rooms.
Opening the sliding screen does not require a large space; the design is easy to install and can be installed on bathtubs of any type and size. The frame for the partition is made of aluminum or plastic.
With footwell
When bathing a child, washing animals or washing clothes, it becomes necessary to get close to the bathtub, so when installing the screen, you can provide a niche for the feet, which is located in the center or along the entire length of the partition. For this purpose, the screen frame can be made with a slope.
General recommendations
Currently, bathtub manufacturers produce products that have a presentable appearance and high performance characteristics. The surface of baths is often covered with a special layer - enamel. It is usually white in color, however, it can differ in other shades. In addition, the image of the plumbing is complemented by the legs that support it above the floor. It is this space that is causing concern.
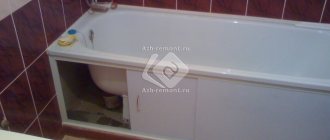
Bath screen
You can close this gap using a special partition - a tile bath screen. This method allows you not only to hide the unpresentable appearance, but also the unsightly appearance of the bathhouse, if it is such. It is also worth noting that the design will look harmonious with the surrounding interior, since it is made in the same style using the same material, for example, ceramics.
Forming a base for tiles
Plasterboard sheets on a frame
The advantages of this material are strength, resistance to mechanical stress, ease of processing, flexibility (important when making custom-shaped screens) and relatively low cost.
Required tools and materials:
- mounting level;
- roulette;
- marker;
- screwdriver, hammer drill;
- guide and rack metal profiles or wooden beams;
- hammer;
- scissors for cutting metal;
- self-tapping screws, plastic dowels;
- primer, roller and brushes;
- drywall.
Stages of frame manufacturing:
- determine the outer boundary of the partition, keep in mind that there will also be facing material on top of the drywall. Along the walls adjacent to the side parts of the bathtub, mark the line for installing the beam or profile so that it is deepened from the edge of the bowl by the thickness of the cladding;
- connect the resulting vertical marks with a horizontal line on the base of the floor, controlling its evenness relative to the sides of the bowl with a plumb line;
- Drill holes along the perimeter of the line with a hammer drill in increments of 150-200 mm, hammer in the dowels;
- cut the guide profile or beam to appropriate sizes, secure with self-tapping screws; additionally glue it to the base of the floor with sealant;
- fasten the vertical rack profiles with a pitch of 600 mm. If a technological hole is left, install additional racks in this place; when installing a niche for the feet, install the floor profile in the shape of the letter U with a recess for the bathtub (the racks in the niche are installed at an angle);
- cut the drywall in accordance with the measurements, keep in mind that the material is attached at a distance of 1 cm from the floor and the edges of the bathtub bowl - this prevents the material from swelling;
- fix the drywall to the frame with self-tapping screws;
- Insulate the seams and joints with sealant and coat the material with a primer.
If using a wooden beam as a frame, coat the material with a special antiseptic. It is advisable to make the structure from moisture-resistant grades of plasterboard (green sheets).
Brickwork
A brick bath screen is considered a solid base and is most suitable for tiling, but the installation process requires significant labor.
Required tools:
- trowel (trowel for masonry);
- polyurethane foam;
- a mixture of cement and sand;
- container for mixing the solution;
- building level;
- hammer for chopping bricks;
- bricks.
Frame installation includes the following work:
- calculate the required amount of material, taking into account the size of the brick and the masonry technology (a quarter or half a brick);
- Use a level to mark the floor and walls of the bathroom. The laying is done so that the edge of the bathtub protrudes beyond the brick wall by 2 cm - the tiles laid on a layer of adhesive will be recessed under the side;
- lightly moisten the floor surface - this will improve the adhesion of the frame to the base;
- mix the solution in accordance with the brand of cement used;
- carry out masonry from one wall to another, with bricks offset in each subsequent row, taking into account the need to leave a technological hole or niche for feet;
- leave a gap of 2-3 cm between the side of the tank and the last row; after the solution has dried, fill it with foam;
- plaster the brick frame.
You can check the evenness of the masonry during installation using a rope stretched between the outer bricks of the row.
Partition made of tongue-and-groove slabs
Construction gypsum or silicate products are an alternative material, which is a hollow slab measuring 667x500x80 mm, with a support (with a groove) and a connecting (with a ridge) side. To make a bath screen, a moisture-resistant type of board is used.
Required tools:
- mounting level or plumb line;
- roulette;
- tile adhesive or gypsum plaster;
- acrylic primer;
- metal spatula;
- wood hacksaw;
- slabs
Carrying out work on making a screen for a bathtub:
- clean surfaces from dust and debris;
- Apply primer to the base;
- transfer the points of the outer boundary of the bathroom to the floor using a level or plumb line, draw a line along the resulting marks. If the tank is located in the center of the room, mark the perimeter;
- step back another 5 mm into the space under the bathtub from the markings and draw a new line - this is the outer border of the screen (if you follow the rule, the facing tiles will not protrude over the side of the bowl);
- prepare the adhesive solution for work;
- Apply the mixture using a spatula to the groove and ridge of the slab, install the product in the desired location, and join adjacent elements. The thickness of the seam at the joints should be no more than 2 mm; adjust the position of the blocks by pressing or lightly tapping;
- check the position of the masonry with a level;
- If you need to cut the material, make markings on the tiles and cut them using a hacksaw.
When fixing elements with tile adhesive, tongue-and-groove blocks do not need to be wetted with water; When using gypsum plaster, each element must be moistened before installation.
Floor and wall tiles: what to look for when buying
Bathroom finishing products are divided into two main categories:
- materials intended for flooring;
- materials for walls.
Beauty and practicality - all this combines the flooring in question
Selecting floor covering
When deciding on the finishing material for the floor, know that choosing tiles will be the most correct, since other products in this category do not have the necessary qualities for long-term service in conditions of high humidity. When purchasing a product, you need to take into account whether it has specific characteristics:
- moisture resistance is a prerequisite, since the likelihood of water getting on the product is very high;
- resistance to changes in moisture and temperature in the room;
- resistance to abrasion and chemicals, this is an important point, because from time to time the bathroom has to be cleaned using cleaning products;
- to avoid injuries, you should choose plates with an anti-slip surface for the floor;
- the product must have a uniform color, especially if you choose tiles with a pattern;
- no chips or scratches.
The tile has five wear resistance classes
It is important to know that the flooring has five wear resistance classes.
The higher the class, the more expensive the cost and, accordingly, the greater the resistance to abrasion and damage of the plates. Manufacturers are required to indicate the degree of wear resistance on each batch of goods:
- Class I - the coating is used in places where people do not wear street shoes, only soft slippers and not intense traffic, can be used in bathrooms and bedrooms;
- Class II - tiles are installed in bathrooms and showers, bedrooms, but not in kitchens and hallways, where there is the highest traffic in the house;
- Class III is the best option for renovation work in residential premises, as the material can withstand average traffic density;
- Class IV - the product is used in public places where there is a fairly high concentration of people - shops, hotels, offices;
- Class V is the most wear-resistant surface and can be used in any public places, including railway stations and airports.
Products higher than third class should not be taken home
But for the home, it makes no sense to buy products above the third class, since there will not be a high load on it.
When choosing a tile, you need to pay attention to the raw materials from which it is made (we will talk about this below), as well as the size of the plates and their shape.
You can create your own tile pattern at home
Let's start decorating the walls
The main purpose of wall tiles is, of course, moisture insulation, and then its decorative component. Therefore, when going to buy finishing materials, you also need to arm yourself with knowledge, based on which you will make the right choice:
- the product must have high water-repellent properties, that is, water should not be absorbed, but remain droplets on the surface;
- You need to purchase tiles only from one batch of goods, otherwise you risk getting a color discrepancy;
- pay attention to the grade, there are three of them: if the coating of the first grade is the highest quality and durable, then the third - on the contrary (the grade also affects pricing);
- Just like flooring, high-quality wall coverings should not have chips or scratches.
Tiles can be used to decorate a room in any style.
The nuances of gluing tiles
- lamellas can be installed on a screen made of brick, tongue-and-groove elements, plasterboard or moisture-resistant plywood;
- install decorative cladding using a moisture-resistant solution or liquid nails;
- if using tile adhesive, spread the mixture on the back of the lamella with a notched trowel, apply liquid nails pointwise along the entire perimeter and in the center of the tile;
- start installing the first element from the top corner of the screen and be sure to control the position of the tiles using a building level;
- When laying tiles, insert dividing crosses into the spaces between the tiles;
- be sure to grout the joints with a moisture-resistant mixture - this will prevent moisture from penetrating under the tiles, mold development and damage to the integrity of the facing coating.
Make the screen from a material identical in its characteristics and colors to the lamellas on the walls.
Where to begin?
Before you go to the store to buy material, you should take note of a few important tips that are relevant when choosing any type of tile.
- Consider the location of the plumbing fixtures, since the possibility of choosing a pattern decorating the walls and floor will depend on this.
- Determine your stylistic direction and color scheme.
- Carefully study the characteristics of each product.
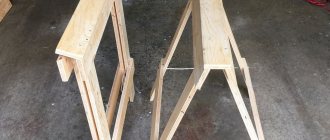
Construction of a removable screen
You can make a removable bathtub panel from moisture-resistant oriented strand board.
Required materials and tools:
- hand or circular saw, jigsaw;
- wooden beam;
- furniture legs (with height adjustment);
- metal corners, screws;
- primer;
- moisture-resistant glue;
- notched and rubber spatula;
- grout mixture;
- facing lamellas;
- OSB.
Screen manufacturing includes the following work:
- take measurements of the bathtub;
- transfer the markings to the slab (make the height of the screen 4-5 cm less than the obtained value, so that there is a gap and your feet can enter);
- cut the sheet to size;
- cut the timber, attach a frame from it around the perimeter of the OSB;
- fix the legs at the bottom of the screen;
- treat the product with a primer, wait until it dries;
- glue the tile to the screen;
- fill the seams with moisture-resistant grout;
- Place the product under the side of the bath and adjust the height of the legs so that the screen is level and motionless.
After completing the work, check the structure for strength; if instability of the structure is detected, make additional stiffeners.
Steps, boxes and podiums
With a combined bathroom size of 9 sq. m, bathroom from 6 sq. m, steps, podiums can be attached to the plumbing fixtures, horizontally oriented boxes with water supply and sewer pipes can be adjacent, transiting to the kitchen or connecting the bathtub with risers.
Steps are used to increase user comfort, making it easier for elderly people and children to step over the side of the bathtub. Usually one or two steps from the floor level are enough.
One step for easy entry into the sanitary bowl.
Or the level of the upper stage of the structure reaches the side of the bowl. This option is only suitable for large spacious rooms.
Operating the bathtub in pool mode.
In this case, the structures near the sanitary ware should be covered by analogy with the cladding of the stairs. The width of the horizontal box should be less than the same size of the ceramic cladding to ensure that the vertical joints between the tiles match.
The width of the box is less than the size of the tile.
The bowl of the sanitary ware can be partially built into the podium, as in the bottom photo.
Bathtub half built into the podium.
In any case, knowledge of standard layouts of tiles on walls/floors will allow you to ensure acceptable quality of interiors when decorating with your own hands.
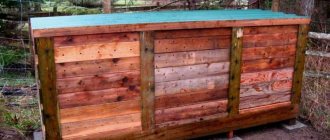
Bathtub cladding of complex shapes
If the tank bowl has a non-standard curved shape, a metal profile is suitable for making the frame; Use a sheet of plasterboard or extruded polystyrene foam as the sheathing material:
- measure the bathtub and cut the required amount of profile;
- make small cuts along the entire length of the guide rail in increments of 30 mm;
- attach the profile to the side and secure with tape. Lay the frame along the entire length of the bowl, making smooth bends at the cut points. To maintain the resulting shape, secure the strip with tape in several places as you work;
- clean the floor from dust and debris, transfer the border points of the sides to the base using a plumb line, draw a preliminary line;
- make an indent deep into the bathtub to the thickness of the facing tiles, adhesive mortar and plaster, mark the outer border of the screen;
- attach the profile to the floor using dowel nails;
- in accordance with the height of the bathtub, cut two metal slats and fix them on the walls;
- cut a sheet of plasterboard or polystyrene foam onto a panel 15-20 cm wide, depending on the amount of curvature of the bowl;
- insert the lower edge of each part of the screen into the profile, place the upper edge under the side of the bathtub and fill the space with construction foam;
- install the remaining panels in the same way, leaving space for an inspection window if necessary;
- insulate seams and joints with silicone sealant;
- Apply waterproof putty to the entire surface of the screen, after it has dried, sand the surface with sandpaper and begin tiling.
If the contour of the bath is too curved, the screen is covered with mosaic tiles (glass, ceramic, polymer materials), which are presented by manufacturers both as individual chips and in the form of modules on a paper or mesh basis.
Types of installation
The calculation of the required amount of tiles depends on the layout of the bathtub tiling. The classic method of laying, “seam to seam”, forms even horizontal or vertical rows. In this case, vertical seams are plumb, and horizontal seams are level.
The “bonded” cladding method is a laying in which each ceramic tile is located in the middle of the seam separating the two tiles of the bottom row. Finishing with tiles diagonally, the seams between the tiles are perpendicular to each other, and the tiles are laid at an angle of 45 degrees. This is a more complex way of tiling surfaces because many well-calibrated tiles are required.
The combined technology of wall cladding with ceramic tiles combines several types of cladding. This method is suitable for spacious bathrooms, and you can combine mosaic tiles with regular ones, smooth ones with embossed ones in various color combinations, it is important to maintain the harmony of the ornament and thoughtfulness of the combination.
Tile laying options
Possible decoration options
- when installing the screen, add a pull-out shelf with magnets - the device will be useful for storing various household items;
- decorate the partition with a mirror cloth or mirror slats, which will visually expand the space of the room;
- An original, beautiful, durable and moisture-resistant material for making a screen is plexiglass (plain, colored, matte and glossy, smooth and with a relief surface;
- Choose small and medium-sized ceramic tiles for cladding - this will avoid a large number of cut elements.
If the appearance of the bathroom interior seems too restrained and monotonous, choose one of the many design options and design a bath screen that will match the size and features of the installed plumbing equipment.
Dimensions
Today, tiles for decorating a room used for water procedures have a fairly wide range of sizes. Therefore, when choosing it, you should take into account not only the parameters of the tile, but also the size of the bathroom. If you are the happy owner of a fairly large room, then you also have a large choice, limited only by your imagination. For a small room, you should purchase medium-sized plates, since small mosaic tiles or too large samples will visually reduce your modest footage.
There is a little trick that will allow you to visually change the parameters of the apartment. If you take a rectangular product and lay it out vertically, the covering will make the room taller, in the horizontal direction it will elongate it, and a diagonal pattern on the floor will create the appearance of an expanded space.
Shapes of tile plates