Independent insulation of ventilation pipes - a whim or an urgent need
Few people now doubt the need to install ventilation systems.
But many young owners are perplexed why it is necessary to insulate ventilation pipes in the attic or in other unheated rooms, because this is not plumbing or heating, and there is nothing to freeze there. However, if you leave this issue without proper attention, you may end up with serious problems over time. In this material I will try to explain the meaning of such insulation and tell you how and with what you can insulate ventilation ducts with your own hands, without involving specialists.
Insulation of ventilation ducts.
conclusions
Making the right choice of materials in accordance with the standards is not as difficult as it seems at first glance. But the installation of thermal insulation itself also requires a competent approach, otherwise it will not be possible to fulfill all the requirements. Before carrying out construction work, it is recommended to check the ventilation and its operation - is full power maintained, is there any contamination? No amount of insulation helps even if the pipes themselves were initially installed incorrectly. Then it is worth correcting the existing problems.
What is the point of insulating ventilation?
The main enemy of any ventilation system is condensation, which is actively formed when warm and cold flows collide. In addition to proper planning of the system itself, insulated pipes for ventilation are one of the main means of preventing moisture loss. I’ll tell you later why this condensation in the ventilation system is so scary.
Actually, the insulation itself is necessary to prevent the conditions for the occurrence of the so-called dew point. According to the construction standard SP-50.1333-2012, this term refers to the temperature at which water vapor contained in the air precipitates in the form of water on surrounding objects, that is, condenses. Naturally, the dew point directly depends on air humidity; the higher it is, the closer the dew point is to the ambient temperature.
Table for determining dew point.
- Let's start with the fact that on an unprotected pipe in the attic floor, condensation can fall out both from the inside and from above the air duct. This moisture is dangerous in its own way in both cases. So the water constantly flowing down the pipe will naturally be absorbed into the ceiling. And here it doesn’t matter whether it’s concrete, wood or any other material, sooner or later it will begin to collapse. Add to this the unpleasant stains around the pipe on the ceiling of the top floor;
- More than half of the ventilation ducts and pipes are now made of galvanized iron. Zinc coating is a good thing, but if it is damaged, which is inevitable when cutting and installing, the thin iron sheet will begin to rust and it will take a little time for holes to appear on the pipe, no more than 2 - 3 years;
Cutting mats made of cotton insulation.
- In addition to domestic ventilation, in houses with 2 floors and above, fan ventilation for the sewer system is installed. To put it simply, this is a continuation of the sewer riser leading to the roof. So, with the extreme humidity that exists in the sewer, the attic sector of such a pipe with a diameter of 100 mm freezes tightly already at a temperature of -5ºC or -7ºC within a week. And this already entails problems with the operation of the sewerage system;
- In addition to its direct function, insulation for ventilation pipes is a good sound insulator. Having installed such a system, you will not have to listen to the howling of the wind in your pipes;
- But a rotten ceiling, a damaged ceiling, constant wind chimes, an unpleasant smell from the sink and a sewage system frozen in winter are just minor problems; the appearance of mold and mildew inside a household ventilation system is much more dangerous. The fact is that such “vegetation” spreads by aerosol; in other words, mold spores are carried by air currents. Naturally, once they get into the ventilation system, they will regularly irrigate the entire house, and the people living in the house will constantly breathe in all this bouquet. The consequences can be very different, from mild malaise to chronic headaches and allergies.
Possible ways to prevent deficiencies
Insulated pipes have no disadvantages that would affect operation.
However, it is worth considering that several steel layers will be heavier than corrugated or polymer insulation. However, the installation quality is not affected by the installation process, so this characteristic is rarely taken into account.
If you have any doubts about the cost, you can make a simple calculation: compare the difference between insulated structures with the sum of the costs of pipe sets, insulation with waterproofing and the cost of fixation means. If the difference is small, you need to choose a material that is easier to install.
Why is this necessary?
The key word is condensate. Without insulation, it will inevitably form on the inner surface of the ventilation duct and flow down the inner walls, flowing through leaky joints into the main walls and ceilings. The consequences are obvious: dampening of the walls and ceiling, the appearance of mold and their gradual destruction.
The effect of condensation on the ventilation duct itself depends on what material it is made of:
- Galvanization can be damaged if the protective anti-corrosion layer is damaged. Which, however, is inevitable when cutting sheets.
- PVC and corrugated aluminum pipes tolerate contact with moisture without any consequences.
Another trouble associated with moisture condensation is the gradual freezing of frost on the inner walls of the ventilation duct outside the warm room. Over several weeks of operation in severe frosts, the pipe clearance can decrease from 100 - 150 millimeters to zero.
Where does condensate come from?
There are two reasons for its appearance.
- Human life activity is associated with excessive air humidification . When washing dishes, cooking, doing laundry, even just breathing, the atmosphere is saturated with water vapor.
However: in industrial premises this point is relevant to a much lesser extent, but insulation of exhaust ventilation is still required. Cause? See point number two.
- Meteorologists have long used the concept of relative humidity . The higher the air temperature, the more water vapor it can hold. 100 percent relative humidity is the maximum amount of water that can be contained in the air in a vapor state. However, as soon as the temperature changes, with the same amount of steam in the air, the relative humidity will change. With significant cooling, it can exceed 100%, after which excess water will inevitably begin to condense on the surface with a low temperature. In our case, on the inner surface of the ventilation duct.
Consequences of moisture condensation in the ventilation duct.
A special case
In production, there is often a need for forced ventilation with high air flow rates. In particular, to remove harmful volatile production products, sawdust, shavings, etc.
The noise of the air and what it carries becomes a serious problem in some cases. In factory premises, ventilation insulation is often aimed not so much at combating condensation, but at banal sound insulation. The methods, however, are the same.
Where to insulate
In what places is insulation needed for ventilation pipes?
A simple solution
The simple answer to this question is obvious: where a sharp and significant cooling of the air flow is possible.
- If the exhaust ventilation is routed through a solid wall, the pipe is passed through a heat-insulated sleeve and insulated right up to the deflector.
- In a private home, insulated ventilation pipes run through the cold attic and are discharged through the gables or roof. Insulation again begins from the point where the ventilation duct noticeably cools (see also the article Insulating the attic - we consider possible options in detail).
Supply ventilation stands apart. Here, the possibility of moisture condensation on the outer walls of the supply ventilation duct depends on its length and location.
Installation Features
Important! For correct and high-quality installation, you must have experience in installing intra-house communications. If you lack experience, we recommend turning to professionals.
If you decide to install the structure yourself, the following reminders may help you:
- With a wide cross-section of pipes, air circulation is better (recommended minimum diameter is 14 cm).
- Short channels must be made wide enough.
- To maintain draft force, all air ducts in the house must correspond to each other.
- It is better to use the same type of thermal insulation and pipes.
- Forced ventilation should be installed when natural heat exchange is disrupted.
Insulation installation process
Video: an effective way to insulate a chimney
Materials
And finally, the cherished question: how to insulate the ventilation pipe? Let's take a short review of modern insulation materials that can be successfully used for ventilation ducts.
Requirements
Let's start by stating our wishes.
- Thermal insulating qualities will, of course, be a priority characteristic of insulation.
- Fire safety. In the event of a fire, the insulated ventilation pipe should not become a conduit for the spread of flame.
- If possible, the price should not be exorbitant.
Disclaimer: we will leave out of our attention the insulation of ventilation ducts from the inside. The instructions for its use imply complete dismantling of the ventilation duct, which is not always realistic; in addition, the useful ventilation cross-section will be noticeably reduced.
Mineral wool
- Unsurpassed cheapness . Any other insulation will cost more.
Mineral wool 50 millimeters thick is supplied in rolls.
- Absolute fire safety.
- Quite labor-intensive installation. The ventilation duct is wrapped in a layer of mineral wool; then it is wrapped in foil (which is only permissible in interior spaces) or protected with galvanization. From the outside, the structure is tightened with bandages.
- The need to protect the respiratory system and eyes when working with the material. Anyone who has ever worked with mineral wool (or glass wool, which differs only in the thickness of the fibers) probably has the most unpleasant memories of it.
- The material cakes over time. Gaps appear in the insulation.
- Humidification leads to loss of thermal insulation qualities.
Some of the shortcomings are devoid of a ready-made solution based on mineral wool - an insulated corrugation for ventilation, which is a two-layer sleeve made of aluminum foil reinforced with steel wire. However, it involves laying ventilation from scratch.
Styrofoam
A ready-made detachable shell made of dense foam plastic (expanded polystyrene) is in many ways more convenient.
- The insulation process is not associated with health risks and is relatively simple. How to insulate a ventilation pipe with foam shell? Just put two halves of detachable thermal insulation on the ventilation and squeeze them so that the tongue-and-groove connection is fixed.
Useful: if the insulated ventilation duct is long, the shell halves are placed with mutual displacement, connecting to the next section of insulation.
The diagram makes the connection method clear.
- The material provides excellent thermal insulation and practically does not change its thermal insulating properties over time, regardless of humidity fluctuations.
- Styrofoam is cheap. It is precisely because of its low cost that it is the main candidate among insulation materials if you are planning to insulate a loggia or the facade of a private house (for more details, see the article How to insulate a loggia and what is required for this).
- Polystyrene foam burns well, releasing toxic combustion products.
- The shell is easy to use only on straight sections of air ducts.
Polyurethane foam, polypropylene foam
The shell can be made not only from polystyrene foam. The other two foam plastics are similar in application to foam insulation.
- Both materials have slightly greater mechanical strength.
- They are more expensive.
- To fix it, you have to apply a bandage. Ordinary knitting wire is often used as it.
Shell made of polyurethane foam.
Foamed polyethylene
This material can be found on sale in the form of split tubes of various diameters. They are put on the ventilation pipe - and, in fact, the thermal insulation work is completed.
The material is cheap and is not afraid of moisture, mechanical impacts of moderate force and rodents.
However, in cases where it is necessary to insulate ventilation in a cold climate zone, you can pay attention to two other types of insulation based on polyethylene foam.
- Penofol and its analogues are polyethylene foam coated with a layer of aluminum foil . In our case, it is useful because the insulated pipe will collect less dust: the porous surface of polyethylene foam tends to accumulate dirt.
- Self-adhesive insulation based on the same polyethylene foam is equipped with a sticky layer that simplifies work . If you have ever insulated plastic windows or steel doors with a rubber or foam seal, you have already come across a method for fixing it: simply remove the protective glossy paper and press the material to the surface (see also the article How to insulate windows - getting ready for winter).
The material is very convenient for insulating pipes of square or rectangular cross-section.
The thickness of the insulation can reach 10 millimeters; if necessary, it can be laid on ventilation pipes in several layers.
Basalt wool
basalt wool for chimney insulation
Composition of rock fibers in molten form. Mineral group insulation whose properties have been improved. Sold in the form of slabs and mats, like other varieties. Installation also involves the same actions as in the case of mineral wool. The chimney can be reliably protected.
Some manufacturers produce ready-made basalt fiber cylinders, which speed up installation. There is a foil coating, or the products are made without it. The price is higher compared to mineral wool. Cheap brands can be dangerous to the health of others.
The material has more advantages:
- High thermal insulation coefficient.
- Durability.
- Fire safety.
Aluminum foil on one side and special water-repellent compounds provide additional protection. Even the roof sometimes allows such insulation.
Do you need ventilation in a cold attic?
No amount of house sealing can completely isolate steam from entering the attic. According to the law of thermodynamics, warm air rises to the top, and steam finds a way out in any case. The floors are mainly made of wood. On wooden surfaces, when moisture accumulates, a natural environment is formed for the development of various destructive microorganisms and mold. Unpleasant musty odors and a feeling of dampness appear. An unhealthy microclimate in the room as a whole is created.
Temperature changes contribute to constant condensation and, if there is no ventilation of the cold attic, rapid wear of the structure occurs.
Reasons for condensation:
- lack of good ventilation;
- violation of roof insulation;
- insufficient waterproofing;
- lack of ventilation ducts;
- defects in building materials.
Ventilation carried out in accordance with technical rules protects the structure from damage.
A cold attic is a non-residential space under the roof of a building without decorative finishing. The issue of ventilation is important to decide during the creation of a house project, when planning the features of the roof configuration.
Financial expenses
Insulation of the under-roof space requires additional construction and insulation materials and labor costs, which increases the budget for building a house. If you are limited in funds or do not plan to equip the attic space as a living space, then such expenses are unlikely to pay off in the future. In addition, ensuring the functionality and quality of such an attic requires its maintenance and timely repairs.
Is it possible to ventilate a cold attic?
Proper air exchange is necessary to:
- avoid the accumulation of fumes coming from the house;
- protect the wooden frame of the attic from moisture;
- counteract the formation of fungus;
- maintain a constant temperature.
Provided that ventilation of the attic space is created - a cold attic from the house, moisture accumulation cannot be avoided. On uninsulated roofs, a thick layer of condensation quickly forms. Even if the roof were insulated, condensation could not be avoided, but in this case the walls of the house would become wet.
A frequently asked question is: is it possible to vent ventilation into a cold attic?
It is possible, but this type of ventilation is the wrong solution and leads to disruption of the microclimate of the attic space, damage to the wooden structure, gradual rotting, and inevitable wear and tear.
Important recommendations to ensure high-quality and durable ventilation of a cold attic:
- Install the necessary ventilation elements to protect the vents from debris, leaves, branches and insects - on ridges, eaves, ridges, valleys.
- Protect ventilation gaps from dust.
- Regardless of the characteristics of the roof, make the area of the ventilation channels 400-500 cm2/m.
- Check that the ventilation channels are not narrowed to avoid condensation due to insufficient air circulation.
- Use auxiliary ventilation structures if the length of the roof covering is more than 10 meters.
- Avoid significant expansion of the gap, as the resulting turbulence reduces air exchange under the roof.
- Ensure ventilation insulation in the attic so that the ventilation system pipelines are not subject to temperature changes and can function uninterruptedly.
Internal and external insulation: pros and cons
There are two ways to insulate pipes: internal lining or external insulation. Each method has its own advantages and disadvantages.
Internal lining
- More difficult to install, but not subject to external mechanical temperature effects.
- To avoid reducing the internal part of the duct, it is necessary to carry out some work to increase the original area.
- The material must be vapor-tight and airtight to avoid absorption of moisture from the air.
- The outer part of the material should be smooth so as not to impede air circulation.
Example of external ventilation duct insulation
External side insulation
- Easier to install, but the material must also be vapor-tight.
- It is necessary to provide for insulation of the exhaust pipe and installation of a hydraulic barrier.
- The material must withstand mechanical stress.
- The insulation must be non-flammable, since in the event of an open fire it comes into contact with air.
- This type of insulation does not reduce the internal cross-sectional area of the pipe.
- It is not susceptible to the formation of pathogenic bacteria.
The need to insulate the ventilation pipe
Each air duct of a ventilation system that operates to release heat from a room requires mandatory insulation. In the cold season, due to the difference in temperature between the warm air emitted from the room and the cold air outside, condensation forms inside the pipe. Modern split ventilation systems and similar climate control equipment with “own” air channels have special blocks that counteract the formation of condensation and remove accumulated moisture.
Ventilation pipes, which in most private homes are an ordinary piece of metal or plastic, are unable to remove condensate in this manner. And the process of formation of dew droplets occurs noticeably faster in them. The result is the appearance of wet spots on the floors and frost, accompanied by a decrease in the air channel inside the pipe.
Dampness causes the formation of fungus and creates optimal conditions for the development of pathogens. You can get rid of these troubles by using insulation for ventilation pipes. At the same time, it is not always necessary to completely “wrap” the air channel in order to minimize the formation of condensation.
Recommendations from professionals
And, finally, some important tips for those who are interested in how to properly ventilate an attic:
All ventilation elements must be resistant to any weather conditions; Be very careful about the location of the ridge vents. They are installed as close as possible to the ridge; Continuous soffits work effectively as cornice vents. The best materials for them are non-rusting aluminum or plastic. The surface of the spotlights is covered with a fine mesh; When installing attic ventilation without dormer windows, special attention should be paid to the vents between the rafters
It is important that during operation they do not become clogged with debris and dust; Hire a professional to calculate attic ventilation above the attic; Install decorative ventilation windows in the attic that will add charm and special style to your home; Equip the supply ventilation outlet to the attic in accordance with all the rules. The supply unit should be installed in the cleanest place, no closer than 8 meters from the exhaust pipe.
The right approach to insulation
To answer the question: how to insulate a ventilation pipe in a private house correctly and at the same time economically, you need to understand the reasons for the appearance of condensation. Temperature differences always lead to the appearance of condensation, but the most abundant release of “dew” is observed during the period of active contact between warm and cold air. The closer it can be moved to the outlet of the pipeline, the less potential danger and damage from condensate will be.
The ideal case is considered to be a situation in which the mixing of cold and hot air occurs in a section of the ventilation pipe located outside the building. But this is not always possible to implement in practice.
Therefore, for chimneys and air ducts in an unheated attic, insulation of the ducts is considered mandatory. Thanks to this, it will be possible to remove the “wet” zone - the place where dew is most actively formed - beyond the walls of the building. This solution will help, even with the active appearance of a large amount of condensation, to prevent moisture from penetrating into the walls, causing the appearance of dampness, fungus and other related troubles.
Remember that the main destructive factor that worsens the performance of any type of ventilation is condensation. But it will not be possible to avoid its formation in our climate zone, so it is better to take measures in advance to reduce its negative impact.
Finding the optimal location
A vertical chimney from a heating stove, fireplace or gas boiler, thanks to the release of hot air, will be completely cleared of moisture during the heating process. Horizontal air ducts, the outlet of which is located in the wall, should initially be installed with a downward slope of at least several degrees. This allows accumulated moisture to drain outside rather than inside the room. Therefore, the most important point before insulating such air ducts is to check whether there is a slope for its removal. Otherwise, even insulated ventilation pipes will become a source of problems in the future, albeit noticeably later than without any thermal insulation at all.
A mandatory place for insulating air duct pipes is an unheated attic space. It is here that the temperature difference during the cold season becomes a source of problems due to the formation of moisture. Condensation on them, regardless of whether plastic or metal pipes are used, forms both inside and outside.
Insulation of ventilation pipes in the attic is a necessity, allowing not only to improve the quality of work and reliability of the air ducts, but also to protect the floor material from destruction. It is also worth mentioning the troubles in the form of unpleasant stains, stains of moisture and rust at the point where the pipe enters the wall.
Choosing the best material
In order for the thermal insulation of any plastic, metal and various other ventilation pipes to be quite effective, but also not to hit the budget, you should choose the right insulation. Today there is a fairly wide selection of materials for this, both affordable and quite expensive. The most recommended options are the following types of insulation:
- Mineral wool. An inexpensive fireproof option available at almost any hardware store. The downside of the availability of mineral wool is the complexity of installation and the need for its subsequent protection with foil or galvanization. Afraid of moisture.
- Stone wool. It has the advantages of mineral wool, as well as its disadvantages. Over time, it cakes and loses its thermal insulation properties.
- Polyurethane foam and polystyrene foam. Detachable structures for pipes of a certain diameter. Inexpensive, but providing excellent heat and moisture insulation. The disadvantage of the materials is their high fire hazard and rather low resistance to mechanical damage.
- Foamed polyethylene. Insulation offered in the form of ready-made tubes of different diameters. Inexpensive, has good thermal insulation properties, and is not afraid of moisture. The disadvantage is the need to put a heat insulator on the duct pipe, which is inconvenient or even sometimes impossible.
Thermal insulation for industrial systems
To insulate pipes in industrial ventilation systems, in addition to the insulation listed above, more expensive methods can be used:
- applying a sprayed type of polyurethane foam;
- installation of heat-insulated air ducts that are ready for installation.
Polyurethane foam
Sprayed polyurethane foam insulation is considered one of the most effective ways to protect ventilation pipes of industrial systems from freezing. A layer of foam is applied over the air ducts using specialized equipment.
Types of polyurethane foam:
- Hard. It has closed cells and, in addition to excellent insulating qualities, also serves as waterproofing, absorbing no more than 4% of moisture.
- Easy. It is distinguished by the presence of open cells, is low in weight, absorbs sound well, and is relatively inexpensive. But it cannot be used for external work, and for internal work it will require waterproofing, since the insulation absorbs up to 15 percent of moisture.
Characteristics:
- thermal conductivity indicators vary from 0.019 to 0.04 W/m°C;
- operating temperature range is -160°С – +150°С;
- low-flammable material;
- compressive strength indicators - over 150 kPa;
- standard service life is more than 20 years.
Advantages:
- the insulation layer fits as tightly as possible to the surface of the pipes;
- there are no seams at all;
- it is possible to apply the material to pipes of complex configuration;
- installation does not take much time.
Flaws:
- high price category;
- installation is quite complicated and requires some experience;
- The material contains toxic substances, requiring the worker to wear special protective clothing, a mask and goggles. In this case, frozen foam does not pose any danger.
Insulated air ducts
One of the convenient options for solving the problem of condensation in the ventilation system is the use of already thermally insulated air ducts during installation.
Varieties:
- Flexible. A metallized film, an insulating layer and a foil film cover are attached to the spiral wire frame.
- Tough. Consists of PIR boards (PirroVentiDuct) or Climaver fiberglass boards, etc. The strength of pipes made from such materials is similar to that of traditional steel air ducts. Flanges can be used to connect to conventional steel ventilation pipes.
Advantages of insulated air ducts:
- reducing costs for purchasing materials;
- reducing the total weight of the entire ventilation system;
- installation speed.
Air ducts with thermal insulation do not have any critical disadvantages.
Condensation is a threat not only to pipes
The main reason for carrying out insulation work on the ventilation line, as a rule, is the appearance of moisture stains on the walls and ceiling. Less often, work is carried out due to loud howling of the wind in the pipe or externally noticeable freezing. These and other factors that destroy individual areas of the building are mistakenly considered the main reason for insulation. In fact, the situation is much more serious.
As mentioned above, moisture in the walls is an excellent environment for the development of fungus and pathogens. But for mold to “appear” on the walls, it takes quite a lot of time and moisture. And until the moment it just “appears” on them, its own “ecosystem” has already formed inside the ventilation system, imperceptibly poisoning the house.
The result of this can be allergies, illnesses caused by unknown causes, and chronic headaches. The pathogens that cause them spread through the air, quietly poisoning it. Therefore, proper ventilation insulation protects not only the walls and ceilings of the house, but also the health of its inhabitants.
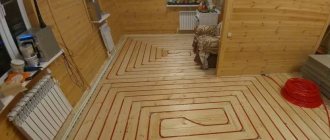
How to insulate a cold attic yourself
According to measurements, up to 30–40% of the heat escapes through a cold attic in a private home, plus due to temperature changes, condensation constantly settles there, which leads to dampness.
Insulation of the attic space is carried out comprehensively
It is not difficult to insulate this sector with your own hands. We will analyze the complete arrangement technology and dwell in detail on the most important points of the process.
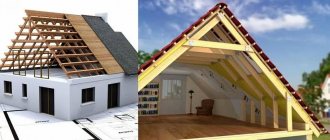
Video projects of houses with gable roofs ↑
Roof installation begins with the installation of floor beams (translations). If the attic space is not planned to be used, then a 50x150 mm board is used for transfers. The timber should be laid exactly on the wall posts; this arrangement guarantees the strength of the entire structure.
Floor beams are laid with an extension of at least 400 mm from the outer edges of the walls - this protects the walls of the house from moisture flowing from the roof.
A 50x150 mm board is fastened to the floor beams along the entire house with nails, which will become the basis for the wall posts of the attic floor. Then the racks and top trim are installed.
The next stage is the assembly and installation of rafters. First of all, the gables must be installed. This is the name of the extension of the wall of the house, with its upper point forming the ridge - the vertex of the triangle that the roof forms. On the top trim, a 150x50 mm board is placed on edge.
The main stages of attic insulation
The attic space is insulated in a comprehensive manner; the technology involves 3 stages of arrangement.
- First stage. Ventilation is installed; without it, condensation will quickly destroy the insulation and lead to damage to the wooden rafter system.
- Second phase. An insulating ceiling pie is installed. The design of this cake largely depends on the material from which the ceiling is made. Thus, a wooden floor is equipped only with vapor-permeable insulation, and for a reinforced concrete structure, extruded polystyrene foam (EPS) or polystyrene foam is more suitable.
- Third stage. Under-roof insulation is installed.
Lathing
Wooden elements that are secured across the rafters and counter battens. The lathing serves as a base for the roofing material; depending on the type of covering, the choice is made in favor of a continuous or step-by-step structure.
- Solid - sheathing made of OSB sheets or plywood, which is used under soft roofing material (bitumen shingles, composite tiles).
- Stepping - made of bars or boards, serves as the basis for hard coverings (metal tiles, corrugated sheets, ondulin).
Attic insulation technology
It is believed that such work can be carried out all year round, but from experience, it is better to do insulation of the attic in the summer; in cold weather, drafts, rain and snow on the roof will greatly interfere.
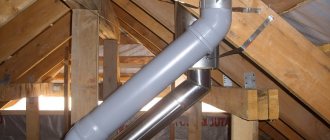
Air exchange in the room
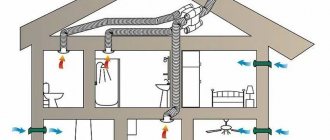
Ventilation is divided into general and under-roof. If the roof was assembled according to the rules, then the under-roof ventilation was installed at the construction stage. The operation scheme is simple: the air, entering through the eaves vents, circulates directly under the roofing material and exits through the ridge or roof vents.
If the roof is covered with solid materials, such as soft roofing, metal tiles, etc. then the under-roof ventilation works through the ridge vent
The main ventilation of a cold room works through dormer windows; a warm attic does not have such windows, so forced ventilation and roof aerators are installed here.
Ventilation of a warm attic is forced
How to insulate ceilings on beams
The technology of floor insulation depends on several factors, the first is the material from which the floor is made. If we are talking about a wooden ceiling on beams, then the instructions will look like this.
- We assume that the ceiling of the lower floor is already lined , and in the attic we have open joists. At the initial stage, it is advisable to coat the wood with an antiseptic and wait until it dries.
- Next, a vapor barrier is attached to the joists and subfloor of the attic. Keep in mind that the vapor barrier membrane only allows steam to pass in one direction, the permeable side has a rough coating, it must be directed downward so that steam from the lower room can freely pass into the attic.
Important! If you are insulating the ceiling in a bathhouse, then in addition to the vapor barrier, foil is placed, and it is advisable to attach the foil under the counter-batten behind the finishing lining of the bathhouse ceiling, so that the rough ceiling and load-bearing beams do not become damp, and the counter-batten will provide a ventilation gap.
- Insulation is laid between the beams . The thickness of the insulation depends on its type, so if you use mineral wool slabs, then 100 - 150 mm is enough, the thickness of the layer of expanded clay, sawdust or ecowool ranges from 200 - 300 mm.
- Another layer of vapor barrier is stretched on top , here the vapor-permeable layer is also directed downwards. The membrane between the beams should sag slightly, plus a gap of 2–5 cm is left from the insulation to the floor covering.
- A floorboard is sewn on top of the second membrane.
The principle of arranging insulation along beams
How to insulate a reinforced concrete floor
The insulation scheme for a reinforced concrete floor depends on the type of insulation.
Vapor-permeable insulation, installed in the same way as a wooden floor:
- The slab is covered with a layer of vapor barrier.
- Wooden logs are mounted on top; the timber should be 20 - 30 mm higher than the insulation.
- Insulation is placed between the joists.
- Next comes a layer of vapor barrier,
- The attic floor covering is installed on top of the insulation.
Vapor barrier membranes are covered with the vapor-permeable side down
When insulating reinforced concrete slabs along the joists, you can use polystyrene foam or EPS. But in this case, there is no point in covering with vapor barrier membranes. This is due to the fact that polystyrene boards themselves are waterproofing - they do not allow steam and moisture to pass through.
There is another way to insulate floor slabs. It is good if you plan to install heated floors in the attic.
- Reinforced concrete slabs are cleaned and puttied.
- On top of the concrete is treated with penetrating waterproofing , for example, Penetron.
- EPS boards are glued to the floor
- A reinforcement cage is placed on the insulation ; if necessary, pipes or a heated floor cable can be secured to it.
- is poured and leveled on the floor .
You can install a heated floor inside a reinforced screed
Under-roof insulation
Installation of under-roof insulation is somewhat similar to installation along beams. If you insulate the attic with your own hands, then it is better to use dense slabs of stone or mineral wool as insulation.
Soft cotton mats will lose volume in 3-4 years, and foam or EPS do not allow steam to pass through, so you will have to install enhanced ventilation, otherwise there will be a problem with condensation.
If the roof was installed correctly, then a wind barrier (under-roofing membrane) goes on top of the rafters, followed by a counter-batten with sheathing. Instead of lathing, OSB is placed under a soft roof, but this does not change the meaning.
You just need to insert insulation boards between the rafters and seal it with a vapor barrier (steam goes from the room to the street). The sheathing is placed on top and the final finishing of the room is installed.
The under-roof membrane acts similarly to a vapor barrier
If the roof was installed without wind protection and counter-battens, then the under-roof insulation scheme will be similar to the floor insulation scheme using beams.
But keep in mind that a ventilation gap of at least 50 mm is left between the vapor barrier and the roofing , and vents are installed in the area of the eaves overhang and ridge.
To provide a ventilation gap, you can stretch a mesh of nylon cord between the rafters
Installation of sheathing
Lathing across the rafters is done in two ways. Sheathing made of solid sheets (OSB or moisture-resistant plywood can be used) is made if it is planned to use soft tiles or corrugated sheets for the roofing. Under the impact of raindrops, these materials make a lot of noise. Solid sheathing will reduce noise. In addition, it is easier to attach roofing decking to a continuous sheathing.
Lay the sheets from the front gable to the rear. Then all the additions will be located in that part of the roof that is least noticeable. With temperature changes, plywood (like OSB) will expand and contract, so leave a gap of 1-1.5 cm between the sheets. When installation is completed, the gaps are filled with roofing sealant to block the path of water.
In order not to doubt the reliability of the sheathing, use OSB with a thickness of at least 1.2 cm, and plywood - at least 0.8 cm. These parameters are optimal for a rafter pitch of 0.6 m. As the pitch increases, the thickness of the sheets of continuous sheathing is proportionally increased.
The second method of constructing sheathing involves the use of boards. In this case, both edged and unedged varieties are suitable, the main thing is that the thickness of the boards is the same. The boards are nailed to the rafters using regular nails. It is better not to use screws or self-tapping screws for this work.