You can even make a welding machine or sawmill yourself, but when you need to make a device with your own hands that will be used in everyday life, then ensuring the safe operation of the product comes to the fore.
Homemade water heater
A homemade water heater will be used by all family members who may have only a vague understanding of electrical resistance, voltage and current. To minimize the likelihood of an accident, you will need to manufacture the device in accordance with all electrical safety rules.
Heating element for a water heater: purpose
Availability of hot water is the basis of comfort for everyone. There is a wide selection of boilers on the market for this purpose. The main source of hot water for home heating is the water heater. Electric heaters are quite popular, which is why a variety of models of such units are sold on the household appliances market. The most important role in its design is played by the heating device - heating element. This is a kind of internal battery, stands for Tubular Electric Heater. The part is represented by a metal tube of different shapes for different models of boilers.
Drain pit equipment
From a biochemical point of view, draining wastewater from the shower and street toilet into a common pit is a gross mistake. It is necessary to build a separate pit under the cabin. To equip a summer shower, which is supposed to be used only from time to time, a drainage hole with a capacity of no more than two cubes is sufficient.
When calculating the required volume of a structure, adhere to the rule that its capacity should be 2.5 times greater than the contents of the water tank
The drain should not be located under the shower building itself or even near its walls, but two to three meters from the building.
This arrangement allows you to solve two problems at once:
- prevent the appearance of unpleasant odors of decaying organic matter;
- minimize the risk of foundation failure.
To construct a drainage pit, dig a pit 2-2.5 m deep. At this depth, wastewater will be discharged into the soil below the fertile layer. Thanks to this, soil microliving creatures will not suffer from such a “neighborhood”.
To make drainage, the bottom is lined with gravel and sand. The thickness of the drainage layer should be 20-30 cm.
When creating a waterproof layer, you should not use clay, since during operation, as a result of the natural erosion process, it can simply break the drainage system.
To avoid shedding of the walls of the drainage pit, they must be laid out in several rows with bricks or decorated with used tires.
The upper part of the drainage pit must be tightly closed. The lid can be made from a wooden panel or a piece of sheet metal.
The technology for constructing a tire drainage pit is described in this article.
Types of heaters
Similar elements are divided into:
- “wet”, directly in contact with water inside the boiler;
- “dry”, not in contact with liquid.
Today, two different heater designs are distinguished:
- magnetic;
- flanged heating elements;
- steatite.
To determine the best element, you need to know the differences in designs. "Wet" is an open device. Its design contains a hollow tube, which is filled with a substance that conducts heat, for example, quartz sand. The “inside” of the heater is a nichrome wire spiral.
In the closed model, the heater is insulated by a sealed high-strength ceramic flask. For the flask, magnesium silicate is used, as well as a steatite element. Thanks to this difference in design, heat from the heating element is transferred through a cover in contact with water.
Private elements have the following properties:
- high safety, due to which short circuits are eliminated;
- ease of use;
- long working life;
- efficiency;
- can be repaired.
This is a firmly sealed nichrome spiral in a metal case.
The only disadvantages of these devices are the high price and low heating rate. It should also be noted that these elements require a moderate filling of the tank. You need to fill the tank a quarter so that the heater is completely immersed in liquid.
The advantages of open types of heaters include fast heating and low cost.
Operating principle of an electrode boiler
As can be seen in the figure, when the polarity of the current changes, the direction of movement of salt ions in water also changes. In this case, the electrode and the device body are used as contacts.
The operating principle of such a device is based on the electrolysis process, that is, the role of the heating element is played by water itself . However, there is one condition: for water to begin to conduct current through itself, the presence of salts is necessary. The more impurities in a liquid, the better it will conduct current. Charged particles of impurities or ions under the influence of electricity begin to move from contact to contact (electrodes). Since the current in a conventional electrical network is variable and its frequency is 50 Hz, the ions change their direction from electrode to electrode 50 times per second.
The home network has a constant voltage of 220 V, hence, based on Ohm's law, as the resistance decreases, the current increases. But water is still not a good conductor, unlike metals such as aluminum or copper, so as the current increases, it begins to heat up. Thanks to this, the efficiency of electrode boilers is close to 100%.
This simple diagram clearly shows the simplicity of the electrode boiler design.
As a rule, a standard boiler is cylindrical in shape. An electrode, also cylindrical in shape, is installed inside the latter. In this case, the first contact in the device is the electrode, and the second is the housing itself. Based on this, there is a need to ground the water heater, since current can flow through its body .
Characteristics of the heating element of the boiler
Open types of devices have the following characteristics:
- fastenings come in nut and flange types (stamped, cast);
- may not have anode fastenings;
- elements can be straight or bent in different directions.
Enclosed devices are safer because there is no risk of shorting.
The advantage of closed heating elements is:
- short circuit protection;
- low maintenance requirements;
- energy saving;
- possibility of placing several heating elements;
- duration of operation.
Tubular heater with a spiral pressed into the filler. This helix is made of wire that has high ohmic resistance and is connected to contact rods. The ends are sealed with sealant, and an insulator is installed between them.
They also produce finned heating elements, the shape of which is U-shaped. They provide a faster heating rate.
Conclusion
An electrode boiler is a good solution for dachas and country houses. Its installation does not require permits or a separate room, and its operation does not require increased safety requirements. You can make such a device yourself, but how practical it is is up to you to decide. Although the water heater has a very high efficiency, its use is still much more expensive than the operation of its gas counterpart . It is also worth noting that the ion boiler is demanding on the coolant and heating system. If you do not comply with the mandatory requirements, the device will work ineffectively and will last much less than the stated period.
Reasons for failure
The operating life of the heating device does not depend directly on the manufacturer. Anyone can purchase a low-quality part, but even the original one has a limit of strength and wears out over time.
The cause of breakdown is often water hardness . To prevent malfunctions, it is necessary to install special mechanical or chemical filters that soften hardness. This will extend the life of the heater.
It is important to know that failures are caused by untimely replacement of the anode, which protects heating devices from impurities and excess alkali. You can replace the anode for a water heater after checking its wear (checking should be done once or twice a year). If this is not done in a timely manner, the risk of tank or heater failure will increase.
<<< Read more. Magnesium anode in a water heater - what is it? What is it for?
Another cause of failure is caused by low voltage.
With a sharp increase in current strength, the core in the heating element overheats, and this often leads to burnout of the device.
One of the reasons for the breakdown is a faulty thermostat, which promptly sends a signal from the boiler control panel. If a failure occurs, the signal will not arrive on time, and this will lead to overheating of the heating element.
It is important to regularly diagnose the unit to extend its service life and prevent breakdowns.
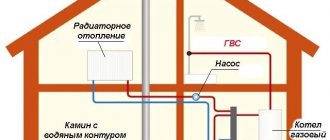
Operating principle and installation diagram
Before studying the drawings and starting to assemble the device, you need to familiarize yourself with its operating principle. It is based on accelerating the movement of ions in a coolant (salted water) under the influence of electric current. The use of physics allows you to save up to 40% of electricity, which significantly reduces the cost of heating your home.
We recommend using an extremely simple design when constructing a heating installation. The coolant enters a container with an electrode installed in it. It is better to use a metal rod of a certain diameter as an electrode attached to one of the sides of the container. The phase wire is connected to the electrode, and the neutral wire is connected to the outer surface of the housing. Connecting a boiler made independently to an electrical network with a voltage of 220 V and a frequency of 50 Hz leads to a chaotic movement of liquid molecules between the cathode and anodes, which in turn leads to heating of the water. Adding salt to water reduces the resistance of the conductor, which reduces the magnitude of the voltage surge when the installation is turned on. For the same reason, we recommend using an autonomous power supply if you make an electrode heating boiler with your own hands.
How to check the heating element of a water heater?
To perform diagnostics and check the unit, it is necessary to disassemble it. To do this, you need to remove and then pull out the electric heater and clean the scale. Then inspect the outer casing for cracks, various swellings and other external damage to the boiler casing. If these types of damage exist, the electric heater needs to be replaced urgently; it cannot be repaired. If there is no external damage, you need to check the device with a multimeter.
First of all, the integrity of the filament of this element is checked. For this purpose, a special tester is installed in the testing position. Then the terminals of the tester device are tightly connected to the contacts of the heating element. If the device scale needle is at zero, the device’s spiral is working. Otherwise, the heating device must be replaced.
At the same time, it is necessary to check the functionality of the boiler thermostat, for which the thermostat terminals are connected to the contacts of the heating device. If the multimeter shows a circuit, the thermostat is also working and there is no need for repairs.
Secondly, it is necessary to check the possibility of closing the spiral and the increase in resistance on the insulation.
To do this, one of the terminals of the tester is connected to any of the contacts of the heating element, and with the other contact end you need to touch the shell of the electric heater. If the testing device shows a circuit, then the internal spiral of the element is touching the boiler body and needs to be replaced.
Such malfunctions pose a risk of electric shock to the owner of the heating unit. If the diagnostics show that the device is working properly, you can check its other elements.
It is more reliable to check for breakdown with a so-called megger. Not everyone knows how to check the heating element of a water heater with a multimeter, although it is simple. The device terminal is connected to the lower end of the heating element, and the second one is connected to the body. The voltage on the device to control breakdown is 500 V. If the heater is in working condition, the resistance will be about 0.5 MΩ. When it is smaller, it is removed and replaced. If such a device is not available, it is replaced with a control lamp. After applying voltage, the lamp will light up, the device is operational.
All the described test options are the simplest and help to determine if there is a malfunction in the electric heater, as well as to repair it correctly. But if you lack diagnostic skills, it is better to invite a specialist for this purpose.
What you need to know about security
Do not forget that we are dealing with a source of increased danger - an electric heating device, therefore, when assembling and using it, you must follow some rules:
Be sure to use a separate electrical line to connect the induction boiler, and also equip it with a safety group.
- If water circulates naturally in the boiler, be sure to equip it with a temperature sensor so that if it overheats, the device turns off automatically.
- Do not connect a homemade water heater to an outlet; it is better to draw a separate line for this with a larger cable cross-section.
- All exposed sections of wires must be insulated to protect people from electric shock or burns.
- Never turn on the inductor if the pipe is not filled with water. Otherwise, the pipe will melt and the device will short out or it may even catch fire.
- The device must be mounted at a height of 80 cm from the floor, but so that about 30 cm remains from the ceiling. Also, you should not install it in a residential area, since the electromagnetic field has a bad effect on people’s health.
- Don't forget to ground the inductor.
- Be sure to connect the device through an automatic circuit breaker so that in the event of an accident, the latter will cut off the power from the water heater.
- A safety valve must be installed in the pipeline system, which will automatically reduce the pressure in the system.
Selection of a new heating element for the boiler
First, boiler designers install a heating element that is ideal for this model in terms of volume, size, operating mode, and software. But after 2-3 years, and sometimes 4, this heating device fails. And then you have to replace it.
Advice! Do not purchase a heater without space to mount the anode.
When choosing a heating element, you must be guided by the following rules:
- You need to look at the model of your boiler (indicated on a plate on the body or in the warranty card) and dictate it to the store consultant.
- Buy an electric heater based on technical characteristics (power, dimensions), dismantle the old one, rinse the tank, remove scale and install a new heating element.
If it is difficult to find a factory version of the heating element, or the owner does not want to pay for an expensive device, you should follow a different algorithm and find a universal heating element:
- Disassemble the boiler, remove the heating element from it, remembering how it was secured. Factory heaters are attached to the tank with a flange base or mounting nut. The new heating element will copy the strengthening scheme in the boiler. Otherwise it will be impossible to insert it.
- Clean the old heating apparatus from scale, remember the material of construction. Modern elements are made of stainless steel, sometimes copper. They are installed in boiler installations and “dry” devices. Their body is packaged in a flask made of ceramic material. To replace, you must choose a device made of the same material. Otherwise, the potential difference will accelerate the corrosion processes in the housing.
- Consider the shape with the dimensions of the water heater. Manufacturers of boiler systems supply them with straight or bent devices. Moreover, the new heating element model repeats, if not the shape, then the dimensions of the body of the old element. Otherwise, it will not be able to fit in the pipe or will rest against the wall of the boiler tank.
- Look in the boiler's passport data for the thermal power of the failed element. It usually varies between 1.5 - 3 kW. The new device must have the same power. There is no point in purchasing a more powerful device - it will definitely disrupt the control panel settings and also increase the power indicators.
Advantages and disadvantages of electrode heating boilers
We will compare electrode models only with other electric water heaters. Gas boilers will not be taken into account, which, of course, are much cheaper to operate, but require obtaining permits for their use, the availability of a project, gas and other special conditions.
So, ion boilers can stand out among their analogues in the following ways:
Electrode boilers are the smallest heating elements. Which does not affect their performance at all.
- they are compact, have a simple design, so they are well suited for use in dachas or private homes;
- the devices are not afraid of voltage surges, since the latter only affects the power of the boiler, but not its operation;
- ion water heaters quickly heat up and cool down, so it is convenient to use any automated room temperature control systems with them;
- they are safe, since even in the absence of water the device will not deteriorate, will not cause a fire or short circuit , it simply will not work (there will be no closed circuit);
- they have excellent efficiency, reaching 98%.
Disadvantages of electrode water heaters:
- knowledge in electrical engineering is needed not only to build a boiler, but also to calculate the parameters of the liquid, its electrical conductivity and the amount of impurities;
- Ordinary water, for example, from any heating system, is not suitable for operating the device, since such a liquid contains many free ions;
- air should not be allowed to enter the boiler, as this will accelerate the process of metal corrosion, thereby reducing the service life of the water heater;
- you need to monitor the temperature of the water in the boiler, since if it exceeds 75 degrees, this will significantly increase energy costs;
- when installing the device, it must be grounded, especially for homemade devices;
- The power of the water heater directly depends on the coolant ; high-quality and correctly made liquid can increase the power of the device and vice versa;
- they operate on AC power only.
You can use your electrode boiler as an instantaneous water heater by simply connecting it to the water supply system.
In addition, it is worth mentioning several features of the ion water heater:
- it can be used as a regular instantaneous water heater, and not just as a boiler;
- ease of assembly and installation, ease of repair have a positive effect on its popularity;
- very cheap, even if you buy a factory version rather than making it yourself;
- silent, has no impact on the environment or humans, does not emit toxins or harmful substances, so it can be installed anywhere.
How to clean the heating element from scale?
Lime-salt deposits on the device and inside the boiler tank are formed during prolonged operation of the device. Limescale has poor thermal conductivity. Therefore, energy consumption increases, as well as the water heating time. This reduces the efficiency of the heating device. The problem can be solved by cleaning the unit from the accumulated layer mechanically.
The initial algorithm of actions is as follows:
- disconnect the algorithm from the network;
- remove water from broiler tank:
- turn off the tap that supplies water, as well as the general valve that supplies liquid to the tank;
- put the end of the hose on the fitting;
- drain all water from the tank.
After removing the water, it is necessary to remove the tank tray by first unscrewing the screw fastenings. Next you should do this:
- the control board is removed;
- wires are released;
- The broken heater is removed from the tank.
Regardless of the water heater model, the procedure is adjusted. It is also better to photograph the sequence of removing the heating element step by step. Then, using the photographs, the device should be restored in accordance with the correct order. The mechanical cleaning method is carried out immediately, until the limescale has dried and is easier to remove. This is done with a metal brush, a knife and a wooden spatula, and then the residue is removed with sandpaper. You should also know that the level of heat transfer depends on the quality of cleaning.
The internal body of the boiler must also be cleaned of the accumulated layer. It is simply wiped with a rag, very carefully, without the use of chemicals. Experts believe that scale on the walls of the boiler tank protects it from corrosion and serves as insulation for the water that is heated in the device.
Upon completion of assembly, a check is carried out. Electrical wiring must be dried thoroughly, and the tank is hermetically sealed. If no leaks are detected, you can fill the heater to the top edge and then connect it to the network.
You can also clean old deposits on heating elements using chemical industry substances. For this purpose, a solution of concentration is prepared in an enamel container, the amount of which will be sufficient to immerse the heater in it. Cleansing is carried out for the duration of the product specified in the instructions. This is, for example, “Melon ZhS17”. This product is more suitable for the reason that its solution is absolutely harmless to rubber boiler components. It contains an inhibitor of corrosion processes.
Among other means, acetic acid is also used in the following ratio: a glass of vinegar essence per 10 liters of water. You can also use citric acid in the amount of a couple of packets per 2 liters of cold water. The heating device is immersed in the prepared solution for 24 hours.
The effect of the cleansing reaction is enhanced by heating the prepared solution for at least half an hour. When using the listed products, it is necessary to avoid getting the solution on the rubber sealing gasket. This will disrupt the elasticity of the gaskets and cause leaks. Monitoring the surface of the device will help determine when to remove it from the solution where it was lying.
Before returning the element back to the boiler, it must be washed with plenty of water and then wiped thoroughly. If the heating unit is installed correctly and connected to the water supply, there is a way to clean the removed unit. To clean the innermost body of the tank, which remains 1/3 full, the selected solution is poured through a hose connected to the drain hole. After this, the hose is raised above the tank level and fixed. After several hours, the filled solution is drained, the tank itself is washed, wiped dry and filled with clean water. After this, you can heat up the device.
This cleaning is done regularly and in a timely manner, which reduces costs and time.
Flushing
After the heating elements are removed, the boiler itself must be rinsed with clean water to remove all the rust and dirt that has accumulated inside. Therefore, for a quality replacement, the water heater still has to be removed from the wall.
Rinse the insides with an ordinary tap hose. Pour only a little water, since the boiler with a volume of 50-80 liters will still have to be lifted manually to drain all the scraps. Some people add citric acid when washing, others don’t.
Washing tip: It is best to rinse the tank in the bathroom, placing it vertically on a linen board. Twist the watering can from the mixer shower and insert the hose into the hole where the heating element was.
Boiler repair instructions: replacing the heater
To replace a failed heating device, you can dismantle it using the option already described above: turn off the water, drain it from the tank, remove the protective panel cover, after first disconnecting the device from the network. For such actions you need to have a screwdriver. Using a phase meter, you need to check that there is no voltage at the terminals, and then remove the heating unit from the mounts, disconnect the wires, you must first photograph the initial circuit in order to get rid of the problem of restoring it when installing a new device. Only after this can you unscrew the nuts securing the boiler. Simultaneously with replacing the heating element, the anode, which protects the heating unit from rust and corrosion, should be replaced. Only after this can new parts be installed. It is important that all contacts are dry. Otherwise, there will be a danger of a short circuit.
8.1 Replacing the heating element in an Ariston water heater
When the boiler fails, before disassembling it, you should:
- Check for grounding.
- Check the operation of the protection shutdown device.
If a malfunction of the electric heater and a decrease in functionality is associated with a fluidized layer, the device will have to be replaced. It is possible that replacing the element will be done at the same time as cleaning the inside of the tank. As with any boiler model, the main element must be replaced in the same order:
- disconnect from power supply;
- remove the protective cover from the thermal unit;
- check if there is voltage at the connecting terminals;
- remember or photograph the location of the wires;
- release the terminals;
- remove the thermostat and thermostat;
- turn off the taps;
- drain the water from the boiler;
- unscrew the nut on the fastening strip;
- pull the heating element inside the tank along with the anode and flange;
- clean the tank, wash it;
- if the heating element is in good condition, replace the anode and clean off the accumulated layer;
- replace the faulty component with a new one;
- change the anode;
- put everything back together.
After assembling the unit, a safety valve is installed to avoid unacceptable pressure levels inside the tank. A safety reducer is installed to avoid pressure fluctuations, as well as a check valve. It will retain the element if the water supply is cut off. It is better to play it safe by installing all safety measures, including child protection.
8.2 Replacing the heating element in a Thermex water heater
Not everyone can follow the long algorithm for replacing an element in Thermex exactly. But if you don’t have the funds to invite a specialist, you can do it yourself, strictly following the instructions:
- Drain the water from the boiler. To do this, first unscrew the nut of the hot water supply pipe, then unscrew the cold one.
- Remove the boiler from its bolted mountings and turn it over.
- Use a screwdriver to pry off the plugs and remove them. It should be remembered that the holes in the plate are not located in the center. In addition, there is a screw under the branded sticker, which not everyone discovers.
- Under the cover, unscrew the nuts on the flanges.
- Take out the pressure washer, which often has to be pryed off with a screwdriver, and first take a photograph of their position.
- Then pry off the heating element.
- There are more wires on the second flange. They need to be disabled.
- Unscrew the nuts, remove the washer and remove the heating element.
- Unscrew the electronics completely.
- Under the board you need to unscrew another screw.
- Remove the side cover.
- Pour water into the boiler and drain it. Repeat the action until the water is clear.
- Insert the new device into the hole, secure each flange of the water heater heating element .
- Put on the pressure washer and tighten it with nuts.
- A magnesium anode is screwed onto the second end of the heating element.
- Repeat steps 15 and 16.
- Put on the side cover.
- Insert the board back, and then the temperature sensors. Connect as photographed in step 5.
- Place the cover and tighten the screw that was under the sticker.
- Install the covers and attach them to the wall!
The law is what the drawbar is, where it is turned there and out
The design on YouTube is not illegal, but it is not very convenient. There is even less chance of setting it up correctly for use. Here are a couple of tips to help you do this somehow:
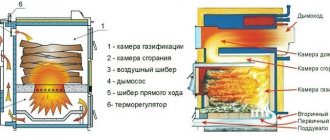
The radiator in the video resembles something from a car hood. There was no time to figure out what exactly it was, but the point is that you will need not just a coil, but just such a corrugated surface. This will significantly increase the efficiency of the device, on which both efficiency and gas fees (if there is a meter) ultimately depend.
This device is a gas instantaneous water heater, which should produce about 4 liters of warm water per minute. It’s easy to calculate how much power it should have for this:
N = A / t = (4200 x 4 (45 - 8)) / 60 = 10.36 kW, this is the power achievable for a factory gas water heater. You can only find out if you can make an appropriate heat exchanger at home by trying it.
The device itself is a coil, which is connected at one end to a cold riser, and at the other to a shower head or mixer. The flow is regulated by a valve. In this sense, you will have to use an old cast-iron tap at the inlet or a bronze tap at the outlet of the coil. The radiator is placed on the hob grate and heated by one or two burners. It is clear that the hose must be heat-resistant, otherwise various unpleasant consequences are possible.
An adult must supervise the operation of the device and, in case of danger, turn off the supply of blue fuel while someone is washing or doing the dishes. A gas water heater or an electric water heater is much safer from this point of view. I would also like to add that even purchased equipment needs to be configured, which means that the intervention of a qualified technician will be required. Sometimes a set of jets (injectors) needs to be replaced, in other cases a reducer is installed in the gas supply path. In the latter case, the system resembles traditional propane-butane power supply.
Multimeter models
It doesn't matter which tester or multimeter you use to diagnose the heating element. There are digital and pointer models, and their cost does not in any way affect the quality of the test. The main thing is to use working equipment to check the heating element.
It is also worth paying attention to the integrity of all wires coming from the multimeter probes to the device itself. If you use a multimeter for work purposes, and not for home repairs, then to check the heating element’s functionality, you must choose a model equipped with a special signaling device. Using such devices, you can determine the integrity of the electrical circuit using an audible signal, without being distracted from the immediate repair.
The simplest solution would be to replace the heating element with another element, the serviceability of which you are absolutely sure of. To do this, turn off the electric heater and remove the device for diagnostics. A new heating element is installed in its place, preferably of the same brand.
If there is no spare heating element in the house, you need to use a digital multimeter. The heating element is removed and the multimeter is connected to the outputs of the heating element. If the norm deviates or the indicator light on the multimeter lights up, we can conclude that the heating element is fully operational, which means that the cause of the malfunction and improper operation of the water heater must be sought in other parts of the device.
If the above testing methods did not help determine the serviceability of the heating element, you can “ring” it using a multimeter. To do this, you need to set the “ring” to a certain value and then, by connecting multimeter probes, check it. Most often, the multimeter readings correspond to the minimum, and if there is a built-in sound signal, the tester will start beeping.
Next, you need to test the heating element for performance . Multimeter probes are attached to the contacts of the heating element, and when they are touched, resistance readings appear on the tester: for example, 0.37 or 0.71. If you see one on the left side of the screen, it means that the coil in the heating element has broken and the heating element needs to be replaced.
There is another way to check: you need to remove the heating element from the water heater and moisten its copper tubes with water. Place one probe to the tube, and the other to one of the outputs. If the heating element is faulty, the device will show an overestimated or, conversely, a minimum value. If it is working properly, the tester shows one!
Advice: if you have any doubts about whether you can correctly remove the faulty heating element and install a new one in its place, then contact a professional. When checking and repairing the water heater, be sure to follow all safety rules to avoid dangerous situations!
Non-standard diagnostic methods
If it is impossible to use any of the methods, try connecting the wire and plug to the output of the spiral and the electrical network. A working heating element begins to heat up. To check the resistance of the insulating filler, one of the ends of the cable, with the plug disconnected from the network, is disconnected from the output of the spiral. Reassemble the circuit, including a 5 A fuse. Insert the plug into the socket and observe the operation of the system. If the fuse does not blow within several hours, the heating element is operational and there is no short circuit with the housing.
Other methods are also used to check the heating element. For example, you can ring the heater using a landline phone. The cable connecting the phone to the network is connected to the contacts of the spiral. If there is a signal in the tube, the heating element does not require replacement. You can call a landline from a mobile phone. The presence of a bell indicates the integrity of the spiral.
Tips and tricks for checking the heating element yourself
When using the device for a long time, it is necessary to evaluate the performance of the heater even in the absence of signs of failure. The following preventive measures are also carried out:
- repeated rinsing of the tank with water;
- replacement of anodes;
- cleaning the heating element with vinegar, a special product or citric acid.
If the water is too hard, scale forms on the boiler elements in contact with it. The service life of the part is reduced to 3 years. In the absence of inspections and maintenance, the following problems arise:
- poor operation of the RCD;
- turning off the water heater control unit;
- malfunction of the safety valve.
In most such cases, the heating element must be replaced.