Let's look at what a window sill is, why it is needed and how to install it. We will also analyze what characteristics this element of the window structure should have, what types there are and some features of window sills.
What is this structural element of a plastic window?
A window sill for a plastic window is a structural element in the form of a flat sheet that is placed on the lower part of the window opening at the same level as the frame (sometimes under it). A correctly installed plate serves as an additional barrier to the formation of cold bridges.
This device increases the layer of air near the window, which helps regulate the temperature. The window sill protects the room from moisture entering through the joint between the window and the opening, and is also used as a decorative element that covers this joint and the surface of the wall.
In some cases, this canvas can be used as a separate workplace (for example, to make a smooth transition to a table) or used as a shelf for accessories and flowers. The window sill helps to maintain the window, as you can lean on it or stand on it while changing curtains and washing windows.
Reference! Also, the window sill can have a kapinos (rounded edge) on one or both sides along its entire length. This element is used more for decorative purposes, but additionally protects the edge of the opening from accidental destruction. Kapinos is used to visually increase the thickness of the window slab, which makes it possible for a wider choice of design solutions.
Selecting masonry type
In most cases, the master has to choose from two options:
- Along the area around the window.
- Perpendicular to it.
The dimensions of the base should be taken as the basis for choosing the type. It is necessary to minimize unnecessary trimming of materials. To adjust the die to the dimensions, use a regular type of glass cutter.
After determining the location of the incision, the area is marked with markers. Cladding should only be carried out on a smooth surface that is firmly fixed. Otherwise, you will not be able to trim the marked marks.
You should not be afraid to press hard on the laid material. If you press weakly, then there is a chance that the tile will not press through.
To do the job carefully, a rubber hammer will help, which should be used to slowly tap ceramic products in places where there is a potential cut. As an alternative to a hammer, you can use the handle of a spatula. But you should wrap it in something soft (for example, a towel) in advance, otherwise there is a risk of damaging the product.
The selected part must be broken off with a sharp and forceful movement. If you are not sure that the process will be like this, it is recommended to use an angle grinder. It will save time and physical effort.
Requirements from state standards
The basic requirements and recommendations for window sills are specified in GOST 34378-2018, as well as GOST 30674-99. These documents mainly contain requirements for window structures, but also mention window slabs.
The standards state that:
the window sill must be secured to the window block with a hermetically sealed connection that can withstand deformation;- the width of the window slab should not be less than 50 mm, but at the same time overlap the depth of the heating devices by no more than 2/3 (if this is not indicated in the working documentation);
- if the window sill is larger than this width, then it is necessary to make ventilation holes in it that will give access to warm air to the window;
- the angle of inclination to the room should not exceed 1%, and the horizontal position along the length of the slab may have a skew of no more than 0.5%;
- the window sill should extend into the slope on both sides for a short distance;
- The installation height of the window sill is not regulated in modern SNiP, but usually during installation they are guided by the Soviet standard of 68 cm (radiators were 50 cm high), most often these figures reach 75-80 cm;
- the service life of this element should be about 40 years (although some manufacturers neglect this in order to save money);
- the finish must be specified in the technical documentation, since its parameters affect the durability and security of the window.
Window sill with increased functional load
When performing designer renovations in a small kitchen area, it is advisable to install a window sill, which will significantly increase the working surface. This technology is conventionally called “tongue”, when the window sill is significantly extended into the room and serves as a table.
Window sill “tongue” allows you to increase the working surface in the kitchen
Note! In order to significantly save money, you can finish the slopes and window sills with PVC materials with your own hands. In this case, you need to take into account that you will need to use a set of power tools, and you also need to have at least minimal practical knowledge of all repair processes.
Types of elements for PVC structures
The difference between window sills for plastic windows most often lies in the type of material from which it is made.
The most common are:
- PVC panels, which are made using technology similar to the profile.
The polymer itself needs external finishing. When using high quality materials, it is protected from fire, moisture, ultraviolet radiation, and mechanical damage. The service life is up to 40 years, but on average 8-10 years without major changes. New stoves may emit an unpleasant plastic odor when heated. In some cases, it is covered with a special laminating film, which is both protection and a design solution. - An acrylic window sill consists of artificial stone (mineral filler, acrylic resin, decorative color pigment).
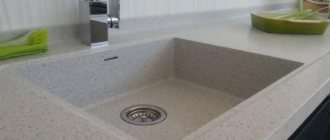
It has high strength, can withstand the weight of a person, and is also completely smooth. This material is protected from moisture, mildew, mold, high temperatures (within reasonable limits, for example, a lit cigarette or a hot frying pan), and does not fade. The surface of the acrylic window sill can be scratched and will show handprints, but it can be easily wiped off or sanded. Service life – up to 15 years. - A stone slab as a window sill is similar in characteristics to acrylic, but has a more beautiful texture. Service life – up to 30 years.
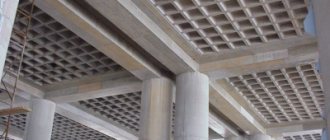
- You can make a concrete It is highly resistant to damage, temperature, fungi and mold. Service life – more than 15 years. This surface can be used as a work area, kitchen table or small sofa.
- Laminate is most often used for finishing slopes, but when using material of class 32-34, you can make a stable coating for the window sill. Service life up to 10 years.
The wooden board has an attractive appearance, as well as high strength (with sufficient thickness).
This material is used as a window sill for design purposes, but due to the fact that wood does not conduct heat well, such a panel will provide additional protection against the formation of cold bridges.The disadvantage is that this material requires additional care and processing, since in its “naked” form it absorbs moisture well, and is also a place for the formation of fungus or mold. Service life is 10-15 years (depending on care, it may be more or less).
- Plywood can be used as a temporary option as it is not resistant to moisture or fire and is also low in strength. Used because it is cheap. A more durable analogue is MDF or chipboard, which is covered with decorative film.
- Drywall is also used in some cases to make a window sill, but it requires additional finishing. Most often this material is used as a base for tiles or mosaics.
- WPC (wood-polymer composite) is a combination of wood chips and PVC. If manufactured correctly and the proportions of materials are observed, such a window sill will have low thermal conductivity, good strength, and also an attractive appearance. Service life – 10-15 years.
Important! Metal analogues are rarely used for residential premises. Most often, they are installed in factories or enterprises, as they are highly resistant to temperature changes, as well as protection from mechanical damage.
You can also learn about which window sill to choose here.
Advice from experienced masons
The cladding process will not be difficult if you pay attention to the following factors:
- Surface condition. The base must be complete. If during preparation you find cracks, large scratches, chips, empty spaces, etc., then the problem should be corrected. If you ignore these nuances, the finish will not be of high quality. The tile can simply crack.
- Choosing a base. A concrete base will ensure the durability of the structure and high quality of finishing in general. It will lie on any surface (wooden or plastic) without any problems.
- Surface condition. After checking the area of work, you need to make sure that it is firmly fixed in the opening and will not “ride” during installation.
- Choosing the tile itself. The most important aspect. The type of masonry and the complexity of the work depend on the size of the tile. The diagonal of the tile is selected based on the size of the base. If it is not large, then it is recommended to go with 10x10 or 15x15 tiles. This will eliminate the need for cutting and will give the surface a more attractive appearance. If the dimensions of the base allow you to choose a larger tile, then you can think between 30x30 or 40x20 centimeters. Any store has a wide range of products, so choosing a model is not difficult.
Installation begins only after a new double-glazed window has been installed and the external type of drip has been correctly installed.
Characteristics
There are no standard window sills, since even in a typical house, the length of the slab for different openings can differ by up to 10 cm. The width also differs for different windows, since different heating equipment may be used in different rooms, the design may change, or a PVC frame of a different width may be installed. .
Therefore, to install the window sill, individual measurements are required. But the fabric is most often made from a standard board, which has a certain size.
Let's look at the example of PVC slabs:
- the length of a typical PVC panel can be from 150 to 600 cm. For a window sill, it is cut to the required length;
- the width of the blade varies from 100 to 700 mm, and the typical size changes in increments of 50 mm (100,150,200...700);
- PVC window sill thickness – from 13.5 to 20 mm in the thin part and up to 40 mm in the presence of capinos;
- the internal space of such a slab has cavities (chambers) similar to a window profile;
- The appearance of such a slab depends on the chosen coating. It can be smooth, textured, any color or with a different pattern, for example, imitation wood.
Treatment
Upon completion of the sanding stage, the countertop must be treated with various compounds.
First of all, an antiseptic to protect against mold and mildew. adjacent to the battery, which is poorly ventilated, and in the event of moisture formation, becomes an ideal place for fungi, should be subject to such treatment
The processing technology is chosen by the owner; the wood under the window can be treated with wax or mastic and an external varnish coating. These compounds preserve the natural grain of the wood and at the same time further increase its service life because they protect the wood from moisture.
Installation technology
the installation of a window sill made of stone or acrylic to specialists, since this material is expensive, and if installed incorrectly or with insufficient skill, it can crack. For products made of plastic and wood, much practice is not required, but its installation can also take time and cause problems.
To install a window sill you need:
After installing the window, clean and level the surface on which the window sill slab will be laid.- You need to cut the slab to the required size, taking into account the space in the slopes where the window sill board should go.
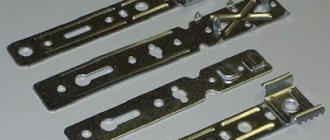
- On the window support profile, you need to secure Z-shaped brackets with self-tapping screws in increments of 30 cm.
- Place the window sill into the grooves on the slopes and secure its edge to the brackets. The plane of the slab should extend beyond the bottom of the frame;
- Level the board using wedges that need to be hammered between it and the window opening.
- Blow out the cavities under the slab with foam. It is necessary to wet the surface of the board and concrete so that the foam expands more smoothly. This will prevent her from bending the window sill.
- Seal the joint between the frame and the slab with silicone sealant.
- Until the foam dries, you need to keep the window sill under pressure from above (put something heavy).
- Finish the walls around the slab, and close its edges with plugs (if it is a PVC model).
Attention! When installing a window sill, you must maintain a distance between it and the heating system (15 cm or more) so that warm air can circulate normally and the stove itself does not overheat.
The video below also talks about how to install a window sill with your own hands:
The article reveals in more detail the topic of installing window sills.
Main scope of work
We proceed to the most important procedures in this order:
- We install slats around the perimeter of the opening using self-tapping screws (9.5 cm). It should stand flush to the wall, that is, not protrude beyond it. We check the verticality with a level or plumb line - it must be ideal without errors. For proper alignment, use a corner.
- Then, using bugs (0.45 cm self-tapping screws), we stuff the starting strip onto the inner edge of the opening (which is closer to the frame). First, it is recommended to make markings: using a level, draw two verticals and one horizontal, and then make the installation using them. You can cut the strip with metal scissors or a hacksaw. Make sure that the inner edge fits as tightly as possible.
- The dirty part of the work is completed, so you can tear off the protective film from the frames (if any).
- Next, cut the F-shaped strip. Take the height of the opening, add 5-10 cm to it and cut it off. On the resulting piece, we cut off the grooves in the part that is above the slope (that is, on the 5-10 cm that was originally left). Excess is removed later if necessary. Having fixed the stripes, we shoot them using a self-tapping screw. The staples need to be driven in where the rail is - that is, on the edge.
- The platform for installing the panel is ready. If necessary, at this stage you can insulate the slope with some insulating material. We recommend first gluing heat-reflecting foil to the surface and mineral wool to it.
- Next, we cut three panels strictly to size (if this was not done for us in the store). Don’t forget to make the vertical posts a little shorter—to the thickness of the plastic. This is necessary so that the upper part is installed directly on them.
- Having cut and tried on the racks, we insert them into the corresponding grooves. Before this, you can apply some kind of glue (for example, liquid nails) to the inner surface - this will improve the fit to the heat-insulating material.
- Finally, seal all the cracks with silicone sealant.
- We glue the edges (external and internal) with a special corner.
Insulation
To insulate the window sill, instead of foam (or together with it), an additional layer is laid under it, which will protect the slab from the cold. The most commonly used is polystyrene foam or a type of insulating wool (mineral, basalt, fiberglass).
Window sill insulation is necessary in order to reduce temperature changes in the slab, as well as reduce the formation of cold bridges. In some cases, this procedure is necessary to prevent the formation of condensation, mold or mildew.
This article explains more about the insulation procedure.
Photo
The template is outlined in pencil
Assembling the rack template
Dimensions must be taken with maximum accuracy
The edges of the window sill go into the wall
On the other side
Check the level
Causes of cold despite insulation
In some cases, the window sill may be cold even with insulation. Most often this happens due to incorrect installation.
The stove may also be cold due to:
- blowing through the installation seam, which could have worn out over time or due to improper installation of the window;
- insufficient heating, for example, due to improper operation of radiators or low power;
- incorrectly selected material for the window sill. Most often, such a stove will be cold if it is made of metal or stone.
Other reasons for cold window sills are discussed here.
Why finish window slopes from the outside?
Many people believe that after installing plastic windows, the repair ends. However, in most cases, builders do not consider it necessary to finish the outer part of the window opening, believing that this is a waste of time and money.
You should know that finishing plastic windows on the outside helps prevent serious problems from arising.
If you leave everything in an unfinished state, the window will look very ugly. Over time, untreated slopes can make the openings leaky. The polyurethane foam will gradually begin to deteriorate under the influence of wind and sunlight and crumble, periodically falling out of the opening.
As a result, there will be a lot of draft through the window. In addition, birds can use polyurethane foam to create their nests. To prevent all this from happening, you should know how and with what help they finish windows from the outside.
When is repair needed?
Most often, repairs are needed when there is a significant change in color, traces of paint and tape, scratches, holes or cracks. Most of these defects can be corrected using:
polishing;- chemicals, for example, Domestos or regular bleach;
- You can erase traces of tape with an eraser or sunflower oil, and paint with solvent;
- cracks can be sealed with putty, sealant or liquid plastic;
- in some cases, the surface of the window sill simply needs to be sealed with laminated film.
More information about window sill repairs can be found here.
Installation
When the base is ready, you can begin the installation of the wooden window sill. Typically, this process is carried out using a cement mixture. That is, it is necessary to prepare a certain amount of cement-sand mixture. Here we can say that there should be enough solution so that it hides the upper planes of the wooden wedges used to level the plane by 3–5 mm. After this, the wooden window sill is laid on top and pressed down. Excess solution is simply removed with a spatula.
When is dismantling and replacement necessary?
Dismantling and replacement may be required when:
- severe deformation or destruction of the old slab (for example, an old wooden panel that has begun to rot);
- dismantling may be required if you need to insulate the window sill;
- replacement with a newer stove or due to a change in the design of the room;
- when reinstalling windows to others;
- for carrying out construction or restoration work for a window opening.
You can read more about dismantling and replacing window sills in the article.