To build a smooth brick wall, you will need not only certain skills or a team of builders, but also devices for laying bricks. Such tools and templates will allow you to do the work faster and with better quality. They can be purchased in stores or made independently. Let's look at the most commonly used devices for making brickwork.
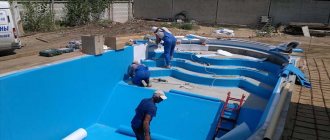
Using a cuvette Source dom-i-remont.info
Making a template
The template can become a very useful and effective device for quickly laying bricks.
You can do it yourself. Of course, you can purchase ready-made models at a hardware store. As a rule, such products have the ability to adjust all dimensional parameters. If you want to save money, then it is better to start making your own template. First, you should focus on the basic geometric parameters of the masonry joint (meaning height and width). In this case, much depends on the material used in construction. Based on the laying technology and the blocks used, the dimensions of the template niche are determined.
To build the template you will need:
- a plastic box of appropriate size (or a sheet of plywood);
- pencil;
- level;
- ruler;
- drill (it is better to use an electric tool - working with it is more convenient and faster);
- fasteners;
- special steel corners;
- screwdriver;
- screwdriver;
- hammer.
If you were able to find a suitable plastic box, then making the template will be much easier
In addition, plastic itself is a more durable and strong material, but at the same time quite light, which is very important when carrying out masonry work. If you don’t have such a tank, then you can make a model of the required dimensions yourself from laminated chipboard sheets, plywood or slats
The design must consist of several main components.
- Frame with longitudinally arranged wooden walls. The space between the wooden planks should correspond to the thickness of the wall. Since these planks will have lower parts protruding forward, they will be convenient for aligning the bricks during laying.
- Handles for carrying. Thanks to these details, using the device will be much easier and more convenient.
- Cross parts. They are mainly made from special strip steel. This element makes it possible to control the linearity of the masonry.
Device creation technology
A dispenser for applying mortar when laying bricks can be purchased at a hardware store. At the same time, in practice it always turns out that it is not currently available for sale .
Wasting time searching is ineffective, since there is no guarantee that you will be able to find it in any other store. Usually they immediately start making a homemade dispenser, especially since there is nothing complicated about it.
Required tools and materials
To make a dispenser you will need:
- Plywood, chipboard or wooden slats.
- If available, you can use a plastic tray of the appropriate size. It is more convenient for working with the solution, but it is more difficult to find similar material.
- Electric drill with a set of drills.
- Fastening elements - screws, bolts with nuts, etc.
- Screwdriver.
- Square, ruler, pencil.
- Steel corners.
- Hammer.
- Screwdriver.
The set of tools or materials can be expanded or reduced depending on the complexity of the selected design and the capabilities of the user.
Dispenser design
The device is an oblong rectangular frame. The internal space has a width equal to the optimal width of the solution layer . Since bricks of different widths can be used, you can either make a customizable gap between the planks, or simply make several similar devices for different standard sizes of material.
The frame laid on a brick row should not fall down, which is ensured by the distance between the side planks being several millimeters smaller than the width of the facing brick.
The thickness of the frame corresponds to the thickness of the solution layer - optimally 10 mm . The crossbars at the edges should be raised above the plane of the guides so as not to interfere with the movement of the frame in any direction when a layer of mortar is applied.
Stops are installed on the lower part of the guides to ensure the position of the frame relative to the row of bricks. If they are of sufficient length, these stops can additionally help align the masonry vertically.
The stops are installed in such a way as not to interfere with the movement of the frame along the row of masonry, for which a small gap is made.
Assembly order
The simplest dispenser is assembled as follows::
- The longitudinal guides are connected by two transverse strips along the edges on the left and right. When connecting, several washers are installed under the slats to raise the crossbars above the plane of the frame. These crossbars simultaneously serve as handles for moving the dispenser.
- The distance between the longitudinal guides is made 10 mm smaller than the width of the brick (for a single facing brick this will be 110 mm).
- Metal corners are installed on the reverse (bottom) side of the guides, which serve as stops for adjusting the position of the frame. At the same time, you can make the distance between them unchanged, or move the corners apart a little further and install screws that serve to fine-tune the position of the stop. With the help of such screws you can achieve a certain depth of the seam, which looks very stylish and professional.
Read also: How to find out how many volts a zener diode
is If plastic strips were used for manufacturing, then no special preparatory steps are required. If wooden slats, strips of chipboard or plywood were used, then before starting work you will need to apply several layers of hard varnish (NC or parquet) to the device, which can protect the material from contact with water .
If this is not done, the wood will quickly swell and change its size, which will disable the device. You can use drying oil or similar compositions instead of varnish, but they will take a lot of time to dry, which is not always convenient.
DIY making
Many hardware stores offer various kits. However, sometimes it is difficult to find something that would fully satisfy the needs of the master. Therefore, many take on the task of making the necessary tools themselves.
To make a level, just find a good metal cylinder, preferably with a sharp conical nose, and tie it to a thin, strong cord. A long, straight strip or board is ideal for checking the evenness of the wall. For convenience, a handle is placed on it in the middle part.
The more difficult situation is how to apply an even layer of mortar to the next row. To do this, make a template for brickwork.
Here is a step-by-step diagram of its manufacture:
- Prepare materials for work and tools.
- A frame is made from slats. Its width should be such that it fits tightly onto the brickwork of the wall being built. To do this, the longitudinal strips should protrude 5-10 cm compared to the transverse ones.
- The cross-bars are made equal in height to the height of the applied layer of solution. For a brick wall of one and a half bricks, this is 10 cm.
- For convenience, handles are nailed to the sides.
- To protect against corrosion, the product is coated with parquet varnish and cleaned regularly after use.
This is interesting: how to use a water level correctly.
The use of simple devices greatly facilitates the work of a mason and helps to make the result of his work better and more reliable. Having spent a little time and effort purchasing such equipment, a novice master will be able to master the basics of the art of bricklaying much faster.
Adviсe
- When making a template, it is advisable to immediately lay down a seam thickness of 10 mm. One is ideal for laying walls of one or one and a half bricks.
- To ensure that a wooden or plastic template lasts as long as possible, its most worn surfaces can be protected with wear-resistant parquet varnish. The composition is applied in several layers on the surface of the dispenser.
- After completing the work, all tools must be regularly cleaned of the construction mixture, otherwise they will very quickly become unusable.
Important: the time or money you spend on making auxiliary tools is more than compensated by the quality and speed of masonry work.
vote
Article rating
How to work with a template? Price of sets.
The set is easy to use. The main template is installed on the already finished row of bricks. Thanks to the presence of stops in its design that prevent movement across the wall, as well as the fixed thickness of the seam, the device ensures horizontality and stable layer thickness. Naturally, this is only true if the supporting (previous) row of bricks is made carefully and accurately. The frame cavity is filled, as a rule, with a trowel, although any suitable tool can be used - a spatula or scoop. The end dispenser is most often filled with a trowel, since the volume of solution that is enough to fill its cavity is small.
https://youtube.com/watch?v=oZruyWJrQL8%3F
Using the kit is intuitive, and anyone will quickly get used to working with it. It must be remembered that the use of the kit does not exclude masonry quality control using levels, plumb lines and mooring cords. The template only helps to obtain a high-quality seam and you should not rely only on it when controlling the geometric parameters of the masonry.
There are several advantages of such sets:
- it becomes possible to quite accurately calculate the required amount of solution;
- materials are used to greater advantage;
- the quality of the seam is good even for an inexperienced person;
- simplicity and ease of use;
- the speed of work increases noticeably.
The price of a set of masonry templates is low - the set is available to everyone. The original “Brick” set costs about 1.5–1.6 thousand rubles; there are also cheaper analogues that sell for 500–650 rubles.
Briefly about the main thing
Various tools are used to perform brickwork. For a professional mason who has laid thousands of bricks, a trowel and jointing is enough. However, to control the quality of work, a plumb line and level are necessary. A novice builder will need templates. There are enough of them for every taste. Templates for double, single and finishing bricks, for straight and end seams are available for sale. Conductors simplify the laying process, making it smooth and neat. Anyone can purchase the necessary equipment or make it themselves.
Properties, sizes and types of bricks used for cladding
Material used for cladding
To decorate the interior or facade, you need to pay great attention to how to lay facing bricks. If we compare, for example, with a working solid brick, then it should have a high-quality front side of various shades and colors
In addition to the commonly found standard colors (yellow and red), you can choose bricks in other colors. The front part can be smooth or decorative.
But the main difference between the cladding material and the simple one is the ideal dimensions, ends and right angles. The front side should not have various chips or deformations.
Main assumptions in dimensional deviation, in mm:
- length – 4.4;
- thickness – 2.3;
- width – 3.3.
There are simple and clinker bricks for cladding; they are also distinguished by durability and quality. Simple water absorption is much higher, which is due to the large number of pores. Double sand-lime brick M 150 is often used.
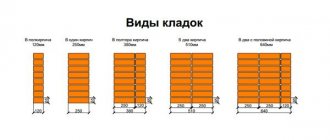
Main dimensions of facing (decorative) bricks, mm:
- ordinary – 250 X 120 X 65;
- narrow – 250 X 60 X 65;
- thickened – 250 X 120 X 88; 250 X 107 X 65; 230 X 107 X 65.
How to grout masonry joints
Brick jointing is required when restoring old walls. The technology may be associated with the execution of jointing in one color. Very often the mixture differs in color in different areas.
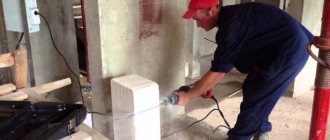
First, the surface of the dry mortar is cut to a depth of 1-1.5 cm using a hammer and chisel. After this, all its remains are removed. Cleaning should be done not only at the seams, but throughout the entire masonry. In order for the treated surface to look beautiful, the wall should be cleaned of dirt before grouting.
You can simplify the task if you blow out the cracks using a compressor unit. This will remove even the smallest crumbs and particles so that the fresh joint has the best adhesion. To prepare for the procedure, you will need a sharp, reliable instrument. This is the only way to remove excess mortar from the surface so as not to destroy the brickwork.
Next, all seams should be moistened with water and the jointing procedure should begin. There is no need to moisten the entire surface at once, since you can limit yourself to a small area that will need to be addressed in the next 1.5-2 hours.
In the store you can purchase ready-made grout or dry grout, to which pigments or plasticizing additives have been added.
When choosing a solution for jointing, you need to pay attention to its base. The seam can be processed using the following types of materials:
- cement;
- epoxy resin.
If you prepare the mixture yourself, then such a composition will be inexpensive. The simplest material used for grouting joints is a solution prepared from 2 parts of lime and cement, taken equally. You will also need fine sand in the amount of 10 parts. You should not mix too much of the composition, since its pot life is about 90-120 minutes.
For another recipe, recommended by experts, you will need to prepare ground volcanic traces and 5 parts of sand, which will serve as a filler. This composition is suitable for treating walls that have efflorescence and whitish stains from the seams. The prepared solution must be stirred until it has the consistency of liquid sour cream
It is important that it does not spread, but stays in a lump on an inverted trowel
Recommendations for laying facades
How to lay brick under jointing
Let's figure out how to lay facing bricks correctly?
- For proper facade cladding, make vertical shrinkage and expansion joints on the wall every 4-5 meters along the entire height of the building.
- It needs to be dried for as long as possible.
- The rows are first laid dry to identify non-standard products.
- In the first row, the bricks are laid vertically. Such a row is made from whole products from below and above the wall, also on protruding parts, at the level of cut pillars and walls, under the supports of load-bearing structures (load-bearing slabs, beams, etc.).
We also recommend laying a row of vertically laid bricks every 4 horizontal ones.
After 3-4 rows, be sure to connect the load-bearing and facing walls with reinforcing mesh with a diameter of 2-3 mm, and the corner elements with anchors with a diameter of 6 mm.
- Seams - no more than 1.5 cm thick.
- Do not allow moisture to get on the material during work or on the finished wall. The top of the wall is covered with moisture-resistant material.
- To prevent the building material from getting wet, the laying is done using a hard mixture.
Brickwork under the template
Place a brick under the template
A layer of mixture having a thickness of 0.8-1.0 cm is laid so that about 1 cm remains to the front edge of the brick - it is placed under a template (a wooden strip 600 mm wide and 0.8-1.0 cm thick, which has there is a longitudinal protrusion at the bottom. This protrusion rests on the façade side, and the mixture is laid on it.
Today, a template for laying facing bricks is most often a calibrated metal rod (laying on a rod) with a square cross-section. The solution is made thick so that it does not spread under the weight of the building material.
The mortar is also fixed on the narrow edge of the brick: it is placed vertically on a horizontal surface and a cement-sand mixture is applied to it under the template, after which it is divided with a trowel between adjacent bricks and laid in a row of masonry.
Cost of factory products
For large volumes of work, it is advisable to consider the possibility of purchasing a finished product. It is most often sold as a kit. For example, the “Brick Set” consists of:
- “Brick” template - used for laying the mixture on a horizontal row (bed);
- template “Brick” - used for a single block measuring 65 mm;
- template “Brick” - for one-and-a-half bricks measuring 88 mm;
- Corner "Mason" - mounted on the outer corners of the building; in addition to controlling angular parameters, it is used to fix the mooring cord;
- mason's trowel;
- video material with lessons on the use of the device and the basics of masonry.
The main elements of the dispenser are made of high-strength plastic. The average market price is 1500–1900 rubles per set.
Sequence of the jointing procedure
Before preparing the grout, you must read the product instructions on its packaging. After this, you can begin making vertical seams. The composition must have the following properties:
- softness;
- plastic;
- density.
If the grouting solution is made liquid, it may flow through the masonry. Having made all the preparations, you can begin to carry out the work. To do this, you need to perform a series of basic steps:
- Use a trowel to apply a layer of grout so that it is larger than required to fill the joint. To prevent the bottom row of bricks from getting dirty, you can use a plasterer and place it in the right place.
- Remove excess mixture with a rib, smoothing the surface with the most suitable hand tool.
- Press down each seam firmly so that the space between the grout and the old mortar does not have any voids.
- Process horizontal rows using a strip, under which you will need to draw a straight line, like under a ruler.
- After completing the jointing of the brickwork, its front side will need to be cleaned of traces of mortar using a stiff brush.
- While the mixture is gaining strength, care must be taken to ensure that it does not dry out or get wet in the rain.
The special jointing used after the solution has set can be replaced with a piece of hose. Each seam should be smoothed and compacted slightly, pressing the compound 2 cm deep if necessary.
After summing up all the results, it is necessary to take into account some additional points, without which the jointing will not be of high quality:
- carry out the procedure in cloudy weather when there is no precipitation;
- start jointing with vertical rows.
The main advantage of jointing is considered to be an increase in the heat and sound insulation parameters of the wall. The jointing procedure allows for a high level of protection of the masonry joint from the influence of moisture on the wall surface. Brick laying under jointing is not only easy to use, but also durable when compared with a plastered surface.
Required additional tools
Auxiliary devices will be needed if you need to create a seam of an atypical shape. It will not be possible to make such a line using jointing alone. The exact set of tools is determined by the technical condition of the brick wall, but the most widespread set will consist of the following assistants:
- hammer;
- concrete mixer;
- chisel;
- electric drill;
- triangular trowel;
- soft-bristled paint brush (or roller);
- Kratsovka;
- brush with hard steel bristles.
A chisel, which is struck carefully with a hammer, will help clean out the old mortar from the joints. If you don’t have such a tool, you can replace it with a hammer drill
Making grout most often requires a drill and a mixing attachment. This component makes it easier to mix the solution.
A concrete mixer is not particularly needed if the scale of work is small. The trowel helps both in removing excess mixture and in applying it. Wall cleaning is carried out when the grouting and grouting itself has already been completed. A flute brush is often used to wet the stripes. A wooden strip 1 meter long is used to support the tool. The reservoir where the grout is prepared must be deeper than wide - otherwise the solution will set very quickly.
Cement mortar as the basis of brickwork
Brickwork diagram: a - leveling the mortar, b - spreading the mortar.
Separately, it is necessary to say about the cement mortar; it should be a little hard, that is, not contain too much water in its base. A standard solution involves using one part cement, three parts sand and two parts water. In our case, a little less liquid is needed, otherwise the ready-made solution poured into the template for laying bricks will not be able to take shape, but will simply flow out of it. In addition, the best option is to use a concrete mixer, which will perfectly mix all the components of the solution and create a product with an ideal consistency, which is unlikely to be achieved with manual mixing.
Using a template and guide elements, we lay the rows of bricks on top of each other. However, it should be remembered that different types of bricks have their own laying characteristics. Clinker bricks require laying only a few rows per day, since the degree of water absorption of this material is very low, which requires a much longer period of time to impregnate the product. Clay brick has a porous structure and, accordingly, a high proportion of water absorption, which makes it possible to lay this product in a much larger volume.
The main sheet is formed in this way to the highest point, each row being checked against the others and guided using a masonry template. After completing all stages of construction, the finished surface must be allowed to dry for 1-2 days. This time will allow the final shrinkage and adhesion of all components to occur. After this, the wall is completely ready and can be used to perform the tasks assigned to it.
Automatic mason's hammer
High-quality work on the construction of brickwork requires a high level of skill of the mason. In order to simplify installation work on bricks and make such work accessible to inexperienced builders, automatic hammer models have been developed for laying regular or facing bricks.
The product is equipped with two laser levels that evaluate the correctness of the laying, and an electric hammer itself, which receives signals from the levels and knocks the bricks to the required position. To do this, the mason sequentially places the product on each of the corners of the brick, horizontally and vertically. The automatic hammer system evaluates the current position of the building block and strikes the surface until the ideal position is achieved.
The battery charge of such a product allows you to install up to 300 bricks, ensuring an increase in worker productivity up to 5 times.
How to properly lay facing material
One of the options for how to correctly lay facing bricks together with insulation
If you want to do the masonry yourself, we would like to emphasize that such masonry is considered very labor-intensive and difficult, requiring special attention and precision. If there is a large amount of work, you will need a partner. And in this case, the price of masonry will increase.
Typically, facade material is laid simultaneously with the construction of the house, and the wall and facing masonry are connected with a special masonry mesh, and insulated inside as desired.
We will consider the option of masonry for cladding after the construction of a building for which building bricks were used. We especially note that the base is made to protrude beyond the wall by no less than 12.0 cm. This distance will make it possible to make a good stop for the wall under construction. In this case, you will have to strengthen and expand the base.
You need to decide on the tools you will need:
- concrete mixer;
- trowels;
- buckets;
- forests;
- threads;
- hammer;
- plumb line;
- a twig 80 cm long with a square section of 10X10 mm;
- round rod for sewing seams with a diameter of 10 cm.
Step-by-step instructions for laying:
- leveling the base;
- layout;
- cladding;
- washing (cleaning).
Joining seams
First, we level the base horizontally with a mortar using a level or building code. Then we lay out the brick dry. This is done to correctly determine where to cut it, and where it is better to place the seams for a better connection in the corners.
In places where there are openings for windows and doors, the rows should not be interrupted, otherwise in the future a similar layout will appear above the door or window. Here the brick is cut.
Next we lay the facing material. The corners are started first. Laying begins from the corners of the building at a height of 4-6 rows. Then the thread is pulled and the lining is done under the cord or thread.
For such work, it is better to use a solution in a ratio of 1:4. If possible, take fine sand from a quarry containing some clay. If you have an assistant, mix the mixture in a concrete mixer; you can also mix it in small portions using a mixer
It is very important to maintain proportions at all times.
The twig must be placed on the edge of the brick, then the mortar is placed just above the twig, which is used as a template for laying facing bricks, and we install it by hitting it with a hammer or the handle of a trowel so that it touches the twig.
When the brick is large and touches the cord, then the twig is removed and placed to the level of the thread. This is the method used to achieve identical seams. If the front side is dirty, clean it with a dry cloth before the solution dries.
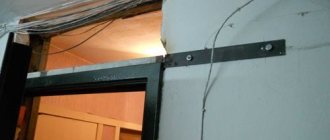
It is very important to make the correct connection to the wall. If the wall does not have twigs and mesh for plaster protruding from the wall
Therefore, we attach it to the wall using dowels and a well-bending knitting wire.
How to do it:
- a 6-piece dowel is driven into the wall;
- a wire is screwed to the cap, the length of which should be equal to the width of the brick;
- the ends of the wire should be inside the masonry and not stick out;
- The height is knitted in 4 rows, and the width is 60-70 cm.
Linking can be done in various ways. The main thing is a good connection between the wall and the cladding.
The space between the wall and the cladding cannot be filled with mortar. Be sure to make a gap that contributes to good thermal insulation of the building.
Required clearance for thermal insulation of a building
Openings for doors and windows are made with a column, laying brick on the narrow side. For slopes, if desired, you can use a material of a different color. The seams are unstitched when doing the masonry so that the scaffolding does not move again.
Then the seams are filled with mortar and rubbed using a round rod. At the end of the jointing, wipe the finished surface with a dry cloth. That's it, the masonry is finished.
Usage algorithm
Working with the device is greatly simplified, which even professionals admit. And without it, non-specialists are unlikely to be able to lay sufficiently even and thin seams.
- The width of the device is adjusted to what is required in a particular case.
- The device is placed on the masonry; it should be oriented in the direction of progress in working with bricks.
- The form is filled with solution. The thickness of the layer is determined by the guide rails.
- Use a trowel to remove excess solution.
Then the device moves along the masonry, and all operations are repeated. Errors can only happen at the very beginning of work. The main one is laying too large a volume of solution over the entire length of the tray. It is better to limit yourself to a distance of a couple of bricks, because the elements need to be laid before the mortar sets.
Moving the device is very simple: stops on the base fix the tray relative to the walls, so there is no need to adjust its position.
Brick laying for jointing: nuances of the process
Before moving on to directly solving the question of how to lay a brick under the jointing, we will first deal with the question of what it even is. According to many people, a stitcher is a special tool that forms a beautiful facial seam. But many people forget that jointing is a kind of template that allows you to maintain equal distances between individual bricks. In most cases, this tool is the length of half or most of the brick, which makes it quite easy to use for leveling masonry.
The joint is either a thick plate with a curved handle, or a tube cut halfway along the length. The latter option was actively used by masons in the past, and today flat jointing has become widespread, which makes the seam more neat.
Brick laying for jointing photo
So, we’ve sorted out the jointing, now it’s time to clarify the situation with the question of how the masonry for the jointing is done? In principle, there is nothing complicated here, especially if you clearly lay out the first, fundamental row in the level. Let's start with it.
There are several ways to lay out the first row while respecting the horizon, but in most cases experts use only one. Beacon bricks are installed at the corners or edges of the wall - their uniform level can be checked using hydraulics or a laser. A thread is stretched between these bricks, relative to which the first row is laid out.
Now the second row and all subsequent ones. This is where the fun begins - you will have to learn how to apply the solution in a certain amount. This is where you will need the jointing, which can be used as some kind of template. The solution is applied to the previous row in a slide, the height of which is twice as large as the width of the jointing. Then the brick is seated with a hammer, and the seam gap between it and the previous row is controlled by jointing. It is simply inserted into the seam, and the brick is lowered all the way. It should be understood that such control will have to be carried out on all sides of each brick.
How to lay brick under jointing photo
Each brick of the facing masonry is laid in this way. This, of course, may seem difficult, but believe me, after a maximum of several unsuccessful attempts everything will work out in the best possible way. As the mortar dries, it is additionally necessary to cultivate the seams - the jointing is again driven into the seam, and with its help, the mortar in it is smoothed out with a longitudinal movement. Here it works as a spatula. Do not forget that this tool needs to be wetted with water more often, then the solution will not stick to the metal, and the seam itself will remain smooth. And yet, in this way the seams can be given any color. This process is rather similar to grouting tile joints, only it is done much more carefully. After drying, excess mortar or grout is removed with a special brush with wire bristles.
Brickwork for jointing photo
Template for laying facing bricks
Equipment for laying a brick pillar:. Brick pillar laying diagram:.
Half-brick masonry scheme: That’s why I wrote about it, so that knowledgeable people could share their experience! As long as I live, I learn as long as I can: Thanks again for your valuable advice!
Design and principle of operation of bricklaying kits
This template is no better:? The example in this case is not about the seams, but about the brick itself that I want to use for finishing. I agree with you that seams of one thickness are more beautiful.
For professionals, probably no devices are needed at all; for amateurs it will be useful. About wire and square. All the devices are often invented by professionals: And whoever does masonry without them is scary to look at.
Safety precautions
Long-term work with the solution requires the right attitude towards your own health, since there are many factors that can provoke its deterioration. The main danger is the mixture itself. After prolonged (constant) contact of the solution with the skin, a person experiences unpleasant symptoms: serious irritation appears on the hands.
To avoid these consequences, any master needs to protect himself with special gloves. Not simple ones, but rubberized ones - those that have internal hydrophobic impregnation on the palm side. The second potential threat is getting the composition into the eyes. This is especially dangerous when the solution contains lime and caustic chemical additives. In this case, any glasses are suitable - regular, carpenter's or sunglasses.
Masonry tools are mostly simple and straightforward, but they need to be handled correctly
In addition to the work itself, it is very important to prepare the perfect solution, to know absolutely all the nuances, and this is impossible without experience. Any theoretical preparation without a lot of practice is powerless if you do not have the necessary skills
Therefore, bricklaying is a type of activity that only a professional mason can handle brilliantly.
One of the useful designs for beginners can be seen in this video:
Common Helper Tools
Since the construction of brick houses has been practiced since ancient times, during this time people have come up with many devices to make the work of the person laying bricks easier.
Since the construction of brick houses has been practiced since ancient times, during this time people have come up with many devices to make the work of the person laying bricks easier. This not only makes the craftsman’s work easier, but also improves the quality of the masonry, and also shortens the time needed to construct the walls.
The most commonly used tools for laying bricks with your own hands are:
- The most common and also necessary tool is a trowel. This product is in the form of a smooth steel spatula. Using a trowel, the master levels the concrete mortar, rubs the seams, and removes excess construction mixture from the surface of the walls.
- A plumb line belongs to the category of measuring devices when making brickwork. Using this device, the verticality of the walls is checked, as well as the correctness of the corners. Depending on the length of the plumb line, control over the verticality of the walls can be exercised to a height of several floors.
- The cord is needed to mark the height of the masonry at the stage of preparation for masonry work. You can also use the cord to check whether the work is being done correctly. Typically, such a device is called a mooring, since the masonry being performed must be moored to a tensioned cord. In other words, the mooring cord is used to control the horizontalness and straightness of the masonry being performed.
- A shovel bucket is usually used for mixing mortar, but it is also needed during the masonry process. Using this device, cement mortar is applied to the stone being laid. This product is simply necessary when working with a significant amount of solution.
- Level . This device can also be classified as a measuring instrument. Using a level, you can control the evenness of the completed wall in the horizontal plane. This device consists of an elongated, durable body, inside of which there are containers with non-freezing liquid and an air bubble. Based on the location of the bubble in the container, conclusions are drawn about the horizontality of the masonry. That is, if the level is laid with the longitudinal side on the masonry, then the air bubble should be strictly in the middle of the container. This indicates that the masonry work was carried out correctly.
- A special device designed for decorative seams is called jointing. This product is used for laying facing bricks. Joining not only aligns the seams, but also gives them the desired shape. Depending on the masonry technology, jointing of different shapes and sizes can be used.
- The rule is a lath for laying bricks, which allows you to control the evenness of the facing masonry. Externally, it is an ordinary even and smooth plank, with the help of which the evenness of laying the outer side of the rows is controlled.
- A pick hammer is used to give the stone the required size and in case of errors during masonry. Using this product you can chop off unnecessary parts of bricks or give the stone the desired shape.
- The order is a device that is attached to the first masonry row. With this product you can accurately measure the location of stones and entire rows relative to each other. Quite often, ordering is used when laying facing bricks with your own hands, since with its help you can create various designs and patterns on the outside of the masonry. Also, using ordering, you can mark the locations of window and door openings, as well as other structural elements of the building. Sometimes ordering is used to fix the cord and level the masonry.
The main purpose
Bricklaying is a very responsible job. Not only the beauty of the future structure, but also its strength and durability depends on it. Therefore, when building walls, you cannot do without precision instruments. Many people decide to lay bricks with their own hands. The devices that help them with this must be available and in good condition. The necessary tools are divided into 3 groups:
- Basic, or main.
- Control and measuring.
- Mechanical.
It is almost impossible to do without tools from the first group.
These include:
- Trowels or trowel. These are special blades of various shapes for applying and leveling the solution.
- Joining is a device for checking and aligning masonry seams.
- Hammer-pick. Fitting and splitting bricks into halves cannot be done efficiently without this tool.
In this video we will look at a device for laying bricks:
The second group is no less important. Without it, it is unlikely that you will get a high-quality wall. Only very experienced masons can afford to work without measuring instruments, and even then only on frivolous objects. This group includes:
- Plumb. This is a very simple device, but without it it is unthinkable to build a perfectly vertical wall.
- The level is one of the most complex construction devices. Used to check horizontal planes and lines.
- A pier is usually a simple cord that is pulled to align the next row of bricks.
- Ordering is a template for laying bricks of different designs. It is used to control the quality of masonry. This tool can be used by different rulers, squares and their modifications.
The third group includes more complex devices for laying bricks.
They are usually made in order to make the mason’s work easier and make his work better and more efficient.
Here are some of these tools:
- Cuvette. This device helps to evenly distribute the mortar onto the next row of bricks.
- Dispenser order. A tool for laying a certain number of bricks. Typically has vertical and horizontal scales and clamps for secure attachment.
- Complex dispenser. This is a modified complex device that combines most of the necessary tools for work.
Without good tools, the final result of the work will be poor or completely unusable. If we allow irresponsibility in this matter, a situation may arise that is dangerous to the health and life of those who will use the building.
Homemade device for obtaining even masonry
To improve the quality of masonry work and speed it up, you can make a special template for masonry
To improve the quality of masonry work and speed it up, you can make a special template for masonry. Externally, this product resembles a wide container without a bottom. Using this device, you can easily apply a perfectly even layer of solution. As a result, the masonry process itself will be much easier.
The following characteristics of the masonry depend on the evenness of the mortar application:
- If you lay the stone on a very thin layer of mortar, the adhesion of the bricks will not be strong enough.
- A layer of masonry mortar that is too thick will lead to overuse and unsightly, uneven masonry.
- If the solution is applied in an uneven layer, the outer side of the masonry will look sloppy due to crooked rows.
You can avoid all these disadvantages of incorrectly applying the solution using a template. Externally, this is not just a container without a bottom, but a product with restrictions on the sides that allow it to be firmly held on the wall. The dimensions of the template can be very different and depend on the masonry being performed and the stones used.
You can pour the solution into the elongated hole in the central part of the device.
The template is laid on top of a row of bricks. The solution can be placed into the elongated hole in the central part of the device. As a result, thanks to the restrictive parts of the template, the layer of solution comes out perfectly even in width and height. Moreover, the height of the seam will be strictly as specified by the dimensions of the template. After filling the niche with the solution, the template can be moved to a new location.
The template allows you to replace two tools used when making masonry mortar at once - a building level and a cord. In this case, during the construction of one building, several types of templates can be used:
- When making the main walls of a building, templates with specified basic wall parameters are used.
- To make the facing brick layer, a different template with the parameters of the facing stone is used.
Application in practice
Even the most experienced masons use many quality control tools in their work. Despite the fact that over many years they have acquired enormous experience, they do not trust their eyes, but regularly check the masonry using precision instruments. It is especially important to use such devices for laying facing bricks, because this type of work requires special care and precision.
Cladding is done to give the building a beautiful appearance. Using special bricks or tiles, not only the outer part of the house is decorated, but in many buildings its internal elements are also decorated. This is a very difficult process. Here are just some of the difficulties that arise during such work:
- The cladding material comes in an unusual configuration. Because of this, difficulties arise with its installation.
- Often the customer requires an original type of cladding, which forces the mason to be very careful and careful. Laying out unusual shapes requires very precise tools.
- The use of solutions with additional components. For example, very often in such cases the connecting mixture is tinted, and this, in turn, requires the master to pay additional attention to the quality of the masonry.
Naturally, when performing such precise work, measuring instruments must be flawless. The more often and more responsibly they are used during construction, the greater the guarantee that the work will be performed with high final quality.