4.8 / 5 ( 17 votes)
Installation and connection of a gas stove must be carried out under the supervision of the gas service. Gas is a source of increased danger; improper handling can lead to tragedy, including an explosion or death. Therefore, if you decide to install a gas stove in the kitchen yourself, you should adhere to the safety rules that we will discuss in our article. And also call the service so that it checks the reliability of the connection.
The nuances of installing a gas hob
- Features and nuances of installation
- Insert into the tabletop: measurements and cutting
- How to attach?
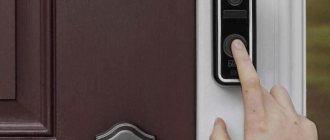
- How to conduct a test run?
- Norms and distances
- What do you need to know?
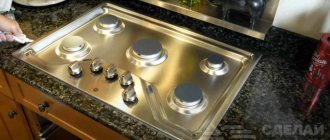
Modern technologies make it possible to minimize the size of household kitchen appliances. Increasingly, instead of a full-size stove, a gas hob is being installed, which allows for significant savings in usable space. But it’s not enough to purchase this type of equipment. It still needs to be installed. How to properly integrate a gas hob into a countertop?
Safety precautions
A gas leak can lead to irreparable consequences. And it is not always possible to notice it on time. Therefore, it is better to follow simple tips:
- The hose must be one piece - several sections cannot be connected together.
- The length of the hose should not be more than 3 m, which must be taken into account when choosing a location for the countertop.
- All connection work should be carried out with the gas supply turned off.
- If you want to move the stove to another room, this will require adjustments to the gas lines, which means coordination with local authorities and gas services.
- After you have connected everything, it is very useful to invite a specialist from the gas service to check the quality of the work.
Preparing tools
To install built-in equipment yourself, you will need the following tools:
- Construction level - needed in order to fix the hob perfectly evenly;
- a measuring device and a pencil - useful for marking the tabletop;
- electric jigsaw for “cutting” the hole;
- fastening elements - selected based on the model of equipment;
- a certified steel hose (up to 3 meters long) is an indispensable element when supplying gas;
- gas winding - will prevent fuel leakage at the junction of the hose and the gas pipeline;
- silicone sealant - will protect furniture from destruction by moisture and fungi.
Article on the topic: What is the purpose of a capacitor in an air conditioner?
Sawing a hole
Before you build a gas stove into the countertop, you need to make a hole. This process is not particularly difficult.
- In order to install a surface into a tabletop with your own hands, you should first of all know its dimensions. As a rule, they are indicated in the instructions, so there is no need to invent anything. You can also take measurements yourself. To do this, you need to turn the panel over and use a tape measure to determine its length and width along the inner edges.
- When working, pay attention to the fact that the instructions give the values of the minimum indentations from the edge of the tabletop. They can only be changed upward, since an edge that is too narrow may break off after a while.
- Now, according to the dimensions of the gas stove, you need to make markings on the countertop using a tape measure, a pencil and a square. It is imperative to ensure that all lines are parallel and the angles are right. The panel will be built into this location.
- Drill a hole where the cutout will begin. It is done using an electric jigsaw. To obtain an even cut, it is recommended to use a file with small sharp teeth. Otherwise, the edge of the cut may crumble. If you don’t have a file, you can use a hand router for the job, round the corners with a radius cutter, and grind the cuts.
- Sawdust generated during work can be easily collected with a vacuum cleaner.
After the hole is ready, you need to try on the hob to make sure that everything was done accurately and correctly.
Advantages of built-in gas stoves
Before considering the question: “How to integrate a gas stove into a cabinet or countertop?”, you need to find out all its pros and cons. Let's first consider all the advantages of this technique.
- First of all, it is an opportunity to arrange kitchen equipment comfortably, compactly, without overloading the room with large appliances. This is especially true in small kitchens.
- The hob and work surface combined by a common countertop look very aesthetically pleasing. The oven door is flush with the doors and drawers of the kitchen unit, which is very harmonious. The kitchen becomes more spacious. In this case, a free-standing gas stove in the kitchen will clearly be a loser.
- In a solid tabletop without cuts, debris and grease do not get clogged in the cracks that always exist around individual slabs. With built-in appliances, all you need to do to clean is to wipe the surface. Isn’t this what every housewife dreams of?
Tabletop markings
Mark the wooden tabletop according to the template, which should be in the documentation for the panel. If there is no template, the dimensions of the cut must be indicated in the passport.
Drilled holes in the table top
Important! You can only cut wood tabletops (chipboard, MDF) with your own hands. It is better to order cutting of countertops made of artificial stone from a company, or even better to order a countertop with a ready-made hole for the panel. Sawing stone requires special tools and complex templates.
The tabletop is cut according to the markings made using an electric jigsaw. To start cutting, holes are drilled in the corners of the markings to insert a jigsaw saw.
The diameter of the drill is greater than the width of the jigsaw blade
To protect the surface of the tabletop from the movement of the jigsaw sole and from chipping when cutting, masking tape is glued next to the markings or along the markings.
To prevent the cut from falling and breaking the tabletop, you need to support it from below, as in the photo, with clamps.
Article on the topic: Where to put an old gas stove in Minsk
Cut the table top with a jigsaw
Connecting the hose to the gas pipe
Connecting the hose to the gas pipe is done before installing the furniture; it is more convenient. The panel is connected to gas using a flexible hose specially designed for gas supply.
not to connect a flexible gas hose (bellows hose) directly to the gas valve. The connection must be made through a plumbing pipe or fitting.
The connection must be made using a fitting
- Before connecting the gas hose, flax, pre-twisted into a thread, is wound onto the thread of the hose. Rewinding is done clockwise.
- After winding, the flax is coated with a thin layer of Multipak gas paste. It will seal the connection.
Important! Do not forget to insert an O-ring into the flexible gas supply nut;
- The supply nut is tightened by hand and tightened with a gas wrench, all the way without zeal.
connecting the hose to the gas
Note: To increase safety, a thermal shut-off valve can be installed on the gas pipe. Its purpose is to shut off the gas supply in case of fire and temperature rise above 80˚C.
- It is better to coat the cut edge of the tabletop with plumbing silicone; it will protect the cut from moisture.
Treatment of cut ends with sealant
Preparing the panel for installation
The panel kit includes jets for the main connection. If they are not installed, they need to be installed in place. The installation diagram for the jets is glued to the bottom of the panel or indicated in the passport.
If the gas panel is connected to a gas cylinder, you need to buy different jets.
Jets
Installation of jets
Connecting the hose to the hob
To connect the gas panel, its kit must include a plumbing corner. The corner must be installed on the panel immediately. There is no need for winding for the corner, but don’t forget about the gasket.
Attach a flexible hose to the plumbing corner, not forgetting about the winding. At the same time, do not forget to pass the flexible liner through the cut in the tabletop.
Article on the topic: Who receives orders for repair of washing machines?
The panel comes with mounting strips that need to be attached to the panel.
Fastening the table top
The cut in the tabletop is ready, it’s time to secure the tabletop in place. The fastening of the tabletop must be strong and reliable.
Preparing the cut (sealing)
I repeat, coat the cut walls with sanitary sealant. Additionally, you can protect the ends of the cut with heat-reflecting tape or foil.
Installation and fastening of the hob
- Place a seal along the cut (it should be included in the kit);
- Place the hob in place.
- Align the panel borders;
- Tighten the panel fastening strips from below, hooking them onto the tabletop;
- Use a sharp knife to cut off the protruding edges of the seal without damaging the surface of the countertop.
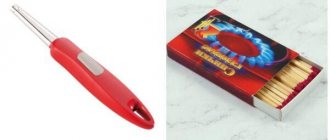
Checking the functionality of the hob
- Open the gas valve.
- Use your sense of smell to check for gas leaks;
- After some time, turn on the panel valve, check its combustion;
- Turn off the panel valves and install a pan support on the panel.
How to install new glass?
How to install new glass on a gas stove?
If the original glass broke due to your fault during transportation or burst during operation, then you can install new glass on the gas stove yourself.
First you need to understand exactly how the glass is attached to your stove. As a rule, the upper part of the glass is hidden under the bar. And from below the glass is kept from falling by two stops. There are rubber inserts only on the door itself, in the middle. The bar is held on the frame with screws; you may not notice them right away, since the glass is in a groove. And the lower stops are iron corners, which are also held on by screws.
So, to install new glass:
- Unscrew the screws on the stops, but not all the way, so that the glass does not immediately fall to the floor.
- Next, open the door completely, hold the glass on top with your fingers and push it out of the bar.
- After the old glass has been removed, you can install the new one. To do this, place it in the groove of the bar to the end.
- And then, holding the glass, close the door. And tighten the screws on the stops.
Useful advice from experienced craftsmen
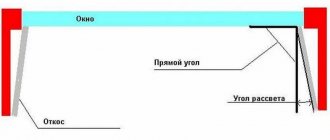
The distance from the front edge of the tabletop to the cutout must be at least 50 mm. Otherwise, this part of the tabletop may break during operation.
To reduce the formation of chips when cutting a hole in a chipboard tabletop, you need to turn on the pendulum stroke on the jigsaw.
It is recommended to install the hob after assembling the kitchen unit, so as not to deform the countertop.
In this article, we looked at the step-by-step process of installing a hob - from marking to connecting to communications, and also talked in detail about all the important nuances that a beginner needs to know. We hope that the information will be useful to you.
How to clean grease from an MDF kitchen?
Here you will need a damp sponge with a regular soap solution, which can be used to gently wipe away greasy stains from the surface of the facade. After this, go over the sponge again to remove soap stains. And finally, wipe dry with a napkin. To protect the surface, you can use kitchen polish made from MDF boards.
Interesting materials:
What to do when you pay off your mortgage? What to do on the veil to get married? What to do on the cover? What to do before baptism? What to do before the new moon? What to do before the full moon? What to do before Christmas? What's the first thing to do when renovating a bathroom? What should I do to obtain Russian citizenship? What to do after the probationary period?
Installation of Gefest CH 1210 hob
When installing the table, of course, it is necessary to take into account the presence and size of the supply gas and electrical communications.
| Rice. 4. Bottom view of the hob with an electrical cord and an outlet for connecting a gas hose |
Marking the countertop for the hob
We start again with markings, using a pencil to outline the outline of the opening on the tabletop in accordance with Figure 5.
Article on the topic: What can you cook without a gas stove
What you need to consider when marking the contour for the Gefest CH 1210 hob
When marking, you need to take into account (Figure 5):
When installing the hob, it is necessary to ensure minimum air gaps according to Figure 7.
| Rice. 7. Minimum air gaps |
Cut out the outline for installing the hob
During the cutting process, we hold the part of the tabletop to be removed from below to avoid its premature fall and chipping of the decorative coating. No additional ventilation holes are required.
| Rice. 8. The cutout for the hob is ready |
Installing mounting brackets
We place and secure the mounting brackets so that the top edge of the bracket is flush with the surface of the tabletop.
To avoid cracking the countertop, do not tighten the screws without first drilling holes with a diameter of 2.5 to 3-4 mm.
| Rice. 9. Installation of fasteners |
By the way, this is a very simple and convenient way to install a hob; before this we encountered a more “hemorrhoids” method.
| Rice. 10. Fastening the hob using staples to the sides of the chipboard oven body |
Along the edge of the inside of the table we glue the table seal for a tight and airtight fit; the seal is similar to that used for installing the sink.
Next, carefully insert the hob into the opening and secure it with four screws and washers.
Why an induction hob is better than others
Advantages and disadvantages of an induction hob compared to gas and electric panels. Economics of using an induction panel. Did you know that there are hobs combined with hoods?
Gas hose connection
The gas hose must be connected by specialists, do not forget about this!
For installation, we bought a bellows hose, a dielectric coupling and an installation kit.
| Rice. 11. Everything we originally bought to connect the gas hob |
| Rice. 12. Contents of the installation kit |
Gas hose connection requirements
When connecting, the following requirements must be met:
Check the tightness of the connections in accordance with the technological instructions of the gas supply organization.
Bellows gas hose
Bellows gas hose is safer and more durable than rubber gas hoses, with references to lifespans of up to 25 years.
Bellows hoses are produced from stainless steel, at the ends of the hose there are threaded fittings with paronite gaskets. The hose bends easily, withstands pressure up to 6 atmospheres and temperatures from -50 to +200 degrees C.
But bad luck, it turned out that the bellows hose cannot be immediately connected to the gas pipe and a dielectric coupling cannot be installed; again, I had to go to a hardware store and buy a connecting coupling. Gas workers checked - everything is secure and there is no gas leak.
| Rice. 13. It turned out to be impossible to immediately connect the bellows hose to the gas pipe using a fitting; a coupling is needed |
| Rice. 14. The bellows hose is connected using a coupling |
| Rice. 15. Connect the bellows gas hose through a fitting to the gas supply to the hob. A little further down the view is a plate with which the hob is fixed to the cutout in the countertop |
| Rice. 16. Hob installed |
| Rice. 17. The gas pipe and bellows hose are hidden behind the box |
Watch a video about the results of installing a gas hob
Pipe transfer
The decision whether it is possible to cut or move the gas pipe in the kitchen will be up to the relevant services. You are only free to propose network redevelopment and voice your option. And professionals will tell you whether such changes are real, whether they will pose a threat to people’s lives, and will also tell you how much such an “upgrade” will cost you. Where to begin? Where should I knock?
Registration of permission
Remember the step-by-step instructions for preparatory actions and coordination of plans for moving gas pipes:
- Contact the gas service according to the place of registration. It happens that you need to “knock” on some subsidiary structure of this organization: they will explain everything to you on the spot.
- Filling out an application. You will be provided with a sample application, on the basis of which you must write statements on your behalf on what changes you want to make (the application serves as the basis for a specialist to visit you).
- Inspection of the home by a gas service representative. The master will listen to you, examine everything, check it, make the correct calculations (taking into account compliance with all standards). It is not a fact that the expert will reject your plan; it happens, especially with a diligent approach and the homeowner studying the rules, that the master does not have to edit anything.
- Drawing up an estimate. This is, in fact, what the office you contacted does.
- Coordination of the estimate. When the plan is ready, it will be given to you so that you can read the documents and give your consent to carry out this type of work.
- Payment. If you are satisfied with the estimate, you should pay for this service. If not, then don’t be upset, it can be improved, you just tell the master what you don’t agree with, and he will find a compromise offer.
Worth paying attention! If it is not possible/safe to make the network configuration according to the “scenario” you propose, or the estimate proposed by the service does not suit you, then it is too early to give up. Buy or order a beautiful box for the gas pipe in the kitchen, and your problem will be solved and the beauty will be increased.
Preparation for the process
If you agree on the estimate, then within 5 days (usually) a team will knock on your house, ready to move the pipes according to your wishes. Do you need to prepare for the arrival of the masters? If you want the work to be carried out quickly, efficiently, and your home not to be damaged by the workers’ visit, you should do the following:
- contact the craftsmen and find out if you need to provide any consumables (so as not to run after them while the team is working, frantically looking for someone of your own who will look after the apartment, after all, strangers are working);
- free up the space where it is planned to dismantle and install new pipes - workers must have unhindered access to the network;
- cover all kitchen surfaces, appliances and other valuable items, because the craftsmen will be cutting, cooking, dusting and littering (it is better to use coatings that are not prone to burning as a material, for example, tarpaulin, burlap);
- close the valve to stop the flow of blue fuel to the pipes.
Source
Buy with a guarantee
Elica provides a long-term official warranty on all NikolaTesla hobs. The user manual contains detailed instructions regarding the operation of the hood, so at any time you can see how to get to the carbon filter and learn the intricacies of controlling the modes of the induction zones.
To select a suitable hob model with a built-in hood, use the filter and model descriptions in the catalog. And if any details are unclear, seek an online consultation. As soon as you choose a model and make an advance payment, the managers will arrange the delivery of the hob. Delivery is made to all regions of Russia.
How to correctly calculate the distance between the countertop and wall cabinets?
Why is it so important to do the calculation correctly? If the cabinets hang too low, you may constantly hit them with your head. Another point (in some cases very controversial) is the ease of use of the upper shelves: you should be able to easily reach for the essentials.
It is generally accepted that the upper edge should end at a level NO more than 20-25 cm above the person’s head. But this method of calculation does not work if the top row is supposed to be installed under the ceiling. Such headsets are most often made to order. In the ready-made furniture market, cabinets with a height of more than 60 cm are, as a rule, produced based on the standard distance above the working surface (60 cm) and under standard ceilings of 2.7 m. In the case of a high set, another rule applies: here it is important to take into account the level of the shelves inside and their filling.
Considering the point described above, we must conclude that when calculating the optimal distance, you need to focus on the lower limit and dimensions of the furniture itself.
Let us note the main conclusions.
The table below will help you quickly determine the optimal distance from the floor.
Along the top edge, the cabinet for the built-in hood is level with all the others.
Source
Dimensions assessment
Before integrating a stove into a kitchen unit, it is important to determine the dimensions, as well as prepare the necessary materials and tools. As for the sizes, the most common hobs on sale now are those with 4 burners.
The slab needs to be measured, but there are averages:
- panel height – 3-10 cm;
- length – 50-60 cm;
- width – 45-50 cm.
The sizes of the slabs from different manufacturers are approximately the same. Gas “built-ins” are characterized by a width of 50-52 cm, electric ones appear in a slightly expanded format - 60 cm. The height of both types is common - 85 cm for dependent models and 3-10 cm for individual panels. In the case of a hob, the depth is also subject to strict consideration: it ranges from 45-55 cm, determined by the number of burners.
Stove-oven sets must be aligned with the plane of the countertop. It is recommended to equip the side surfaces of the table with metal slats - this measure will significantly extend the life of the kitchen furniture.
Measurements are carried out in the usual way, by measuring the length and width of the equipment. Many companies help simplify the process by providing a convenient template, cut out in full accordance with the parameters of the unit: all that is required of the installer is to trace the contours of the stencil.
When marking a set, it is important to provide for such a factor as thermal insulation - otherwise there is a high risk of damaging the furniture from constant overheating. To organize high-quality ventilation, it is necessary to retreat approximately 10-15 centimeters from the walls and all edges of the tabletop. The minimum distance from the edge of the table is always specified in the instructions for the stove; it is permissible to increase it slightly, but in no case reduce it.
If you are unable to properly protect the set from overheating, or the distance to the wall is less than the standard value, a heat-insulating material like foil-coated plasterboard will come to the rescue.
Premises requirements
Gone are the days when tiny Khrushchev-era kitchens quietly placed four-burner gas stoves by the window, next to hanging curtains. Now the situation has changed . A new regulatory document has been approved and put into effect - SP 402.1325800.2018 “Residential buildings. Rules for the design of gas consumption systems."
It includes a number of requirements for premises in which gas stoves are allowed to be installed:
- purpose of the premises - kitchens, kitchen-dining rooms, corridors;
- ceiling height - at least 2.2 m;
- the presence of natural ventilation, an exhaust ventilation duct and a window with an opening sash or window;
- the door from the room opens outward;
- there is a gap of at least 0.02 m² between the floor and the door leaf (for air flow);
- minimum room volume: for two-burner stoves - at least 8 m³, for three-burner stoves - at least 12 m³, for four-burner stoves - at least 15 m³;
- window glazing area - at the rate of at least 0.03 m² per 1 m³ of room volume (glass acts as an easily removable enclosing structure in the event of an explosion).
These requirements apply to both free-standing and built-in devices.
Installation and connection process
Installing the hob in the prepared window is simple. We lower the panel into the hole . We align its position using a measuring tool.
Using special brackets and self-tapping screws, which the manufacturer supplies in the kit, we fix it from below. You can use a seal around the perimeter of the device that is being installed. It is usually supplied with the product.
We glue a special aluminum tape onto a degreased and dried surface and press it slightly. A good sealant is also polyethylene tape for drywall, which is 30 mm wide. This becomes an obstacle to the path of debris and moisture under the surface that is being installed.
IMPORTANT! Before gluing, we check whether the thickness of the seal matches the internal depth of the panel sides. If the tape is thin, a gap will form. And moisture will get through it.
Next, you need to lay a solid strip around the perimeter of the cutout from the front of the cabinet. It is good if the seal protrudes 1 cm below the side. This is ideal.
We reinstall all the parts that were removed. We connect the energy carrier. We cut the gas panel into the gas main. We connect the electrical panel to the electrical network, which must be prepared in advance. It remains to test the technique in action.
Article rating:
How to build a regular gas stove into a countertop Link to the main publication Articles mentioning words:
Important Don't
Related publications
- How does a gas coffee machine work?
Do-it-yourself wall cabinet mounting
You can install the upper modules of the kitchen unit yourself, without resorting to the services of professional teams. To do this, it is important to have the necessary tool and have minimal skills to work with it. In addition, it is necessary to consider the fastening system.
Fixing the cabinet on the wall can be done in two ways:
Kitchen Cabinet Fasteners
The first method, despite the more expensive parts, is considered the most reliable and convenient. All work can be done alone, and aligning the modules is easier. Dismantling of structures suspended on the bar is also easy.
Installation of kitchen cabinets on a strip
Important! The work of installing cabinets should be treated responsibly, since incorrect calculations can worsen the perception of the entire installed set, and poor fastening can cause the collapse of the structure.
To install the upper modules, you need to prepare the following tools and accessories:
To fix the cabinet, universal canopies are used (2 pieces per cabinet).
The great advantage of such devices is the ability to adjust the installation level of the cabinet in terms of reach and height. Canopies can be right or left, as well as universal.
In addition, you will need self-tapping screws: with dowels for mounting the tire (for greater reliability, you can replace them with anchor bolts) and for attaching canopies.
Step 1.
Tire installation markings are made using the level. The bar itself can be broken off using the notches on it. Many people use separate tires for each canopy for installation. However, for convenience, it is recommended to mount a solid rail across the entire width of the modules. This will immediately ensure the correct installation level.
Marking the tire installation using a laser level. Marking fastening points
Step
3.
To fix the tire, you need to drill holes. The wall can be made of different materials. The vast majority of load-bearing structures are made of reinforced concrete. The cabinet is installed on such bases using dowels with a diameter of 6 mm and self-tapping screws of 4 mm.
Slots in the back wall of the cabinet can be made with a jigsaw or hacksaw
Fastening the back wall of the cabinet
You can pull it closer to the wall by tightening the end bolt.
Adjustment by tightening the bolt
Now the cabinet will not be able to jump off the mounting, even if it is accidentally lifted a little. Height adjustment is carried out using the second bolt.
Height adjustment
The wall cabinet is securely mounted on the kitchen wall.
In order for the dimensions of kitchen structures to best meet the requirements of household members, it is recommended to order designs according to your individual requirements. However, this option is more expensive. If you want to save money, you can purchase standard modules. In this case, you need to consider the proposed options and carefully calculate the installation method to choose the optimal one.
Features of accommodation
A kitchen stove to be built in can be inextricably linked with the oven (the latter occupies a place strictly under the panel) or can be arranged separately, independently of the oven (the controls belong to it personally and are not combined with the oven units). The location possibilities directly depend on what type you have to deal with - devices of combined models, with rare exceptions, have a single power source, plus, they are connected by a network of wires. First of all, the oven is installed as the main carrier of the control elements (the unit is leveled using a building level).
Freestanding hobs, which actively crowd out built-in sets, usually fit into or are embedded in the countertop set.
The minimum thickness of the countertop for installing a stove is 38 millimeters. The material must wick away moisture well and withstand temperature increases of at least 100 degrees.
If the device supports automatic ignition, there should be a socket next to it. Installation rules prohibit placing any stove near the sink so that drops of water do not end up on the hot surface. Close proximity to a refrigerator is also an unspoken taboo: the walls of the unit will be subject to thermal attacks every now and then.