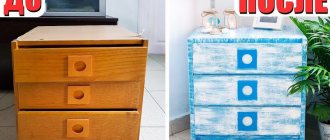
What should you do if the interior of your apartment is outdated? What if some decorative elements no longer look so lively and interesting? If you just want a change in life and want to start with your own home? The answer is quite logical and simple - repair. This article will focus on the process of assembling furniture with your own hands.
Below are some tips and recommendations for choosing materials, as well as for assembling furniture. A video about assembling furniture with your own hands will also be attached, so this article will be of interest to people who want to completely renovate their apartment themselves.
Is it worth assembling furniture with your own hands?
And yet, today, self-assembly of furniture is not as labor-intensive and incomprehensible as it used to be. Of course, it will require knowledge of the design features of various pieces of furniture and possession of the simplest tools.
In a furniture showroom, it is convenient to buy furniture that is already assembled, which only needs to be placed in the right place, but the offer of different types of furniture is so large that you do not have to buy it in the first store.
In addition, when ordering furniture for self-assembly, it is often much cheaper and comes directly from the manufacturer.
Many models come with assembly instructions, which you can always refer to if you have any further questions. And after you assemble at least one cabinet, I guarantee that you will cope with all the other elements much easier.
How much did we save?
Our wardrobe is a unique model. I haven't seen these on sale. I tried to calculate how much I managed to save. To do this, I found a company on the Internet that makes furniture for balconies.
The cheapest set of a cabinet and a cabinet costs 15.5 thousand rubles. Prices for such furniture of a higher class - from 19 thousand. We, in fact, have two such sets - that’s already 38 thousand rubles. Add to this a table top, a cabinet for storing skis underneath - about 11 thousand more. Total - 49 thousand. Our homemade product cost 23 thousand. Even though prices have increased in six years, they certainly have not doubled.
Read also: Why are lymphocytes in the blood elevated?
Prices for balcony cabinets in a furniture workshop
General recommendations
Once your furniture has been delivered, ensure that the number of boxes matches your order and that all items needed to assemble the furniture you ordered have been delivered.
- Whenever possible, try to always follow the manufacturer's instructions when assembling each item.
- Before you begin assembling furniture, carry out all planned repair and construction work, such as moving utilities or laying tiles.
- Use an angle iron and a spirit level to check the levelness of the floor and walls.
- Assess what material the walls are made of. Our consultants will advise you which fasteners to use to attach cabinets to a specific wall.
- Mark on the wall where the electrical and plumbing systems are located to avoid damaging them when drilling into the wall.
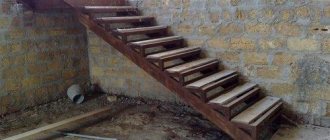
Bed
If we are talking about a standard model, then it consists of three main parts - a headboard, a frame and a base. Otherwise you will need a diagram.
The assembly process itself is not complicated and includes several stages:
- Base assembly - connecting the side, rear and head elements of the frame.
- Attaching the headboard, legs, corners and parts holding the base.
- Installation of fasteners that ensure reliable connection of the entire structure.
- Installation of the base and laying the mattress.
The rigidity of the bed can be adjusted with special screws, which should be included in the kit. If we are talking about models with lifting mechanisms, it is better to entrust this matter to professionals.
Assembling furniture with your own hands (step-by-step instructions)
Today I will try to describe as accurately and clearly as possible how the assembly works. We did this using the example of a chest of drawers with four drawers. Among all the pieces of furniture, I chose the chest of drawers because of the rather complex (at first) assembly of the guides in each of the drawers. Plus, I find it much easier to assemble a desk, cabinet, or shelf.
Let's start, of course, by opening the package with the elements and a set of necessary parts (screws, plugs, etc.). Before work, it is important to prepare the tools: hammer, rubber mallet, Phillips screwdriver and negative screwdriver.
Here is a set of small standard parts. From above: painting furniture assembly instructions, slides, furniture legs, wood pins, Vikol glue, end caps, furniture hinge, spindle, handle screws, knobs, silver screws, gold slide screws and nails.
The first step is to properly group all the elements together, as this will simplify and speed up your work.
- You can start assembling furniture directly from the bottom, that is, from the base, or you can start from one of the sides of the chest of drawers. We used the last option.
- There are many holes inside the chest of drawers. I'll explain what needs to be screwed in or driven in. Let's start with the sides and legs of the furniture.
- It is best to immediately attach them to the floor, because then it will be difficult for us to turn the entire product upside down. Nail the dresser legs.
- We insert a round furniture joint into the largest holes. It is important to place them with the cross facing up and the empty space towards the hole on the edge of our side.
- You have to do it this way because then we have to tighten the spindle to give stability to the whole structure.
Insert wooden pegs into the smaller holes. But before we put them there, we squeeze out some Vikol glue. Only now we put a peg and nail them with a hammer. We place the pins in the small holes next to the pins.
They should be screwed to the side wall of the cabinet with a Phillips screwdriver. By tightening the furniture joint with a hairpin, all places can be masked with a plug to match the color of the furniture. When we have difficulty pressing it accurately, we can help ourselves with a rubber mallet.
- When almost all the holes are on our side, we repeat the same action on the other side of the chest. Then we move on to installing and screwing the guides.
- I'm going to explain how to screw them in correctly, but you can also see how to do it with other furniture you have in your home.
- There are 4 slides in one set: two on the sides of the dresser and two on the bottom of the drawer on both sides. For now, leave the drawers alone and use the drawer runners to prepare all those with extra space above the wheel.
- We screw them in a circle to the front, to the front of the chest of drawers. To do this, we use small gold screws, which we screw into small holes on the side of the chest of drawers.
Now, to the finished side of the dresser, place the bottom of the dresser and the middle shelf in the appropriate places, which will support and stabilize the entire structure. Don't forget to glue all the holes where the pins go! Then place the dresser on the other side and the top. We tighten all the screws, blind it, and the frame of the chest of drawers will be ready.
At the very end, we nail the plywood to the back of the chest of drawers. This can be done now or at the very end of assembling the entire piece of furniture. It's time to move on to stacking the boxes. It’s good to start folding by marking the elements of the box. Then we tighten the handles, thanks to which our drawer will open, using self-tapping screws for the handles.
The box is installed quite easily compared to others, because no screws are used except for the guides. Apply glue to the places where the tenons enter and press the side firmly with a pin, using a rubber mallet to help you.
Nail the plywood to the bottom of the box. Install the guides on the sides of the drawer bottom. This time with a ring in the back of the drawer. We do this with each subsequent box. We check if everything is stable, and if so, then our box is ready. All we have to do is insert the drawers into the chest of drawers and the chest of drawers is ready for use.
Drawing Drawers
Our balcony closet does not have drawers. We encountered this headache when we were making another wardrobe - for the bedroom. I'll tell you what you need to know about these boxes at the drawing stage.
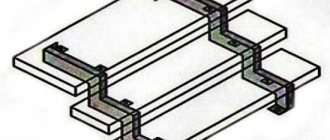
The project must take into account not only the boxes themselves, but also the box into which they are inserted. The problem is that you must not forget about the space for the internal mechanisms: guides are hung on both the drawers themselves and the walls inside the cabinet. The slides are the mechanism that allows the drawer to slide out of the cabinet.
There are two types of guides: ball and roller. Ball ones are more expensive, but their movement is smoother. Roller ones can be installed on boxes that are rarely used.
Ball guides Roller guides
The guides can be of full or partial extension. The former allow you to pull out the entire drawer, the latter do not: part of the drawer remains inside. Partial extension slides are cheaper.
On the website of the same “Seagull” there is a special designer that calculates the sizes of drawers and doors for sliding wardrobes. It is enough to indicate the width of the opening, and the system will produce a drawing with all the dimensions, indentations, etc.
In the Seagull constructor, you just need to enter the width and height of the opening, as well as the height of the box frame - and the system itself will create a drawing. After calculation, the user will receive an order form for parts
The “Chaika” designer didn’t suit us. It turned out that he only calculates gaps for fittings. When later assembling a bedside table with drawers for the bedroom, I knew in advance that I would use guides: we already had furniture with such fittings. They look very reliable. You hold it in your hands and understand: even if the cabinet falls apart from age, the fittings can be used again. And the drawers with Bloom guides slide out very smoothly. The only thing that might confuse you is the price: RUB 4,300 per set. For comparison, “Boyard” of the same length costs 678 RUR.
The instructions for each Bloom guide indicate the dimensions that must be taken into account when designing. The diagram looks very complicated - you want to close the instructions and never open them again. But if you start to understand, everything becomes clear.
The “Blum” guides are quite large, so the drawing must provide space for them between the drawers. The instructions for the “Blum” fittings look like a drawing of a spaceship. But if you start to understand, everything becomes clear
TEXTBOOK
Photo instructions for assembling furniture with your own hands
Drawers and slides
There are many ways to make furniture boxes. The simplest of them is to assemble a perimeter from laminated chipboard. If a beautiful facade is required, it is screwed onto the main frame from the inside (like the tabletop). The façade can also be secured to eccentrics as the fourth wall of the drawer.
But the main thing is not to assemble the drawer, but to secure it correctly.
Drawer guides are divided into roller or ball guides.
- Roller guides are usually attached to the bottom of the drawer. He will ride on them on two rollers. A pair of such guides costs about 150 rubles, but it is highly not recommended to use them. The main disadvantage is that they do not allow the drawer to be pulled out completely; a heavy drawer in the more than half-open position may simply fall.
- Ball guides, or as they are also called, “full extension telescopic guides,” can exactly double the length. They have many balls inside, like bearings, so they provide a smooth ride.
Roller and ball guides for drawers
- In addition, Blum has metaboxes and tandemboxes. These are ready-made side walls of drawers with installed guides. All that remains is to install the façade, back wall and bottom.
Furniture fittings
The choice of fittings for cabinet furniture is a moment no less important than the assembly itself.
| Cabinet hinges | Poorly selected loops can negate the results of your efforts. |
| Hinge mechanism with four hinges | Today this detail is being used more and more often. Adjustment is carried out both at the fastening stage and after completion of the installation work. |
| Drawer guides | You can take roller or ball ones. |
| Handles for drawer lids and cabinet doors | They need to be matched to each other. They may differ in style - it is important to adhere to a single design for the facade or interior content. For children's cabinets or chests of drawers, it is recommended to choose streamlined handles so that the child does not get hurt while moving or playing. |
Any material you are going to use must be of high quality and well dried.
What tools are needed?
The tools available in the house are suitable for assembling cabinet furniture:
- screwdrivers;
- screwdrivers;
- Sander;
- jigsaw;
- wood hacksaw;
- ruler;
- simple pencil.
The popular design with craquelure varnish makes the facade of the cabinet look original and expensive.
Sandpaper is suitable as a material for cleaning surfaces. In order to measure the elements correctly, it is necessary to do this not on the floor, but on a table, preferably a carpenter's table or something similar. You can use stools as supports when cutting off extra centimeters from the board.
To assemble a cabinet or chest of drawers, you must first calculate the parameters of the future product.
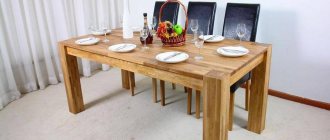
Work progress
The assembly scheme for tables, regardless of the material from which they are made, is largely similar. Let's consider the algorithm of work using the example of a product made from boards.