Along with topics describing the details of the construction of large country cottages, reports are very popular on FORUMHOUSE, where portal users share their experience of remodeling small houses. In this article we will tell you how, having about 600 thousand rubles and a great desire to provide your family with normal housing, you can convert an old house with a “cold” attic into a comfortable cottage with a residential attic. Namely:
- How to expand your living space with an attic floor.
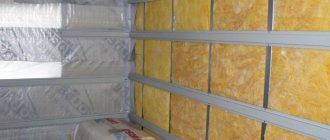
- How to properly reconstruct and insulate an old house.
- Why is there a double ventilated gap on an insulated roof covered with metal tiles?
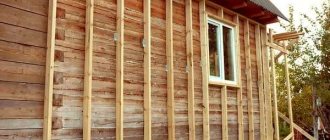
- What are the features of installing a ventilated facade?
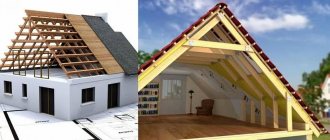
Features of rebuilding the roof into an attic space
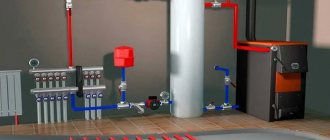
The most profitable and less labor-intensive would be the construction of an attic in part of the house project, where sewerage, water supply and a heating system will immediately be installed. However, developers do not recommend constructing an attic space for further use by the owners.
If the attic is to be dismantled, then additional fastening of the attic roof is not required, and all work is carried out in the room itself. Before you start building an attic, you should check the reliability of the floors and, if necessary, strengthen them with metal or wooden beams. Since the attic is located on the upper floors, you can get inside by stairs. Also important is the quality of thermal insulation of the roof structure, internal communications, interior decoration, provision of natural lighting and ventilation of the attic above the attic.
Drawing up a diagram
The drawing is made based on the layout of the house, the location of rooms, premises, taking into account the individual characteristics of the structure
Take into account the specifics of household equipment and lighting systems
Types of electrical wiring diagrams in a private house:
- Principled. Shows the method of connecting consumers to the circuit and the number of users. For compilation, special notations are used that are not used in other diagrams.
- Assembly room. The plan shows the components, indicates the principle of operation, and the connections between the elements.
- Structural. The functionality is shown together with the equipment after the start of work. The diagram determines what is needed for connection and configuration.
- Functional. They differ from structural ones in more detailed characteristics and descriptions.
The combined project includes several types of sketches and drawings, and is used more often in high-rise buildings.
Calculation of total power
The calculation is necessary to find out whether the characteristics of the electrical wiring are sufficient to supply energy to existing devices and newly connected units. The total power of the equipment is calculated as the sum of the power of all consumers, taking into account the magnitude of the starting currents.
Calculation features:
- information about power is in the technical passport of each device;
- active power indicators are given in W (watts), designated by the letter P;
- if the value is given in VA (volt-amperes), we are talking about total power (letter S), such readings are not suitable for calculating the total indicator.
Dividing consumers into groups
The concept is understood as a generalization of several users who are connected in parallel to the power cable. The common wire is powered from the distribution device (panel). For high power units (stoves, water heaters) a separate line is drawn. Functional sockets for a kettle, dishwasher, electric or microwave oven are included in the general group.
Consumers in the category are formed using several methods:
- by type of consumption, for example, washing machines, electric stoves, sockets, lighting fixtures;
- by room (each room is provided with a separate line);
- using the European version, when each house or apartment is equipped with its own wiring line in the house with protective devices, and the type of connected devices does not matter.
Choosing a place for the shield
The electrical panel can only be installed in a dry room
The input cable fits into the distribution panel; a machine, group switches, a meter, protective and control devices for determining the quality of electrical energy and automatic devices are mounted here.
Shield installation rules:
- shields must be encased in glass and locked with a key to prevent unauthorized access;
- panels are mounted only in dry rooms so that it is convenient to maintain;
- the installation height is determined so that the shield is higher than the expected flood level;
- from the water supply and gas mains should not be less than 1 meter.
Methods of thermal insulation of the attic
The main step in increasing the usable space of a room is the installation of an attic roof with the installation of insulation. Saving money and materials in this case is absolutely unjustified, since the level of heat loss from the attic is much higher than the lower floors. Constant contact with the environment is the primary reason that the room will quickly cool down in winter and heat up in summer.
It is important to know how to properly insulate the attic of your home. Thermal insulation, vapor-tight and non-combustible materials based on glass wool or stone wool can be used as roofing insulation. To eliminate the “cold bridge,” the slabs are stacked very tightly together. In harsh climates, it is recommended to purchase insulation no thinner than 250 mm.
As the sheathing of the attic roof is completed, insulation is attached to it with a gap of 2-5 cm. Thanks to the gap left, moisture from the thermal insulation layer will gradually evaporate. This process occurs as follows: due to air flows penetrating into the under-roof space and mineral wool, moisture is removed through ventilation holes in the roof ridge.
This blowing guarantees the presence of dry roofing and wooden structures (sheathing and rafters) in any weather. In addition, you can prevent thermal insulation boards from getting wet by placing a special waterproofing membrane on the roofing material.
The absence of a “thermal cushion” above the attic, which exists on the lower floors, as well as the fairly large dimensions of the attic roof in contact with the external environment, require serious attention to careful and effective thermal insulation.
Project preparation
Before starting work, you need to decide on your own wishes. Also, a true professional will tell you that not every attic is suitable for converting the roof into an attic. It will be uncomfortable for a person to be in a cramped closet with a low ceiling. It is optimal if its height is 2.5 meters on at least half the area of the second floor.
Before starting work, you should request a project. This way you will be sure that the construction company initially correctly interpreted and took into account your every wish. In addition, this will make it easier to prepare a preliminary shift.
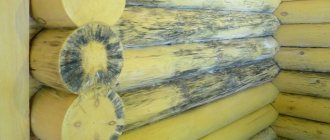
Features of using insulation
The outside of the roof is covered with a waterproofing layer, which, due to the low throughput of water vapor, promotes the formation of condensation. After some time, the results of this process will be noticeable - mold, sputum will appear, and water will begin to drip from the ceiling. In addition, the initial properties of the insulation will begin to decrease, so a vapor barrier material must be laid on top of it on the room side. If moisture gets in, it can be removed by creating a ventilated layer between the hydro- and thermal insulation. If the assembly of the attic roof does not allow such a procedure, then to access the insulation you will have to remove the top trim.
As a rule, when dismantling an attic into an additional living space, the rafter system is completely preserved, therefore, to reduce the load on the supporting structure, it is recommended to select light, non-dense materials as insulation.
Due to the wind blowing through the insulation, heat is quickly removed from the room, therefore, in order to preserve the heat-protective properties of the structure, a vapor-proof windproof material is laid on top of the heat-insulating layer bordering the ventilated material. When insulating a room, it should be taken into account that heat leaves the covering and the end wall, so special attention is also paid to the pediment. The height of the ridge of the attic roof is no less important, because as it increases, the likelihood of heat loss increases.
Constructive points
Converting the roof of a house into an attic usually does not cause any difficulties, but it is important to understand that there are different forms of pitched roofs and some of them are not very suitable for such a procedure. An ideal option for arranging an attic is a gable roof. If necessary, it can be raised by slightly increasing the walls.
As for the hip roof, it has one significant drawback - the attic space will be much smaller due to the presence of four slopes. In addition, the height of the attic floor will be less due to flatter hip slopes.
A popular bookmaker has released an application, officially you can click on the link without registration and absolutely free.
Depending on the angle of inclination of the slopes, you can determine how much the attic area will be reduced if it is converted into an attic. Thus, according to regulatory requirements, the height from the finished floor of the attic to the line of intersection of the walls with the roof slopes must be at least 1500 mm, and the height of the room must be at least 2500 mm. If in your attic this distance is less, then a system of wooden posts is placed along the slopes at the required distance from the walls so that the required wall height is obtained. Then these racks can be covered with plasterboard, clapboard or other material.
The design of the attic roof of a one-and-a-half-story house
Tip: in the space behind the racks under the slopes you can arrange additional storage spaces. This will reduce the amount of furniture in the attic floor and get more free space.
You may refuse to refurbish your attic for the following reasons:
- Small attic area or insufficient height. In this case, the converted attic will be uncomfortable and uninhabitable.
- If the roof structures and the roof itself need to be modified, replaced or completely remodeled, this will entail significant costs.
- Before converting an attic into an attic, you need to calculate the total costs for materials and installation of attic windows. It may turn out that the amount is too large.
How to properly insulate attic coverings
To create the structure of the attic roof of the cottage, a rafter system is used, where each subsequent rafter is installed at a distance of 600-1000 mm from the previous one. Insulation is placed in the resulting gaps. As a rule, thermal insulation is made from fiberglass slabs or mineral wool, where basalt fiber is taken as the basis. Laying is done in several layers. If there is a slight discrepancy between the height of the rafter section and the thickness of the insulation layer, wooden blocks treated with an antiseptic are attached horizontally to the rafter legs. You can see examples of mansard roofs with this design in the photo. In this case, the insulation must be laid in two layers: in the gap between the bars and in the gap between the rafters.
How much power will you need?
After distributing electrical equipment among rooms, you need to add up its power. You can see how much each device will require in the table, but you need to remember that there are starting currents that exceed the average values. Approximately 20% is added to the amount received to create a small reserve.
Heat shrink sleeve
The result obtained is indicated in the documents required to obtain permission. If you are provided with the declared power, then very good, but most likely, you will be given only 5 kW - the standard limit for private housing construction.
| electrical appliance | Power consumption kW | electrical appliance | Power consumption kW |
| TV | 300 | Air conditioner | 1500 |
| Printer | 500 | Water heater | 5000 |
| Computer | 500 | Boiler | 1500 |
| Hairdryer | 1200 | Drill | 800 |
| Iron | 1700 | Hammer | 1200 |
| Electric kettle | 1200 | Electro-emery | 900 |
| Fan | 1000 | Circular Saw | 1300 |
| Toaster | 800 | Electric planer | 900 |
| Coffee maker | 1000 | Electric jigsaw | 700 |
| Vacuum cleaner | 1600 | Grinding machine | 1700 |
| Heater | 1500 | A circular saw | 2000 |
| microwave | 1400 | Compressor | 2000 |
| Oven | 2000 | Compressor | 1500 |
| Electric stove | 3000 | Welding machine | 2300 |
| Fridge | 600 | Pump | 1000 |
| Washing machine | 2300 | Electric motor | 1500 |
Terrace attached to the house: 150+ Best photo ideas | Do-it-yourself step-by-step arrangement
How to properly arrange a ventilated layer
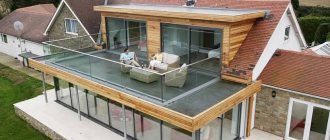
The profile design of the coating is the determining factor in the width of the air gap required for ventilation of the roof and insulation. If the roof is laid with metal tiles, tiles or other corrugated sheets, then the gap must be at least 25 mm. If rolled materials, soft bitumen tiles or galvanized steel, that is, flat sheet materials, are used for roofing construction, then an air gap of 50 mm will be required. The air gap is ventilated due to ridge and eaves openings. If a mansard roof with a balcony is being built according to the project, then ventilation can also be removed through the balcony.
How many phases
A private house can be supplied with single-phase voltage (220 V) or three-phase (380 V). According to energy consumption standards for a private house, the maximum consumption per house for a single-phase network can be 10-15 kW, for a three-phase network - 15 kW.
Three-phase input is needed only when you need to connect powerful equipment operating from a 380 V network
So what's the difference? The fact is that powerful electrical appliances can be directly connected to a three-phase network - electric stoves or heating boilers, ovens and similar equipment. However, the input requirements and wiring of the 380V network are much stricter: higher voltage, greater chance of serious injury. Therefore, if your house is no more than 100 square meters, and you do not think of heating it with electricity, you are better off using 220 V.
Methods for eliminating blowing of thermal insulation
To avoid contact of the heat-insulating material with the air ventilation layer, a vapor-tight membrane is used. It is prohibited to replace such material with plastic film or roofing felt. Another advantage of membranes that transmit water vapor is that they prevent the penetration of liquid, so the insulation does not get wet even if condensation forms.
When building a new house, windproof material is laid on top of the rafters and then secured with wooden blocks. And if, for example, an attic hip roof is installed on an existing attic space, then the windproof material is attached to the rafters using ordinary slats.
Preparatory work
At the stage of preparation for installation of wiring in a frame building made of wood, you must:
- determine a list of tools for installing cables and related equipment;
- develop a switching scheme that allows you to determine the need for materials;
- purchase the components necessary to build the wiring (it is recommended to purchase materials with a reserve in case of defects or damage).
Required Tools
The minimum set of tools and devices includes:
- hacksaw or electric jigsaw;
- hammer;
- electric or cordless drill with a set of cutters for woodworking;
- tape measure and metal ruler;
- building level;
- a set of screwdrivers with flat and Phillips tips;
- stepladder for access to installation areas remote in height;
- tool for stripping wires from insulation;
- pliers and wire cutters;
- indicator screwdriver or test device.
Consumables
To carry out installation work you will need:
- metal pipes or corrugated hoses (provided the wire is laid in the walls);
- plastic cable channels or hoses with installation brackets (when implementing external wiring);
- distribution boxes;
- sockets and switches for open or hidden installation (depending on the project);
- screws;
- connection terminals (for example, Wago);
- insulating tape or heat shrink tubing;
- additional components (for example, brackets for fixing wires or devices for attaching switches inside wooden partitions).
Drawing up a diagram
Before you build the electrical system at home yourself, you need to develop an installation diagram indicating the cable laying lines and the installation point of consumers. For example, sockets are placed on the walls along the intended installation sites for household equipment, and switches are mounted near the entrance doors.
Ensuring high-quality vapor barrier in the attic
To reliably protect thermal insulation materials from water vapor contained in the air, a vapor barrier layer is attached to its inner lower side, or rather, polyethylene film, foil material and roofing felt. The materials are laid overlapping each other, then the resulting seams are sealed with adhesive tape. Thanks to construction tape, high tightness is guaranteed and a reduction in horizontal and vertical overlap to 100 mm, regardless of the roof slope, which is especially important if you are designing an attic semi-hipped roof in a cottage or private house (read: “Attic in a private house - stages of superstructure”). Fastening the film over the bars or rafters is done using thin wooden slats.
When laying foil materials, it is important that the foil is located closer to the room, while the internal lining is applied to the vapor barrier with a small gap (see: “Interior decoration of the attic roof and its features”). Thus, shiny aluminum foil serves as a means of not only reducing heat loss through the attic space, but also reflecting thermal radiation coming from the room to the outside.
We insulate the slopes and ridge
The thickness of the insulation for slopes is calculated by specialists - we do not recommend doing this yourself, because... easy to make a mistake.
To insulate the slopes, we use low-density insulation - up to 50 g/m3, - for example, “Technolight”. More dense thermal insulation is needed where it will experience stress.
- We lay insulation slabs or mats spaced between the rafters.
Installation of thermal insulation on slopesThe slabs or rolls should be slightly wider than the distance between the rafters. Then they will stand securely and will not fall out.
If you use basalt insulation, the slabs should be 1-2% wider than the rafter pitch. For quartz insulation, this figure increases to 2-3%.
The insulation may stick out slightly, i.e. be higher than the rafters (1-1.5 cm). But, ideally, its top edge should be in the same plane as the rafters.
If we install insulation in 2 layers, we lay the slabs with the joints staggered (displaced). The joints of the first and second rows should not coincide. The edge of the slab of the second row should be in the middle of the slab of the first.
- We fix each slab or mat using a marking cord - stretch it crosswise and nail it to the rafters.
- We install a vapor barrier. Roll out the roll over the surface of the insulation. We move from bottom to top - first we roll out the material along the floor, then higher. We move towards the ridge. We lay the vapor barrier membrane like wallpaper - face up. We attach the canvases to the rafters with a construction stapler.
- We glue the joints of the vapor barrier with double-sided connecting tape (if there is no adhesive strip on the canvas).
Attention : do not forget to insulate the ridge. We cut the insulation boards at the required angle and install them with the seams staggered.
The final stage
Traditionally, wall panels, plasterboard sheets or wooden lining are used to cover rafters; working with them will not cause any particular difficulties. The rafter system must be varnished and, according to the recommendations of experts, also impregnated with an antiseptic composition. It is better to lay the floor in the attic also from natural material - wood. For better lighting of the room, a mansard roof with a bay window is more suitable, and in the absence of one, it is enough to use light colors in the design.
Drywall, endowed with unique moisture-resistant properties, allows you to model the surface of the ceiling and walls at the discretion of the developer. It is easy to install, wallpaper or paint, and does not require additional processing.
In a word, competent design of the attic space in the attic and high-quality implementation of all its stages will allow you to equip a new bedroom, room or living room for relaxation and communication with family and friends, where it will be warm and dry at any time of the year.
How to insulate?
Typically, the roof is insulated with mineral wool based on molten basalt or quartz.
| Basalt insulation | Quartz insulation |
Which material to choose?
Both insulation materials are similar in their performance properties. They are environmentally friendly and fireproof, retain heat well and provide good sound insulation.
Basalt is denser. But it is resistant to chemical influences.
Melted quartz insulation is more elastic. It is optimal for roofs of complex shapes, because... takes the shape of almost any surface. It is also lighter than basalt.
Quartz insulation is produced in the form of rolls and slabs. Their working properties are the same. Just choose the material that is more convenient to install.
| Insulation in the form of a roll | Insulation in the form of plates |
Dismantling ↑
The old covering from the old slate is removed using a crowbar and a hammer. If the sheets are intended to be used a second time, then the work should be done as carefully as possible and always by two people. If not, then simply punch holes where the slate is attached to the sheathing and throw it to the ground.
Coverings made of corrugated sheets, metal tiles or other modern materials can be reused in small areas, so they are dismantled as carefully as possible.
Do-it-yourself electrical wiring - basic rules
Before starting work, read the Electrical Installation Rules (ELD), which outline the basics of working with the equipment. Electrical wiring in the house, carried out independently, requires the following conditions:
- free access to metering equipment, distribution boxes, sockets and switches is required;
- they are mounted at a level of 60 - 150 cm from the floor;
- opening doors should not block access;
- the cable is brought in from above;
- The installation height of sockets varies from 50 to 80 centimeters from the floor. For safety reasons, they cannot be placed less than 50 centimeters from electric and gas stoves, heating radiators, and pipes. Power supply is provided from below;
- The number of sockets is determined at the rate of 1 piece per 6 square meters. This rule does not apply to the kitchen; sockets are installed here according to the number of household appliances. To power the bathroom, it is better to provide a separate transformer located outside this room (to reduce the voltage);
- the cable is laid with strict adherence to vertical and horizontal (without bends or diagonals, so as not to damage it during installation and perforation);
- horizontal ones are laid at a distance of 5–10 centimeters from the ceilings and cornices and 15 cm from the ceiling and floor. Vertically located cables are laid at least 10 cm from the edge of the door or window opening. The distance to gas pipes should not be less than 40 centimeters;
- the wiring should not come into contact with metal building structures;
- Special boxes are used for wiring and connecting cables. Connections must be securely insulated. It is forbidden to connect copper wires with aluminum ones.
How to repair or completely replace a tile roof
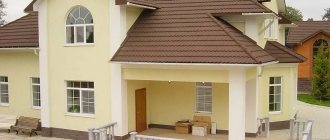
Currently, they are trying to make country houses reliable and solid, because people often live in them not only in summer, but also in winter. This involves using reliable and high-quality materials with a good service life for roof finishing. Ceramic tiles are one of the common solutions in this case, as the tiled roof is reliable and durable. Replacing a roof on an old house involves inspecting the roofing surface to identify damaged elements. If any are found, they are changed.
Ceramic tiles are characterized by a good level of strength. The service life of this material is almost on par with a copper roof. Damage to individual tiles can be caused, but this is not so easy. To split a tile in two, a very strong blow with a heavy object is required. In practice, this happens when a tree falls on the roof: it is clear that this does not happen every day. Sometimes, in a strong wind, individual tiles can be torn out of place: replacing the roofing in this case comes down to installing new elements in their place. This involves dismantling a small area, inspecting the sheathing and rafter structure below.
Complete replacement of the old roof with a new one is carried out only if there is significant damage to the roofing system. After restoration work, the removed tiles can be laid back if they have retained their integrity. This concludes replacing the roof on an old house with your own hands. If you decide to completely cover the roof, you need to choose what to cover the roof of your dacha inexpensively in order to save money.
Roof replacement: common options
Every homeowner dreams of seeing their home warm, dry and comfortable. In many ways, it depends on the condition of the roof. If there is something wrong with the roof, then problems will begin to make themselves felt one after another. So, one way or another, issues related to its current, or even major, repairs cannot be avoided.
Related article: Construction of a valley roof made of metal tiles
Many people wonder what is better, permanent roof repairs or roof replacement. From a budget point of view, it is undoubtedly preferable to patch it thoroughly. However, as practice shows, frequent minor repairs do not particularly contribute to improving the condition of the structure: it continues to wear out, and the cracks only multiply. A more rational option would be complete dismantling.
How to make a house roof after building an extension
They ask us:
Hello
, please tell me what is the best way to deal with the roof.
The house is wooden, 1960, 7 by 10 m. We made a block extension 3 by 10 m. In the summer, the foundation was completely replaced with a new one (strip foundation with reinforcement). Now the question arose with the roof.
They wanted to leave one part of the roof and lay new rafters from the ridge. The old rafters are 16 by 10, the beams are 16 by 20, the pitch is 140, the height of the pediment is 3.30. The resulting rafters are 5.33 and 7.70. In any case, we will dismantle the roof to raise the height of the ceilings. Since we wanted to leave part of the roof, several questions arise:
1. If you use old rafters on one part of the roof, do you need to assemble the old one (entirely) from the ridge to lay new rafters or attach new ones to the old rafters and put them on racks?
2. If the second part of the old roof is removed and posts are made, then what size rafters and beams should I order? After all, the load increases, the rafters will have to be joined. Although we were told to order 7 by 15 rafters and the same beams, which is even less than ours, with such a step.
What options might there be in our case?
We answer:
It’s a
pity that you didn’t attach at least a couple of photographs to the question; it would be easier to imagine the situation. But let's try without them.
As far as I understand, the problem is how best to make the roof of the house after building the extension, making maximum use of the existing rafters.
At the same time, it is planned to raise the ceilings in the house, which means raising the attic floor beams, and apparently installing new crowns.
To begin with, the rafter section size of 100x160 mm has a significant strength margin. The cross-sectional dimensions of the rafters 70x150 are also more than enough.
Beams 70x150 are quite sufficient as beams above the extension. But for the main house, we would recommend leaving it at 160x200 mm. Firstly, you will need to walk in the attic occasionally and the extra rigidity of the ceiling will not hurt, and secondly, in the future there will be an opportunity to build an attic. Despite the fact that the difference in price is small.
Now about the assembly techniques. The house is quite old, so we would recommend completely disassembling the rafter structures and carefully checking for rot and insects. Sort and sort.
Then estimate the need, the availability of suitable material, and buy the difference. Joining the old rafters with a beam of a new section will not be a problem.
Roof options may vary. The main ones are shown in Fig. 1. You can, for example, make the slope not continuous, but broken. Above the extension, make the slope smaller and the attic low or even impassable. This will slightly reduce the overall height of the ridge.
How to make a house roof after building an extension
If the rafters along the long side of the slope are composite. Stands for them, and at the junction, are quite appropriate. The complexity of the work will not increase much, and the materials will not be added much. Moreover, there will probably be a lot of scraps, so they will go to the racks. Get a rigid and reliable design.
If there are racks, the fact that the load will increase is no longer important; anyway, the strength of the entire structure will be obviously excessive.
Remodeling the roof of a house after building an extension is a complex task; it’s difficult to understand in one post. Ask questions in the comments, send a photo if possible.
Option for modifying the roof of an extension, with minimal dismantling of the old roof
Thank you, everything was well explained. We just wanted to clarify whether rafters with a cross-section of 70 by 150 at a pitch of 140 cm would be enough? After all, it will be 7.4 meters long and will be joined on a stand. We were told that such rafters are suitable for a pitch of 80 cm. We want to cover the roof with slate, a gable roof with different slopes. We thought about reducing the rafter pitch, but then we need to buy 7 meter beams, and we only have 6 meter or thicker rafters to order. Or is this rafter section sufficient?
Saying offhand that a section of 70x150 is sufficient, I confess, out of inertia I accepted the conditions of my region, the layout of the rafter system with intermediate supports, and the covering is metal tiles. But for the conditions of even the middle zone and slate, this is not enough, you need at least 75x220. Even at a pitch of 80, the section is 70x150 almost exactly. Alternatively, you can not reduce the pitch, but install racks reducing the span length. There is another point here: the fact that the length of the rafters is 7.4 m is not entirely true. Since you have supports, you need to calculate the length between them. To calculate rafters using formulas accurately, you need to know the dimensions of the entire system: the length of the slopes, the distance between intermediate supports. The construction region is also needed to calculate the wind and snow load. You can roughly estimate it yourself - there are calculators on the Internet for calculating rafter legs, let’s say here https://expert-dacha.pro/stroitelstvo/krysha/vidy-krysh/dvuskatnaja/raschet-stropilnoj-sistemy.html there are also maps indicating regions to calculate snow and wind loads. Just enter your details and watch. True, the calculators are configured with a significant margin of safety, but here, I think, more is not less.
Thanks for the calculator. He gave a minimum cross-section of rafters of 100 by 275 (Belarus, Grodno region, region of snow load - 3 (160 kgm2, wind load - 1 (23 ms)). That is, to summarize, 70x150 beams are quite enough as beams above the extension. For the main house , leave - 160x200 mm. Place supports under the rafters. Rafters with a pitch of 140 cm and a section of 75 by 220 - 100 by 275 under slate.
Yes, somewhere like that. Keep the calculator “at hand”, say, a slightly larger or smaller beam will be on sale, somehow the situation will change, you can still try different options. The principle of “measure seven times” is never superfluous.
Cable cross-sections in home wiring
Smallest permissible cross-sections of cables and wires:
| Wiring | scheme | cables | ||
| material | cross section, mm 2 | |||
| Stationary installation | Insulated cables and wires | Lighting and power circuit | copper aluminum | 1,5 2,5 * |
| Signaling and control circuit | copper | 0,5 ** | ||
| Cables without insulation | Power circuit | copper aluminum | 10 16 | |
| Signaling and control circuit | copper | 4 | ||
| Flexible connectors for cables and insulated wires | Circuit of special equipment and control devices | copper | 0,75 | |
| Other uses | 0,75 ** |
* The smallest cross-section in the house input network is 16 mm2. Aluminum wire connectors must be tested and approved for the specific application. ** The minimum cross-section of wires in signaling and control circuits connected to electrical equipment is 0.1 mm2.