Making repairs with your own hands is doubly pleasant. After all, this allows you to enjoy the process and gives you the opportunity to really get what you want. And independent actions are an opportunity to save money. As a result, this approach is very popular among us, but many suffer from it. After all, any repair involves certain difficulties that have to be overcome. And very often unforeseen circumstances or unusual situations arise. For example, there is a space above the door that needs to be filled. What is the best way to do this? What tools and materials should I use? How to properly lay the opening above the door?
Opening above the door
Let's try to answer all these questions, using photos for clarity.
Features of doorways in a log house
However, precisely because of the ability of wood to change, equipping a log house with doors and windows is not an easy task.
Modern designs - a door block, a metal-plastic window - require rigid fixation and a tight fit of the elements to the slopes of the walls. But it is precisely in a log house that the walls exhibit serious shrinkage - up to 1 cm per year, which does not allow the use of conventional installation methods. Exactly the same difficulties are faced when it is necessary to install doors to a bathhouse. However, as a rule, a wooden door block is installed in a bathhouse extension, made from the same wood that was used for construction, and this greatly simplifies the task. The entrance door to a residential log house requires sufficient strength and reliability, which a panel wooden door cannot provide.
In any case, it is possible to install a door in a log house only a year after its construction, when the most active stage of shrinkage is completed.
Causes
What could be the reasons for this situation? Essentially there are two of them:
- design features;
- inaccuracy of measurements taken.
In the first case, there are situations when the door opening corresponds to the height of the ceiling. Quite often you encounter this in bathrooms, storage rooms and even living spaces.
Opening above the door
Overhead hinges
No drilling or overhead. The most famous manufacturer producing glass doors is Leroy Merlin. This method is used only when the canvas is completely transparent and does not have a frame. Buying hinges for glass doors without drilling is required for systems installed inside apartments, shopping centers, and offices. Such canvases perform rather a decorative and delimiting function, so their canvases are light in weight and have a slight thickness. Canopies that are made in the shape of the letter P can easily withstand them.
A sheet of glass is inserted between two metal surfaces, after which it is fixed with clamps (pressure bolts). The adhesive gasket under such canopies is used for thin 5 mm glass, which is more often found in furniture doors. For thicker doors and interior partitions with a thickness of 8-10 mm, plastic or rubber gaskets are used. The weight of the canvas should not be more than 25 kg, then such loops will hold it. This hardware is much easier to install. Furniture hinges for glass doors without drilling are more noticeable on a transparent sash, so you need to choose neat and not too bulky models.
The main advantages of overhead fittings:
- the loops are installed opposite each other;
- they are suitable for interior doors and furniture;
- It is not necessary to fix such a canopy to the wall; it can also be fixed to the ceiling;
- You just need to clamp the glass sheet; installing such fittings yourself is not difficult.
There is a third mounting option - with partial drilling. In this case, no hole is made in the canvas, but only a small depression is made. This is a cross between the two methods. This approach provides a strong fixation, but it is acceptable for not too heavy sashes. This method is often used to install glass doors for furniture. Partial drilling does not violate the integrity of the glass sash and prevents its displacement, since the fastening elements fit exactly into the grooves made for them.
Eliminating a passage with a brick
When sealing openings, brick, as a structural material, has undeniable advantages. With its help, you can wall up a passage in both a load-bearing external and internal wall. Moreover, there is not much difference whether these walls are brick or panel. Although we note that in panel houses they are rarely allowed to move.
As for partitions, brick is more often used for sealing. The reason is that the thickness of asbestos-cement, plaster, or gas-block structures does not always correspond to half a brick. When the thickness differs, differences are formed, which can create certain problems during plastering.
Selection of material according to the thickness of the partition
But there is almost always a way out - you just need to try to choose the material that best fits the width. The same brick, but only solid, can be laid not flat, but on the edge, which is important for those cases when the partition has a minimum thickness (7.5-8 cm).
- You can see how it looks in the picture below, and the difference of 1 cm can be easily removed by increasing the thickness of the plaster coating. If, for example, the thickness of the partition is 9-10 cm, you can take not a single brick, but a one-and-a-half brick, which has a height of 88 mm, and also place it on the edge.
- If the wall is to be plastered, then it is better that the thickness of the “patch” be less than the thickness of the main structure. If the masonry protrudes beyond the plane of the wall, then in order to smooth it you will have to spend more plaster on the entire surface, which will entail unnecessary costs.
- Before sealing the passage with piece masonry material, you need to properly prepare the base and end surfaces. The base below should be level, without a threshold or floor covering. Usually this is a concrete slab, on which it is advisable to lay a strip of roofing material under the first row of bricks.
- So that the new masonry can firmly adhere to the old one, notches need to be made on it. If the wall is brick, you can simply remove part of the mortar from the end seams, or even slightly knock down the corners of the products to create peculiar grooves. Then the dust is carefully removed, the surfaces are thoroughly moistened with water - and you can begin sealing the opening.
The masonry is carried out in the usual way, with bandaging of the seams. For reliability, some craftsmen hammer long nails into the seams of the old masonry so that their free end can be placed in the new one. But by and large, this is not necessary.
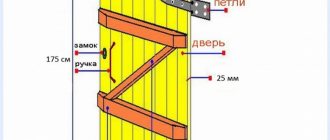
Features of installing a door structure
If you need to install wooden doors, then installation of the frame is not required; its role will be played by the casing system. An exception may be the situation when wood lining is used as a finishing material. Then the box is placed on polyurethane foam.
After installation, the box is closed with platbands. In case of severe shrinkage, they can be replaced with new ones or simply reinstalled by adjusting the dimensions.
If you plan to install a metal door, then the casing is done a little differently. Its upper part does not need to be installed. Instead, you need to leave a gap that allows settlement to occur naturally.
The main advantage of a metal door is strength. Its box is able to withstand the pressure of wood during shrinkage without any consequences.
When cutting an opening, a number of recommendations should be taken into account:
The above requirements are relevant and, if necessary, install a window. The casing must be carried out in any case, even if the opening cut in the log house is small.
When carrying out the work described above, the possibility of the formation of cold bridges should be taken into account. To avoid this, it is necessary to use thermal insulation materials, for example those with which the wall was insulated.
In other words, cracks and gaps formed during the installation process can be sealed with tow, polyurethane foam and other materials with similar functions.
It is preferable to use polyurethane foam, because it not only prevents drafts, but also gives strength to the structure. At the same time, it is much easier to use.
Law first
Remodeling an apartment is, of course, an interesting thing, but the law does not always allow you to do what you would like. This is primarily due to safety, since almost every element of the design of a residential building has its own purpose. For example, you cannot move a bathroom into a living space, and vice versa. Also, openings cannot be made in load-bearing walls. If you recklessly make any changes to structural elements, you can significantly reduce the strength.
Please note that you must coordinate any redevelopment actions with the relevant services before work begins. This way you will avoid problems. But if you do make a redevelopment, then still try to arrange everything correctly. Otherwise, over time, when you want to sell your apartment, you will have to urgently resolve this issue, which cannot always be done quickly.
In order to correctly complete all approvals, you must first go to the district administration and receive there an order to develop an architectural planning task and technical conditions. Next, we go to an organization that operates under a license and order the development of the project. Having received the project, we coordinate it with the district architect and, if all is well, we receive an order to begin work.
If we are talking about sealing an opening, then verbal approval from the architecture will be sufficient. After all, you are not destroying the structure of the house, but on the contrary, you are sealing the opening. However, everything here will depend on exactly how you decide to seal the opening. If you are drilling into a load-bearing wall, these actions may be unsafe.
With what? Choosing material
Before you start work, you need to decide on the material with which you will seal the doorway. If you want to seal it once and for all, then use one of these materials:
- Brick;
- foam block;
- drywall.
Each of these materials has its own characteristics, which we will discuss below. However, remember that if you can dismantle a plasterboard structure if necessary, then removing brickwork or blocks will not be so easy. We will also look at how you can decorate the opening without completely sealing it - such a temporary solution will allow you to avoid major repairs and approval from the authorities.
Brick
Brick can be considered the most reliable building material that can be used to seal a doorway. You can use brick to make a strong wall, which will also have good soundproofing qualities. If you have to seal an opening in a load-bearing wall, then brick will be the most preferred material.
When working with brick, it is necessary to remove the floor covering right down to the concrete panel. The walls also need to be prepared so that they can be securely connected to the new masonry. To do this, you can pull out several bricks from each side. During the process of laying bricks, it is necessary to check the masonry from time to time using a level to avoid the appearance of the so-called “belly”. Once you are done with the bricks, you can move on to the plaster.
Foam block
It is more convenient to work with foam blocks than with bricks - they are larger in size, which means the work can be completed much faster. In addition, foam blocks have excellent strength, which allows them to be successfully used when working with permanent walls. Foam block also provides excellent sound insulation.
To lay the blocks, gypsum glue is used, which is diluted at the work site. If the block needs to be sawed, then use a regular hacksaw. In order for the block to lie tightly, it is necessary to additionally tap the laid block with a rubber hammer.
Please note that a partition made of foam blocks will not withstand hanging heavy objects without additional reinforcement. Take this into account when choosing material for work.
Drywall
It’s easier to work with this material - you don’t need to fuss with mortar or glue, and all the work can be done in a matter of hours. If necessary, you can use mineral wool, with which you can make good sound insulation. This sealing option is suitable for non-load-bearing walls, which are usually much thinner.
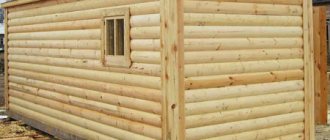
Installation of canvas in a log house
Construction of a doorway for a bathhouse
Correct installation of the entrance block begins with the installation of the flashing. This specialized structure consists of two bars connected at the top by a board.
If you plan to install doors for a bathhouse that are lightweight (for example, made from panel boards), you can get by with installing a door frame:
- from the end sides of the opening, select a groove with dimensions of 0.5 × 0.5 m;
- bars of identical size are inserted into the resulting groove;
- and the box is already attached to the latter.
Installing a door to a bathhouse
If you want to install a massive door in a bathhouse, it is recommended to use a U-shaped flashing and follow the following recommendations:
- First of all, correctly take measurements of the doorway. Moreover, its width should be identical to the thickness of the frame and the box on all sides.
- Make markings on the surface of the walls of a log bathhouse using a building level and a plumb line.
- Cut a hole in the wall of the bath house using a chainsaw.
- From all end sides of the doorway, form a tenon measuring 0.5 * 0.5 m in the form of a vertical ridge along the height of the door.
Flashing for mounting the door structure
Fix bars measuring 0.5 * 0.5 m onto this tenon. In the upper and lower parts of the frame jambs, securely secure them with a beam. The latter should be distinguished by the presence of grooves on the sides, which in size correspond to the protrusions of the bottom and top of the side posts. This design of the frame is reliable and can prevent the movement of the logs of the walls that lead to the opening. A log house in a log bathhouse should not be attached to logs. Indeed, in this case it is necessary to ensure movement in the doorway. And the insulation of cracks near the bathhouse frame can be done with a regular jute strip. After installing the frame, you need to hang the door leaf on several hinges. Their number must be at least four
To complete the task, it is important to combine the canvas and the frame with the exact location of the hinges on the sashes. Thanks to the use of wooden wedges in a log bathhouse, the position of the door leaf is secured. Moreover, it is important to leave a small gap of 20-30 mm between the canvas and the racks with hinges, and at least 50 mm between the other surfaces.
Door in a bathhouse made of logs
- Only then can you start attaching the frame with self-tapping screws. It is recommended to use at least two of them for each connection and final fixation of the pellet.
- Next, hang the door leaf on the hinges and double-check the verticality using a building level.
- Install fittings - handles - on the bathhouse door.
- Lastly, install the trims. If necessary, trim the logs.
If you purchased the door leaf and frame already assembled, the installation of the structure occurs in a simplified version. Grooves are created along the verticals of the opening, and bars are inserted into them. Moreover, the door frame is fixed to the latter
However, in this case, it is important to remember about the shrinkage of the fresh log house and leave a gap of 60-80 mm
If you follow all the described recommendations, you can easily install a wooden door in your log bathhouse, because there are no particular difficulties in this matter. The main thing is to be aware of all the subtleties, which are clearly described in our article.
Voted over 301 times, average rating 5
What will you need?
Preparing the iron entrance door for installation
The type of door you need depends on correct measurements of the opening - this is one of the most important operations, so you cannot make mistakes in this matter. Difficulties in obtaining accurate dimensions may arise if you still have an old door: the door frame makes it difficult to find out the specific parameters of the new door.
Tips for installing different types of bath doors
Following the installation instructions will help this element perform its intended functions. After all, the door protects from drafts and retains heat in the room. And its service life directly depends on proper installation. So, any door leaf should open outward. It is not advisable to remove the packaging from the product until the installation process is completed.
The entrance door to the bathhouse can be of the following types:
- wooden;
- glass;
- metal;
- from MDF, chipboard, plywood.
If your budget allows, you can opt for a metal door. It is durable, reliable and durable. However, this option is not in great demand. MDF, chipboard, plywood - all of them can be used as an entrance door. But such products are less durable due to the fact that the slabs quickly absorb moisture. This circumstance can lead to deformation of the product. The wooden option is the oldest and most traditional of all available. This canvas is attached to the frame.
https://vk.com/video_ext.php
The dimensions of the recesses should be 0.5 centimeters larger than the width of the frame beam. Such a reserve is needed to correct possible deformation of the canvas after its installation. The frame requires a beam with a section of 6 by 15 cm. When choosing a beam, you need to take into account the fact that the thickness of the canvas should be 5–7 cm less than the width of the frame posts.
You will see that the door leaf will fit tightly into the groove cut on the outside of the posts and crossbars. It protects the room from drafts. The main thing is not to confuse the location of the groove: the recess should be on the outside of the door leaf. After the timber is strengthened, you need to go over it with sandpaper to eliminate any unevenness on the surface.
The next step in installing the door is to tenon the top lintel of the frame with the posts at the corners. The entire door frame is leveled so that there are no distortions. Long anchors are used to attach the frame to the opening. After installation, you must once again check the strength of the fastening of the racks and the upper jumper. At the final stage, the threshold is installed.
After installing the door frame and threshold, the fittings are attached. It is recommended to use 3 sets of hinges: the first should be fixed 20 cm from the floor, the second - 50 cm, and the top - 140 cm. Then the door leaf with the installed fittings is hung on the frame.
When installing a glass door, you must first remove the panel. For this purpose, several screws are unscrewed using a hexagon on the hinges. Then the threshold is removed from the box. The side posts and the top crossbar are mounted in the opening, then the frame is attached. After fixing the box evenly, you can hang the glass sheet. The final stage is attaching the handle.
The steel product is mounted in the opening in the same way as wooden and glass panels. This means that the opening is first prepared, then the frame is installed using plates, screws or steel rods. The next stage is foaming the resulting gaps. The installation of the door leaf and fittings completes the work process.
Selection of plaster
Plaster for door slopes must comply with operating conditions. These may be sides inside or outside the heated room, constant or variable relative humidity and temperature, and mechanical stress to varying degrees. You also need to take into account the materials with which the solution will come into contact: concrete, wood, metal, plastic. Good adhesion of the composition to one or another base is important here.
Cement plaster for interior and exterior work Source prom.st
More often, craftsmen consider three options for dry mixtures:
- DSP.
This can be a ready-made composition or mixed independently in traditional proportions: 1 part cement and three sands. This plaster is inexpensive, but has a number of good characteristics. In particular, the material can be used in conditions with any humidity and temperature changes. The coating becomes strong and durable. When applying a layer over 3 cm, it is recommended to use reinforcing fibers or lay a mesh to avoid cracking. The composition has good contact with most types of substrate. The surface is grey, rough, with high compressive strength.
- Two-component plaster.
This is a cement-sand mixture, which includes another binder component. For example, gypsum accelerates the hardening process of the solution, slaked lime improves the plasticity of the crumbly mass. There is less susceptibility to cracking, but resistance to direct moisture is slightly reduced. That is, on a street without a canopy, it is better to finish the slopes of the external door with one-component plaster.
An example of two-component plaster Source virashop.ru
See also: Catalog of companies that specialize in finishing materials and related work
- Gypsum mixture.
Compared to cement analogs, this composition is more flexible, easier to work with, cracks less, and the surface can be created smooth enough to immediately begin painting or wallpapering. But such a composition is unacceptable for use in conditions with high humidity and gypsum has less mechanical strength. There is also the appearance of rust stains that appear through the layer.
In addition to operating conditions, before choosing a plaster mixture, you need to take into account the permissible layer. For example, it is not recommended to apply a cement-sand mixture in a layer less than 10 mm. And Rotband, known to all builders, has a coating thickness limitation of 50 mm.
Gypsum plaster Rotband Source td-komplektovshik.ru
Features of installing a door without deforming the frame
When installing a door block, you often have to secure the wooden frame with screws. Not everyone likes the fact that their heads are visible on the body of the box. This can be easily avoided. After all, in the design of the door block there are already visible screw heads that do not hurt the eye, and their presence is justified - these are the screws for fastening the door canopy. And so, if the place of one of them is used for the box fastening element, the replacement will be invisible from the outside.
To implement this idea, you should not use the upper or lower mounting hole of the canopy. The second one from the top is better, the one that moves deeper into the box. After installing the temporary fastening of the door frame using wooden wedges, the awnings are removed. The intended hole is expanded with another large drill to such an extent that the plastic dowel for quick-mount fastening together with the cap can freely pass through it. Then a hole in the wall is drilled through this hole using a Pobedit drill of the appropriate diameter and to the required depth. Insert a plastic dowel, pressing the cap all the way to the wall.
The same operation is performed with the lower canopy. At the next stage, the canopies are installed in place. A mounting nail is threaded through the hole intended for fastening the box and driven into the plastic dowel. It may happen that the gap between the wall and the frame is too large, then you should select a longer mounting nail from another quick installation kit. At the attachment point between the wall and the body of the box, a wooden spacer should be laid so that the mounting nail does not move the vertical part of the box towards the wall.
There are no canopies on the other side of the box, but there it is permissible to use a metal lock cylinder for hidden fastening. Here, to fasten the box, it is advisable to use both mounting holes of the cylinder. The end result will be an additional strengthening of the door lock.
In general, installing wooden spectacular doors with your own hands becomes an accessible task for everyone. Installing wooden doors is not difficult, but you should listen to the basic recommendations. In this case, it will be possible to correctly install the door structure and ensure the longevity of the wooden panel. Take into account the specific placement of the box and the insertion of hinges. The result will be a reliable door with an interesting appearance.
Cutting methods
To cut a doorway with your own hands, you will need a tool, but you can choose it correctly after determining the method of work being carried out. The method depends on the wall material. It is not advisable to chisel and sledgehammer, as the integrity of the entire partition will be compromised. You can carefully cut the opening using diamond, laser, waterjet or oxygen cutting.
Diamond cutting
For concrete partitions, the method of diamond cutting of a doorway using a grinder or circular saw is used. The cutting element of the tool is a metal disk coated with diamond.
The diamond cutting method has many advantages:
- low level of vibration eliminates the appearance of cracks even on loose partitions;
- during the cutting process, an accurate thin cut is entrusted along the marked contour and at the desired angle;
- the noise level of a working tool does not exceed the permissible threshold specified in sanitary standards;
- a small amount of debris due to the absence of chips, which is impossible to achieve when using a hammer drill.
Among the shortcomings
highlight the costs of purchasing expensive diamond blades. During work, the concrete wall is moistened with water, but fine dust still spreads into the room.
Laser cutting
Expensive equipment is used for laser cutting of openings. Previously, it was bulky and was used only in production. Modern laser cutting equipment is compact, but its high cost and specific purpose have made it popular only among specialized repair teams. The cutting of a concrete wall is made with a laser cutter due to the gas-discharge action.
Before starting work, the parameters of the wall
:
- thickness;
- the presence of a reinforcing frame;
- passage of communications inside the partition;
- grade of reinforced concrete wall.
Additionally, the floor of the apartment building where cutting is planned is taken into account, as well as the admissibility of wetting the concrete structure with water.
Waterjet cutting
Cold cutting of an opening in a wall refers to the waterjet method. A special installation is used for work. It creates a strong stream of water at a speed of 1 thousand m/s. The liquid in the tank is mixed with abrasive particles with a diameter of about 0.4 mm. The prepared mixture is fed through a nozzle onto the reinforced concrete structure and destroys it at the point of contact. The cutting force depends on the pressure. At the maximum power of the equipment, a reinforcing frame made of steel rods is cut along with the concrete.
The waterjet cutting method has the following advantages:
- precise cutting of concrete according to markings;
- the environment is not polluted due to the absence of chemical impurities and harmful gases;
- the concrete partition is not subject to mechanical and thermal stress;
- no wall vibration;
- low noise level;
- The method allows you to cut out a section of the partition at any angle, as well as make a doorway of complex shape.
Disadvantage
is the formation of dirt, the high cost of consumables, and the large dimensions of the equipment. Waterjet cutting is used on construction sites that have not been put into operation.
Oxygen cutting
The oxygen cutting method is also called spear drilling. To cut out a doorway, a machine with a metal tube is used. Oxygen is supplied through the spear under high pressure. At the same time, the jet is heated inside the tube to a temperature of 1400°C using a gas burner. After the spear has ignited, the external heating source is turned off. When the temperature reaches 2000°C, the tube is leaned against the concrete surface and turned slightly. During cutting, you cannot move the spear away from the concrete, as it cools quickly.
The disadvantage of this method is considered to be a fire hazard, as well as the possibility of getting burned. During cutting, hot slag particles scatter throughout the room.
Ways to fill the opening
There are several common solutions for how to remove a window in a wooden house:
- The most radical, but also the most reliable and aesthetic way is to disassemble part of the log house and replace the logs or beams. If we are talking about an attic or dormer window, this is not such an expensive solution, and it will allow you to forget about all the problems with blowing through the walls. But it should be borne in mind that old and new lumber will settle differently, so it is better to purchase dried wood and do not forget about laying insulation. When shrinkage is complete, re-caulking of the resulting cracks will be required.
- Installation of fragments of logs or beams of similar size and diameter into the hole. This is a rather labor-intensive method: the opening logs are cut at an angle of 45 degrees, the same angle is made at the ends of the insert pieces. There is also a minus: the new elements filling the hole will be very different in color. In this case, you will have to paint the entire wall to disguise the embedded part, or use another cladding option.
Frame method
How to install a window in a wooden building with minimal labor costs without cladding? There is a simple and effective method that will allow you to forget about the cold, and at the same time the structure will remain beautiful and neat. Sequencing:
The old window block is being dismantled. The doors are carefully removed and the frame is removed. There is no need to throw away the plastic system: it will be useful for a summer house, greenhouse or gazebo. The resulting hole is cleared of accumulated debris and dust. After this, a frame made of thin timber or wooden slats is installed in it. It can be attached to the wall logs with nails or self-tapping screws.
A frame is stuffed onto the frame from the outside, and material corresponding to the walls is attached to it. If the house is made of logs, they usually use a block house, if it is made of timber, a horizontal lining of the required size is used. As a result, the opening will not be noticeable from the street, and the surface will appear smooth. To avoid any difference in color tone, the wall should be painted.
Drywall
How to decorate a front door doorway cheaply and without expense? In this case, plasterboard sheets are used.
It works well for eliminating defects, such as crooked walls. In addition, you can form a new doorway - narrower than the previous one. Subsequently, it is covered with a layer of finishing putty, painted or wallpapered.
Pros: simple and cheap. But there are a few more disadvantages:
- The strength of drywall is very low. The decoration of doorways will definitely not last long if there is a child or dog in the apartment.
- It absorbs moisture well through the slightest cracks.
- Drywall has been going out of fashion for a long time. Still, it belongs to the category of cheap materials.
Preparatory work for the installation of metal doors
Before you begin installing the doors, it is necessary to carry out preparatory work, and the whole process looks like this:
- The opening is being prepared;
- Sizes are customized;
- The box is fixed to the opening;
- The cracks are sealed;
- The door leaf is installed.
It is customary to install the block flush with the wall and secure it with anchor plates. If desired, the block can be made recessed into the opening and secured with anchor bolts or steel pins. The door frame inserted into the opening is pushed apart with wooden wedges to fix the product in the desired position.
The position of the box is adjusted using a building level; the position is adjusted by moving the blades to the side or inward. After adjusting the desired position, the box will be tightly fixed and will not move during the drilling process.
Afterwards, the canvas is put on and its movement is checked, which should be free when opening and closing the doors. Next, you need to remove the door in order to secure the lintel with the threshold on the narthex side and put it on again, checking the movement again. You can correct the position of the box by tightening or loosening the nuts.
Having finished installing the box, it is left without a canvas to seal the technological gaps with polyurethane foam, having previously sealed it with construction tape. Excess polyurethane foam is cut off and covered with casing.
How to lay a window in a wooden house: step-by-step instructions and video
How to install a window in a wooden house if you need to get rid of it on the wall is not very often of interest, but it does happen. This can happen if you want to divide a large room into smaller rooms. There may be a lot of extra windows in the corner room, so it would be appropriate to make the decision to get rid of them. Otherwise, in summer there is a risk of excessive sunlight entering the room, and in winter it can be quite cool.
Getting rid of the window
First of all, it is necessary to completely remove the unnecessary window in the wall. This process begins by removing all fasteners, after which it will be possible to remove the window frame. After this, it is worth getting rid of all sorts of protruding parts, particles of solutions from previous installation work, as well as other elements that may interfere with the further work process. A large rectangular hole appeared in the wall.
Dismantling a window opening
Frame and sheathing
To create a light wall directly inside the main wall, you first need to make a frame. The material is selected in accordance with the material from which the building is made. In this case it is a wooden frame. In no case should you skimp on nails, because it is they who must securely and firmly hold this structure in the wall.
In order to remove an unnecessary window opening, it is necessary to attach slabs to the frame; these can be OSB slabs. They are long-sized chips compressed under high pressure. Each subsequent layer of such chips is located perpendicular to the previous one, which subsequently helps to provide such structural elements with an increased level of strength. These boards are distinguished by a homogeneous structure without knots, which is significantly superior to the structure of plywood. Thanks to this, the boards have high strength and durability. It is also worth noting the addition of formaldehyde to the mass of parts, due to which the slabs become environmentally friendly.
Insulation
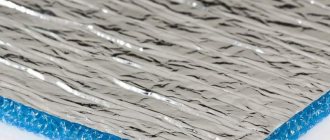
When the wall is completely covered with the above panels, the structure should be insulated using basic materials. Here are the main types of possible insulation:
- Mineral wool - the material has good thermal insulation properties, helps absorb noise and contains environmentally friendly components.
- Foam plastic - helps create a favorable microclimate in the room and protect the walls from the cold.
Note!
When insulating the walls of a house from the inside, mixtures such as ecowool, wet plaster and polyurethane foam are used.
Moisture insulation
At this stage, a drainage system or special insulation impregnated with resin should be prepared. This process helps to protect the wall from water and moisture entering the room. Due to this, the resulting moisture will flow down the walls. The insulation needs to be carefully secured; for this purpose, plastic nails are often used.
Attention!
Be sure to ensure that cracks and crevices do not appear during moisture insulation.
Facing
Finally, all that remains is to veneer the wall from the outside, after which it will be completely ready.
The inside of the wall is covered with plasterboard. An important process is the alignment of joints. If you do not have the skills to work with this material in this direction, you should seek help from specialists.
Taking into account the capabilities and taste preferences of the owners, you need to paint the wall or hang wallpaper on it.
Features of installing a metal door
Installing an entrance door made of high-strength metal means creating reliable protection against sudden entry into your home.
To reliably protect a wooden building, install a metal entrance door
Installing a metal structure in a wooden house consists of several steps:
- Arrangement of the opening. If the opening was not provided during the construction of the house, then it is cut out in a blank wall with a chainsaw. When non-solid crowns are installed in its place, then apply markings and trim off the excess protrusions of the tree.
- Installation of the pigtail. Ridges are made on the sides of the opening, onto which carriages with a groove are subsequently placed. Then the cross bars are attached.
- Installation of frame and sash. If necessary, the metal box must be insulated. After it is inserted into the frame, level the structure and secure it with self-tapping screws. The number of fastening points must be such that the load is evenly distributed over the entire wall. After installing the box, hang the canvas on four loops.
- Sealing joints. It is performed with polyurethane foam.
- Decorating the opening. To make the opening look more attractive, it is decorated with overhead strips. They are attached not to the wall, but to a metal frame.
It is difficult to install a metal door alone due to its heavy weight. Therefore, it is recommended to call someone to help you. Strict adherence to the instructions and the presence of desire will allow you to cope with this not very easy job, even if you have no experience.
DIY window bookmark
Laying openings in a wooden structure is carried out in several stages, each of which requires care, concentration and accuracy.
First, the window block is removed:
- Remove the doors and immediately take them to a safe place.
- Remove the hardware, cut and remove the polyurethane foam. Carefully remove the frame from its socket. It is not worth sawing and breaking it in the traditional way, since the product can be useful on the farm.
- Clean the opening from debris and sealant residues. Scrape or grind off areas damaged by rot.
- Treat the wood with an antiseptic and a hydrophobic agent. Wait until the material is completely dry.
In a log house, you can sew up the opening with a block house
Frame assembly sequence:
- Cut four fragments from a thick board corresponding to the parameters of the opening. There are no special requirements for casing. The main thing is that the material is well dried, treated with an antiseptic and a hydrophobic agent.
- Install casing. The boards are screwed or nailed to the walls of the opening. It is necessary to ensure that there is room for shrinkage, which in wooden houses lasts constantly. Seal the remaining cracks with sealant or foam.
In conclusion, you need to eliminate minor imperfections and defects left after installation - seal the joints, cover the cracks, if necessary, paint the insert so that it does not stand out against the background of the facade. Similar work is carried out inside the house.
Installation instructions
Installation of the product requires a clear sequence of actions. Step-by-step instructions will allow you to get an overall picture of the entire scope of work and not lose your way. Installing a metal door consists of four stages.
Metal door installation diagram
Preparing the opening
The locations of openings in the building are provided for by the design. They are made at the construction stage or cut out with a chainsaw after the house is built.
During construction, an opening for the door is cut out
The width of the opening should be 150 mm larger than required by the door structure. This is necessary to install a casing box with a width of 65 mm. It is also necessary to leave a gap of 15 cm at the top, which will be closed over time by the settled crowns.
When replacing an old frame door, preparation of the opening begins with its dismantling. Disassembling the structure will not be difficult. To do this you need:
- Remove the canvas.
If it was held on collapsible hinges, then open the door and lift it with a crowbar. If the hinges were not removable, use a screwdriver to unscrew the screws holding the sash in the frame. Removing the old door - The easiest way is to disassemble a wooden box with your own hands.
To do this, unscrew all the fasteners or saw the racks on the sides and tear them off with a crowbar. The metal box is usually sawed off with a grinder. Removing the door frame - Clean the opening from worn-out insulation, remaining fasteners, and pieces of plaster.
Assembly and installation of casing
The frame or casing is the name given to the bars around the perimeter of the opening, which form a rigid base for fastening the door. It does not prevent the shrinkage of the wooden structure, but at the same time protects the openings from distortions that appear under the influence of settling crowns. When installing the casing, a groove is made at the ends of the opening using a router.
To install the frame, you need to cut a groove at the ends of the opening
Then a beam is inserted into it. It is also called a sliding bar, along which the entire house settles. The contours of the opening remain unchanged.
A sliding bar is installed in the groove
It is also possible to use other casing structures that perform exactly the same function. The choice of connection type is a matter of taste.
Casing options
A cross-bar is installed at the top, and soft insulation is placed in the gap. The beams are extended on the sides with boards, the width of which is equal to the width of the end. As a result of these actions, a rough frame is obtained to which the iron door will be attached.
The door casing is arranged by analogy with the window
Finished casing
Installation of box and canvas
For buildings made of wood, frames with a high degree of rigidity are usually chosen. As a rule, this is a welded mechanism made of sheet material with a thickness of at least 2 mm.
Before inserting the front door frame into the opening, it should be insulated with mineral wool and thereby seal the joints. Often there are products with an insulated box. In this case, no additional manipulations are required before installation.
The gap between the door frame and the casing should be in the range from 1.5 to 3 cm. It is filled with polyurethane foam.
Once you have managed to place the iron box in the opening, align it and secure it. To ensure that the load is evenly distributed over the entire wall, it is recommended to increase the number of fastening points.
After installing the box in the opening, it is aligned and fixed
The next step is hanging the sash. There are 2 fastening methods used in iron doors:
- Welded external hinges. To put the fabric on, you need to lift it and place the top of the loop on the pin. This fastening is considered unreliable, since the loops are easily cut off.
- Hidden loops. They are inserted into the sash or hatch and are considered burglar-proof. To carry out installation, you will need a hex key, which is used to tighten the fittings.
By opening and closing the door, check that it is hung correctly
The correctness of the door hinge is checked by opening and closing it.
Filling cracks with foam
After installation is complete, it is necessary to foam the cracks around the iron box. If you don't want traces of foam to remain on the frame, cover its edges with masking tape.
After the polyurethane foam has hardened, its excess is removed. As a decoration, the metal door is framed with platbands. The overhead strips are not attached to the wall, but to a steel frame.
Tile
Decorating with tiles is only justified if it is in harmony with the surrounding design. Basically, it is used to finish the slopes at the metal entrance, and to match it. Ceramics “metal” or “stone” are suitable for this.
It is almost impossible to break, scratch or break tiles. Glass glaze is much harder than steel or aluminum, which is used to make rivets and clothing fittings.
Of the minuses: before you make the slopes of the front door with your own hands, you will need to perfectly level the wall.
Basic information
In timber buildings, doors and windows can be installed both during the construction of walls and after all construction work is completed. And the bathhouse is no exception to these rules.
In the first case, it is necessary to take into account that the log house dries out over a certain period of time and gives rise to sediment reaching 60-150 mm. Therefore, this factor can affect the quality of door installation as a whole. Therefore, the best option would be if it is installed after the constructed log house has stood for about 6-8 months, or even a year. As a rule, this is enough so that the degree of further shrinkage cannot adversely affect the geometry of the doors or windows. Moreover, to guarantee this, we will provide for such a possibility and take appropriate measures.
So, let's begin the process of installing the door in the steam room. We have already made its canvas earlier (see the article “How to make a door for a bathhouse with your own hands”). We will work with him.
Complexity and pitfalls
Wood is a living material that constantly breathes. After installation on the foundation, the log house must stand from several months to several years before it is subjected to subsequent finishing. Shrinkage can reach 15% of the height of the frame.
Even after shrinkage, in a house that has already been completed, the wood will still continue to breathe. Wood absorbs moisture and releases it depending on the state of the environment and air humidity. The permissible values for changing parameters are 1 centimeter per 1 meter of wall height, that is, a one-story log house will move by 2-2.5 cm, a house or bathhouse with two floors will be up to 5 cm.
When a house breathes, the geometry of the object may be disrupted. The weakest points are window and door openings, since the size of the metal door leaf, window frame and glass does not change. During construction, shrinkage and operation, it is important to ensure that these elements have a rigid and unchanging shape.
Non-standard solutions
In addition to the above standard methods using popular materials, you can use more original options that will highlight the interior, decorate the front door and surprise your friends:
- Artificial stone is a non-standard finishing of slopes. The main advantage is resistance to mechanical stress (if it is not a plaster model, it is fragile). Not a cheap option, requires the participation of a specialist.
- Tile. A type such as clinker (imitation brick or stone) is suitable.
- Plastic panels are an affordable but unreliable finish.
- Decorative plaster – in terms of aesthetics and durability, it has no equal. But you will need to work hard to find a good specialist in this field, because this work requires a creative approach and professionalism.
Materials can be combined if their properties are similar (sandwich panel parts + stone, laminate + tile and others).
Plastering slopes
[flat_ab > Slopes are most often plastered along with the entire apartment when the finishing is not completed.
- Putty knife.
- Level.
- Master OK.
- Rule.
- Painting mesh.
- Painting tape.
- Painting corners.
- Construction mixer.
- Plaster (dry mix).
- Finishing putty.
- The primer is liquid.
- Sandpaper.
- Water-based paint.
Do-it-yourself plastering sequence:
- Prime.
- Install and fix the beacons using a level.
- Close the junction of the wall and the slope using a painting corner.
- Cover the front door and frame with masking tape
- Attach the painting mesh.
- Make a solution.
- Fill potholes.
- Apply the solution to the entire surface, stretch along the beacons, then wait for it to dry and seal the cracks.
- Prime.
- Level with finishing putty.
- Wait until dry and sand with fine sandpaper.
- Paint with water emulsion.
If we are talking about a private house, it is advisable to treat the cleaned opening with an antifungal primer before work and add a little to the solution itself.