If you are not a professional, then installing a plastic pool in your country house
We recommend entrusting it to specialists so that it serves you for a long time. The installation process of a plastic pool includes the following steps:
- preparation of the foundation (dig a pit, strengthen the bottom with polystyrene foam, concrete, sand)
- installation of the purchased plastic container in the pit
- construction of formwork around the bowl
- installation of embedded elements (bottom drain, lights, skimmer, nozzles, etc.)
- filling with water
- filling the distance between the formwork and the font with sand-cement mortar
- edge trim
- connection of communications
ORDER Please note that you do not need to finish the inner surface of the hot tub and seal it, and this significantly saves your money.
Types of pool waterproofing
It is recommended to seal both inside and outside the pool. The external one is no less important than the internal one, as it protects the pool from water that is in the ground. The internal one protects not only from moisture, but also from chemicals that disinfect water, but can have a detrimental effect on the integrity of the structure. To ensure protection from moisture for many years, you need to take a responsible approach to the choice of material for waterproofing.
It is advisable to seal both inside and outside the pool
Calculation of materials, determination of size
Preparatory work includes choosing a location for the pool and developing a project. Pay attention to the following points:
- The future swimming tank should be located as far as possible from trees and bushes. Roots growing underground can damage the structure, and leaves will fall from the branches.
- On the other hand, the distance between the artificial reservoir and the water supply should be small.
- Owners of plots with clay soil are lucky. This soil retains moisture much better.
- When marking, take into account the fact that the finished pit should be one meter wider than the pool area.
In addition to the polypropylene itself, construction will require bricks and concrete, steel rods, crushed stone, and geotextiles. The latter can be replaced with polystyrene foam (if available).
The secret of construction: for the bottom and walls, use material of varying thickness. The diameter of the walls will be larger.
Modern manufacturers produce polypropylene sheets of different sizes and diameters. The most common options: 150 x 300 and 200 x 400 centimeters. The thickness varies from 0.5 to 1.5 cm. The minimum threshold for an artificial reservoir is 0.8 cm. Anything thinner will have an unaesthetic appearance. And when gluing the seams it can tear.
Polypropylene sheets
To calculate the required number of sheets, you will need to know the volume of the bowl. It doesn't matter if you are building a tank of complex shape. It is simply divided into simple shapes. The resulting volume values are summed together. To calculate the volume, use a simple formula: V = a ∙ b ∙ h, in which a is length, b is width, h is height.
We substitute the obtained values into the table. It will help you calculate the exact number of sheets:
| Length, mm | Width, mm | Depth, mm | Volume, m3 | Sheet size | Number of sheets |
| 4000 | 1500 | 1500 | 9 | 1500x300 | 5 |
| 6000 | 2000 | 1500 | 18 | 1500x300 | 10 |
| 8000 | 2000 | 2000 | 32 | 2000x4000 | 7 |
| 6000 | 3000 | 2000 | 36 | 2000x4000 | 10 |
To calculate the amount of concrete, take into account the perimeter and volume, as well as the diameter of the gap. Usually this value is 30-40 cm. And if you multiply the area of the base by the height of the layer (30 cm), you will get the amount of crushed stone that you need to stock up on.
A lattice of rods will help to strengthen the base, but even here you can’t do without mathematics. We calculate the number of transverse rods using a simple formula: divide the width of the base by 20 cm (grid pitch). Determining the number of longitudinal rods is also easy. It is enough to divide the length of the base by the width of the step. The rods are connected with wire - each connection will require approximately 40 cm. Also stock up on brick halves - we will place a grate on them.
Pool bowl diagram
Cement based solutions
Mixtures for waterproofing swimming pools consist of cement, sand, and polymers. This insulation option is excellent for outdoor and indoor pools, as it can withstand temperature changes. A high degree of adhesion (adhesion to the surface) makes this material convenient for independent use. Tolerates loads well. The disadvantage is that the material is not elastic, so it can form cracks or pores under load. This problem can be solved by making silicone seams that will take the load when compressed or stretched.
Waterproofing a swimming pool with a cement-based solution
Where and at what cost can I order this turnkey work?
The installation of a polypropylene pool should be ordered from specialized organizations with qualified workers and the necessary equipment.
It is necessary to check that the organization operates officially and provides a guarantee for the work. This is an important point, since there are many unofficial brigades operating.
The cost of installing a polypropylene bowl costs an amount approximately equal to the price of the material. It is difficult to name specific amounts, since the final price depends on many factors.
For most organizations, prices start at 35,000 rubles and increase in accordance with the volume and scope of work.
Penetrating waterproofing
Coating waterproofing for swimming pools penetrates deep into the pores of concrete and clogs them, thereby preventing moisture from entering. The mixtures also use a special polymer. The composition can penetrate to a depth of half a meter. The mixture not only protects from moisture, but also increases frost resistance and prevents the development of fungi in concrete. The disadvantages include the fact that the material is quite difficult to work with. It is especially difficult to apply to joints, seams or equipment connections.
Pit digging technique
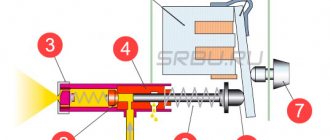
Before you make a polypropylene pool with your own hands, check the possibility of renting a hot air gun and an extruder in your city. They will be needed for assembly. Otherwise, you will have to buy the installations in a store, and this is expensive.
If you plan to dig a pit yourself, without the help of specialists with an excavator, be prepared for long, painstaking work. Stock up on a shovel (or better yet, two – bayonet or scoop), a cord, wooden pegs, a level, a pencil and tape measure, and buckets. Let's get started:
- Drive pegs around the perimeter and pull the cord. This will mark the boundaries of the pool. But be careful! We make the depth half a meter greater than expected - there will be a concrete pad below. We also expand on the sides, because we need to take into account the laying of communications and the indentation for pouring concrete.
- When the pit is dug, level the bottom and compact it. Place geotextiles and a 30-centimeter layer of crushed stone on top (even more is possible). Use a spirit level to level and tamp down thoroughly again.
- Next, the grid of reinforcement is installed on the brick halves. The optimal rod diameter is 10-12 mm. It is very convenient to pour concrete using a wooden chute. The mixture is quickly delivered to the pit and distributed evenly. It has been established that the concrete of a future polypropylene pool dries in 5-6 days. In case of precipitation, the base is covered with polyethylene, after drying it is lined with geotextiles and polystyrene foam.
Waterproofing film coating
Among film coatings, the most popular membrane is made of polyvinyl chloride. The big advantage of this insulation method is the wide variety of colors. Thus, the coating not only protects the reservoir from water, but also serves as a good decoration for the bowl. You can find films with tile, marble, or intricate patterns. It exists in different densities. The film is resistant to damage, can take any shape and does not “be capricious” if the base underneath is not perfectly flat. Can tolerate temperatures from -50 to +80. Laying PVC film with your own hands is not a difficult task, but still, for monolithic permanent structures it is better to choose a more durable and reliable material.
Choice
The choice is purely individual. We will not advise you on a specific finishing material for a number of reasons:
- Each material costs differently. Start from your budget.
- Some materials are suitable for indoor pools, while others can only be installed with open ones.
- Everyone has positive and negative properties.
- The preference factor is also taken into account. Some people like marble, others are crazy about mosaic tiles.
We have described the main characteristics of the most popular finishing materials for arranging swimming pools. Choose the material that you think is most relevant.
Liquid rubber for waterproofing
Liquid rubber is ideal for waterproofing a swimming pool. It is a bitumen-polymer mastic that is applied to surfaces. This method allows you to obtain a seamless coating that well protects the reservoir from moisture. Sometimes it is combined with other insulation methods, such as film.
Liquid rubber is ideal for pool waterproofing
Since the substance is water-based, it can be easily applied by sprayers or rollers. In order for the material to harden later, it contains calcium chloride, which plays the role of a catalyst. Once applied, the salt draws out water, resulting in a hard but flexible coating.
The disadvantage of liquid rubber is its instability to sunlight. The bottom is usually protected from ultraviolet radiation by a thick layer of water, but the upper layers may crack or collapse.
Insulating coating liquid glass
Liquid glass, also known as sodium silicate, is the most proven insulation method. For this, an aqueous solution is used, to which an acrylic polymer is added, which provides a durable coating. Thanks to the water base, the material penetrates the pores of concrete and closes them. The advantage of liquid glass is that it tolerates temperature changes well. The disadvantage of this method is that liquid glass can begin to collapse without moisture, for example, if a reservoir is left without water for a long time.
To apply a coating efficiently, you need to take into account its features. The mass sets very quickly, so you need to prepare the solution in small quantities and try to use it up as quickly as possible. Liquid glass cannot serve as a top coating; it must be top coated with a finishing layer in the form of varnish, mosaic or tile. The seams between the tiles are sealed with epoxy.
Insulating coating made of liquid glass
External moisture protection of the bowl
Insulating the exterior is very similar to insulating the foundation of a building.
For it they use:
- clay;
- penetrating mixtures;
- films;
- coatings;
- hydroglass isolol;
- injections.
PVC waterproofing is carried out in several stages:
- if the groundwater is high enough and reaches the bottom of the bowl, drainage needs to be done. To do this, holes are dug under the bottom of the pool and filled with crushed stone;
- we make a concrete screed;
- We lay out the insulating material and weld the seams.
If you are insulating an already installed reservoir, you need to clean the walls from soil or dirt, moisten them with water, and cover them with an insulating solution. Exactly one day later you need to apply the second layer. After drying, it is not the soil that is filled in, but the clay.
Waterproofing the pool with PVC film
Repairing the walls in the pool with your own hands: photos and features of finishing the room
The pool walls should be lined with practical and moisture-resistant materials. Plastic and siding are very popular among wall decoration, which we will discuss below.
In terms of their properties and characteristics, these are almost identical materials. True, one is sold in strips and sheets, but the technical indicators will remain unchanged.
These materials:
The surface of plastic or siding can be:
Attention! There are no restrictions on the use of this or that surface of plastic or siding for finishing the walls of the pool. In his choice, a huge role falls on the interior of the room itself.
Installation of plastic or siding when repairing walls in a pool with your own hands
For such work we offer detailed instructions. Following it initially, a lathing is created on the surface of the walls - a kind of frame. Typically, metal, rather than wood, is used in damp rooms.
Attention! If a wooden frame is created, then upon completion of its installation the surface must be painted to protect it from the negative effects of the environment.
Attention! Each joint of a sheet or strip must be treated with a sealant, which will ensure its greater tightness.
A starting strip is installed along the top of the room, intended for installation of the material. Each of the corners is decorated using decorative plastic corners.
They are mounted after installing the material using a stapler or using liquid nails. The whole process is quite simple, and you can watch it on video.
Do-it-yourself pool wall repair: photo and choice of material
As for the cladding of the walls of the pool and its bowl, it is usually done with ceramic tiles. This type of material is most often used for finishing swimming pools.
Ceramic tiles can have different surfaces:
Attention! The pool bowl should be covered only with tiles that have a rough surface, otherwise it will slip.
Peculiarities:
Lining the bottom of the pool, as well as its walls, can be done with any size of ceramic tiles. There are the following main sizes of ceramic tiles used in cladding: 20x30, 60x60, 30x30 cm.
What is required to install ceramic tiles?
Tiling the pool bowl is done by:
Attention! Before work, you need to prime the surface, thereby organizing better adhesion of the concrete solution. First, the pool bowls are lined inside the structure, after which all work moves on to the walls. True, this is only if you choose ceramic tiles that have the same size. In other cases, you can start from the walls of the structure.
how to cover a glass balcony
Finishing the pool with porcelain stoneware
This material is stronger and more practical than simple ceramic tiles, despite the fact that it is one of its subtypes. Therefore, quite often the pool is lined with porcelain stoneware. Tiles have similar types of surfaces, but are slightly more expensive.
The benefits will be identical:
Attention! The pool bowl is faced exclusively with porcelain stoneware tiles, which have a rough surface, while the walls can have a glazed, polished surface.
It is worth considering that when finishing a pool with porcelain tiles, it should also be located around the structure (on the floor).
The process of installing porcelain tiles
Finishing the walls in the pool using porcelain stoneware is done in exactly the same way as when using ceramic tiles.
Thanks to the installation of cross beacons, you will achieve a uniform distance between each tile during installation. After drying, decorative putty of one shade or another is applied to its surface.
Finishing the pool with PVC film
Pool finishing technologies using PVC film can vary greatly. Some mount it on a metal frame, which is then treated with sealant and covered with ceramic tiles, while others mount it on the surface of the walls.
Main characteristics:
Installation of PVC film
Repairing pool walls with your own hands can be done even by a non-professional, since you won’t encounter anything too complicated.
Attention! If the cladding technology involves the use of a specific frame for installing the material, then it must be profiled from metal, since wooden sheathing is afraid of moisture and can become deformed if it gets in.
Outdoor pools and their finishing options
Pools located on the street differ from indoor ones only in that they are not located indoors. The lining of an outdoor pool is not much different from an indoor one.
However, only moisture-resistant materials can be used:
Quite often, such pools are lined with mosaics, the size of which is 20x20 mm, although it can be larger than 20x30 cm. Here, all the main mosaic elements are already attached to the base, through which high-quality and quick installation is done.
An original solution - painting on the walls of the pool
Wall painting is the simplest, easiest and most affordable way to create an interior that promotes relaxation. And you can create the appropriate atmosphere even without the help of professional artists. After all, a swimming pool is the best place to relax. Swimming in the water will quickly relieve tension in your body and negative thoughts. Therefore, it is important that the interior of the pool promotes peace and relaxation.
If you want to visually expand the space, we recommend that you choose a wall painting or a classic style that will fill the room with light. It’s good if your pool room has support columns that will stand out from the general background and complement the wall painting. To support the painting, a “sky” painting can be applied to the ceiling. Light clouds reflected in the water can create the complete illusion of freedom of space and the absence of a ceiling.
As a result, the result is an imitation of a terrace on the Italian coast. It seems that a few more steps and you will find yourself on the sand, which is heated by the Italian sun and plunge into the azure waters of the Adriatic or Mediterranean Sea.
In order for the entire composition to look as realistic as possible, wall painting should be done using the airbrush technique, reflecting the possibility of transitioning from tone to tone. Considering the characteristics of the room, we recommend choosing matte acrylic varnish and acrylic paints.
Source
Internal waterproofing of the pool
Ensuring the tightness of the inside of the reservoir is the most important step. Therefore, it is better to use several methods at the same time.
Waterproofing installation technology:
- When pouring a bowl of concrete, you can initially add a plasticizer, which will increase the insulating capabilities of concrete. Leave the bowl to dry;
- Cover the resulting cracks with sealant or resin;
- cover the base with a screed with self-leveling properties;
- Apply plaster to a flat surface;
- Using sandpaper we make the surface slightly rough to ensure better grip;
- cover with primer and let dry;
- Apply waterproofing material in 2-3 layers. We pay special attention to places with cracks or other defects;
- after drying, check the bowl for leaks;
- We finish the work by lining the reservoir using tiles or other methods.
Using different materials will allow you to protect your pool from water for many years.
Mosaic
| Surely you have all seen swimming pools decorated with glass mosaics. The small size of the elements allows you to finish a pool of any shape. Mosaic has a wide range of colors, allowing you to create individual color solutions, make smooth transitions from one color to another, and add panels (various patterns). |
| pros | Minuses |
|
|