If you decide to start construction, then be prepared for serious financial costs.
To save significant money , you need to do most of the work yourself.
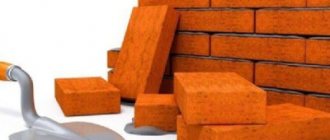
Every home craftsman is capable of laying bricks on his own, he just needs to have the desire and understand the technology for performing these works. No imitation of masonry can replace natural brick
Types and methods of installation
If we talk about what brickwork is, then it is a structure made of bricks, and they are laid in a given order and connected to each other with mortar.
The classification of brickwork will depend on its complexity and where it is used, so
there are several groups:
- the simplest masonry , it is used for cottages and houses, it involves the construction of any walls, and the work is carried out without architectural elements;
If the height of the corbels and cornices is no more than 4 bricks, they are not considered architectural elements, and this type of masonry is classified as the simplest.
- simple complexity , in this case decorative parts in the form of cornices, bay windows, belts, semi-columns and other elements make up no more than 10% of the wall surface;
- medium complexity , the part of the wall with architectural elements is no more than 20% of its area;
- complex , in this case decorative elements account for up to 40%;
- especially difficult when creating arches, domes and other elements that have a complex curvilinear shape.
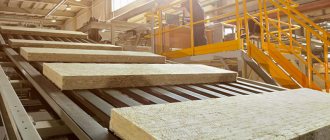
Depending on what materials are used during masonry, it differs into the following types:
- from solid brick made by plastic pressing, it is used to create walls, chimneys, and underground buildings.
- Hollow bricks are used to make any building walls. If we compare such masonry with that made of solid brick, then its thermal conductivity will be less, which makes it possible to make the wall 20-25% thinner, and its weight is 20-30% less, which reduces the load on the foundation.
- Concrete stones are used to create foundations and underground spaces.
- from hollow concrete stones ; if they are lightweight concrete or slag concrete, then to protect them from the effects of natural factors, such surfaces must be plastered.
- Hollow ceramic stones have low thermal conductivity, which allows masonry to be made 50% thinner than that made from hollow bricks.
- Silicate stones are used for the construction of any walls.
- Natural stones are used to construct foundations, underground structures and plinths.
- Natural stones having the correct shape.
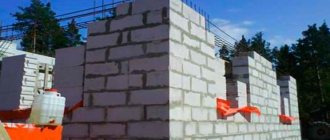
The masonry option with insulation in the photo below allows you to insulate brick walls during masonry.
Both brick and stone have edges: an upper and lower bed, spoons, which are the long side sides, butts, the short side sides, and there are ribs at the intersection of the edges.
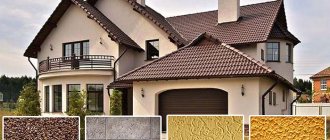
Briefly about the choice of material
At the moment, manufacturers offer 4 types of facing bricks (listed in ascending order of price):
- silicate – white and colored;
- ceramic;
- hyper-pressed;
- clinker.
Note. The last 3 types of material are sold in several colors - traditional red, yellow, brown, black and various shades of gray. Strength and durability do not depend on color.
Decorative facade bricks are usually made hollow, the front side is smooth or embossed, imitating chips or natural stone. The building material can also be purchased in solid form, but it will cost more.
The standard size of a single brick is 25 x 12 x 6.5 cm, but there are other options on sale:
- one and a half 250 x 120 x 88 mm;
- “euro” clinker 240 x 115 x 71 mm;
- bars 125 x 120 x 65 mm.
This is what a full-bodied hyper-pressed stone looks like
To choose the right stone for facade cladding, builders without experience should pay attention to the following recommendations:
- Study the characteristics of the types of brick you like and select the best building material for frost resistance.
- Look how much volume the voids occupy. Try to choose a fuller stone with fewer internal cavities. The front wall - the spoon - should not be too thin.
- Inexpensive types of bricks are often made with a slight curvature - the spoons are wider in the middle than at the edges. It is difficult for a beginner to place such material.
- Calculate the amount of building material for laying the front wall around the house and add a margin of 15-20%.
How many bricks will be needed per cubic and square meter of masonry is shown in the table.
Technology
Before starting this work, the foundation of the building is created and the outline of the wall is marked using a cord. Brick laying is carried out from left to right, and consists of the following steps:
- using a trowel, apply and straighten the solution;
- the brick is brought to the place of laying, its position relative to the marking is controlled;
- When the brick is settled, do this with a hammer until its top edge coincides with the markings made;
- excess mortar is removed using a trowel and placed between the ends, and the remainder on the upper bed.
If you plan to joint the wall, then it is done along the external seams after the mortar has dried, and can be made with either a convex or depressed seam.
Tool
If you decide to carry out these works yourself, then to carry them out you will need the following tools:
- pickaxe hammer;
- trowel;
- level;
- square;
- measuring instruments;
- cord;
- bucket;
- shovel;
- concrete mixer or container in which the solution will be mixed;
- device for laying bricks (template).
How to make a styling device with your own hands, see the photo below .
In addition, you need to purchase the required amount of bricks and make the mortar correctly.
Solution
It can be cement, lime or lime-cement.
To make cement mortar, cement and sand are used in ratios from 1:3 to 1:6; lime mortar is fragile, so it is not used in the construction of residential buildings.
When creating a lime-cement mortar, sand, cement and lime are used.
Brand of mortar for external walls:
- at humidity 60% or less - not lower than M10;
- up to 75% brand no less than M25;
- at 75% or more - no less than M50.
You cannot prepare a lot of solution at once, because it must be used within 1.5 hours.
Types of dressings
To make the wall strong, the masonry is carried out in such a way that the top brick rests on two or three lower ones and overlaps the seams between them.
Properly performed dressing allows you to create strong and stable walls, evenly distributing the load; in case of incorrect installation, additional reinforcement of the walls will be required.
There are three main systems:
- Single-row chain , provides for alternating spoon and butt rows with each other, which ensures high reliability and strength of the building. This dressing is usually used in cases where the use of facing bricks is not planned.
- Multi-row , 5-6 spoon rows are performed, which are tied with stitching ones.
- The three-row system is a variation of the multi-row system: every three spoon rows alternate with tie rows; it is usually used when creating piers and columns to give them high stability.
To create walls, the following masonry methods can be used:
- end to end;
- in the butt with trimming the mortar;
- press in.
Which method to choose will depend on several factors: the quality of the mortar, the time of year, the brick used and the requirements for the cleanliness of the outer part of the wall.
Carrying out jointing of external walls
For external walls exposed to precipitation, it is not recommended to use rectangular recessed jointing.
- To create a beautiful appearance of the wall, seams can be sealed, which is called jointing; it can be of the following types:
- Flush jointing is the easiest way; in this case, the seams are cut at the level of the wall using a trowel, and then treated with a brush and hard bristles.
- Rectangular recessed jointing , when it is carried out, the mortar is removed from the seam by 5-6 mm, after which it is compacted and smoothed.
- Concave , to perform it you will need a special tool, in this case the excess mortar is cut off and the seam is processed with a semicircular joint;
- Beveled , it is used in harsh climatic zones, using a sharpened trowel, the mortar is cut at an angle.
When jointing brick walls, all vertical seams are processed first, and then they move on to horizontal ones.
According to accepted standards, the horizontal seam should be 10-12 mm thick, and the vertical seam thickness should be 10-15 mm; in order to save mortar, some builders make thin seams measuring 3-4 mm.
Preparation
When performing jointing on an old building, preparation is required. The walls must be cleaned as much as possible from contamination. Use a stiff brush to clean the seams. Then you should moisten those that are to be worked with.
You should not do jointing in hot weather or in the rain. In hot weather, the solution will dry out too quickly, and during rain it will pick up excess moisture. If it rains during work, it must be stopped and the wall covered with film. The best weather for work is cloudy with high humidity.
Solution
After preparation, you should prepare a solution for work. Stores sell dry mixture for jointing or ready-made solution. The dry mixture is diluted with water. The required quantity is indicated on the package. The instructions must be followed strictly, observing all proportions. It is important that the mixture or solution is not expired. To mix, you need to use a drill with an attachment, since the process is labor-intensive. It is not recommended to mix the entire solution at once; it is better to make a piece of the wall and prepare the solution again for a new one. The solution should be homogeneous, without lumps. It must be used within half an hour after preparation.
Quality control
It is necessary to control the quality of brickwork at the stage of preparation for masonry, during masonry and when the object is accepted.
At the laying stage, the following indicators are monitored:
- thickness and width of walls;
- seam thickness;
- deviation from the vertical axes, per floor it is allowed no more than 10 mm;
- deviation from the horizontal, per 10 meters of the wall, no more than 15 mm is allowed;
- unevenness of the vertical surface, when using a meter rod, should be no more than 10 mm;
- correctness of the dressing;
- if reinforcement is carried out, then the correctness of its implementation;
- filling seams;
- if work is carried out in winter, then the temperature of the air and solution.
To carry out control, a building level, a plumb line, a metal ruler, a tape measure and a rule are used.
Functional purpose of jointing
Jointing is not always used; some buildings do without it. So why do you need jointing for brickwork?
The aesthetics of the building have already been discussed. In addition, it increases the tightness of the wall, its resistance to external influences, and protects against water ingress. This extends the life of the building.
The destruction of the cement base is prevented, and the building does not need repairs for a long time. Its thermal insulation and sound insulation properties increase.
Sheathing is used:
- Most often when finishing external walls.
- Beautiful jointing of a brick wall is necessary in cases where the interior wall of a building should be especially colorful. Any wall can be further decorated by using a mortar for jointing in a color that contrasts with the brick.
- Jointing is also used for walls made of natural stone.
- It can be carried out at any stage of construction. Sometimes this is done during construction, sometimes when the building shrinks. It is easier to do this work right away, since the solution has not had time to harden.
- If the jointing is carried out on an old building, the removal of the old mortar needs to be deeper, up to 15 millimeters.
Price for work
Today the range of prices is very wide, it all depends on the region and the skill of the worker, for example, the cost of installation work:
- rough masonry costs from 1500-3000 rubles/m3;
- finishing from 2000 to 3500 rub/m;
- rough partition 300 -700 rub/m2;
- finishing cladding 700-1400 rub/m2.
Sometimes builders calculate the cost per piece, from 5 to 7 rubles/piece , but immediately specify what is included in the masonry, whether the laying of roofing felt, masonry mesh and reinforcement is taken into account.
In Crimea, a pricing system is practiced: cost of work = cost of brick , for example, laying one shell rock costs 30 rubles.
Video description
To see what laying bricks looks like in practice, watch the video:
The half-fill masonry option is used when laying a thick wall (for example, two bricks thick). First, the inner as well as the outer mile are laid out, after which they only begin to fill the middle of the future wall (the backfill).
Half-fill laying technology:
- Level the mortar in the middle of the wall.
- Take a brick (you can take one or two at a time).
- At a distance of about eight centimeters from the previously laid bricks, begin pressing new brick blocks, slightly raking up the adhesive.
If the vertical seams are not 100% filled, do not worry, because they will be saturated with mortar during the laying of the next bricks. In this case, the transverse seams must be checked for the presence of mortar on the bricks and, if necessary, added.
Over time, the amount of solution is determined “by eye” Source theknowledgeexchangeblog.files.wordpress.com
Do-it-yourself cladding masonry technology
Finishing with facing bricks is valued for its beautiful appearance and long service life. Load-bearing and facing walls must rest on the foundation; if there is none, then it is added.
To carry out the work prepare a little solution so that it does not harden, and to give the seams a certain color, you can immediately add pigment to it.
Specialists usually lay the first row without mortar, which allows them to correctly lay out the bricks and determine their defects, after which they are replaced and the rest are laid with mortar.
The mortar is laid so that it does not reach the edge of the wall by 1 cm; this is easy to do using a template.
After jointing, the protrusion of the seam beyond the brick should be up to 2 mm, the thickness of horizontal seams up to 10 mm, and vertical seams no more than 12 mm , this can be controlled using a block or a special tool.
If the solution gets on the front part, it must be removed immediately. The cladding performs not only an aesthetic role, the house must breathe through it , that is, moisture evaporates and heat exchange occurs, so ventilation holes must be made at the bottom and top of each wall.
Execution Process
The jointing is carried out using a special device, using freshly laid and fresh mortar, when it has not yet lost its elasticity. After several rows have been made in the masonry, it is necessary to immediately begin jointing. First, vertical seams are processed.
For this, a special tool (trowel) is used, which is used to process the seams with slight pressing of the mortar into the masonry. After the mortar has been compacted and compressed at the seams of the masonry, it is necessary to remove its excess part, unnecessary residues. To do this, you can use a soft brush or an ordinary broom.