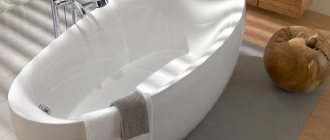
Even the most stylish bathroom interior will look ridiculous if the space under the plumbing fixture is not covered. You can decorate it using different methods, but installing a screen is considered the best and most reliable. With it, you can not only improve the room, but also create a comfortable work area, hidden from prying eyes. Under such panels in the free space you can place household chemicals, small buckets and other things.
How to select a screen
A bath screen is a rigid structure made of a frame and hinged, sliding or blind (tightly fixed) panels. They are installed on the outside of the bathtub (with the exception of a free-standing bowl, where decorative protection is installed around the perimeter). There is a huge selection of protective screens on sale based on frame and panel materials, design and design features. Therefore, choosing a beautiful, easy-to-install product without preparation is difficult. We fill the gap and note the parameters that you should pay close attention to when purchasing a screen:
- functionality - how important is free space under and around the bathtub for the housewife: it will be used to store household chemicals, leftover building materials, etc. or the screen will serve as a screen hiding plumbing communications;
- complexity of installation. Here you need to consider two points: is it possible to do the work yourself; Is it possible to install the type of screen you like on an acrylic bathtub?
- cost of the product - for many families this criterion is very important, because the price of a factory screen can range from 300 to tens of thousands of rubles;
- durability - ideally, the service life of the screen should coincide with the service life of the bathtub;
- dimensions - determine the dimensions of the set for the installed bowl;
- appearance - depends on the aesthetic preferences of the owners.
Functionality
Installing a screen on a corner acrylic bath solves several problems at the same time:
- hides water pipes, siphon, frame and walls of the bathtub;
- completes the interior design of the bathroom;
- creates a closed space for storing household chemicals and care items for acrylic and plumbing fixtures of the room.
You can buy screens for specific tasks:
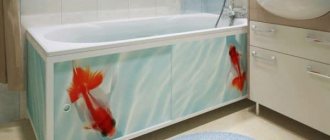
- with sliding doors - a classic of the genre, the easiest to install, practical and easy-to-use option. Performs simultaneously all the tasks assigned to this element of acrylic bowl arrangement;
- swing - an improved type (replica) of a sliding structure. Instead of doors, doors are attached to it. But such a screen can only be installed in a spacious room - you need space to open the doors;
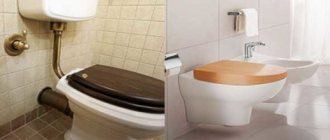
- deaf. The consumer immediately has a question: how to maintain plumbing equipment in this case? The answer is simple: blind versions of decorative panels are removable, attached with magnets (available for bathtubs of original shapes and sold together with the bowl) and stationary with a hidden hatch for access to the siphon. This type of decoration of the walls of the font is characterized by simple installation, increased strength and high aesthetics (designers claim that a solid surface looks more attractive than one divided into sections or doors). But it will not be possible to store any objects or things behind such decor.
Sometimes you can find sliding curtains made of film or fabric instead of screens. They perform the same functions, but it is difficult to classify them as screens. This is most likely a decorative element in the design of the font bowl.
Difficulty of installation
The most difficult way to attach a screen to an acrylic bathtub with hinged doors. But this is in comparison with a blank panel. If we evaluate the technology as a whole, then any representative of the human race who has ever worked with a screwdriver can install a screen of any type - there are no difficulties in the instructions.
Price
The difference in screen prices is significant. Plastic models can be bought for 300-700 rubles, from MDF for 4,500-8,500 rubles, and from cast acrylic for 30,000-45,000 rubles.
Durability
The service life of the protective panel is influenced by the type of materials from which the frame with fasteners, fittings and sashes (doors) are made.
Manufacturers offer the frame in several versions:
- made of plastic;
- become;
- aluminum
The plastic frame is the cheapest, with a sufficient level of strength for gentle operation. But the strength laid down by the manufacturer is not able to withstand an accidental kick on the rack - it crumbles, without the possibility of restoring the structure.
The steel parts of the frame cost about 3 times more than their aluminum counterparts, but they will also last longer, because... In practice, cases of deformation of aluminum screen elements are observed. Fittings can be made of plastic, brass, aluminum and steel. The most durable handles are made of galvanized steel. Brass and aluminum are prone to corrosion in humid conditions.
Plastic by its nature does not last long. The problem most often occurs in painting - peeling.
The screen doors can be:
- made of plastic - they can serve for a very long time, but having increased fragility, they are easily damaged by mechanical stress;
- plexiglass (plexiglass). The material has the same problem as plastic - high fragility;
- MDF is the most suitable option in terms of service life;
- cast acrylic - corresponds to the service life of the bowl;
- Tempered glass is expensive, but will last a long time.
Size
Most often, a protective plastic panel coated with a thin layer of acrylates is also sold along with an acrylic bathtub. This allows you to get a screen that is perfectly sized to the font and has a tone that matches the sanitary ware. This approach is especially relevant when buying a bowl of an original shape - it is unlikely that you will be able to select a screen. But such panels are sold only in a solid version, which many housewives do not like - there is no way to hide small household items that are used in the bathroom. Therefore, most often the screen is purchased separately or installed independently from scrap materials.
If the panel with the frame is not purchased as a set, then before going to the retail outlet, the length of the bowl and its height above the floor level are carefully measured. If the exact dimensions of the screen are not on sale, you need to buy with a small margin - the excess length can always be cut off with a grinder, and the height can be adjusted using the legs of both the bowl itself and the frame under the panel.
Design
Screen doors (doors) can be made from several types of materials:
- plastic. Such screens can have a variety of textures and colors, as a result of which choosing a screen to suit the interior of a particular room will not be difficult. But the design as a whole looks in accordance with the price - not rich;
- plexiglass. Matte or mirror surfaces look very impressive, giving the room a special charm. But installing such a screen without a thoughtful design of the entire room sometimes leads to dissonance in the interior;
- MDF panels. Looks expensive, stylish, fits perfectly into any interior;
- cast acrylic Used for round or asymmetrical bathtubs (sold together with the bathtub, as it is impossible to choose). You will have to pay a decent amount for such a panel, but it is worth it - it looks great, creating a single whole with the bowl.
When making a screen yourself, the panel can be made of plasterboard, painted with water-based paint, boards or ceramic tiles (glued to gypsum board).
What you will need for installation
Typical factory screens are mounted using the spacer method, resting the horizontal section of the frame under the side, and on the opposite side from below, unscrewing the support posts with some force.
Even a woman or a schoolchild can install a standard factory-made screen under a bathtub; this does not require expensive construction tools. Some manufacturers complete their products with a flat key for tightening the legs.
A flat or adjustable wrench may be needed when installing a standard or sliding screen to adjust its height using the lower supports.
The screen frame in the vast majority of cases is made of aluminum coated with polymer coating in various colors. To install a screen under a bathtub of standard length, it is cut on one side for an exact fit. To perform cutting work on aluminum guides, you will need a hacksaw. It can also be useful if the height of the screen is too high and does not allow it to be installed under the bath. In this case, the protruding sections of the vertical posts into which the supports are screwed are cut off.
Wooden fences
In many cases, next to the bathroom there is a sink, the pipes from which go under the bowl to the sewer pipe. In this case, you will have to cut the side panel where the pipeline passes. Depending on the type of material used to make the panels, this can be done with a fine-toothed metal hacksaw or a paint knife.
When placing a screen of complex shape under acrylic baths, it may be unevenly immersed under the side along the entire length. To level it, scraps of wooden beams or rigid extruded foam are usually glued, placing them at the same distance from the lower edge of the side. To carry out operations, in addition to fragments of supporting materials, you will need appropriate glue for polymer materials (acrylic).
In order to correctly install a sliding plastic screen under the bathtub, it is necessary to maintain the vertical position of its location under the side. To track the position, you will need a short building level, which is also necessary when installing the bowl itself.
Factory screen barriers made of MDF
Materials and tools
Before starting work on installing the factory panel, you need to buy the screen itself and select a set of tools (buy, rent, borrow from friends or neighbors).
The kit should include:
- sashes - 2-3 pcs.;
- frame consisting of 2 (preferably 3) vertical posts and 2 horizontal ones;
- legs;
- pens;
- screws for fastening handles (2 per handle);
- self-tapping screws for attaching the frame to the bowl.
Attention: manufacturers increasingly began to supplement kits with screwdrivers for screws and self-tapping screws, and wrenches for legs, and therefore they will be superfluous in the tool kit.
Tools you will need:
- screwdriver with drill and bits: slotted and cross-shaped. The tool will be needed for drilling holes for handles, and also as a replacement for screwdrivers;
- roulette;
- construction pencil or marker;
- level;
- wrench, if not included;
- silicone sealant.
Useful tips
The following advice from experts may be helpful when selecting a suitable screen fence and its installation:
- One of the varieties of screen fencing - with PVC panels, is one of the most budget types with a cost of 500 rubles. These are universal screens, that is, if they are larger in height, you can shorten the vertical posts and trim the panels at the top. For large length sizes, simply shorten the horizontal guides on one side.
- In any collapsible frame, vertical slats are sometimes located in inconvenient areas. They can be unscrewed and moved to another location by first drilling holes at the desired points on the profile guides.
- Expensive MDF screens with an average cost of 4,500 rubles. have higher strength characteristics in contrast to plastic ones. Laminated panels cannot be cut in height if the screen is larger than the space under the bathtub, so it is advisable to purchase it after installing the bathtub.
Installation instructions for a standard screen
- When purchasing, it is more practical to choose panels with cut holes instead of overhead handles. They are more reliable in operation, do not protrude beyond the plane of the panel and serve as a hatch for ventilating the enclosed space under the bathroom.
- To prevent water from getting on the frame and canvas, leading to the formation of mold and loss of their aesthetic appearance, the gap under the side of the bathtub is sealed with silicone sealant.
- The lower gap in the screen under the bathtub, although convenient for placing feet, spoils the aesthetic appearance of the room, so the screen fence is selected as accurately as possible in height. If desired, you can set the bathtub itself to the height of the already purchased fence.
- If the user is very bothered or does not like the two side stands, proceed as follows. Remove one of the vertical strips, installing the second in the middle. The corners are screwed to the ends of the lower horizontal profile. Make marks on the cladding along the holes in the corners, drill through the wall with a hammer drill and insert dowels. The side corners connected to the lower horizontal guide are screwed through the dowels with self-tapping screws, securing them to the walls.
Cost of plastic and MDF models
To install a sliding plastic screen under a bathtub with your own hands, you need a simple tool for cutting metal, with which you can adjust the horizontal aluminum guides to size. Basically, installing a standard screen barrier does not cause any particular difficulties; the vertical position of its position is checked by the level or seams of the tiles on the side walls, and increased attention is paid to the accuracy of cutting panels for pipes.
How to quickly remove the screen without damaging it
It is almost impossible for an untrained home craftsman to remove the screen from an acrylic bathtub without damaging the panel. You need to know the type of fastening. However, not everything is so complicated in the end if you know some of the nuances.
- If there are no supports between the bottom of the screen and the floor, then the panel is secured in one of three ways: self-tapping screws, magnets or using springs.
- The supporting legs of the screen frame indicate that it is installed sideways.
- Direct fastening of the panel to the floor indicates the presence of spring clips.
With this information, you can easily remove the screen.
Fastening with self-tapping screws. The panel hanging above the floor should first be inspected for the presence of plugs. If they exist, then the problem is solved in two steps:
- decorative plugs are carefully removed using a sharp blade;
- Use a screwdriver to unscrew the screws.
Magnets. If there are no plugs, the panel quietly pulls down. If a little effort is not enough to tear the screen out of place, it means it has magnets on the bottom and latches on top. It's easy to remove - just pull the top towards you. In this case, it is advisable to perform the operation with several hands, so as not to distort the screen too much.
Springs. Pull the panel down and out from under the side. After this, disconnect the springs from the hooks.
Attention: if there are no plugs, and attempts to remove the panel by other methods were unsuccessful, it means that the screen is still on screws, and the heads of the hardware are skillfully masked with sealant by a good craftsman. In this case, a needle will help - in the supposed locations of the screws you need to carefully prick the acrylic (plastic). Acrylic (plastic) will resist, but the sealant will puncture easily. Then it’s simple: the homemade plug is removed, the hardware is unscrewed.
Installation by surprise. The presence of a frame is indicated by the legs. In such options, the screen is attached to the acrylic bathtub by surprise. To remove the panel, simply screw the legs into the frame and then pull them towards you.
Spring latches. The panel is removed from the spring clips in two steps:
- the upper edge of the panel is pulled towards itself until the clamps are released;
- the screen is raised up to release the latch tab from the clamp attached to the floor.
Installing a rectangular bathtub on a factory frame
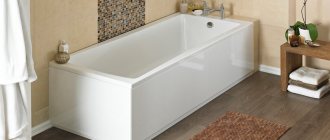
Acrylic bathtub Cersanit
Acrylic bathtub with frame
Step 1. We print out the purchased bathtub and the factory frame and lay it out on a clean floor, having previously laid it with soft cloth or cardboard. In the set of fasteners you will find short and long metal profiles, self-tapping screws, legs and pads for them (thrust bearings), dowels, studs, washers, nuts, stands. Depending on the configuration, the number of parts may be different, for example, the reinforced frame contains more metal profiles, or the bathtub is supplied immediately with an all-welded frame.
Typically, holes are already drilled in the reinforcement and dowels are inserted. This eliminates the need to mark and drill holes yourself.
Most acrylic bathtubs are installed not only on the frame, but are also fixed along the line adjacent to the walls with metal hooks and hangers.
If the kit does not include drain fittings, it must be purchased, taking into account the height of the legs and comparing it with the dimensions of the siphon.
For work you will definitely need screwdrivers, wrenches and pliers. Also don’t forget about silicone-based sealant, a bubble level, a tape measure and a pencil.
Step 2. We start by assembling the frame and legs. We turn the bathtub over without removing the protective film from the inner surface. We provide easy access to any side of the bowl.
Frame diagram for installing a bathtub
Using long self-tapping screws, we connect the profiles. We rely on the instructions attached to the acrylic bathtub and the correspondence of the holes in the longitudinal reinforcement with the dowels installed in the transverse strips.
We place the assembled frame exactly in the center of the bottom of the bathtub.
Installing a bath yourself
Step 3. Let's move on to installing the legs. We will install three pieces on the front edge of the bathtub, two under the bottom of the bowl and two more at the edge that will be adjacent to the wall.
We begin to fasten the racks to the profile and side of the bathtub. We install the stand on the side, screw the first long pin into it, and a nut onto the pin. We insert the resulting pin with a stand into the hole of the longitudinal metal profile. Secure the stud with a nut and locknut. We screw a plastic support on top.
We assemble the remaining support legs in the same way. We adjust the height of the legs depending on the dimensions of the decorative screen. The approximate height from the floor to the edge of the side should be 60 cm.
Short studs are intended for the legs located under the bottom of the bathtub. We insert them into the holes of the transverse profiles, secure them with nuts and screw on the plastic supports.
How to install an acrylic bathtub
Installation of a bathtub frame
Step 4. Check the assembled frame with a bubble level.
Checking the position of the bath
If necessary, tighten the studs with a wrench to level the position.
Turning the bath over. If necessary, adjust the position of the legs
We take short self-tapping screws and fasten the racks to the sides of the bathtub.
Step 5. Turn the bath over. We take a level and once again double-check the horizontality of the sides. There is no need to make slopes for better water flow.
Step 6. Now you can connect the siphon with overflow, based on the manufacturer's instructions. The general principle for connecting inspection siphons (piping) of the knee type is as follows:
What and how can you make a screen with your own hands?
You can make a screen with your own hands. The technology is simple:
- The bathtub is being tied up. The material can be brick, wooden beam, metal profile. At the same time, any of the above materials are suitable for rectangular bowls; for semicircular corner baths, brick and a special aluminum profile (it can be given any rounding). During the work, it is important not to forget to make a harness under the hidden hatch through which the bathtub siphon will be serviced;
- You can immediately attach ceramic tiles to the brick, and cut-to-size sheets of gypsum plasterboard are screwed onto the frame with self-tapping screws;
- a finishing finish is applied to the drywall (mostly ceramic tiles).
In conclusion, choosing the right screen will make the task easier: no need to adjust anything, just install. The instructions for all types of fastenings are simple and easy to follow on your own.
Options for a homemade bath frame
What material is most often used to make a bathtub frame? Regular profile for drywall. It is coated with zinc, which means it is quite durable and reliable. And it will last a long time. It can be used under the frame of acrylic and steel bathtubs.
Before starting installation work, you need to level the walls, separate the sewer and water supply pipes.
Let us follow step by step the entire procedure for constructing this structure.
We prepare the equipment and make markings
First of all, turn the bathtub over. We attach the profiles for the legs to the self-tapping screws. For this purpose, the design of the bathtub includes reinforcement of the bottom with a plywood sheet. And now we attach the legs to the profile. Without moving far from the bathtub, we install a drain and overflow system.
Now you can bring the structure into the room and, after adjusting the legs in height, install it in place. Along the lower edge of the side we apply markings for mounting the frame.
Next, you again need to pull the bathtub out of the room and start assembling the frame.
Frame assembly
To make a frame from a metal profile, it is enough to perform several manipulations:
- Cut the profile according to the marks. Holes are made in the cut pieces so that they can be mounted on the wall.
- Apply sealant to the shelf adjacent to the wall. Next, following the marks, screw the profile to the wall. If the wall is made of brick or concrete, then drill holes and insert dowels. No dowels are needed in the gypsum board; the screws hold perfectly.
- Next you should install the side posts and the bottom guide of the screen.
- Apply sealant to the top of the profiles. Bring the bath back, install and connect it.
Now you need to make a stand on which the bottom of the bowl will rest. You can take brick or cinder block for these purposes. We place them in several rows and secure them with ordinary cement mixture.
After the foam has hardened, we proceed to install the frame under the screen and hide it with a sheet of drywall.
Wood frame
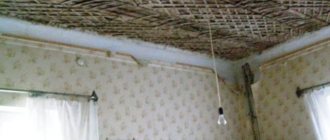
Wood is not as suitable for creating a bathtub frame as metal. In rooms where people bathe: in bathrooms, baths, saunas, it is always very humid. As you know, moisture is the worst enemy for wood. To protect our structure from the destructive effects of moisture, we should take care of protection.
The material must be impregnated with an antiseptic or other protection that will repel water and protect against fungus and mold. We assemble the frame from bars with sides 50 by 50 millimeters. We do this in the same way as assembling a frame from a metal profile. Let's go over the main points:
- We level the walls and prime them, after which you can attach the frame;
- to give additional rigidity, we supplement the horizontal slats with vertical slats;
- as soon as the frame is assembled, we cover the beams with a waterproofing solution; If the walls located behind the bathroom are not planned to be covered with tiles, then it is better to cover them with waterproofing.
When the waterproofing compound has dried, you can install and connect the bathtub. To make it more stable, a support is made from brick underneath it. A foam layer is placed between the support and the bottom of the bowl. Next, the screen and its casing are mounted.
Welded metal frame
Naturally, you can weld a metal frame. A profile pipe is suitable for this design. Essentially, it is a metal rectangular object that does not even look like a pipe. Such a frame can be arranged for an acrylic bathtub, as well as for a cast iron or steel one. Its strength is such that it can withstand any weight. This design allows, in addition to the bath itself, to install a glass screen for the shower.
How to make a frame using welding? Let's look at the main points:
- first you need to take all the measurements and draw a diagram of the future structure;
- cut blanks to the required length;
- connect the base of the frame by welding - these are three supports, with two guides attached to them; the bottom of the bathtub will “rest” on the guides;
- installing the legs - selecting small sections of profile pipe and welding them to the support legs;
- at the lower end we weld a washer and a nut to it, matching the diameter of the screw;
- when all the elements are assembled, the frame can be adjusted in terms of horizon and height;
- Now you need to weld a rack located vertically, and install horizontal crossbars on it, on which the lower part of the side will rest;
- To be able to cover the front side of the bathtub, we weld on the front pillars.
We install the assembled structure in the room, level it and install the bathtub itself. We connect and test the operation of the drain and overflow systems. We cover the frame with a sheet of plasterboard.