Such a simple thing as making shelves in a bathhouse should not raise questions or difficulties for people who are not picking up construction tools for the first time. But even they often make mistakes, losing sight of some of the nuances and operating conditions of bath furniture. To avoid them and better understand the topic of the internal arrangement of a bathhouse, read this publication to the end. It will help you choose the right material and optimal shelf assembly technology.
Original arrangement of a steam room Source www.rmnt.ru
What you need to know about bath shelves
If the bathhouse is built not only as a room in which you can wash, but also as a home center for relaxation and wellness, then it must be equipped accordingly. Paying special attention to the most “soulful” room – the steam room. Staying in which should be comfortable and safe. This can be achieved by knowing the principles of optimal placement of shelves and choosing materials that are pleasant to the body for their manufacture.
Posting rules
There are no strict requirements for how to make shelves in a bathhouse or steam room. Their size, shape, and level of location depend on the parameters of the room, the location of the oven and openings, the number of people simultaneously undergoing procedures, and other factors. But to create the most comfortable and safe conditions in the steam room, you should listen to some rules. They take into account the experience of many generations of bath pleasure lovers.
Bathhouse - relaxation for soul and body Source avatars.mds.yandex.net
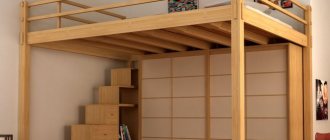
- If space and ceiling height allow, it is advisable to make shelves in 2 or 3 tiers, arranging them in steps. This will allow you to individually select a comfortable temperature for yourself, since hot air tends to rise, and the higher the level, the hotter it is.
- The distance from the ceiling to the upper level should be at least 110-120 cm, so that it is comfortable not only to lie on the shelf, but also to sit, climb on it, and steam with a broom.
- The distance from the floor to the bottom shelf is selected within 25-40 cm.
- The optimal distance between adjacent tiers is about 50 cm.
- The sufficient width of the shelves for sitting is 30-40 cm. For lying down - at least 60 cm, but it is better to make it 80-90 cm.
- The length is selected taking into account the height of the tallest member of the family; it is desirable that it be at least 180 cm so that you can lie down with your legs stretched out.
It is clear that compliance with all these parameters is not always possible, especially if the room is small and is used as a steam room and washing room at the same time. How to make shelves in a bathhouse with your own hands, in such cases, is dictated by common sense and the desire of the owners.
In a traditional Russian bathhouse they steam and wash in the same room Source avatars.mds.yandex.net
Shelves can be placed along one wall, parallel in 2 rows along opposite walls, or at an angle to each other. By “playing” with the location, you can find the best option and get closer to the recommended standards.
Advice. When designing the interior of a bathhouse, you should not forget about safety, and try not to install the stove benches too close to the hot surface of the stove. It is also undesirable to place it under a window, since the glass in it can be accidentally broken by actively using a broom.
Recommended materials
Another important question is what to make the shelves from in the bathhouse. It is clear that this must be wood, but not every type of wood behaves equally well in conditions of high temperature and humidity and does not cause discomfort when touched. It can become very hot, preventing you from sitting or lying on the surface, quickly rotting, losing its visual appeal, releasing resin, etc.
Resin drips on the surface of coniferous lining Source i.ytimg.com
Therefore, first of all, you need to choose the appropriate material by deciding on the type of wood. For this purpose, hardwoods are usually taken, since conifers, while resistant to moisture and have a pleasant aroma, are nevertheless unsuitable for use in a steam room. For the simple reason that when heated, they release resin, touching which not only threatens to burn, but also stains the skin. The resin is very difficult to wash off, especially if it gets on your hair. It is unlikely that its fragrant smell will force anyone to come to terms with these disadvantages.
On a note! You can make a load-bearing frame from inexpensive and practical pine, since making shelves in a bathhouse with your own hands from wood needs to be strong and reliable. This wood, due to its resin content, better resists moisture.
The most suitable types of wood for making seats and beds are:
- linden is the most popular material, attracting with its optimal ratio of price and performance characteristics, which include the pleasant color and aroma of wood, its low thermal conductivity, ease of processing and maintenance;
Linden has a pleasant light shade
- alder will cost more than linden, but it is stronger and more durable, heats up less and does not deform under the influence of high temperatures and variable humidity;
- Aspen is very common in our country, it costs less than linden, but has all the necessary properties required for a material for finishing baths and saunas. It is very resistant to moisture, does not deform, does not rot (in the past, well log houses were made from aspen), but over time it changes color, acquiring a gray tint;
- Abash is an exotic wood species, also called African oak. Expensive elite variety. Its wood does not split when installing fasteners, does not deform or shrink, slowly absorbs water, practically does not change color over time, and quickly takes on the temperature of the human body upon contact with it. The main advantage of African oak is the absence of knots.
Abasha wood is even, smooth, without knots or cracks Source tvoy-usadba.ru
See also: Catalog of projects for bathhouses and bathhouse complexes
When deciding what and how to make shelves in a steam room with your own hands, the choice is made of wood with low thermal conductivity and good moisture resistance. All of the listed breeds have them, therefore, when choosing from them, they are guided by other criteria: appearance and price. Abash is magnificent, but linden or alder look no worse at a much more reasonable cost.
What is a shelf in a bathhouse?
An important factor when placing benches in a bathhouse is the area of the room itself: in a small steam room, a couple of benches of different heights are enough, but if there is free space, corner shelves are placed in several tiers.
The multi-tiered canopy organization system allows you to choose the most comfortable steaming temperature. The higher the shelf level, the hotter it is. The distance from the last shelf to the ceiling should be at least 120 cm, which will allow the average person not only to lie on the top tier, but also to sit and steam with a broom.
From the floor to the lower tier, the height should be at least 25 cm and no more than 40 cm. The optimal height between tiers is considered to be 50 cm. The width of the canopies is about 40 cm (for sitting) and over 60 cm (for lying).
The length of the shelf in the bathhouse is selected in accordance with the height of the tallest guest or family member. The person should lie comfortably so that their feet do not rest against the stove or another guest.
Making a headrest
These products usually lie on the lower tier or in the dressing room. They are taken with you to the bathhouse and placed under the head like a pillow, and they should not be hot at that moment. Headrests are made from different materials and differ in shape.
Selection of headrest material and design
For headrests, it is better to choose linden - a cheap, easy to process and high-quality material. Even a beginner will be able to make with his own hands a model that is light in weight, convenient in shape and easy to make. The most difficult step will be cutting out curved surfaces with a jigsaw.
The curved parts of the headrest need to be cut with a jigsaw
The dimensions should be such that the product fits generously on the shelf, is small and convenient for placing under your head, for example, 340x353 mm.
The optimal headrest size is 340x353 mm
Table: materials for headrest
- We draw the side supports on the scraps of the board and cut them out with a jigsaw according to the diagram.
The side supports of the headrest are cut out with an electric jigsaw
- We fix them in a clamp and process them with grinding wheels until they are completely smooth.
- Cover with impregnation for shelves and walls and dry.
- Then we cut the planks and process their edges. We also cover them with impregnation for shelves and walls and dry them.
The planks also need to be coated with impregnation for shelves and walls and dried
- We prepare the pins. We count and check for smoothness.
- Using a wood drill, we make blind holes with a diameter of 6 mm on the underside of the planks.
Non-through holes are drilled on the slats at a distance of 4.5 cm from the edge
- We try on the planks to the support. We drill the same holes on the top side of the supports according to the diagram, but not right through.
Holes in the support are drilled according to the diagram
- We insert the pins there and tap them with a hammer. They should go in with force and sit tightly.
The pins should fit firmly into the holes and be tight.
- We connect the planks with the support on the pins. We start from the center bar to set the correct distance. We tap them on top with a felt hammer so as not to damage the appearance of the wood, or with a regular hammer through a rag.
- The headrest is ready. The connections will not be visible from either the top or bottom.
If you make a headrest on pins, then the joints of the parts will be completely hidden
Types of curtains in the bathhouse
- Bench shelves. Suitable only for sitting, but considered the most popular.
- Beds. You can lie and sit on them.
- Sun loungers. An alternative to a bench and a couch.
Canopies should not be placed near a hot stove (this can lead to injury) or near windows (when hovering with a broom, the glass may be accidentally broken, which will cause injury). Bath shelves are extremely simple, functional and do not require special care.
Decorative elements are not welcome, since at high temperatures and humidity from hot steam, artificial ornaments can release toxic substances. Making shelves for a bathhouse with your own hands is quite simple even for an untrained person. It is worth preparing the material and carefully following the instructions.
Briefly about the main thing
The bath canopy is made of wooden boards and timber. Sanded workpieces are pre-impregnated with protective compounds containing fire retardants and antifungal additives.
Self-assembly of the structure begins with drawing up a project. In this case, the recommendations of the craftsmen regarding the location of the benches should be taken into account: location, height, width.
Assembly begins with the installation of a supporting structure, then the sheathing for the boardwalk is constructed. Additionally, you can make a headrest and footrest. Installation of backrests is performed at the discretion of the bathhouse owner.
Material for bath canopy
Wood for a bath shelf must meet several criteria:
- Do not release resin when heated.
- Excellent tolerance to elevated air temperatures and humidity.
- Be resistant to fire.
- Have reduced thermal conductivity so that the material does not heat up and allows visitors to relax on the warm wood of the shelf.
- Be stable in use (do not delaminate, without knots and splinters).
Coniferous wood is not suitable for constructing a bathhouse canopy. The material will release a lot of resin, which becomes extremely hot in the bath, sticks to the body, hair and clothes, and can also cause a burn.
It is recommended to build the frame of the canopy from inexpensive pine, but not the sunbeds themselves. The resin will allow the frame legs to more easily tolerate moisture and not rot.
Suitable for bath canopy seats:
- Linden is a popular material with an optimal price-quality ratio. It is worth noting the pleasant light shade of linden, its delightful aroma, low thermal conductivity and high performance characteristics.
- Alder is a practical and durable wood, but the price of the material is slightly higher than linden. Alder heats up less and demonstrates high resistance to elevated temperatures and humidity.
- Aspen is an excellent and inexpensive material for a bathhouse, durable and reliable, not prone to rotting, but after a while the wood turns gray.
- Abash (African oak) is an elite type of wood that does not split during installation, does not rot, does not change its size after installation, does not easily absorb moisture, and does not change its color. The main advantage of wood is the complete absence of knots.
How many cubes are there in a floorboard and how to figure out how much it is: 1 cube of material
For the convenience of buyers, there is a special classification of wood by type and class, which makes it easy to select the required material.
| Class | Quality |
| Extra | Maximum smooth surface without knots or any defects |
| A | Smooth surface without cracks or chips. Minor knots are allowed, no more than every 150 cm. Small blue spots may occur, no more than two surface cracks, resin |
| IN | No more than 4 knots per 150 cm, no more than 2 surface cracks, light defects and damage, resin |
| WITH | The lowest class, as a result of which the presence of surface cracks, 2 knots, contrasting color stripes, blue stains and even some mechanical damage is allowed |
Understanding what types of boards there are, you can easily choose the option that is suitable for a particular type of housing. After all, it is completely pointless to overpay for extra-class if you plan to rough-finish the floor, and it is also not recommended to make the final coating from a low-quality material. The table will help you decide on the required class of material, choose it wisely and plan costs.
Floorboards, like all other lumber, are measured in cubes. However, not all buyers understand how many boards are contained in 1 cube and how to determine how much material is needed for a particular room. Let's look at how to deal with these issues using a simple calculation example.
We invite you to familiarize yourself with the floor made from regular edged boards
To calculate the amount of material in 1 m³, you need to know the volume of one board. Determining this is quite simple: the thickness of the board is multiplied by its width and length. As an example, consider a product with dimensions of 35x100x6000 mm. For convenience, all indicators need to be converted into meters and multiplied: 0.035 * 0.1 * 6 = 0.021 m³ - as a result of performing arithmetic operations, we found out that the volume of one board is 0.021 m³.
To find out the volume of one board, you need to multiply the thickness by the width and length
For the convenience of buyers, there is also a special table of standard indicators, which shows how many boards 6 meters long are in one cubic meter.
| Board size (mm) | Volume(m³) | Quantity per 1 m³ (pcs.) |
| 25x100 | 0,015 | 66,6 |
| 25x150 | 0,0225 | 44,4 |
| 25x200 | 0,03 | 33,3 |
| 40x100 | 0,024 | 41,6 |
| 40x150 | 0,036 | 27,7 |
| 40x200 | 0,048 | 20,8 |
| 50x50 | 0,015 | 66,6 |
DIY bathhouse shelves (step by step)
Before you make shelves in the bathhouse with your own hands, you need to draw the future structure, distributing the number of shelves and sunbeds, their height and length, based on the dimensions of the room.
When calculating materials, it is important to take only beams with dimensions of 50 by 50 mm or 50 by 80 mm.
The maximum cross-section of the beam should not exceed 100 mm (there is no point in taking thicker beams). The step between the 50 by 50 mm leg supports is at least 60 cm. The smaller the diameter of the bar, the more often the supports are placed.
- The thickness of the frame board should be at least 25 mm, and the width should be 4 times the thickness. The boards are placed at intervals of 1-2 cm. The wood must be carefully sanded, eliminating any knots and cracks.
- To fasten the frame you will need zinc screws and corners. Installation of the canopy begins with the construction of the upper tier adjacent to the wall. The required number of supports and crossbars are cut.
The strapping bars are attached to the wall at the calculated height. Under the harness, support bars and intermediate ones are placed, which are fastened to the second row of support bars with jumpers. The supports of the second row are tied together using jumpers. The bottom row trim is attached to the outer supports. The process is repeated.
Design
The element is assembled from a frame, base and boarding, which can be stationary, removable or folding. The basis is made up of support posts (vertical), as well as jumper boards - such a frame is attached directly to the wall. But between the shelves and the wall you need space for ventilation - this is about 8-10 cm. The flooring is made of narrow planks.
Ramunas
In theory, the frame is made from racks - vertically located bars. A diffuse film (membrane) and a vapor barrier are attached exactly over them, and then along these racks (vertically) an air gap is attached, forming a lath two to two and a half cm thick. And the lining is already attached to it - let me remind you, the lining is attached HORIZONTALLY with a “folder” at the top . And the shelves are attached precisely to the racks through this entire sandwich - that is, fastening occurs only at certain points of the wall and not just anywhere.
It is important to leave a gap between the wooden planks of the shelf flooring (it is better to make it removable so that it can be washed and dried in fresh air) so that the water drains and does not remain in puddles. A suitable step is usually 1 cm - sometimes a little more.
Kern:
Kern
I left 1.5 cm gaps between the boards (ours are made of abasha) - this makes them easier to wash and sweep away leaves. The sides were not sewn up, I think there should be some ventilation there
Advice from the experts
Experienced craftsmen advise using the method of cutting into half a tree instead of steel corners. Rubber pads or plastic plates are placed under the racks to reduce the effect of moisture on the wood body.
During installation, it is necessary to use a building level to identify frame deviations.
- The screws should not stick out, so you need to carefully select the length of the material and compare it with the thickness of the board.
- It would be a good idea to treat the wood with antiseptic solutions, which are recommended for use inside the bath complex.
- The impregnation should not release toxic substances when heated.
After bathing procedures, it is necessary to thoroughly ventilate the room and wipe the benches with clean cloths. Building shelves in a bathhouse will not be difficult, and properly selected wood will last for decades, giving a feeling of comfort and bliss when visiting the steam room.
How to care for shelves
Despite the fact that making shelves does not require serious financial investments and labor costs, any bathhouse owner does not want to redo them every few years due to loss of appearance, mold or other problems. Simple rules for caring for bath furniture will help you avoid them:
- Each time after completing the bath procedures, the steam room must be ventilated by opening the door and window, if any.
- To speed up the drying of the shelves, wipe them with a dry cloth that absorbs water well.
- During drying, all water from containers must be poured out or closed with lids.
- Things remaining on the surface should be removed, and traces of dirt and soapy compounds should be washed off. You cannot use abrasive or chemically aggressive products for this.
Regular cleaning and ventilation are required to extend the life of bath furniture Source scontent-cdg2-1.cdninstagram.com
In general, the interior of the bathhouse should be kept clean and dry, periodically carrying out general cleaning. It is better to make the beds of the shelves in the steam room removable, and in hot weather take them out to dry in the sun.
Photo of shelves in the bathhouse
Criteria for selecting electric current consumers and fittings
For each bathhouse room, you need to select devices taking into account operating conditions. According to the international classification, the housing is marked with the IPXX code. XX – two numbers indicating the degree of protection against penetration of foreign objects (first) and moisture (second). Get acquainted with the proposed tables, they will help you choose the optimal devices for each bath room.
Class of housing protection against penetration of foreign objects and dust
Housing protection class against water penetration
Let us determine, for example, which lamps need to be chosen for the most “complex” room in the bathhouse – the steam room. There is no dust there, it is enough that the case protects against penetration of objects ≥ 2.5 mm (the first digit on the code should be “3”). In the steam room you can not only take a steam bath, but also pour water over your body. This means that the housing must protect against such influence; according to the table, the digital designation corresponds to “5”. This means that the lamp housing in the steam room must be designated IP35. We talk in such detail about the different protection classes not only because it directly affects safety, but also because the protection class of the housing significantly changes the price of the devices.
The same parameters should be used to select mounting boxes, sockets, etc.