Do-it-yourself toilet renovation
You can repair virtually any room in a house or apartment with your own hands. It is important to correctly draw up a preliminary project, as well as evaluate your own skills and abilities. You can find various instructions on the Internet that help you visualize the intricacies of repair work.
Before you start making toilet repairs with your own hands, you need to:
Choose a suitable design concept. It should be based not only on personal preferences, but also on the characteristics of the room itself;
Select suitable materials. Taking into account the characteristics of operation and the premises itself, you cannot choose any materials; you must focus on reliable, durable, not subject to the negative effects of moisture and chemicals;
Select suitable plumbing fixtures (if you do not plan to do major repairs, do without this item, since they leave the old plumbing fixtures).
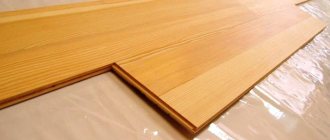
Flooring
Materials for finishing the floors of restrooms and bathrooms in panel buildings must simultaneously meet several criteria. They must be durable and not afraid of moisture, and also not be subject to deformation due to the combined influence of the specific microclimate of small bathrooms.
Today, floor finishing with natural wood or waterproof laminate is very popular. However, in tiny rooms it is better to refrain from such a decision. Firstly, these coatings, despite their characteristics, are still not suitable for rooms with a high content of wet steam. Secondly, often the cost of these quality materials is too high and is comparable to the price of floor tiles.
Related article: How to choose a double-glazed window: recommendations
Laying tiles diagonally in a checkerboard pattern creates the illusion of expanding space
An inexpensive and fairly simple solution would be to lay linoleum. However, such a coating is highly susceptible to mechanical stress and will lose its aesthetic characteristics over time.
Given the modest area, the best option would be to cover the floor with tiles or porcelain stoneware. Only this material guarantees long-term use while maintaining its original appearance.
In general, repairing a toilet in a panel house, photographs of examples of which you will see below, should be done as functionally and simply as possible.
Photos, design and ideas for toilet renovation
First, you need to clearly define the requirements. The most important thing is that the chosen design concept must comply with sanitary and hygienic standards, taking into account the specifics of the toilet room. It is also necessary to focus on space; if there is a lot of space, then there are also more options for design.
- Not enough space. When there is not enough space, you cannot waste it on designer delights. Every square cm should be used productively. We need to think through the optimal concept. It is available to view photographs from the Internet, where experienced designers demonstrate exactly how they solve the problem of limited space.
- Average area. You can put a small cabinet here to store cleaning products, toilet paper supplies, magazines and other things.
- Lots of space. When you have 2-3 sq.m. or more, then in the toilet they put a sink, a small table, and hang a towel.
The combined bathroom deserves special attention. It is the most difficult to work with, since you need to adhere to the functionality of two rooms at the same time. In this case, it is better to trust the specialists, or take ready-made projects on the Internet as a basis.
Dismantling of old equipment
Gradually, all preliminary work looks like this:
- Cut off the hose responsible for the flow of water into the tank, disconnect the water supply hose.
CLOSING THE TAP, DRAIN ALL THE WATER.
We disconnect the tank from the drain pipe (old model) or toilet in newer products. In the first case, unscrew the large metal nut on the pipe. The second contains two plugs located below, under the toilet. Older versions have difficulty disassembling - the iron fasteners rust and loosen. A problem has arisen - cut off the nuts. This can be done using a saw.
- Delete;
- Place the removed tank on a wide, stable surface;
- First remove the float and water connection to the valve;
- Remove the main drain system.
BE CAREFUL WHEN DISASSEMBLYING THE DRAINAGE MECHANISM. IMPROPER USE OF METAL TOOLS WILL DAMAGE THE SURFACE OF THE HYDRAULIC EQUIPMENT.
After removing old pieces of equipment, wipe the tank dry.
It was mentioned above that older models of drainage systems have more holes for attaching fittings. It does not matter if, instead of used reinforcing parts, new ones similar to the design are installed. But often, in order to complement the old plumbing system with a more reliable new “filling”, we have no choice but to replace the used toilet fittings with modern ones. In particular, we will pay several lines in the overall build process.
Let's start:
- On older models we attach a bracket with a barrel and bulb with a metal fastener to the bottom of the tank. In the new drainage system, it is secured in the middle with a plastic nut.
- Be careful! Handle plastic fasteners carefully. Over-tightening may damage one of the fastener components.
- Install the water pipe. In older systems we attach a needle with a float to it. In the new system, the pipe can be combined with a water level control system. This means that the float and water intake are combined into one structure. Install everything together.
WHEN BUYING ACCESSORIES, YOU MUST FOLLOW ORIGINAL PRODUCTS FROM.
Do-it-yourself toilet repair: where to start?
First, they determine how large the work will be. If you plan to simply update the renovation, then little time and money will be required. But when the decision is made to make a major overhaul, you will have to invest a lot, both time and effort.
There are a few things you need to do first:
- Determine the scope of repairs. You need to roughly calculate the estimate and the time spent, and then make a final decision.
- Create a design project. This takes into account the functionality, features and style of the room.
- Remove old plumbing fixtures. This is carried out provided that capital work is planned.
- Remove old coverings from walls, ceilings and floors.
When the room is completely clean and ready for further actions, you can begin the main work. Preparing a toilet room for renovation takes about 1-2 days. It all depends on how easy it is to remove the old decorative trim. For example, with tiles things are more complicated than with wallpaper, and several times more.
Detailed overview of the drain system
We will now discuss the existing options and their main features in more detail. In order not to describe each model separately, we will consider the two main parts of the system, this way you can understand the problem in as much detail and as clearly as possible.
Inlet valve
The valve performs the function of filling the tank to a predetermined level. Even with the same functions, the appearance of the structure can vary greatly, so we will tell you which option is the most common.
Let's start with the classical systems that have been used since the middle of the last century; their characteristic features are the following factors:
- The float is made of brass; it is a very reliable material that is not afraid of contact with water and retains its original characteristics for decades;
- The system is located on a beam, which must also be made of brass, because steel will start to rust very quickly, and after a few years the corrosion will render it useless;
- A valve with a rubber seal opens and closes the inlet port . This is also brass, but here the quality of the sealing element is of great importance, because it must ensure an accurate fit and remain flexible for a long time;
- The principle of operation is simple: the valve is lowered, when the water falls, the water supply opens . Since the filler cap covers the hole, it is sealed with a rubber gasket.
Regarding this option, you will notice that the system is very reliable and easy to maintain, you will easily solve the problem. Experts call this option an old-fashioned flush head because other types of designs are being created these days.
As for malfunctions, the following can be noted:
- The valve nozzle becomes clogged with sand, rust and other foreign objects. The problem is solved simply by cleaning the cavity with a wire;
- At the right time, the pin that holds the suspension arms can wear out, it can be easily replaced by using a suitable piece of copper wire.
When it comes to modern solutions, they are as follows:
- A copy of the classic version with the only difference that the float is made of plastic, and all metal parts are made of galvanized steel. This solution has a low cost and its reliability is much lower;
- There are options made entirely of plastic. they are cheaper, but less reliable;
- A system in which the float is located on a movable handle, characterized in that after filling the element it tilts back, and the nozzle fully opens and closes when the float is tipped over, which reduces the time of filling the tank;
- In many modern versions, the valve has a vertical design, in which the fastening element is made with the side wall of the tank. The float can be adjusted vertically using a special screw. The system is quite simple and has gained a good reputation;
- Finally, the most modern solution is to install the valve not on the side, but at the bottom of the tank. This design simplifies installation.
Drain system
When considering a device for flushing a toilet, one cannot fail to mention this part of the structure; it is all the more important since it provides high-quality flushing and is subject to high loads. There are several basic options.
The oldest of them, the bell, has the following features:
The second solution is plastic corrugations; the operating principles of such structures are as follows:
- When you pull the chain , the ripple bends, it sucks up water and delivers it to the toilet;
- When the chain is released, the element returns to its original position and the water supply stops;
- The biggest disadvantage is that plastic does not work under constant loads ; after a few years, only replacing the components can help.
Older design flush tanks are simple in design. This makes the system quite reliable, but even the most primitive devices periodically fail.
If primitive people could repair hammers, then a modern Internet user has sufficient skills and knowledge to repair an old mechanism with his own hands.
Most "ancient" old model toilet bowls consist of a cast iron plug with a soft rubber gasket . When you press the outer lever, the bell rises and water rushes down through the hole.
More recent designs have replaced the bell with rubber or plastic bulbs . Once the tank is released, the float lowers and a lever opens the valve through which water begins to flow. When the container is full, the lightweight object is raised until it is in a position where water stops flowing into the device.
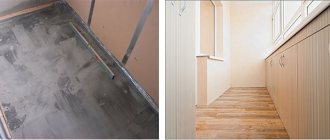
Toilet floor repair. Screed and tiles. Step-by-step instruction
Repairing the floor in any room is the most expensive. Physical/time costs are also taken into account, especially if it is necessary to carry out not only finishing, but also screeding. Although there are many different types of screeds, it is recommended to choose the cement-sand format in the toilet, as it is excellent for subsequent installation of tiles.
Work is carried out according to the instructions:
- Preparing the base. It needs to be cleaned and leveled. The cracks are filled with cement composition. It is also advisable to prepare the right conditions. It is necessary that there is no draft in the room, and a suitable temperature should not exceed 25 degrees.
- Primer. Required for waterproofing and reducing the load from the base. This allows you to extend the service life of all materials used in the repair process. But some people prefer not to carry out waterproofing, which is considered by experts to be a serious mistake.
- Installation of beacons. This is required to ensure that the floor is level, without slopes or serious defects.
- Preparing the solution. Subsequently, it must be laid on the floor to the level of the pendulums in several layers. It is advisable to fill the screed within one day, or better yet, several hours. Then the cement will dry evenly, which will have a positive effect on the quality of the work performed.
- Drying out. The upper part must be constantly sprayed with water to ensure even drying.
- Laying tiles. It can be fixed with special tile adhesive. Some people prefer to work with cement compounds, since this option is a little more economical. But the savings are felt only if the work is carried out on a large room; in small rooms the financial difference is almost not felt.
Do not buy branded items and materials
Economy bathroom renovation involves the use of all kinds of budget materials. Thus, for such a process, it is advisable to choose all kinds of inexpensive materials for finishing the bathroom.
At the same time, it is important to understand that only obvious counterfeits of expensive brands and products of too poor quality can be extremely cheap.
Therefore, when choosing materials for repairs, it is better to buy something cheaper, but without fanaticism. After all, a stingy person always pays twice. Remember this!
Repair of toilet walls. Tiles, PVC and MDF panels. Step-by-step instruction
You need to repair the walls according to almost the same instructions as the floor. You should:
- Clean the walls down to the ground.
- Level the surface. To do this, you can no longer use cement mortar, but ready-made plaster compositions. It is advisable to make a perfectly flat surface.
- Prepare the base for finishing.
Further actions depend on which finish was chosen. If you plan to lay tiles, then you should buy tile adhesive. It is most convenient to work with him. But you can also use cement mortar.
For plastic or MDF panels you need to make a lath. It is made of wood or metal. It is advisable to measure the room, since individual panels will probably need to be cut. Laying the panels is convenient; there are special grooves. After installing the first panel, all subsequent panels are placed in the grooves. Also, after the work is completed, it is necessary to secure the corners.
See what can be restored
Be sure to see what can be restored from the plumbing fixtures and furniture in the bathroom. For example, it is better not to throw away an old bathtub if it can be used for many more years.
It is much cheaper to restore the surface of a high-quality structure than to buy a new product. So, covering a bathtub with acrylic will cost only about three thousand rubles, and after such a procedure the product itself will again become sparkling and snow-white.
Thus, this solution is optimal. You can easily and cheaply cover the pipes with a plastic screen.
Ceiling repair. PVC panels, suspended ceiling. Step-by-step instruction
To repair the ceiling, you need:
- Clean all trim down to the base.
- Level the surface. It is better to use only special compounds, since the cement mortar does not stay well on such a surface, so the work will be done less efficiently.
- Solve issues with electrical wiring and lighting. This is thought out before the ceiling work is completed. It is necessary to bring out the wires to all lighting fixtures that are planned to be installed in the toilet room.
- Prepare the surface for the final stage.
Then again you need to act in accordance with the final coating that needs to be used. For plastic panels, a lathing is prepared, onto which they are subsequently fixed. Working with a stretch ceiling is quite difficult. This requires a special frame. Moreover, it is almost impossible to carry out all the work on installing suspended ceilings without the appropriate knowledge and at least minimal experience. Therefore, it is recommended to contact specialists if the choice was made in favor of a stretch ceiling. And PVC panels can be installed independently.
Stage of laying communications
If the area of the toilet allows for the installation of additional sanitary and hygienic devices, then hidden pipes are installed to them. Pipes are hidden in the walls. The installation technology is as follows. Today, pipes and connections made of polypropylene are most often used - after installation is completed, the grooves are foamed.
The grooves in the walls are not plastered - they will be hidden behind the tiles. It is not recommended to hide pipes in the floor, run pipes in a bunch in the corners and cover them with slopes. This installation creates places where unpleasant odors will accumulate, and slopes will significantly reduce the floor area.
Since there is usually no excess moisture in the toilet, there is no danger of electric shock if there is good electrical wiring and electrical appliances. Therefore, switches can be installed not outside, but inside the room.
Professionals advise laying corrugated wires with a cross-section of 0.5-0.7 mm² from the lighting fixture to the ventilation vent. A fan that will turn on simultaneously with the lamp is practical and convenient.
When choosing lamps for lamps, pay attention to krypton and xenon lamps. They have a color temperature of 4200 K and provide an excellent spectrum of illumination.
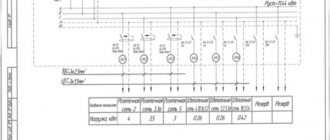
Installation of sewer pipes and water supply. Step-by-step instruction
To install water supply and sewerage pipes, a wiring diagram is first developed. You can watch various video instructions available on the Internet. You can choose a ready-made project or create one yourself. The following are the instructions:
- The sketch is carefully worked out in full accordance with the dimensions of the room.
- Choose the method of placing pipes (hidden or open). Recently, mainly the first option has been considered, because it allows you to maintain the aesthetics of the room.
- They purchase materials.
- Installing pipes. If modern communications are used, there will be no problems with installation, since they are installed without the use of special tools. If these are old-style metal or plastic pipes, it is better to hire specialists.
Why choose plastic panels
In addition to the above materials, you can renovate your bathroom with plastic panels. To some extent, these panels resemble a construction set; any part can be easily disassembled if necessary. The use of such material for bathroom renovation is a win-win option; you can safely experiment with the interior of the room.
In the modern world, various manufacturers offer a huge selection of textures and colors of plastic panels, so they can be matched to absolutely any interior. In addition, the main advantages of the panels include:
- Strength of the material, resistance to various types of deformation;
- Excellent material for sound insulation;
- Additionally provides thermal insulation;
- Very easy to move;
- Fire resistance;
- Sufficiently moisture resistant;
- Easy installation;
- Long lasting.
Decorating a room with plastic
Installing a box on sewer pipes in a toilet. Hiding the pipes
To install the box, you can use ready-made options on the construction market, or make it yourself. If you plan to work independently, you must:
- Draw up a project, take measurements and draw a sketch.
- Buy the required amount of materials.
- Assemble the box. Tools may be required, but fasteners are a must.
Next, you need to install the box and secure it to the wall. If you plan to install a wall-hung toilet, then you will not need to hide the pipes separately; in this case, the tank and other plumbing communications will be initially closed behind the wall.
If you purchase a box, you need to buy a model that fits the size, then mount it on the wall.
Decoration of walls
Of course, the first thing the eye stops at is the walls. Here, perhaps, the best solution would be to veneer them with ceramics. This is the most practical and win-win option from a design point of view. This coating will last a long time without losing its aesthetic properties. The only disadvantage of this type of finishing will be the fairly high cost and the need to call an experienced tile-maker. However, the resulting result will be impressive.
The best finishing material for the walls of such a bathroom would be tiles.
Examples of bathroom renovations in a panel house using other materials will only confirm the correct choice of tiles. Painted and wallpapered walls require periodic restoration, although the range of possible colors is superior to ceramics. Wall panels cannot withstand significant loads and are subject to mechanical damage, but their low cost and ease of installation captivate many.
If you still need to save on wall decoration, you can use a combined option, where the areas adjacent to the bath or shower will be finished with tiles, and the rest of the walls - in any other way. This technique often only enhances the aesthetics of the room.
It would be useful to use mirrors in such an interior. Even a large number of them can only improve the design of the bathroom, since the ability of such surfaces to reflect surrounding objects will create the illusion of increased space.
Toilet installation. Step-by-step instruction
Experts do not recommend installing the toilet yourself, especially if it is a complex wall-mounted plumbing device. To do this, it is better to hire specialists who are well versed in the matter, as well as use professional tools. If you have to install it yourself, follow the instructions:
- Preparing the toilet and materials
- Removing an old toilet
- Assembling the toilet structure in the right place
- Connection to sewerage
- Water connection
Floor finishing stage
Porcelain stoneware, kaolin tiles, marmoleum or other materials with bactericidal properties are used as finishing materials. Marmoleum has several advantages:
- since this coating is pressed to the floor surface by the weight of the toilet, moisture will not be able to seep through the mounting studs;
- When installing toilet mounts, there is no need to bother with measuring; installation can be carried out directly through the marmoleum.
As an option, leave the bulk polymer layer uncoated. In this case, the result is a slightly springy surface under your feet, grayish or yellowish in color with streaks.
Installation of lockers. Step-by-step instruction
It is advisable to install cabinets in the toilet room. Here you can store various toilet cleaners, toilet paper, air fresheners and other household supplies. To install lockers you will need:
- Drill holes in the wall (if this is the fastening method).
- Hang cabinets (or place them on the floor).
- Adjust the location. The doors need to be easy to open. If they open with difficulty, this indicates a crooked installation.
If you plan not to buy a cabinet, but to assemble it yourself, then measurements are first taken, after which a sketch is drawn up. Then the materials and tools for installation are prepared and the guide discussed above is used.
Plumbing installation
This article discussed the renovation of a toilet step by step. If you strictly adhere to the instructions described in it, then you will certainly be able to do everything at a high level. However, this is not the end, since you still need to install and connect the plumbing equipment, and this is also a very labor-intensive process.
It is performed according to the following algorithm:
- The toilet is installed in the designated place. At the same time, to prevent it from fidgeting on the tiles, it is recommended to place it on a special rubber lining.
- We make marks for the holes for the fixing bolts and drill them.
- We install the plumbing fixtures and fasten them with anchors, after which we connect them to the drain using a corrugated pipe.
- Next, screw the flush cistern to the toilet. The kit includes all the necessary fasteners, so you don’t have to buy anything extra.
- We connect the equipment to the water supply system.
- If you also planned to install a sink in the restroom and supplied hot and cold water for this purpose in advance, then there should not be any special problems with this. The sink is simply mounted on the wall and secured with anchor bolts. It is recommended to use an additional bracket, which will give the sink more stability.
- We connect it to the sewer drain through a siphon and install taps for hot and cold water.
When all work on the installation of plumbing equipment is completed, it is recommended to check the quality of all connections so that there are no leaks anywhere. After this, you can begin to install lamps in the ceiling and start using the bathroom. This, in fact, is the entire turnkey renovation, which you can handle yourself without the involvement of professional builders.
Plaster
Bathroom walls are plastered using a cement or gypsum based mortar. In damp rooms it is not recommended to use gypsum mixtures such as Knauf Rotaband, because they can subsequently become deformed from constant moisture, although this is not prohibited by the manufacturer. Read more about the types of plaster mixture.
Required Tools
For plastering you will need the following tools:
- primer brush;
- level;
- trowel for applying mortar in corners and hard-to-reach places;
- wide spatula for applying plaster;
- usually to level the surface;
- grout grater;
- a bucket with a volume of more than 5 liters for mixing the solution;
- gloves to protect your hands;
- drill with a nozzle for stirring the mixture;
- roulette.