When installing plastic window blocks, it is necessary to monitor the following basic parameters:
- fastening window blocks to the opening;
- filling the installation gap between the surface of the wall opening and the planes of the frame of the window block (installation seam);
- arrangement of junction points for window blocks.
Let us highlight the main requirements of regulatory documents that regulate these parameters.
Requirements for the installation of PVC window blocks are established in the following regulatory documents:
- GOST 30971-2012 Assembly seams of junctions of window blocks to wall openings. General technical conditions
- GOST R 52749-2007. Window assembly joints with vapor-permeable self-expanding tapes. Specifications
Let us highlight the most important points of these regulatory documents that need to be monitored during the installation of window blocks from PVC profiles and monitoring its quality.
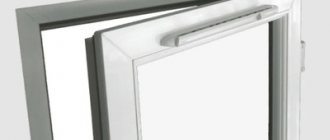
Assembly seam
An assembly seam is an element of an abutment assembly, which is a combination of various insulating materials used to fill the installation gap and having specified characteristics. The seam must meet the following requirements:
- Ensuring reliable fastening of the window unit to the wall;
- Ensuring the required temperature and humidity conditions at the junction of the window frame and the wall. In this case, the window unit must be installed in such a way as to avoid freezing of the window slopes and the frame profile itself;
- Density and tightness;
- Low thermal conductivity and high durability;
- Susceptibility to thermal expansion and contraction of the window unit without loss of tightness.
GOST establishes the requirements that the three-layer construction of the construction seam meets - it ensures ideal preservation of the thermal insulation properties of the foam.
Assembly seam – 3 layers:
- External – waterproofing, vapor permeable;
- Central – thermal insulation;
- Internal – vapor barrier.
This design is designed to ensure the resistance of the assembly seam not only to atmospheric influences, temperature and moisture, including from the inside, but also resistance to operational influences. In addition, it must be resistant to various types of deformation, both temperature and force.
The outer (outer) layer of the assembly seam protects it from moisture penetration, exposure to ultraviolet radiation, exposure to temperatures from -35 to +70°C, and partially prevents the penetration of cold air through the assembly seam, etc.
In addition, the outer layer of the installation seam must have high vapor permeability ( vapor permeability coefficient
outer layer material –
at least 0.15 mg/(m*h*Pa)
to remove condensation moisture from the installation seam to the street.
Today, the most mature technology is the construction of the outer layer of the assembly seam using vapor-permeable self-expanding sealing tapes (PSUL). There is a fairly wide range of names for this type of material, but not all are suitable for sealing window installation joints. PSUL tapes intended for installation of window blocks must withstand water pressure in a compressed operating state of over 300 Pa. The PSUL must be resistant to ultraviolet radiation (the total irradiation dose to the front surfaces during testing is at least 5 GJ/m2
).
Applying a layer of plaster, putty or painting compositions to PSUL is not allowed!!!
The central layer must provide the specified resistance to heat transfer of the assembly seam and the necessary sound insulation.
To create the middle layer, polyurethane foam or, more simply, polyurethane foam is used. (Spray foam is a polyurethane foam sealant). The central layer must be made without voids, cracks, peeling and overflows. Shells larger than 10 mm are not allowed. The water absorption of foam insulation of the central layer when completely immersed for 24 hours should not exceed 3% by weight. The high heat and noise insulation characteristics of polyurethane foam are maintained only in a dry state. Humidification negates all of its above-mentioned advantages. Therefore, keeping the insulation in as dry a condition as possible is the main task performed by the outer and inner layers of the assembly seam.
The inner layer must be sealed and provide reliable insulation of the central layer materials from the effects of water vapor from the room. Vapor barrier materials along the internal contour of the installation gap must be laid continuously, without gaps, tears or un-glued areas. Vapor barrier materials of the inner layer of the installation joint must have a vapor permeability coefficient of no more than 0.01 mg/(m*h*Pa). Vapor barrier sealing tape is made of aluminum foil, coated on one side with a self-adhesive plastic-elastic mass based on butyl rubber with a high degree of adhesiveness. The tape must be glued tightly along its entire length. Any gap or swelling is a channel for moisture penetration. The width of the tape is determined by the formula: the width of the installation gap plus 30 mm or more.
Lubrication of PVC window mechanisms
Every self-respecting manufacturer of plastic windows offers its own lubricants. At the same time, there are separate lubricants for the mechanical part, and different ones for the rubber seals. They are not always available, so any silicone-based lubricants will do. Do not use water-based lubricants or those containing aggressive substances.
The best option for the physical state of the lubricant is a spray. It easily penetrates into any place under pressure.
Lubrication points:
- loops;
- pen;
- trunnions and strikers;
- scissors.
Lubricating the fittings is easy. There are technological holes in the end sides of the sash element, where the window closing mechanism is located. Lubricant is added to them. Moving and rotating elements located on top are lubricated in the usual way - on top of the contact planes.
Errors in the accuracy of geometric parameters
A very common mistake when ordering and installing products is errors in measurements. Ideally, this procedure is carried out on empty window openings during the construction stage of the building.
In practice, plastic windows are installed as a replacement for old wooden ones. The presence of an installed frame prevents accurate measurements. In turn, this leads to an erroneous geometry of the finished double-glazed window. How can you understand at the installation stage that the measurements are incorrect?
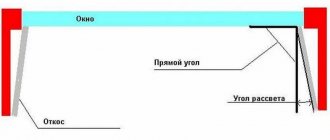
At a minimum, it is worth remembering that the distance between the frame and the wall of the building should be 3-4 cm. In the lower part, such a gap may be larger, taking into account the installation of an external ebb. A distance less than that specified is unacceptable, because in this case the expansion and contraction of the plastic becomes difficult. This occurs due to changes in air temperature: at positive temperatures the frame will increase, and at negative temperatures it will shrink.
The frame has no choice but to rest against the wall. Because of this, curvature occurs and it can deteriorate ahead of time. Sometimes cracks even appear in the glass unit. For the installer, narrow gaps also have disadvantages, because they are quite difficult to fully fill with foam. The empty spaces thus obtained violate the tightness of the seams.
It is important to choose the optimal distance to the wall, because large openings also negatively affect the quality of installation. There is no normal fastening, and the structure turns out to be shaky
Such defects can be corrected in rare cases. If the error is a few centimeters upward, then it is corrected with polyurethane foam. In other situations, it is necessary to order new products.
How to take measurements
There are two window configuration options. Panel houses often have frames with a quarter (double-sided side). In brick buildings, the opening is formed by a pair of rectilinear planes perpendicular to the walls. This design does not provide for a quarter. For both options, there are diagrams and drawings demonstrating the process of taking measurements. They need to be carried out from the outside. If the room has a balcony, measurements can be taken by going out onto it.
If the opening has a quarter , the height of the window is determined by measuring the distance from it to the bottom point of the opening. Add 2 cm to the result so that the product goes slightly overboard. If the windows will have a window sill and drainage, you need to provide 3 cm for the support profile. Then 3-6 cm under the mounting foam is subtracted from the result.
According to the standards, windows should extend beyond the quarter by 3-6 cm . So their width should be less than the full size of the opening, but greater than the distance between the sides. Add 4-6 cm to the last parameter. In this case, there should be a gap under the foam. It is not worth recessing the structure in a quarter to an excessively great depth - this complicates the installation of the mesh.
Errors when sealing and insulating window openings
Practice shows that in order to seal and insulate window openings, in the vast majority of cases today, special polyurethane foam is used. This is due to a number of well-known factors, the main of which are maximum tightness and speed of installation.
When using spray foam, inexperienced installers often introduce too little or too much spray foam into the gap around the window frame. Thus, in the first case, the gap space around the window is not completely filled and does not provide a tight seal. The result is the absence of a thermal circuit, freezing in winter and possible blowing. In the second case, excessive use of polyurethane foam can lead to deformation of the window profile.
Lack of sealing or poor quality sealing can be caused by other reasons. Premature start of processing of polyurethane foam, before it has completely dried, can lead to a decrease in the volume of the insulating layer, and as a result, to a deterioration in sealing efficiency.
The main part of the window and the components used in the assembly. 1. Outer layer of insulation (PSUL) 2. Inner layer of insulation (vapor barrier) 3. Central layer of insulation (foam) 4. Glass 5. Fasteners 6. Frame 7. Slope 8. Spacers 9. Wedge
Filling gaps
Fill gaps around window units using polyurethane foam, expansion tape and vapor barrier. The insulation pie consists of three layers! Before using foam, it is necessary to insert spacers (mounting wedges) between the window frame posts to prevent their deformation due to the expansion of the foam. Choose foam with minimal expansion, thereby reducing the risk of making a mistake in its dosage
Sealing with polyurethane foam
Before you start sealing, thoroughly moisten the window openings with water, which will increase the adhesion of the foam. Fill the gap between the frame and the opening to 1/3 of its volume. After applying the foam, be sure to allow time for it to dry completely in accordance with the manufacturer's instructions. Once dry, remove excess foam using a sharp knife.
Using mounting tape
If you choose the option of finishing window slopes with plastering, then use a special tape to prevent scratches and dirt from appearing on the window profile. Upon completion of the work, do not forget to remove the tape as soon as possible; after 2-3 months this will be very difficult.
How long does it take to work?
Installation of PVC windows can take from 2 to 10 hours. The duration of installation work directly depends on the following factors :
material of wall structures, work is completed faster in panel houses, where the window opening is initially made more carefully;- level of premises preparation;
- level of preparation of the window unit;
- number of floors and distance from the waste site;
- time for delivery of the window and accepted consumables.
The preparation of the workplace is carried out by the customer; the more thoroughly it is carried out, the faster the installers will work.
If all conditions are met to the greatest extent, then the main operations for installing a PVC window will take :
- dismantling the old unit - from 25 to 60 minutes;
- window opening preparation - 30 minutes;
- installation at the level of the window frame - 30 minutes;
- installation of sashes and fittings - 15 min;
- window sill insertion - 10 min;
- installation of ebb tides - 15 minutes;
- installation of slopes with panels - 30 min;
- compaction - 15 min;
- total from 2 hours 50 minutes to 3 hours 25 minutes.
The process of installing a plastic window frame into an opening
Please note that the linear dimensions of the window change depending on the temperature. This is most likely another reason for using anchor plates
In this case, they serve as springs, preventing deformations from causing significant damage. As for the anchors, they must be recessed into the frame. And that's why.
Let's say our frame is broken through at the attachment points. In summer, when temperatures are high, plastic expands rapidly. Its linear dimensions change faster than the wall. Therefore, if something connects these two elements, then deformations will occur in the profile
Please note that this cannot be said about foam; it holds along the entire perimeter, which blocks this factor. Thus, if anchors are used, they should not be rigidly connected to the profile
We said this now because GOST is silent about it, and the need to drill the wall is already imminent. To mount the frame you will need wedges. GOST mentions spacer elements and says that they should be made of plastic or special hardwood, properly processed. As a result, it is much cheaper to buy mounting wedges in a store than to try to swim against the current. Before installation, the opening is thoroughly cleaned. GOST says that any interfering factors, including snow and ice, are removed. Irregularities are eliminated with various compounds. There should be no defects larger than 1 cm in size.
Window frame perimeter
While the solution dries, the frame of the plastic window is prepared. To do this, two strips of vapor barrier membrane are glued along its perimeter. One for each side. If there is a window quarter, then a PSUL is mounted along its length with an indentation of 1 - 2 mm inward. We remind you that the membrane is glued with one edge under the anchor plates, which must be placed around the perimeter at a distance of no more than 70 cm with a distance of 10 - 12 cm from the corners.
Before installation, loose walls are primed with special mixtures or reinforced with film, and materials with strong water absorption are also treated accordingly. Mounting wedges are placed on the sides of the prepared base, approximately equal to the calculated gap. A plastic window frame is placed on them. The structure is symmetrical in the opening and leveled. Wedging begins, during which it is necessary to provide a calculated gap on each side of the frame.
The wedges themselves do not hold the profile; they are needed only at the installation stage. It is clear that if the temperature drops in the future, these elements will lose their load. Before foaming, the cleanliness of the opening is checked once again, and in place. The surface is moistened, after which the seam is blown in about two-thirds. In the future, polyurethane foam will expand and take up the entire space. When the composition has dried, the vapor barrier membrane along its edges is attached to the concrete base. No operations are performed with PSUL around the perimeter of the window quarter.
This way, the seam is isolated from the street, and finishing work can begin. GOST 30971 contains several sketches of how to build slopes. According to one option, finishing is not done at all. The work of the master is limited to what we have already described. As for the slopes, it is proposed to make them from wood, plaster or drywall. PVC is not yet on this list, and everything made from sandwich panels is not regulated by the standard. But because of this, fewer polymers were used in finishing. Because insulated and beautiful slopes are great, and the installation of PVC panels is much simpler than the plastering process.
That's all the installation of PVC windows according to GOST, about which there is so much gossip. Not a word about low tides at all. However, the procedure for installing them is extremely simple.
What to do if the frames were installed incorrectly?
If errors are noticed during the installation process, they can be corrected before the window unit is permanently fixed.
If such errors are detected during operation, for example, due to moisture condensation on the window and slopes, blowing through the block or depressurization of the glass unit, the cause of the violation must be identified.
If the window is not under warranty service and the owner performed the installation himself, then in this case the inspection and correction of errors can be carried out either independently or with the involvement of a specialized installation organization.
If the PVC window is under warranty, then only the organization that installed the structure should be involved in the inspection and elimination of errors.
On one's own
Unfortunately, most errors can only be corrected by a radical method involving dismantling and reinstalling the window.
List of works to correct defects in PVC windows that can be performed without removing the frame:
- re-sealing the assembly seam;
- finishing of external slopes;
- low tide sealing;
- re-installation of the window sill;
- glass unit sealing;
- setting up fittings.
Invited specialists
If unsatisfactory performance of a PVC window is discovered during the warranty period, you should immediately invite company representatives to eliminate the defects.
The warranty service procedure and application procedure are usually prescribed by the terms of the contract, but if there are no such sections in the contract, and the customer did not pay attention to this in a timely manner, then the dispute is resolved in accordance with legislative norms regarding the protection of consumer rights.
Sample claim:
First, the customer submits a written claim to the organization to the contractor, by registered mail with notification. Reputable companies, as a rule, immediately send their representative to the site, who diagnoses the technical condition of the PVC window, its operating conditions and decides to carry out repairs or replace the old unit with a new one.
If the organization voluntarily refuses to correct the defects or replace the window, the dispute can be resolved in court with compensation to the customer for all material and moral losses.
A dispute over the protection of consumer rights is not subject to state duty for claims up to 1 million rubles.
Installation technology and rules for installing plastic windows according to GOST 30971-2002
In order for the installed structure to serve for a long time, it is important to comply with the requirements for the work performed. Factors such as:
- features of the opening walls;
- dimensions (weight, dimensions).
GOST requirements for the installation of metal-plastic systems
The state standard contains requirements governing the location of the frame and installation seams.
Basic requirements for window installation:
PVC window installation options
There are two types of installation work with plastic windows:
- full analysis;
- without ruin.
The second method is easier, but not always applicable. There are a number of restrictions when its use is prohibited.
Technology for installing a plastic window with disassembly
The state standard notes that collapsible technology is indicated for use in cases where it is planned to install a large structure at a sufficient height of the building. This method is implemented with the aim of giving the frame additional strength and reliability indicators.
The whole structure is disassembled into its component parts:
- remove glazing beads;
- disconnect the glass;
- remove the flaps.
Prepare the anchors, the larger the frame, the longer they should be, the smaller the distance between them should be. The average distance between anchors is about 50 cm.
After attaching the frame, the elements that were removed before the installation process began are fastened. When they are put in place, attach the ebb, as well as the slopes. It is recommended to fix the ebb to the stand profile.
Installing a plastic window without disassembling
OLYMPUS DIGITAL CAMERA
Plastic structures are installed indiscriminately where the window system will not be higher than two meters, and also, when installed in a building, no higher than the 12th floor. An important advantage of this technology is the absence of risks of incorrect installation of the structure during its final assembly.
How does this process work?
- The old frame is dismantled (if necessary).
- The block is installed on the bars.
- The window is aligned horizontally and vertically.
- The system is fixed in the opening.
- The block is secured with fasteners.
- Create the inside of the assembly seam (it is necessary to protect against moisture penetration).
- Foam the assembly seam.
- Cover it with an elastic band.
- Screw on the starting profile.
- Cut slopes according to predetermined parameters.
- Install slopes.
Little things that require special attention
It is very important to consider a number of little things that can affect the overall quality of the design:
carrying out installation without disassembling the block strictly with the doors closed; adjustment of the fittings should be carried out before the installation phase begins; be sure to use a stand profile, without it cold bridges will form, its absence affects the level of the system; When installing a collapsible structure, pay attention to the order of fastening the glazing beads, as well as their tight installation in the right place.
How to make balcony glazing?
Balcony glazing requires special attention because the area of glass surfaces here is very large. In addition, individual structural elements will bear a large level of load.
The first step is to install a frame on the balcony that has the necessary parameters, including power. The designs of plastic windows here can be completely different: hinged, tilting, fixed, with or without vents. If the balcony is small and rarely used in winter, it makes sense to install sliders. They are very convenient, excellent space savers, and allow you to use the useful area of the window sills. Their only drawback is the ability to let cold in.
If it is necessary to create a warm loggia, wide profiles equipped with multi-chamber double-glazed windows should be used. They have tilt-and-turn mechanisms, which makes it easy to ventilate rooms.
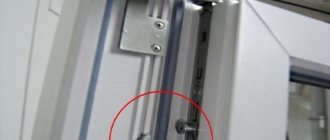
Adjusting the vertical and horizontal position of the window
When adjusting a plastic window with your own hands, you need to do everything gradually. For example, it is recommended to shift it by 1 mm, check it and, if necessary, further adjust it.
Each hinge has two screws: one located in the top end, the second on the side. The first adjustment is made vertically, the second horizontally. A hexagon is used for this. The upper regulators are usually closed with plugs.
To adjust the plastic window vertically, you need to rotate the screws clockwise, during which the sash will begin to rise. Conversely, counterclockwise rotation results in lowering.
Horizontal adjustment is carried out with the window open. To do this, rotation is done clockwise. In this case, the sash will move towards the frame. By rotating the screw in the opposite direction, movement is achieved from the frame.
Specifics of installation in a wooden room
- When installing windows, the material where it is inserted also matters. For example, a concrete or brick wall differs only in the depth of the anchors. Whereas a log house has a different approach to itself. Not only the installation of packages plays a role here, but also the time at which you can install them.
- If it is a new building, plastic windows are installed only the next year, or even better the second. The house will shrink, and then you can proceed to installation. If the house is made of laminated veneer lumber, cutting in can be done earlier. Blocks cannot be placed in the opening; they are placed in a wooden box. This will protect the structure from deformation.
- The work begins with treating the opening with antiseptic agents. Shrinkage will continue after the installation of blocks and finishing, but not as actively.
- It is worth leaving a gap of up to 7 cm between the plane of the opening and the frame. It is mainly regulated by the humidity of the materials used. After the installation is done, the gap should be filled with jute insulation and covered with platbands on both sides.
- If we talk about the window sill, it can be either wooden or polymer. It can be prepared in advance, and there is no fear that the profile will rest on the windowsill.
- Wood has the ability to allow vapor to pass through, therefore, this will affect the quality of the polyurethane foam. To prevent this from happening, it must be equipped with foil-coated polyethylene foam material.
Execution options
vaster
The discussion turned out to be constructive at the seams. I would also like to hear from the installers what you think about the materials for installation and the technology described below.
- Pre-treatment of aerated concrete: primer, then STIZ-D.
- Window fastening: mounting plates, pitch up to 700mm, terrace exit with anchor bolts.
- Support pads: plastic.
- Waterproofing (from the street): vapor-permeable sealant STIZ-A or analogues.
- Assembly seam: polyurethane foam.
- Vapor barrier (from the room): vapor barrier tape.
- Additional sealing of connectors and expanders with PSUL tape.
technologistSPK
Apart from support pads, plates and mounting foam, everything else is a waste of money. I will give my reasons.
- Polyurethane foam has negligible vapor resistance.
- Polyurethane foam is negligibly hygroscopic.
- For interior and exterior applications, the foam will be sealed inside and out, creating the same barrier as sealants. The internal slope will be denser, which means that the rule is more dense on the inside than on the outside.
Of course, you can do what you plan, it won’t be bad, but it won’t be just as bad without extras.
What document regulates the installation process of plastic windows?
In March 2003, GOST 30971–2002 was developed and adopted, which ensured the formalization of installation work. The adoption of this document was facilitated by the state program to increase energy efficiency and energy saving.
But not all companies are guided by the provisions of this document in their work. The high requirements imposed by GOST 30971–2002 increase the costs of companies operating in the PVC window market. Therefore, small companies often ignore its provisions, skimping on the quality of services provided. This is also facilitated by the low professional level of employees of such enterprises.
For the average person, familiarity with this document will bring tangible benefits. Knowing the rules for installing PVC windows, he will be able to control the entire installation process, and after its completion he will be able to receive detailed technical documentation on the work performed and full warranty service.
General adjustment instructions
| Malfunction, problem | Causes | How to fix |
| The window does not open | Handle malfunction The sash is sagging | Replacement Adjusting the sash vertically and horizontally using adjusting screws on the hinges |
| The window does not close | Handle malfunction Loss of sash geometry Incorrect height adjustment | Replacement Place a pad under the strikers of the closing mechanism Adjust the position of the sash correctly |
| The handle doesn't work | It's broken, jammed, difficult to turn | Replacement Disconnect the lock Reduce the pressure and clean the handle |
| Micro-ventilation is impaired | Small gap | To adjust the gap and increase it, use a screw located on the scissors. When it rotates clockwise, the gap increases |
| Blowing through the window | The sash sagged and sagged | Raise the sash structure by rotating the top screws on the hinges Rotating the side screws |
| Transfer to winter-summer modes | Installing the trunnions in the winter or summer positions by rotating them to the required position |
GOST in installation
Each document describes the exact installation process, thanks to which the service life of the windows is increased. These standards are relevant in Russia. The first stage is to measure everything according to level. In addition, in the process you will have to install a certain number of anchors, there are 14 of them. Although many may think that this is too many. According to the requirements, this gives a chance for a long service life. Three layers of seam are not always beneficial, but they allow you to protect against steam and insulate the room.
If the building is new, then GOST 30971-2012 will become relevant for implementation. When dismantling occurs, the structure of the opening is violated, which, according to the rules, has its own limitations and permissible deviations. To create proper conditions, plaster and putty are used, but these are additional costs and time. Even after this, it is difficult to create a complete vapor barrier.
Today, plastic windows are in great demand precisely because they create a comfortable microclimate. They are not as susceptible to destruction as wooden ones. There are rules that allow you to work in different directions. Therefore, installing wooden windows in accordance with GOST brings benefits and extends their service life.
Conclusion:
There is such a saying. If you want to do it well, do it yourself. This statement best describes window installation.
If you install plastic windows yourself, then such installation will be much better and cheaper. The approximate price of three types of tapes is 1000 rubles. The cost of installation from the company according to the “bungle-blunder” principle is 2500-3000 rubles. Total direct savings for self-installation will be 1500-2000 rubles.
At the end of the article, I suggest watching two videos on this topic.
Basic requirements for seams
There are two main requirements for seams: reliable insulation and high strength. But to truly achieve compliance, a huge amount of work needs to be done. The result will largely depend on the skill of the contractor’s specialists. The company is obliged to agree with the regional supervisory authority in the field of construction on a work instruction containing all the necessary standards.
Characteristics of layers and materials
Work within the framework of GOST for the installation of plastic windows 30971−2012 requires a special selection of materials, accurate calculations and control. All this should guarantee the reliability and durability of the structure. The process is lengthy, but even to save time, none of its stages should be neglected. The following technical requirements are established for seams:
- The selection of materials must ensure resistance to loads, design durability, absence of contour freezing, and tightness during precipitation and wind. The last position is checked by the condition of the outer layer.
- Materials must allow for replacement both during operation of the unit and after the warranty period has expired. The use of non-replaceable consumables is permissible only if a durability guarantee is confirmed in the contract.
- Depending on the design features, adjacent seams may vary in design and have a different number of layers, but the common rule for them is a higher density of internal filling compared to the external one.
- Each layer of the seam has its own purpose. The main one is designed to create conditions for high-quality sound and heat insulation, the external one is for protection from atmospheric phenomena, the internal one (or several internal ones) is for vapor barrier.
- When determining the composition of the seam, it is necessary to take into account the characteristics of the materials from which the walls are made.
- When installing window blocks using moisture-intensive methods (masonry, solid concrete), the insulating layer must be additionally protected by a vapor barrier.
- Block deformations that may occur due to temperature changes must be completely absorbed by one or more joint layers.
- The seams must be resistant to loads such as moisture exposure from inside the room, shrinkage stress, and variable wind pressure.
- The joint characteristics must ensure that the temperature on the inner surface of the structure is not lower than the dew point, taking into account the conditions of the coldest five-day period in the region where the work is being carried out.
Layering and other features
Construction joints can be formed in accordance with GOST 30971−2012 only from materials that fully comply with the standard and contractual technological conditions. It is prohibited to use consumables that have expired. All materials must have sanitary and epidemiological certificates.
The requirements for each layer are different. There are features for a number of positions:
- External protection must be waterproof when exposed to design parameters, but its materials must allow moisture to pass through from the central layer.
- Conventional external protection materials must be resistant to temperatures from +70 to -30 °C (even lower in special versions).
- A vapor-permeable sealant must ensure strong adhesion to other materials. The contact width cannot be less than 0.3 cm.
- If sealing tapes are used for installation of structures at high-rise construction sites, then flashings must be used together with them.
- If plaster is used externally, it is necessary to ensure adequate adhesion to the wall and block.
- Plastering or painting, which may impair the vapor permeability of the joint from the outside, is prohibited.
- It is recommended to keep the width of the central layer seal within 1.5–6 cm. Working with such polyurethanes is permissible at temperatures not lower than -10 °C.
- In the middle layer, thermolene, jute, and polyethylene foam can be used.
- Cutting off excess sealant is possible on both sides, but only if the seam is completely insulated.
- The gaps are filled completely, without tears or cracks. There should be no sinks or overflows.
- Along the internal contour, the special tape must be glued continuously, without joints or breaks.
What does the price consist of?
Pricing for installation work of PVC windows depends on many factors, which include :
- wall material;
- condition of the window opening;
- the need to dismantle the old window;
- window size;
- installation floor;
- brand of window block;
- window class: economy, standard and elite;
- quality of consumables;
- additional installation work, for example, making slopes, installing ebb and flow sills;
- transport invoices.
The installation price of window structures is determined per 1 m2 and for standard equipment is:
- window installation from 850 rub./m2;
- installation of slopes from 400 rub./m.p.;
- installation of window sills from 800 rub./m.p.;
- remote opening of sashes from RUB 5,500/set;
- anti-burglary fittings from RUB 7,000/set.
Read more about pricing in the article here.