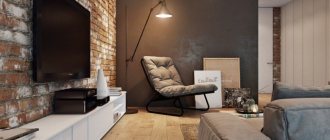
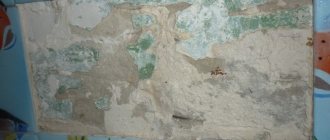
A bathroom is a room with a problematic microclimate. Not every material can withstand constant changes in humidity and temperature levels. Traditional tiles often get boring, so homeowners are looking for suitable analogues. In this review, we will look in detail at what can be used to decorate the walls in the bathroom, except for tiles.
Inexpensive option for the bathroom Source alberomarket.ru
Self-adhesive film
PVC film is a budget option that will help you quickly change the interior of your bathroom. A variety of textures, colors and prints allows you to choose an effective solution for your room design. Raw materials are produced in sheets and rolls, like wallpaper. On the back side of the material there is an adhesive composition covered with protection.
Self-adhesive film is not afraid of high humidity, which allows it to be used in the bathroom. To remove drops and debris, wipe the coating with a rag. The finish is glued only to prepared surfaces. The base can be either a painted wall or boring tiles. Installation is carried out very carefully, otherwise bubbles and distortions will occur.
Fragility is the main disadvantage of film. In wet areas, the self-adhesive will begin to peel off after a few years, and with careless movements it can easily be damaged (torn). Bright colors and images gradually fade. This option is perfect for people who like to change their design frequently with little investment.
Ventilation arrangement
The ventilation system is an important part of any room with high humidity. In the absence of air circulation, plastic panels become covered with mold, which negatively affects the health of apartment residents. To ensure ventilation, a hole is made in the plastic casing that matches the size of the ventilation window. The latter is covered with a decorative lattice. It is fixed with glue or sealant. The ventilation grille should not touch the frame rail.
The mine is equipped with an electric fan that provides a constant flow of air. Devices can be exhaust, supply or multifunctional. The device is powered from a separate grounded outlet. The electrical wire is connected to the bathroom switch. Work is carried out before finishing the walls. It is recommended to install an additional ceiling fan.
Painting walls
Paint is an affordable alternative to bathroom tile. The enamel coating can be either single-color or multi-color. A design with vertical or horizontal stripes helps to visually correct the shortcomings of the room. The author's drawings look luxurious on the partitions in the bathroom. If there is no artistic talent, then stencils are often used.
After drying, the paints create a durable polymer film on the walls. The coating must be resistant to abrasion, household chemicals and steam. In conditions of high humidity, 3 popular types are used:
- Alkyd. Very strong, durable compounds that are easy to apply. The inexpensive material has moderate resistance to impact loads. The pungent odor is the only drawback of the coating.
- Acrylic. Enamels based on polymers and water do not stink and dry quickly. They are inferior in durability to alkyd ones, but are easy to use.
- Latex. Synthetic rubber paints with fungicides are resistant to high humidity and fungus. Operation – 15 years.
The enamel is applied to a previously prepared surface. The walls are cleaned of old finishes, cracks are sealed and depressions are leveled. Before painting, the partitions must be primed and dried thoroughly.
Over time, any enamel fades, cracks, and therefore requires updating. The old layer is washed off with a solvent or removed mechanically. We recommend additionally protecting the surface near the bathtub bowl or in the shower with water-repellent varnish.
Paint in the bathroom Source ourvagabondstories.com
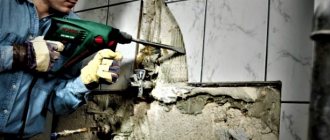
What tool and how can you process the material?
There are the following methods for cutting and processing panels with your own hands:
- Construction knife. Use only new blades with sharp tips. Can be cut along panels. The element is laid on a horizontal surface, the places of cuts are marked. When slicing, use a long, straight
Method of cutting panels.
bar It is placed on the panel, and a cut is made on one side with the tip of a knife. Turning the lamella over, bend the cut point. The remaining part is cut off in a bent state. Cutting across the panel is more difficult; you need to carefully cut the jumpers with the tip. - Bulgarian. The tool is equipped with a metal disk with a minimum thickness. The cutting process does not take much time, but you need to know how to use a grinder. After the cut has cooled, the burrs can be easily removed. When working, observe safety rules; the tool can cause serious injury.
- Hacksaw for metal. The inconvenient method takes a lot of time. It is used in the absence of other tools. The saw teeth must be of a minimum size. The quality of the cut depends on your skills in using a hacksaw. Uneven places are hidden with the help of additional elements.
Decorative plaster
Textured putty is a plastic material with which you can create an original bathroom design. The composition of the raw material includes crushed particles, allowing you to obtain a surface like marble, concrete or brick. After drying, the decorative plaster is painted and protected with a special varnish.
The beauty of the coating depends on the application technology. Three-dimensional drawings of varying complexity, which are created using rollers or spatulas, look luxurious on the walls. In the design of a bathroom, decorative and smooth surfaces are often combined, emphasizing a particular area.
Decorative plaster Source silka.com.ua
To decorate the walls in the bathroom, sanitizing types are used, adapted for use in wet conditions. The material contains synthetic additives that allow you not to be afraid of fungus and maintain a normal microclimate. On average, the durability of high-quality finishing is at least 10 years.
Decorative plaster is applied to prepared and leveled walls. Areas of the wet zone are protected from water with special compounds, otherwise difficult-to-remove limescale stains from the liquid will remain on the surfaces. Glazing solutions and varnishing will help cope with the problem.
Beautiful bathroom design Source poradu24.com
Equipment and additional elements
When finishing a bathroom or toilet with plastic panels, the following types of components are used:
- Universal corner. It is a plate bent at a right angle. The part is used for finishing internal and external corners.
- Skirting for floor and ceiling. Part of the profile is placed under the panels, the other side covers uneven cuts and surfaces.
- Outdoor corner. Helps to beautifully decorate the outer corner, hiding unevenness.
- Inner corner. It differs from the external one in the size of the sides. The wide part is placed under the lamellas, the narrow part is used to hide irregularities.
- Connecting corner. Used to connect panels without a lock. It is used when the length of the lamellas is insufficient for finishing the surface.
- Start/finish profile. It is installed when laying the first and last panels. Sometimes a finishing guide is used instead of a universal angle.
- F-shaped corner. Placed at joints and can replace casing.
- Sheathing plank. It is considered the main element of the frame. The part is made of metal or plastic.
- Klyammer. Used to press panels to sheathing. Allows you to remove slats without damaging them.
- Fastening elements. The material is secured with self-tapping screws, staples or liquid nails. The choice of fixation method depends on the installation method of the cladding and the quality of the walls.
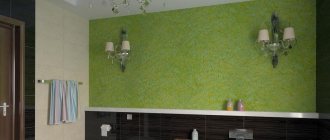
Moisture-resistant wallpaper
Trellis with maximum moisture resistance markings (3 waves) are suitable for use in the bathroom. Popular types include acrylic and vinyl wallpaper. The models are not afraid of a humid microclimate, but will not withstand direct exposure to water. A varnished protection or glass panel will save the wet area from destruction. The alternation of finishing with painting or decorative plaster on the bottom looks original.
Fragility is the main disadvantage of trellises. On average, the material will last no more than 5 years. Even water-resistant types quickly deteriorate in humid conditions. The dense, often multi-layer structure of products provokes the formation of mold and mildew on the walls.
Trellis in the bathroom Source pobudova.in.ua
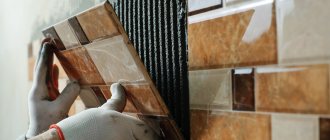
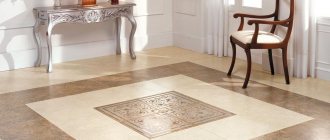
Option #1 - ceramic tiles
This is the name given to plates of various shapes and sizes made of baked clay. The tiles are made by pressing a homogeneous crushed mixture and subsequent firing in ovens at a temperature of about 1200C. There are different types of ceramics:
Glazed tiles. Additionally, it is coated with a special transparent layer, which not only protects the ceramic plate, but also gives it a more attractive appearance. Unglazed cladding.
There is no protective layer. The tiles are distinguished by the natural structure of the material and attractive natural texture. It can be considered conditionally suitable for decorating wet rooms.
The design of ceramic tiles can be very different. In addition to the traditional square and rectangular cladding of various sizes, more interesting plate shapes are produced: hexagons, triangles and even circles and ovals. The colors and textures of the tiles are also varied.
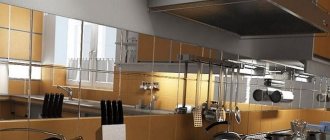
Interesting models with all kinds of inserts made of metal, mirror or stone. Manufacturers offer tile collections that include basic cladding and decor: borders and plates decorated with various patterns and motifs.
The obvious advantages of ceramics include:
The main disadvantage of any ceramics can be considered the complexity of installation, before which it will be necessary to carry out labor-intensive work to prepare the surface of the walls for cladding.
The features of the finishing material are such that it can only be laid on a completely leveled, dry base primed with a special compound. The cladding process is also complex and requires the involvement of specialists. It is almost impossible for a person without experience to lay tiles on walls efficiently.
In addition, the surface of ceramics is always cool to the touch, so leaning against such a wall is not very pleasant. The material is classified as brittle and fragile, which complicates transportation and laying of tiles. The cost of cladding depends on the quality and the manufacturing company.
On sale you can find both elite models belonging to the high price category and quite budget material. Thus, if desired, cladding that is acceptable in cost and quality can be found without much difficulty.
Flexible stone
The composite type consists of a non-woven base (fiberglass) and a stone filler. The top of the product is coated with a special protective varnish. The finishing is produced in the form of rolls or ready-to-use sheets. Flexible, soft panels can be easily cut into individual pieces with a knife.
Composite material Source arriver71.ru
In the bathroom, the stone composite is glued to the partitions with a fixing compound. The position of the material can be adjusted within 5 minutes, after which the parts are set. The finishing is very light, so the elements do not slip during installation.
Decoration is the main advantage of flexible stone. The raw material visually and to the touch resembles granite, marble or quartz. The material has a high price, which will pay off with durability (more than 20 years) and easy maintenance. The composite does not rot in humid conditions, even with poor ventilation.
Agglomerate. New from manufacturers
Agglomerate is a new achievement of modern technologies. It is an artificial stone, which contains compounds of stone chips, cement and dyes. Externally, the agglomerate resembles ceramic tiles, but it is more durable and easier to install.
Agglomerate comes in different colors and any texture. It is elastic, waterproof and resistant to temperature changes. The walls do not require special treatment before installation; just a flat surface is enough.
This modern material also has its disadvantages. The agglomerate requires special storage conditions, since it tends to deform under its own weight. The price of this material is significantly higher than its analogues.
Wall panels
Raw materials help to quickly make wall cladding in the bathroom. Under the boards they hide the imperfections of the partitions, making repairs easier and faster. The panels in the room must be installed on a frame, otherwise dampness accumulates under the finishing and mold appears. You can hide plumbing and meters under the structure.
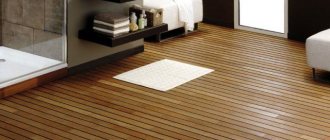
Among the alternatives to tiles in the bathroom, professionals highlight lining. Inexpensive cladding boards are mounted on metal profile sheathing. To prevent the wood from rotting, the surface is protected with an antiseptic and water-repellent varnish. The material should not be installed in a shower stall or next to a bowl. In wet areas it is better to use paint or a glass screen.
What to give preference to?
The variety of materials for decorating bathroom walls serves as a kind of guarantee that everyone can choose the best coating for themselves. When choosing, you must take into account the individual characteristics of the bathroom, since the same material will manifest itself differently in different conditions.
The deciding factor should not be the attractive appearance, but the durability and practicality of the coating. Then the bathroom will delight its owner for many years not only with beauty, but also with functionality.
Well, now it's time to finish the article. All the material I wanted to share has been reviewed. I hope you find it useful and you will use it if you need to decorate your bathroom walls. Improve your own practical skills and gain new knowledge, as they say: “It’s never too late to learn!” That's all, thank you for your attention, successful and easy repair!
A natural stone
Marble and granite, travertine and onyx bring a touch of luxury to the room. Natural materials are expensive. The cost is compensated by high durability and decorativeness. Wear-resistant stone types can withstand mechanical damage and constant fluctuations in temperature and humidity.
Natural finishes will appear in a large bathroom, but will be invisible in a tiny one. To prevent a room from looking pompous, cladding is often combined with other materials. For example, with decorative plaster, painting or wallpaper. Partial finishing will help place accents or visually change the irregular shape of the bathroom.
Natural stone Source zen.yandex.com
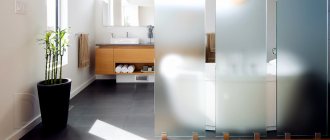
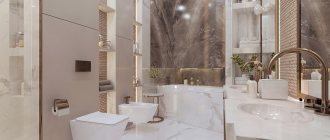
Ideas for decorating a small bathroom
A small bathroom is not a reason to abandon large-scale plans and bold design ideas. It seems that country, rustic or Provence are not for an intimate room, where paneling with natural wood is out of the question? However, there are tiles or PVC panels that are difficult to distinguish from real boards even close up.
With the right combination of finishing materials, small bathrooms can look very stylish and creative.
The selection below proves this.
Decorating a 4 sq.m. bathroom m :
design 6 sq. m:
Bathroom decorating ideas are endlessly varied. It is important to choose the style that best suits your inner mood, and then you will definitely find decorative techniques to bring your idea to life.
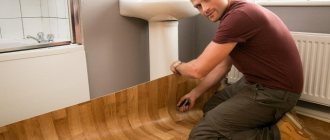
Linoleum
Flooring is an unusual and rare alternative to tiles in the bathroom. When choosing a material, preference is given to thicker models with high moisture resistance. Advanced finishes are more expensive than regular linoleum. Types based on PVC or corundum chips are suitable for use in the bathroom. Products must contain antibacterial impregnations.
The material is cut into pieces or used along the entire length of the wall. The raw materials are glued to the partition using a technology reminiscent of installing wallpaper. The fixing composition for linoleum is distributed on the back side of the product, pressed to the surface, and leveled. Use a spatula or dry cloth to remove any remaining solution. The seams are treated with joint sealant.
Original bathroom design Source build-experts.ru
Ceiling methods
There are several ways to properly sew a ceiling with plastic.
Installation of panels on a rough ceiling
The rough ceiling does not require special preparation. The finishing elements are laid as follows:
- Treat the surface. Antiseptic compounds are applied to the base and left until dry. It is recommended to install a waterproofing material, such as polyethylene film. The joints are taped.
- Measure the distances between walls located opposite each other. The skirting boards are cut so that when two parts are combined, an angle of 45° is formed. It is not recommended to fasten the part with self-tapping screws. When installed on an uneven surface, the additional element will sag. Liquid nails are used for fixation. At this stage, only 3 skirting boards are installed, the fourth is installed after laying the cladding.
Installation of panels. - Panels are cut. The element fits into the plinth by 2 cm. Having measured the distance between the walls, add 1.5 cm to the resulting value. The remaining 0.5 cm makes installation easier.
- Re-measure the ceiling. If there are minor errors, they are eliminated by changing the size of the gaps between the lamellas. It is recommended to align the panels in hidden places. Open areas must have smooth joints.
- The end of the lamella is inserted into one plinth. The element is slightly bent and the second end is inserted into the opposite profile. The long side is inserted into the third plinth.
- Pressing the lamellas tightly against each other, they are fixed with staples. The more tightly the elements are installed, the stronger the connections will be. When fixing on an uneven ceiling, pieces of plastic are placed under the end of the panel. This will help prevent cracks from appearing.
- After installing the entire elements, measure the width of the uncovered part of the ceiling. Taking into account the obtained value, the material is cut using the previously selected method.
- The lamella is inserted into 2 skirting boards. One edge is connected into a lock, the second is secured separately. The element is fixed with liquid nails or self-tapping screws.
- The fourth plinth is removed from the base part. The remaining part is treated with glue and installed on the wall.
Installation of panels to the ceiling on a metal frame
This method is used when finishing an uneven ceiling yourself. The work is carried out as follows:
- Mark the installation locations of the supporting profiles. The parts are placed in increments of 0.5 m. If there are pronounced irregularities, hangers are used. They are mounted in the same way as on the walls.
- 3 skirting boards are glued using liquid nails. If there are no right angles, the cuts will have to be adjusted. The plinth is attached both to the wall and to the metal frame. After applying the plastic element, it is removed for 2-3 minutes. After reinstallation, the correct position is checked with a level. The corners are sealed with sealant.
- The ends of the lamellas are inserted into the baseboards. The finishing material is laid along the long side of the ceiling. This reduces the number of cuts and waste. The plastic sheathing is attached to the profiles with self-tapping screws. To prevent the screwdriver bit from coming off from damaging the finish, place a metal spatula on the ceiling when screwing.
- The finishing panel is cut, taking into account the dimensions of the uncovered part of the ceiling. The back side of the fourth plinth is removed. The remaining parts are lubricated with glue and pressed to the base. After the glue has dried, they proceed to placing the lighting fixtures.
Fastening plastic panels to the ceiling in the bathtub.
How to install panels when mounted on a ceiling diagonally
This idea is difficult to implement. Installing the frame and adjusting the cladding elements is a labor-intensive process. The work is carried out as follows:
- Determine the area of the base and the longest length of the lamella. To do this you need to measure the diagonal of the ceiling. The volume of waste when using this installation method increases, so the material is purchased with a reserve.
- 3 skirting boards are installed in the standard way. When the glue dries, the height of the additional elements should not change.
- The end of the panel is cut at an angle of 45°. The second end of the lamella is cut off at the same slope. The result will be a starting element with the shortest length. It is installed in the corner.
- Measure the length of most of the installed part. This is how the length of the shorter side of the second element is determined. Markings are applied to the panel and cuts are made. Use the same method to cut and fasten the remaining parts. You can see what the ceiling will look like in the photo.
Stylistic directions
The style of the bathroom can be anything, but most homeowners adhere to certain ready-made solutions for bathroom design. Most often, the toilet is decorated in a classic style. This option looks beautiful and elegant. It is especially suitable for large bathrooms with a window. And the Art Nouveau style will be appropriate in small bathrooms. It allows you to install small functional shower cabins in the toilet. Art Nouveau is characterized by a natural palette of colors, floral motifs and the presence of all kinds of accessories with floral patterns. Among modern stylistic trends, it is worth highlighting bionics. This design style is characterized by the imitation of everything natural. Many people decorate their bathrooms in marine, ethnic, Scandinavian or Mediterranean styles. They look impressive and allow you to bring non-standard design ideas to life.
These styles can be combined.