If you are faced with the task of decorating a wooden wall with tiles, then in this article we will tell you how to do it and avoid making serious mistakes. The fact is that wood, as a material, is not the most stable finishing option, for the sole reason that wood breathes, which means the cement base of the adhesive used for laying tiles can crack. As a result, your tiled wall will soon begin to crack at the seams and ultimately either lose its appearance or simply fall apart.
Grouting the cladding
To ensure that the seams acquire a neat appearance and are protected from external factors, they are treated using grout based on cement or epoxy resins.
Having decided to lay the cladding using a seamless method, the color of the grout mixture should be matched to the color of the ceramics. If there are fixed gaps, the color of the composition should be selected for practical and aesthetic reasons. To ensure that the cladding installation process goes smoothly, you should remember a few simple recommendations:
- Before starting work, it is advisable to mark the future layout on the floor, taking into account the gaps. This will help you better imagine the finished appearance of the coating and calculate the number of consumables needed;
- When heating floors, you should use special adhesive compounds, which have a corresponding mark on the label;
- The recommended joint width for calibrated tiles is 2.5-4 mm, and for edged porcelain tiles, the allowable gap size is 1.5-2 mm.
By strictly following the instructions, with the help of a small number of tools you can create the perfect porcelain tile flooring yourself, which will delight you with its durability and beauty for many years.
Laying porcelain tiles on the floor with your own hands is one of the best options when the task is to obtain a durable and reliable coating. The installation technology is simple, but requires flawless execution of all the necessary steps
It is important to consider that only with the right approach to the cladding process will the result be a high-quality and durable surface
Porcelain stoneware flooring has a number of significant advantages that make the material stand out from other products, such as tiles.
So, the advantages of the product include the following parameters:
- Ability to withstand large mechanical loads, which is especially necessary in high-traffic areas.
- Durability. The service life depends on correct installation. If everything is done according to technology, then the surface will please the eye for decades.
- Excellent decorative range. Nowadays, you can choose an option that will fit perfectly into any interior.
- Resistant to temperature changes, high humidity and household chemicals. That is, the cladding is not subject to this kind of influence, which makes it the best solution in many situations.
Based on these characteristics, we can conclude that porcelain stoneware is suitable for any room in a house or apartment
The only thing you should pay attention to when making your final choice is the type of front surface. So, for showers and bathrooms, rough coatings will be preferable. VIDEO:
VIDEO:
Pros and cons of cladding
The main and most valuable quality of clinker panels is simple and quick installation. Installation is carried out using the tongue-and-groove fastening technology, which reliably fixes the modules in relation to each other.
Several factors can be considered advantages:
- environmental Safety;
- frost resistance;
- waterproof, protects wooden elements from mold;
- high level of thermal insulation;
- easy care;
- easy repair;
- choice of colors and shapes;
- low weight does not overload the structure;
- do not deteriorate when exposed to sunlight;
- the buildings look well maintained.
It also provides reliable protection from extraneous noise and has a long service life.
The disadvantages include the price and mandatory surface preparation before installation.
Laying technology
Laying ceramics on a wooden base in a bathroom is no different from working on any other surface. The main condition is that it must be firm and even. Before starting work, door jambs and baseboards must be removed. The technology provides for the following work order:
- The first step is to decide how the tiles will be laid. If the tiles are positioned evenly, perpendicular lines are drawn across the room from the center of the walls.
- The tiles are laid in accordance with the drawn lines. In order to have fewer cut pieces, the lines can be shifted. If you plan to install large objects in the room (bathtub, shower, etc.), then the tiles next to them are laid symmetrically.
- Using a notched trowel, apply the adhesive evenly to small areas (about 1 square meter), and then attach and press the tiles to the floor. Laying is done along one of the lines over the entire surface where the adhesive mass is applied.
Next, the ceramics are placed in the direction from the center of the room to the walls. In this case, you need to focus on the markings made. After the tiles are laid in one half of the bathroom, move on to the second
It is important to lay the tiles at the same level. It happens that you come across tiles of different thicknesses
In this case, you need to reduce the layer of glue. You need to leave a gap between the tiles. To make it the same everywhere, crosses are inserted. After the floor is completely covered, the voids between the walls and the floor are filled. Cut tiles are placed in the gaps. It is necessary to take into account that the angle of the walls is rarely ideal. Therefore, before cutting ceramics, you need to take measurements on different sections of the wall.
After the glue under the tile has completely dried, the surface is treated with a primer.
It is necessary to pay attention to the fact that some types of tiles are treated with it initially. The gaps between the tiles are sealed with grout. This can be done with a scraper with a rubber pad.
Excess solution, before it dries, is removed with a damp sponge. Then the tiled carpet is polished with a dry sponge. As you can see, a wooden base is not a problem at all if you plan to tile the bathroom floors with ceramic tiles. The right choice of materials, the correct calculation of the number of tiles, a little effort, and the floor will look great.
As you can see, a wooden base is not a problem at all if you plan to tile the bathroom floors with ceramic tiles. The right choice of materials, the correct calculation of the number of tiles, a little effort, and the floor will look great. Leave your comments in the form below!
https://youtube.com/watch?v=a9ywS9oxufo
Clinker tile laying technology
Cladding the facade of a wooden house with clinker tiles must be carried out according to a certain algorithm, which optimizes the work process and does not allow one or another moment to be overlooked. This algorithm in a simplified form can be expressed as follows:
- leveling wooden facades;
- preparing tile adhesive (you can use regular tile adhesive);
- laying tiles on facades;
- preparing the grout mixture;
- sealing tile joints.
The surface under the clinker tiles must not only be flat, but also dry and clean, otherwise air bubbles may form under the tiles and poor adhesion between the wood and the tiles.
Technology for laying facades with clinker tiles/video:
It is necessary to think through the design and layout of the tiles in advance, and mark the façade for the masonry. You need to find a compromise between the number of cut tiles and the centering of the pattern - if you start laying from the center, you will have to cut a large number of tiles, but the pattern will be centered, and when laying from a corner, the pattern will shift to the side, but you will have to cut fewer tiles. It goes without saying that the larger the surface to be tiled, the larger the clinker tiles should be.
It's no secret that in most regions of Russia, facing a private house with brick is considered one of the most prestigious. In many settlements we saw how decent log houses were hidden in brick jackets. The thing is that brick has long been considered an expensive material, so such a facade indicates the wealth of the owner. Now the cladding process can be significantly speeded up and made cheaper by using thermal panels with clinker tiles for a wooden house.
Floor tiles in a wooden house: 5 reasons for rare use
Well, if the house is for permanent residence and the floor is always heated, then yes, the screed will warm up. Otherwise, it takes hours to warm up more than a ton of concrete screed with a heated floor.
Ceramic or porcelain tiles are considered to be the most suitable material for finishing the walls and floors of a bathroom, toilet, hallway, as well as other rooms of a residential building or apartment, which are characterized by the use of open water sources and the impact of intense dynamic loads on the floor. Thanks to the wear-resistant and durable outer layer, porcelain tiles instead of a wooden floor in a room are more durable, much better resistant to the abrasive effects of sand and dust, are absolutely not afraid of direct moisture and can be easily cleaned using household detergents and cleaners.
The piles will certainly support the weight, but it is not clear how you will attach the formwork to the piles so that the concrete rests on the piles. Isn't it easier to fill it with sand and make the floor on the ground? You have cool floor joists in which you can put a lot of cheap polystyrene foam and foam the cracks.
Layout options for floor tiles in bathrooms
The classic rule for ceramic flooring is to lay it out from the middle of the room towards the walls. This allows you to finish each row against the wall with a large piece of tile, more than half its width/length.
The bathroom and toilet are initially the smallest rooms in a cottage or apartment. At least 2/3 of the floor area is occupied by a toilet, shower stall and/or bathtub, washing machine and floor cabinets, washbasin pedestals and laundry baskets.
Therefore, special layout schemes are used here:
- on the floor, not the middle between the walls is marked, but between the free wall and the plumbing or household appliance that is permanently standing on the tile;
- Under the bathtub, washing machine and toilet, the cladding is started randomly.
Defects in the geometry of rooms, including bathrooms, are masked by diagonal layout schemes. For example, if the walls are not parallel, it will not be noticeable.
Thus, there are several technologies and construction materials that make it possible to tile a wooden floor and ensure a long service life of the coating. All of them are available for independent implementation in a country house or city apartment.
Base preparation options
There are several options for preparing the base of the floor and walls for ceramic cladding. For the floor, 2 options are used: the dry method and the standard wet screed. Gluing tiles to wood on such a base is quite simple. In this case, the technology for laying ceramics does not differ from the standard one.
The walls are prepared using tongue-and-groove panels, sheathing made of aluminum profiles or wooden blocks. The latter design includes an important component - a moving element. This is a fastening that allows the frame to move along with the cladding as the building shrinks.
Wood-moisture-resistant panels, gypsum fiber sheets, and moisture-resistant plasterboard are attached to such structures.
Dry leveling
https://youtube.com/watch?v=v2s%2520%E2%80%B3%26gt%3B
The walls are dry leveled by installing a frame (from profiles or bars), onto which sheets of plasterboard or plywood are subsequently installed. The base must be primed. The solution should be antifungal. It will give additional protection to the log wall.
It is necessary to check that the structure does not reach the ceiling by 5-8 cm. This is necessary to preserve the frame during the period of shrinkage of the house.
If the frame is mounted in the kitchen, it is important to correctly calculate the distance between the slats so that in the future you can fix the kitchen furniture
Construction of the screed
It is impossible to securely glue ceramic tiles to wood even on the floor. To cover the floor in a wooden house, you can build a screed. Under it, a frame similar to dry leveling is created, only it is necessary to lay waterproofing on the last layer and then pour the screed.
In order for the condition of the floor to remain normal and the surface not to be overloaded, the thickness of the screed should be exactly 3 cm. When the solution has dried, the surface is tiled using a special polyurethane glue.
Use of gypsum fiber sheets
Laying tiles in a wooden house can be done on a plywood sheet or plasterboard, but construction technologies offer an alternative to these materials. Gypsum fiber sheets can be attached to the base for tiling; they differ from simple plasterboard in their versatility.
Gypsum fiber sheets “breathe”, do not retain moisture, are environmentally friendly, and can withstand heavy loads.
GVL is a special material for wooden houses. It is heat resistant. Gypsum fiber sheet is practically non-flammable and resistant to temperature changes.
Features of wood materials
Wood material has specific features that must be taken into account during finishing and repair work, these are:
- Shrinkage of the room. A house made of wood shrinks 5% or more. The process is reflected in the condition of the floor, walls, and foundation.
- Changing the geometry of the material. Wood, under the influence of factors such as temperature changes and high humidity, can change its shape: expand, flake or dry out.
- Risk of premature failure. The material does not tolerate moisture, so in a wooden house it is necessary to provide hydro- and vapor barrier and create good ventilation. In addition to moisture, insects, mold and mildew pose a danger to wood. To prevent premature damage to the floor and walls, boards and beams must be treated with antiseptic agents and other protective substances.
Ceramic tiles must be installed in a wooden building in accordance with standard technological requirements.
When to start finishing work in a wooden house
Before starting repairs, you must make sure that the wood is completely dry and the shrinkage of the house is completed. When finishing an old wooden dwelling, you can begin repairs immediately; a house made of laminated veneer lumber should “shrink” for at least 3 months; dwellings made of rounded logs or timber are best repaired after a year (in a warm climate) or two (if the site is located in the middle zone Russia).
A wooden house made of rounded logs can begin to be finished a year or two after completion of construction. Source plantu.ru
The degree of shrinkage depends on the chosen material: a wooden frame shrinks from 7% to 10%, timber - 3-5%, and rounded log - 5-6%.
Factors influencing the degree of shrinkage of a house
The time required for the wood to dry completely depends on the material of the building, the quality of the felling, and the season in which the material was harvested.
The rate of shrinkage of the finished home is also determined by changes in environmental humidity. For example, frequent precipitation in the cold season significantly slows down the process, and regular heating can speed it up.
Under the influence of changes in the level of humidity in wood, it can dry out or, conversely, swell. The amount of change in the final dimensions of the material depends on the direction of the fibers in the wood. As a rule, side walls shrink more slowly than front walls.
Possible difficulties
The main problem of laying tiles on a wooden surface is the change in the geometry of the wood under the influence of many factors, including shrinkage of the house. Ceramic tiles cannot change their shape. She remains tough and fragile.
Installation of tiles in a wooden house is carried out taking into account these features. For wall cladding, a special frame is created from aluminum profiles or wood beams.
Laying tiles on a wooden floor is different from tiling the surface of walls. For the floor covering, you need to make a lathing and provide the necessary conditions that will allow the structure to last longer.
Expert advice
It is not difficult to do the cladding yourself. Expert advice:
- If during finishing it is not possible to lay a whole number of tiles in a row, then the excess is cut off at the corners with a tile cutter, diamond glass cutter or grinder. The fragments that remain can later be laid out in the corners or covered with a shelving unit or cabinet.
- Finishing work needs to be carefully planned, because good facing tiles are expensive. You need to buy material with a reserve of at least 10% of the total quantity for trimming.
- Textured requires docking and adjustment. Its quantity needs to be increased by 15–20% of the total volume.
- If you need to make holes when finishing, it is best to use a crown or a ballerina. Just don't press hard on the fragment. This will help prevent the icing from chipping and keep the edges of the hole smooth.
Even the most expensive facing materials will not be able to ensure the durability and strength of the coating if the base was poorly prepared at the initial stage.
It is necessary to perform a complex of simple works - clean the base from dirt and dust, oil stains and other substances that reduce the adhesion of the glue, eliminate all irregularities and add strength. Then the result will please the apartment owner for a long time.
Block house for wall cladding
Block house for wall cladding
Some apartment owners strive to make their homes original and even extravagant in some ways.
So if you are tired of boring solutions, then pay attention to the block house, that is, a board whose cross-section imitates the rounded log known to everyone from village landscapes. Using this material you can achieve a real “rural” interior in your home.
To make the design look even more impressive, it is recommended to resort to a method such as artificial “aging” of the wood. For this, the method most often used is “brushing”, that is, processing the material with a wire brush. During the processing of wood, fibers are removed from it, which creates an interesting relief. After this, the material is painted and, without allowing the paint to dry, it is removed.
Method No. 2
It is effective if the floor is in almost deplorable condition, but inspection still allows us to conclude that installation is possible.
First, you need to dismantle the old coating to get to the concrete. Next comes waterproofing. For this purpose, there are enough special materials on the modern market.
To get a flat floor, you need to use a level and thread to cut a horizontal line around the perimeter of the room. Then we place beacons in increments of about a meter; the distance from the walls should be 10 cm.
The following can be used as beacons:
- Bars. After the solution hardens, they are removed and the space is filled with the mixture.
- Gypsum profiles. They are secured using self-tapping screws.
- Plastering. Mounted on plaster marks.
Recommendation: to mix the screed mortar, use a container with a capacity of up to 15 liters.
If the layer turns out to be too high, most of the space can be covered with expanded clay. It is filled with the mixture and waited for 24 hours. After this, the surface is primed and filled with solution. Alignment is performed by the rule, moving towards the door.
Then you will have to wait 3 days and then knead the self-leveling mixture.
Wall decoration
The work is carried out on a carefully prepared and primed surface. If space in the room is limited, instead of using plywood, seal the joints and cracks with foam, and level the coating with a small layer of plaster on top.
It is also important to use elastic mixtures here.
We suggest you familiarize yourself with How to make a shower tray from tiles yourself: photo
Laying tiles begins from the second row. They advance in small sections. It is recommended to increase the layer of adhesive solution by applying it both to the walls and to the tile itself, this will provide it with additional space for movement. Fix the gaps with crosses; on average, their thickness should be 3 mm.
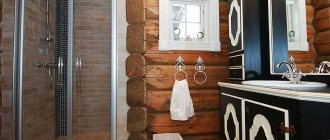
Installation of tiles in bathrooms
When work is carried out independently and, moreover, for the first time, it is best not to just look for any information on the Internet or reference books, but to strive to obtain specific information. The best information will be step-by-step instructions for laying tiles in relation to a specific type of surface base.
Laying tiles in the bathroom is especially difficult. When renovating such a room, you need to take into account the increased number of pipes on the walls and floor, as well as plumbing equipment (bathtub, shower, etc.). The same is true when renovating a toilet.
Sometimes people do not resort to tiling the back wall so as not to dismantle the toilet. The tiles are replaced with imitation screens. The same technique is used in the bathroom.
To create a beautiful appearance and avoid removing the bathtub itself, it is covered with moisture-resistant gypsum plasterboard, followed by painting or tiling, or special roller screens are installed.
In addition, in order to lay out rows evenly and avoid pressure from the next row on the previous one, plastic crosses are used, which are installed along the lines of vertical and horizontal seams.
Different types of crosses are selected for the floor and walls. For vertical laying of tiles, thinner types are used. The thicker ones go to the floor. The use of such elements helps to create clear geometric lines. In addition, after grouting the seams, the tiles have a truly finished look.
Preparing the base
One of the most important stages of the facing process is preparing the base. Observe the following requirements:
- Do not skimp on materials; the rough base must be strong;
- Perform waterproofing;
- Set up a slope.
These are general points that we will talk about later, but preparation depends on the structure and condition of the foundation. The concrete base requires pouring a cement-sand screed, sloping and waterproofing. Wood flooring requires an expanded approach. Wood is a very unstable material, susceptible to temperature and other influences. Considering the comparative complexity of working with wood, let’s look at the pre-laying stage using it as an example.
Preparing the wooden base
Reliable operation of the floor is possible only if all components of the structure are strong. Therefore, we are talking about plank floorboards, but not about plywood or chipboard. The latest sheet materials for flooring are not suitable due to their outright unreliability. Walls - please, subject to other requirements.
First of all, make sure the boards are in working condition. If necessary, replace individual floorboards or even the entire subfloor. Ideally, it is best to disassemble the structure, lay down insulation, get rid of the paint and varnish covering the boards, and treat the wood with an antiseptic.
Make sure there is a centimeter gap around the perimeter between the walls and the boards. Its absence in conditions of constant temperature changes will entail layering of wooden elements on top of each other. As a result, the movement of the boards will lead to disruption of the adhesive layer and destruction of the cladding. Also leave gaps of 3–5 mm between the floorboards. Fill the gaps with silicone or foam.
Fill any possible holes from knots or fasteners. Treat the wood with latex impregnation or heated drying oil. This is the first layer of waterproofing. Next, perform the second one - using the coating or laying method. The first involves the use of bulk or flowing materials, the second - the use of conventional roofing felt or similar roll insulation. Having chosen the coating method, after waterproofing, without waiting for complete drying, lay a painting mesh on the floor. All that remains is to fill the screed. Before this, install a metal mesh over the entire base, which reinforces the screed and compensates for possible movements of the layers of the structure. A horizontal plane in a bathhouse is inappropriate, so fill it taking into account the slope towards the drain hole (drain). If you are laying the tiles on a mortar, you can make a slope directly during the tiling process.
Slope
- Calculate the height difference between the ladder and the contour area. Make marks in the corners of the room.
- Pull the cords from the corners to the drain hole.
- Start laying, keeping in mind that the side of the tile parallel to the ladder should be horizontal, and the perpendicular side should correspond to the slope specified by the cord. Of course, each side of the room has its own parallels and perpendiculars. You can maintain the slope of slabs that are not in contact with the fishing line using a bubble level or using additional beacon threads stretched between the main ones.
- At the intersection line formed by the main cords, tile cutting is required. If the floor is large enough relative to the size of the ceramics, you can do without trimming. In this case, small “steps” are made. It's not very pretty, but cut ceramic floor tiles look even worse. With large tiles and a small room, this trick does not work - the “steps” turn out to be too noticeable.
Which glue to choose
A two-component adhesive is suitable for working with ceramics and wood. The mixture contains polyurethane resin and a hardener, which makes its adhesive parameters an order of magnitude higher than other options. You can use a ready-made store-bought mixture or mix the components yourself using a drill and a special attachment. The polyurethane resin adhesive is suitable for use in just one hour. You can also glue tiles to wood using the following compounds:
- Silicone sealant. Guarantees excellent results, protects the tiles from cracking under minor vibrations and mechanical loads;
- Tile mortar. The gluing will be especially strong if you use plasterboard sheets as a layer between the boards and tiles;
- Acrylic putty. The mixture is applied to the tiles using the dot method, which increases the adhesion of the materials. The composition of the construction paste is similar to liquid nails. You can stick any tile on it;
- PVA glue. Suitable for gluing tiles to timber or thick boards. Thin wood, plywood, chipboard, when in contact with glue, are deformed due to moisture.
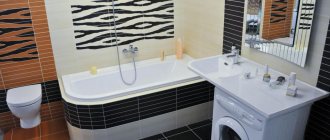
Can I lay tiles on a wood floor in a bathroom?
Most often, this issue worries those who make repairs in private houses and cottages. In such buildings, wood serves as the basis for cladding. In this case, cladding is acceptable, but it is worth assessing the condition of the surface and performing certain work before installation.
- If the surface is in good condition, then minor processing is done and masonry can begin;
- If there are serious flaws, installation is unacceptable. First, you should repair the base by replacing the necessary parts.
Calculate the required volume of material for the floor covering of the room, and you need to take into account the specific layout option (herringbone, offset, diagonal, rows, etc.). When doing DIY repairs, it is advisable to choose the simplest installation method, for example, cladding in rows . When laying in a diagonal direction, the consumption of tiles will increase significantly, since trimming will be necessary.
Diagonal direction when facing and trimming elements.
Important! Purchase facing material with a reserve, the recommended quantity is 10-15% more than the volume. Be careful when purchasing, the finishing material must be from the same batch, otherwise there is a high probability of color discrepancy.
How to choose quality material
The quality of cladding and its durability do not always depend on the skill of the craftsman. No matter what professional gets down to business, everything will go down the drain if you use low-quality material. Here are some tips to help you make the right choice:
The miser pays twice, remember this. Yes, clinker thermal panels are far from cheap material. The critical price minimum is 1.7 thousand rubles per square meter.
There is a huge variety of this facing material on the market today. Mainly produced in Italy, Poland, Germany. But no one is safe from counterfeits or defective materials. A simple procedure will help you identify it - tap the material, if it rings, take it.
Avoid clinker panels with polystyrene foam as insulation, as it can accumulate dampness.
Preparing for tiling the floor
In order to lay tiles in a wooden house with the highest quality possible, you need to take care of the evenness of the surfaces (see video). The existing floor covering, if installation will be carried out on it, should be as close as possible to the screed. If there are places where it “walks” into them, the coating needs to be additionally fixed. For example, if it is wooden, then fixation is carried out with nails. Next, you need to remove the top layer from the existing coating. This could be paint, varnish or another mixture. Perhaps the most difficult process will be the process of removing the old coating from the paint.
After the top layer is removed from the surface, it is necessary to inspect it for cracks, chips and other defects. If any are present, they must be removed using a primer or sealant. After all of the above work has been completed, you can proceed to preparing all the tools and materials necessary for laying tiles in a wooden house. These include:
Sequence of work
To begin with, the floor in the house must be treated with latex, on which a painting mesh must immediately be placed and leveled (see photo). After the mixture has dried, it must be attached to the surface with self-tapping screws, which will ensure maximum fixation. Next, you need to mix water, sand and molten glass in a ratio of 1:2:2 and treat the entire floor surface with the solution. After the mixture has dried, its horizontalness must be checked using a building level - it must be perfectly level.
The floor needs to be divided into several squares and you can start laying tiles in one of them. The material can be fixed either with tile adhesive or with concrete mortar mixed with a special putty. You need to spread the tiles with the solution one at a time and immediately lay them out on the floor of the wooden house. In this case, the material must be slightly pressed against the surface. The solution or glue that will protrude on the sides must be removed immediately before it hardens. It is necessary to grout the seams between the tiles after the material has been laid out over the entire surface (see photo). Remains of grout can be removed with a slightly damp cloth.
Preparing for wall decoration
Laying tiles on the walls of a wooden house is somewhat more difficult. And all because working with vertical surfaces is always more difficult than with horizontal ones, since objects on them do not stick on their own. First of all, you need to check whether the walls are even. You can use a building level for this. If the height differences are more than 0.5 centimeters, the walls must be leveled, and if less, you can proceed to laying tiles.
You can level the walls using putty, but before doing this, the surfaces must be primed. The mixture is usually applied in a thick layer using a rule and leveled. After the solution has dried, the verticality of the walls is checked again. If there are still deviations, the puttying is repeated again, and if there are no deviations and the surface is perfectly flat, you can proceed to collecting the tools and raw materials necessary for laying the material in a wooden house. Among them:
- ceramic tile;
- wooden slats;
- crosses;
- roulette;
- pencil;
- Master OK;
- damp cloth;
- tile adhesive;
- grout.
Installation stages
First, you need to mark the walls in a wooden house to determine how best to place the finishing material. Next, you need to nail wooden slats to the surface (see photo), which will hold the top and bottom rows of material. Laying must begin from one of the lower corners, inserting crosses between the individual elements. The glue or solution is applied using a trowel, smoothed, after which grooves are made on it, which will make the adhesion of the finishing material to the wall as effective as possible.
This is how the entire tile is laid out on the surface. At the same time, do not forget to remove excess glue. The crosses and slats are removed after the solution has completely dried. Then it is necessary to grout the joints, the excess of which, after drying, can be removed with a damp cloth. As you can see, there is nothing complicated about laying tiles in a wooden building. The main thing is to stock up on the necessary materials, tools and patience.
You need to understand that all things bought in a store will never be unique. Therefore, if you want to get not only functional, but...
Today, stores offer a huge selection of various finishing materials that allow you to bring even the most daring ideas to life. But.
Installation of covering for tiles
After installing and insulating the boardwalk, it is necessary to create a smooth intermediate covering on it, which will absorb the deformation of the underlying layer when its wood swells or shrinks due to changes in humidity and air temperature. There are three ways to create such a layer.
Dry coating installation
This solution is the simplest and most common. It consists of creating an intermediate layer of moisture-resistant plywood, on top of which ceramic tiles can be laid.
There are many ways to install plywood on plank flooring. One of them consists of installing point supports or a joist system on top of the boards, which are covered with sheet material. Another method is to lay an adjustable floor on the deck that has screw supports under the plywood sheets. You can also simply fasten sheets of plywood, OSB or moisture-resistant plasterboard cut into quarters with screws to a flat boardwalk.
At the final stage of installation, the plywood or similar base must be sanded, its joints filled with a sealing compound and coated with a primer.
When laying ceramic tiles on a wooden floor covered with plywood, you should choose a two-component polyurethane adhesive, which creates a strong but elastic substrate under the cladding. This property of the adhesive composition is especially useful for damping weak linear vibrations that wood boards exhibit.
Installation of coating using the wet method
It consists of installing a cement or polymer screed on the waterproofing layer of a wooden floor plank. Unlike a conventional screed for ceramic tiles, this coating has a small thickness due to the need to reduce the load on the floor. It may not support the weight of a standard thickness screed.
Another feature of the “wet” covering for tiles is its complete isolation from the walls of the room, that is, the base is made according to the “floating floor” model, which requires the presence of a deformation gap along the perimeter of the enclosing structures and around utility outlets from the floor.
This design allows for slight movements of the wooden floor elements, but the cladding, located on a monolithic base, will not feel these movements.
The lightweight screed should have a thickness of 30 mm. It is not advisable to reduce it, as this will reduce its reliability. Cement screed is prepared from a mixture of cement, sand and plasticizing additives. The polymer composition includes a two-component polyurethane mixture and liquid glass.
Before pouring any of them over the waterproofing laid on the boardwalk, you need to secure the metal mesh with screws. Subsequent actions are carried out as usual. After leveling, the coating must be left to dry and then treated with a primer to improve its adhesion to the tile adhesive.
Leveling material sticker
This method of installing a base for laying tiles on a wooden floor is the fastest in execution. Its essence consists of gluing moisture-resistant plasterboard sheets to the prepared board flooring.
In this case, an elastic two-component polyurethane adhesive is used. If the rigidity of the coating seems insufficient, you can lay a second layer of gypsum board on top. Layer-by-layer laying of sheets must be carried out so that their seams do not coincide in the vertical direction. It is recommended to fill the joints between them with a sealing compound, and then treat the surface with a primer.
As in all previous cases, the plasterboard base should be made according to the “floating floor” model. The technological gap that remains around the perimeter of the coating after laying the tiles should be filled with elastic sealant and then covered with baseboards.
All of the above methods for arranging a base for tiled cladding are general recommendations, which will certainly require modification in each specific case to resolve technical issues directly on site.
In fact, there are many more options for constructing such coatings.
Adhesive for tiles on a wooden base. The most important thing is a thorough revision of the old coating
Taking on the task of laying tiles if there is even the slightest suspicion that the wooden base is unstable is the height of recklessness. This is explained simply:
- Wood is a fairly flexible material, tending to return to its original configuration after deformation. But what is “forgivable” for a wooden floor (slight deflection, springing, etc.) is absolutely unacceptable for ceramics. Each individual tile is very rigid and cannot be bent. If the floor “plays”, it may simply crack.
- Another case is if, for example, the ceramic tiles are small-format. Cement-containing tile adhesive also does not like dynamic bending loads. It will definitely develop small cracks, begin to delaminate, and the tile, even maintaining its integrity, will simply move away from the base.
We should not forget that the load on the coating will increase significantly - in addition to everything else, the ceramic tiles themselves, mortars, and other possible structural elements of the multi-layer “pie” of the floor being created have considerable weight. Thus, the wooden base must have guaranteed static stability. This is exactly what needs to be achieved at the first stage of work.
It is clear that the first step is always a thorough visual inspection, applying efforts to the most problematic areas of the wooden floor in order to identify its possible vibrations and sources of squeaks. If there are any, then no questions should arise at all - the coating must be thoroughly rebuilt and repaired, and not only in places of instability, since strengthening the floor in one place does not guarantee that it will not appear in another. It is necessary to understand the cause and eliminate it at the root.
Sometimes after dismantling the floor a “scary” picture appears
Moreover, experienced craftsmen always advise, in all cases of laying tiles on a wooden base, to carry out a complete search of it. If you are planning a ceramic coating, then you need to think that it is for the long term, and not for a year or two. Where is the guarantee that a defect hidden by a wooden floor or a process of wood decomposition that has begun, which does not appear in any way today, will not be discovered literally in a month or even a year, when the tiled covering has already been completely laid? To carry out repairs, you will have to remove all the tiles, dismantle the wooden base - and all due to the fact that the proper principles were not shown during the preparation. Isn’t it better to be completely, 100% confident in the reliability and stability of the wooden floor before you start laying tiles?
The main thing is to get to the joists and floor beams
Don’t let this prospect be particularly scary - compared to completely dismantling a wooden floor and pouring a new concrete slab to replace it, this procedure is much simpler and requires significantly less labor and financial investment.
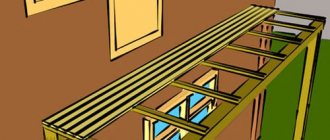
Typical wood flooring with subfloor
So, the usual layout of a wooden floor is a plank covering mounted on logs. The logs themselves can be installed on a concrete base. Another option is that they are a double timber covering system, with a rough and finished floor and a space between them, which can be filled with thermal insulation material. For any type of floor inspection, you will have to remove the boardwalk completely to expose the joists for inspection, repair and alignment.
- If the condition of any of the joists causes even the slightest concern - there are cracks or areas with signs of wood decomposition, it must be unconditionally replaced.
- If the distance between adjacent joists exceeds 500 mm, it will be necessary to install additional beams, otherwise even the thickest floorboard may bend in this place.
- The logs must be leveled horizontally. If they are securely embedded, and it is not possible to change the height of the supports, this can be achieved by adjusting it with a plane, or, conversely, by building it up with a wooden plank.
- Of course, if there is a subfloor, it should also be given some repairs - replace dilapidated or cracked boards, eliminate possible distortions, creaks, etc. When it is ready, both it and the logs are covered with a layer of dense waterproofing film.
- If you already have the opportunity to get to the joists and subfloor, you should take the opportunity and treat all the parts with antiseptic and water-repellent compounds. You should not attribute your reluctance to carry out this procedure to the fact that such treatment was carried out earlier, during the initial installation of the floor - the compositions are inexpensive, the process itself will not take much time, but the durability of the structure will certainly increase.
Preparatory work
Preparation of the base consists of several operations.
All damage is eliminated, and if it is significant, new materials are installed. Require special attention:
- A vapor barrier film laid on top of the ground: if there are holes in it, steam enters the floor structure, promoting the development of mold colonies and rotting fungi.
- Wooden elements.
Laying plywood on a wooden floor (with glue) to level the base under the tiles
It is important to remove rotten areas, stripping them down to completely healthy tissue, and treat all lumber with one of the antiseptics:
- hot drying oil;
- sodium fluoride solution (50 – 100 g per 10 l of water);
- copper sulfate;
- any factory-made antiseptic for interior work.
Rotten areas are recognized by their soft structure - a knife or awl can easily penetrate them.
It is necessary to bring the drying oil to the desired temperature carefully: if it overheats, its vapors will ignite. If you lack experience, it is better to apply impregnation without heating.
Gain and Leveling
When the lag pitch is more than 50 cm, intermediate ones are laid between them to prevent sagging of the floor boards. New beams are also treated with impregnations.
The upper edges of the joists must lie in the same plane - then the base will be perfectly flat. During construction, they are placed this way, but due to uneven shrinkage, distortions occur, so alignment is necessary. Protruding beams are trimmed with a plane, sagging beams are placed on supports or thin boards are stuffed onto them, then the thickness is adjusted with a plane.
Installation of boards
The dismantled floorboard, if it is in good condition, is returned to its place. Before this, varnish or paint is removed from it using one of the following methods:
- Heating with a construction hairdryer: a quick and inexpensive option. When air is supplied at a temperature of 200C - 250C, the paint and varnish coating lags behind the wood, swelling with bubbles, so that it can easily be cleaned off with a spatula. This effect is due to a significant difference in the thermal conductivity coefficients of paint and wood. You cannot remove paint from metal and concrete substrates using this method.
- Remover treatment: This is the name given to chemicals intended for removing paint and varnish coatings. Available in the form of a ready-made solution (available in liquid and gel form) and a dry mixture. The paint can be easily removed after treatment, but for large volumes of surfaces, this method is expensive.
- Processing with abrasive tools: the manual method is labor-intensive, the mechanized method (using an angle grinder or a drill with a special attachment) is dusty and requires mastery of the tool.
Finished floor - tiles on wood
If damage is detected (cracks, woodworm passages, rotten areas), the boards are rejected.
The boards are laid on the joists with gaps of 3–4 mm, and between the boards and the walls - 1 cm.
The gaps eliminate the occurrence of stresses when wood expands due to changes in temperature or humidity.
Before installing the flooring, you must make sure that there is a ventilation gap of at least 5–7 mm between it and the insulation.
The boards are secured to the joists with corrosion-resistant nails or self-tapping screws:
- galvanized;
- oxidized (black);
- phosphated.
The board is attached to the outer joists with two hardware, and to the rest - with one.
Irregularities are puttied, then the boards are sanded with a grinder.
Finally, all gaps are filled with polyurethane sealant (spray foam). This elastic composition will transform the flooring from cracked to solid and at the same time allow the boards to expand freely. The gaps are foamed little by little: when curing, the sealant significantly increases in volume. The exposed material is cut off flush with the floor.
Tile selection
When choosing tiles, relying only on decorative qualities is not enough; ceramics must meet certain requirements.
- Choose low porosity tiles. Tiles with a large number of pores absorb liquid, which, under conditions of temperature fluctuations, leads to the destruction of ceramics. The best solution in this situation is porcelain stoneware or clinker. Their water absorption is extremely low, they can withstand both severe frost and African heat. Plus, these materials are also very durable. Conventional ceramics with low moisture absorption are marked with the letters “A I” and “BI”. The first letter denotes tiles made by extrusion, the second – those made by pressing.
- If you prefer regular tiles, choose glazed ones. Enameled ceramic tiles are fired twice, while unglazed ones are fired once. Double furnace treatment hardens the material more.
- Bath tiles must have a rough surface. Slippery ceramics in bath conditions are too dangerous for injury. First of all, this point concerns floor tiles, but it is also better to choose wall tiles in secondary rooms taking into account compliance with safety regulations.
Secrets and tricks during installation
Although the process of installing clinker thermal panels is simple, it is worth knowing some tricks. For example, when screwing panels to walls or sheathing, do not tighten the fasteners all the way. Leave a gap of literally 1 mm. This will be needed so that the building materials have a reserve for shrinkage or expansion during temperature changes. It is also important to hold the screwdriver exactly perpendicular to the hole. Insert the elements of the clinker thermal plate into the groove as tightly as possible.
We are sure that the information presented in this article will be useful to you. Follow the instructions exactly and you will not only be able to efficiently finish the facade with clinker thermal panels, but also wisely invest in your home.